SpringBoot整合系列-整合Swagger2
原创作品,可以转载,但是请标注出处地址:https://www.cnblogs.com/V1haoge/p/9959844.html
SpringBoot整合Swagger2
步骤
第一步:添加必要的依赖
<dependency>

    <groupId>io.springfox</groupId>

    <artifactId>springfox-swagger2</artifactId>

    <version>2.7.0</version>

</dependency>

<dependency>

    <groupId>io.springfox</groupId>

    <artifactId>springfox-swagger-ui</artifactId>

    <version>2.7.0</version>

</dependency>
第二步:添加必要的配置
一般无配置项,必要时可以添加自定义配置项,在配置类中读取
第三步:添加配置类(重点)
// swagger2的配置内容仅仅就是需要创建一个Docket实例

@Configuration

@EnableSwagger2 //启用swagger2

public class Swagger2Config {

    @Bean

    public Docket createRestApi() {

        return new Docket(DocumentationType.SWAGGER_2)

                .pathMapping("/")

                .apiInfo(apiInfo())

                .select()

                .apis(RequestHandlerSelectors.basePackage("com.example.springbootdemo"))

                .paths(PathSelectors.any())

                .build();

    }

    private ApiInfo apiInfo() {

        return new ApiInfoBuilder()

                .title("springboordemo")

                .description("Springboot整合Demo")

                .version("0.0.1")

                .build(); // 这部分信息其实可以自定义到配置文件中读取

    }

}
通过@Configuration注解,让Spring-boot来加载该类配置。再通过@EnableSwagger2注解来启用Swagger2Config。
再通过createRestApi方法创建Docket的Bean之后,
apiInfo方法用来创建该Api的基本信息(这些基本信息会展现在文档页面中)。
select() 函数返回一个 ApiSelectorBuilder 实例用来控制哪些接口暴露给Swagger2来展现。
一般采用指定扫描的包路径来定义
Swagger会扫描该包下所有Controller定义的API,并产生文档内容(除了被@ApiIgnore指定的请求)
第四步:在Controller和Bean上添加Swagger注解
@RestController

@RequestMapping("/user")

@Log4j2

@Api(description = "用户接口")

public class UserApi {

    @Autowired

    private UserService service;

    @ApiOperation(value = "添加用户", notes = "根据给定的用户信息添加一个新用户",response = ResponseEntity.class,httpMethod = "PATCH")

    @RequestMapping(value = "/addUser",method = RequestMethod.PATCH)

    public ResponseEntity<User> addUser(final User user) {

        log.info("执行添加用户操作");

        return service.addUser(user);

    }

    @ApiOperation(value = "更新用户状态", notes = "根据给定的用户ID修改用户状态",response = ResponseEntity.class,httpMethod = "POST")

    @RequestMapping(value = "/updateUser", method = RequestMethod.POST)

    public ResponseEntity<User> updateUser(final UseState useState, int useId) {

        log.info("执行修改用户状态操作");

        return service.updateUser(User.builder().useState(useState).useId(useId).build());

    }

    @ApiOperation(value = "更新用户手机号", notes = "根据给定的用户ID修改用户手机号",response = ResponseEntity.class,httpMethod = "POST")

    @RequestMapping(value = "/updateUsePhoneNum", method = RequestMethod.POST)

    public ResponseEntity<User> updateUsePhoneNum(final String usePhoneNum, int useId) {

        log.info("执行修改用户手机号操作");

        return service.updateUsePhoneNum(User.builder().usePhoneNum(usePhoneNum).useId(useId).build());

    }

    @ApiOperation(value = "删除用户", notes = "根据给定的用户ID删除一个用户",response = ResponseEntity.class,httpMethod = "DELETE")

    @RequestMapping(value = "/deleteUser", method = RequestMethod.DELETE)

    public ResponseEntity<User> deleteUser(final int useId) {

        log.info("执行删除用户操作");

        return service.deleteUser(useId);

    }

    @ApiOperation(value = "查询用户", notes = "根据给定的用户ID获取一个用户",response = ResponseEntity.class,httpMethod = "GET")

    @RequestMapping(value = "getUser", method = RequestMethod.GET)

    public ResponseEntity<User> getUser(final int useId) {

        log.info("执行查询单个用户操作");

        return service.getUser(useId);

    }

    @ApiOperation(value = "查询用户", notes = "根据给定的用户信息查询用户",response = ResponseEntity.class,httpMethod = "POST")

    @RequestMapping(value = "getUsers", method = RequestMethod.POST)

    public ResponseEntity<List<User>> getUsers(final User user) {

        log.info("根据条件查询用户");

        return service.getUsers(user);

    }

}
@ApiModel(value = "用户模型")

public class User {

    @ApiModelProperty("用户ID")

    private int useId;

    @ApiModelProperty("用户姓名")

    private String useName;

    @ApiModelProperty("用户性别")

    private UseSex useSex;

    @ApiModelProperty("用户年龄")

    private int useAge;

    @ApiModelProperty("用户身份证号")

    private String useIdNo;

    @ApiModelProperty("用户手机号")

    private String usePhoneNum;

    @ApiModelProperty("用户邮箱")

    private String useEmail;

    @ApiModelProperty("创建时间")

    private LocalDateTime createTime;

    @ApiModelProperty("修改时间")

    private LocalDateTime modifyTime;

    @ApiModelProperty("用户状态")

    private UseState useState;

}
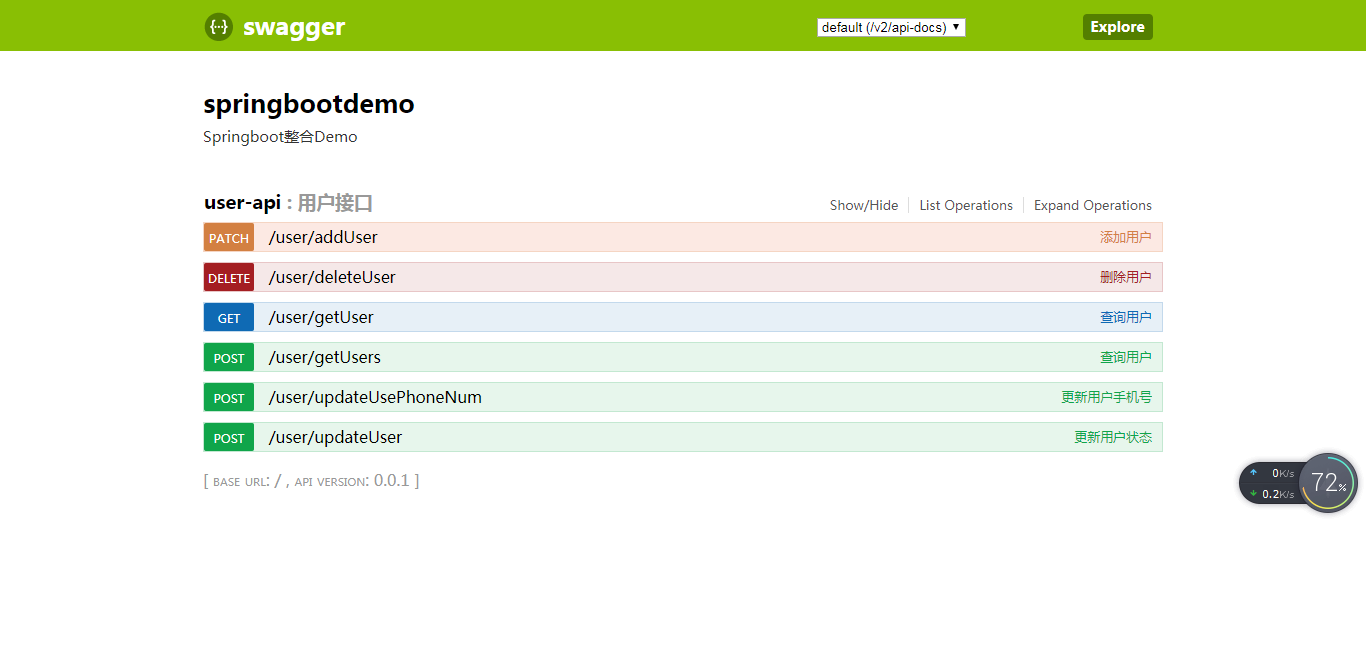
第五步:启动应用,浏览器请求
http://localhost:8080/swagger-ui.html
可得到如下界面:
SpringBoot整合系列-整合Swagger2的更多相关文章
- SpringBoot整合系列-整合MyBatis
原创作品,可以转载,但是请标注出处地址:https://www.cnblogs.com/V1haoge/p/9971036.html SpringBoot整合Mybatis 步骤 第一步:添加必要的j ...
- SpringBoot整合系列--整合MyBatis-plus
原创作品,可以转载,但是请标注出处地址:https://www.cnblogs.com/V1haoge/p/10125279.html SpringBoot整合MyBatis-plus 步骤 第一步: ...
- SpringBoot整合系列-整合SpringMVC
原创作品,可以转载,但是请标注出处地址:https://www.cnblogs.com/V1haoge/p/9984607.html SpringBoot整合Spring MVC 步骤 第一步:添加必 ...
- SpringBoot整合系列-整合JPA
原创作品,可以转载,但是请标注出处地址:https://www.cnblogs.com/V1haoge/p/9959865.html SpringBoot整合JPA进行数据库开发 步骤 第一步:添加必 ...
- SpringBoot整合系列-整合H2
原创作品,可以转载,但是请标注出处地址:https://www.cnblogs.com/V1haoge/p/9959855.html SpringBoot整合H2内存数据库 一般我们在测试的时候习惯于 ...
- SpringBoot整合系列-PageHelper分页插件
原创作品,可以转载,但是请标注出处地址:https://www.cnblogs.com/V1haoge/p/9971043.html SpringBoot整合MyBatis分页插件PageHelper ...
- SpringBoot系列-整合Mybatis(注解方式)
目录 一.常用注解说明 二.实战 三.测试 四.注意事项 上一篇文章<SpringBoot系列-整合Mybatis(XML配置方式)>介绍了XML配置方式整合的过程,本文介绍下Spring ...
- springboot + mybatis + mycat整合
1.mycat服务 搭建mycat服务并启动,windows安装参照. 系列文章: [Mycat 简介] [Mycat 配置文件server.xml] [Mycat 配置文件schema.xml] [ ...
- SpringBoot与Swagger整合
1 SpringBoot与Swagger整合https://blog.csdn.net/jamieblue1/article/details/99847744 2 Swagger详解(SpringBo ...
随机推荐
- ef.core Mysql
Entity层 using System; using System.Collections.Generic; using System.ComponentModel.DataAnnotations; ...
- lvm快照备份数据库(Mysql5.7)
备份的目的 能够防止由于机械故障以及人为误操作带来的数据丢失,例如将数据库文件保存在了其它地方. 备份的分类 以操作过程中服务的可用性分: 冷备份:cold backup mysql服务关闭,mysq ...
- UVALive 2474 Balloons in a Box(枚举)
https://vjudge.net/contest/277824#problem/A 尤其是模拟题,三思而后敲!!! 纠错了好久,主要还是没有处理好:单点若还未放气球,其他气球可以膨胀越过它(即可以 ...
- LoadRunner(一)——性能测试基础及性能指标概述
参考学习感谢:<精通软件性能测试与LoadRunner实战> 一.典型的性能测试场景 某个产品要发布了,需要对全市的用户做集中培训.通常在进行培训的时候,老师讲解完成一个业务以后,被培训用 ...
- Content-Type: application/www-form-urlencoded
默认的方式 1.Content-Type: application/www-form-urlencoded id=3&fgf=56&908rr=767 2.Content-Type:a ...
- [Swift]LeetCode803. 打砖块 | Bricks Falling When Hit
We have a grid of 1s and 0s; the 1s in a cell represent bricks. A brick will not drop if and only i ...
- Java IO流读取文件
使用指定编码读取文件 public static String toString(File file, String charset){ StringBuilder result = new Stri ...
- 又拍云 API 使用的那些小事
又拍云提供了丰富的 API 调用,为了减少用户在初次接入时可能会遇到的坑”,本文将对又拍云常用的 API 使用方法做个简单的梳理,力求让业务接入变得更简单,更高效. 目前我们的 API 主要有四大类, ...
- JVM基础系列第9讲:JVM垃圾回收器
前面文章中,我们介绍了 Java 虚拟机的内存结构,Java 虚拟机的垃圾回收机制,那么这篇文章我们说说具体执行垃圾回收的垃圾回收器. 总的来说,Java 虚拟机的垃圾回收器可以分为四大类别:串行回收 ...
- 【干货】基于Owin WebApi 使用OAuth2进行客户端授权服务
前言:采用Client Credentials方式,即密钥key/password,场景一般是分为客户端限制必须有权限才能使用的模块,这和微信公众号开放平台很类似. 让用户通过客户端去获取自己的tok ...