python之验证码识别 特征向量提取和余弦相似性比较
0.目录
1.参考
2.没事画个流程图
3.完整代码
4.改进方向
1.参考
https://en.wikipedia.org/wiki/Cosine_similarity
https://zh.wikipedia.org/wiki/%E4%BD%99%E5%BC%A6%E7%9B%B8%E4%BC%BC%E6%80%A7
Cosine similarity
Given two vectors of attributes, A and B, the cosine similarity, cos(θ),
is represented using a dot product and magnitude as...
余弦相似性通过测量两个向量的夹角的余弦值来度量它们之间的相似性。0度角的余弦值是1,
余弦相似度通常用于正空间,因此给出的值为0到1之间。
范数(norm),是具有“长度”概念的函数。二维度的向量的欧氏范数就是箭号的长度。

这两篇文章在计算矢量大小的时候函数参数都写成 concordance调和, 而不用 coordinate坐标, 为何???
numpy中提供了范数的计算工具:linalg.norm()
所以计算cosθ起来非常方便(假定A、B均为列向量):
num = float(A.T * B) #若为行向量则 A * B.T

denom = linalg.norm(A) * linalg.norm(B)

cos = num / denom #余弦值
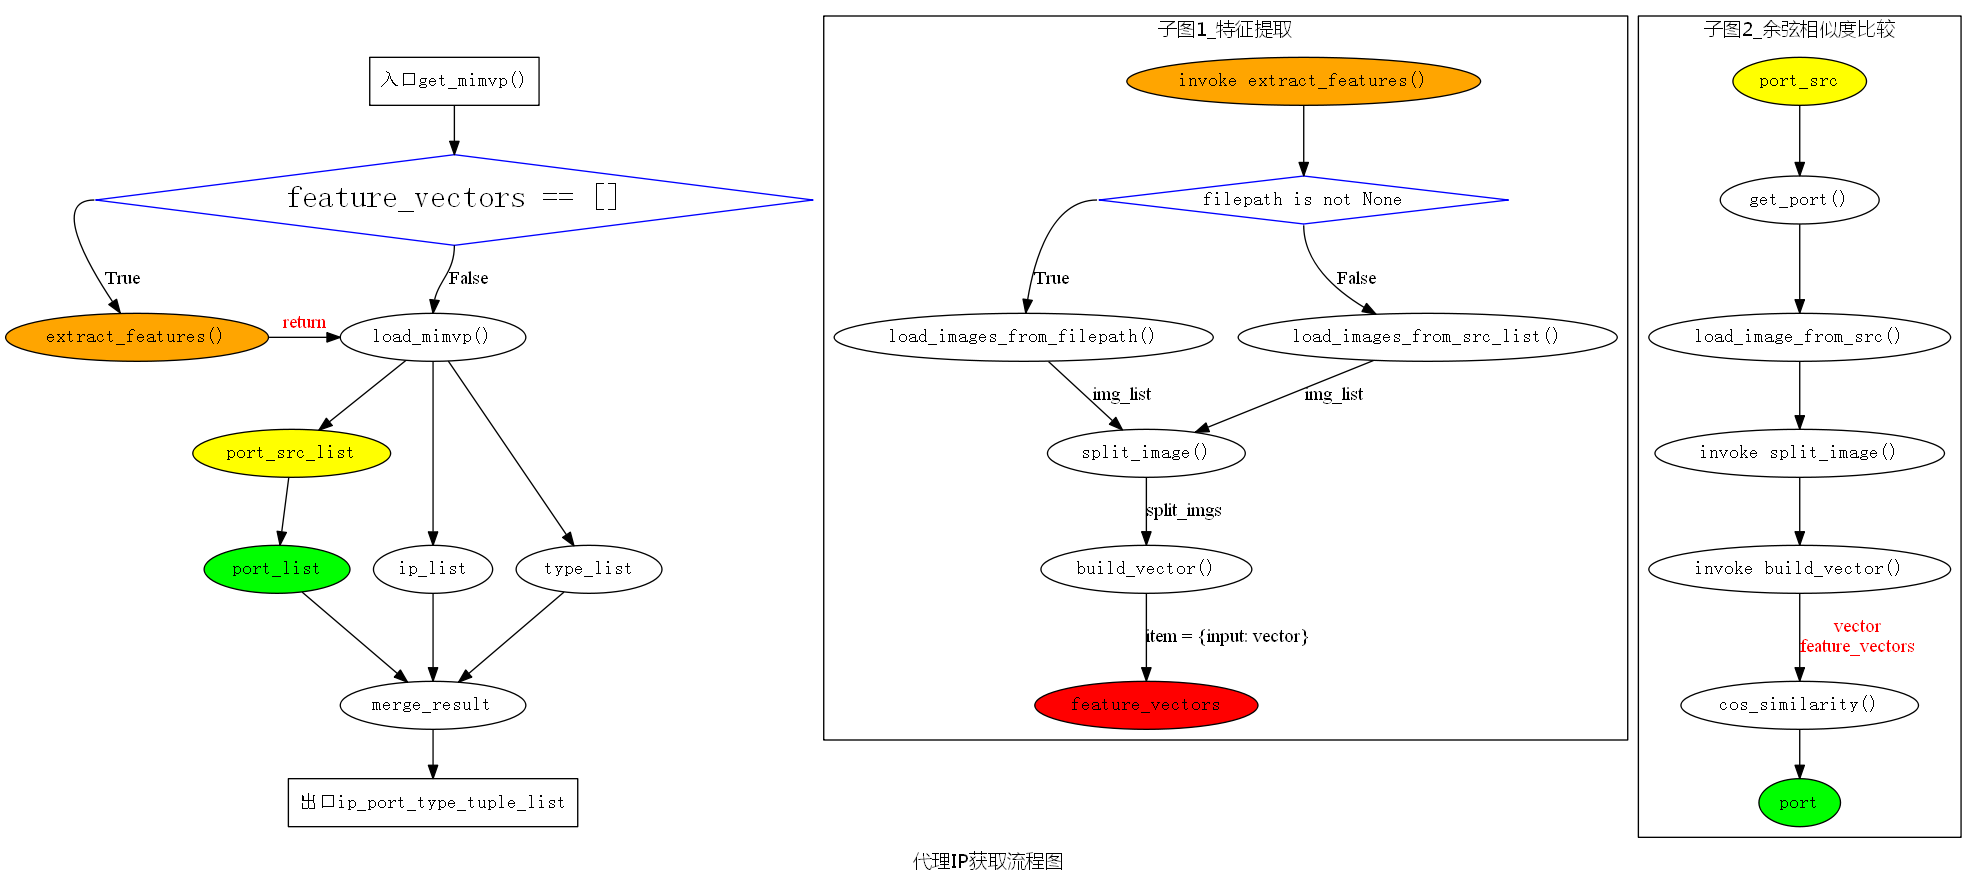
2.没事画个流程图
流程图 Graphviz - Graph Visualization Software
3.完整代码
#!/usr/bin/env python

# -*- coding: UTF-8 -*

import os

import time

import re

from urlparse import urljoin

import requests

ss = requests.Session()

ss.headers.update({'user-agent':'Mozilla/5.0 (Windows NT 6.1; WOW64; rv:54.0) Gecko/20100101 Firefox/54.0'})

from PIL import Image

# https://www.liaoxuefeng.com/wiki/0014316089557264a6b348958f449949df42a6d3a2e542c000/001431918785710e86a1a120ce04925bae155012c7fc71e000

# 和StringIO类似,可以用一个bytes初始化BytesIO,然后,像读文件一样读取:

from io import BytesIO

from string import ascii_letters, digits

import numpy as np

# ip_port_type_tuple_list = []

class Mimvp():

    def __init__(self, num_width=None, feature_vectors=None, white_before_black=2, threshhold=100, max_nums=None, filepath=None, page=None):

        self.ip_port_type_tuple_list = []

        #fluent p189

        if feature_vectors is None:

            self.feature_vectors = []

        else:

            self.feature_vectors = list(feature_vectors)

        self.num_width = num_width

        self.white_before_black = white_before_black

        self.threshhold = threshhold

        self.max_nums = max_nums

        self.filepath = filepath

        if page is None:

            self.url = 'http://proxy.%s.com/free.php?proxy=in_hp'%'mimvp'

        else:

            self.url = 'http://proxy.%s.com/free.php?proxy=in_hp&sort=&page=%s' %('mimvp', page)

    def get_mimvp(self):

        # 预处理提取特征组需要取得 self.port_src_list

        if self.feature_vectors == []:

            self.extract_features()

        self.load_mimvp()

        self.get_port_list()

        self.merge_result()

        return self.ip_port_type_tuple_list

    def load_mimvp(self):

        resp = ss.get(self.url)

        self.ip_list = re.findall(r"class='tbl-proxy-ip'.*?>(.*?)<", resp.text)

        self.port_src_list = re.findall(r"class='tbl-proxy-port'.*?src=(.*?)\s*/>", resp.text)      #图片链接

        self.type_list = re.findall(r"class='tbl-proxy-type'.*?>(.*?)<", resp.text)

    def get_port_list(self):

        self.port_list = []

        for src in self.port_src_list:

            port = self.get_port(src)

            self.port_list.append(port)

    def get_port(self, src):

        img = self.load_image_from_src(src)

        split_imgs = self.split_image(img)

        port = ''

        for split_img in split_imgs:

            vector = self.build_vector(split_img)

            compare_results = []

            for t in self.feature_vectors:

                cos = self.cos_similarity(vector, t.values()[0])

                compare_results.append((cos, t.keys()[0]))

            # print sorted(compare_results, reverse=True)

            port += sorted(compare_results, reverse=True)[0][1]

        print port

        return port

    def load_image_from_src(self, src):

        src = urljoin(self.url, src)

        print src,

        resp = ss.get(src)

        fp = BytesIO(resp.content)

        img = Image.open(fp)

        return img

    def split_image(self, img):

        gray = img.convert('L')

        if self.num_width is None:

            img.show()

            print gray.getcolors()

            self.num_width = int(raw_input('num_width:'))

            self.white_before_black = int(raw_input('white_before_black:'))

            self.threshhold = int(raw_input('BLACK < (threshhold) < WHITE:'))

        gray_array = np.array(gray)

        bilevel_array = np.where(gray_array<self.threshhold,1,0)  #标记黑点为1,方便后续扫描

        left_list = []

        # 从左到右按列求和

        vertical = bilevel_array.sum(0)

        # print vertical

        # 从左到右按列扫描,2白1黑确定为数字左边缘

        for i,c in enumerate(vertical[:-self.white_before_black]):

            if self.white_before_black == 1:

                if vertical[i] == 0 and vertical[i+1] != 0:

                    left_list.append(i+1)

            else:

                if vertical[i] == 0 and vertical[i+1] == 0 and vertical[i+2] != 0:

                    left_list.append(i+2)

            if len(left_list) == self.max_nums:

                break

        # 分割可见图片

        # bilevel = Image.fromarray(bilevel_array)    #0/1 手工提取特征 show显示黑块 还没保存gif

        bilevel = Image.fromarray(np.where(gray_array<self.threshhold,0,255))

        # the left, upper, right, and lower pixel

        split_imgs = [bilevel.crop((each_left, 0, each_left+self.num_width, img.height)) for each_left in left_list]

        return split_imgs

    def build_vector(self, img):

        # img = Image.open(img)

        img_array = np.array(img)

        # 先遍历w,再遍历h,总共w+h维度,不需要/255,标记黑点个数等多余处理

        return list(img_array.sum(0)) + list(img_array.sum(1))

    def cos_similarity(self, a, b):

        A = np.array(a)

        B = np.array(b)

        dot_product = float(np.dot(A, B))   # A*(B.T) 达不到目的

        magnitude_product = np.linalg.norm(A) * np.linalg.norm(B)

        cos = dot_product / magnitude_product

        return cos

    def merge_result(self):

        for ip, port, _type in zip(self.ip_list, self.port_list, self.type_list):

            if '/' in _type:

                self.ip_port_type_tuple_list.append((ip, port, 'both'))

            elif _type == 'HTTPS':

                self.ip_port_type_tuple_list.append((ip, port, 'HTTPS'))

            else:

                self.ip_port_type_tuple_list.append((ip, port, 'HTTP'))

    def extract_features(self):

        if self.filepath is not None:

            img_list = self.load_images_from_filepath()

        else:

            self.load_mimvp()

            img_list = self.load_images_from_src_list()

        for img in img_list:

            split_imgs = self.split_image(img)

            for split_img in split_imgs:

                split_img.show()

                print split_img.getcolors()

                input = raw_input('input:')

                vector = self.build_vector(split_img)

                item = {input: vector}

                if item not in self.feature_vectors:

                    print item

                    self.feature_vectors.append(item)

        for i in sorted(self.feature_vectors):

            print i,','

    def load_images_from_filepath(self):

        img_list = []

        postfix = ['jpg', 'png', 'gif', 'bmp']

        for filename in [i for i in os.listdir(self.filepath) if i[-3:] in postfix]:

            file = os.path.join(self.filepath, filename)

            img_list.append(Image.open(file))

        return img_list

    def load_images_from_src_list(self):

        img_list = []

        for src in self.port_src_list:

            img = self.load_image_from_src(src)

            img_list.append(img)

        return img_list

if __name__ == '__main__':

    feature_vectors = [

    {'': [4845, 5865, 5865, 5865, 5865, 4845, 1530, 1530, 1530, 1530, 1530, 1530, 1530, 1530, 1020, 1020, 1020, 1020, 1020, 1020, 1020, 1020, 1020, 1020, 1530, 1530, 1530, 1530, 1530, 1530, 1530]} ,

    {'': [5865, 5865, 3825, 6120, 6120, 6375, 1530, 1530, 1530, 1530, 1530, 1530, 1530, 1530, 1275, 1020, 1020, 1275, 1275, 1275, 1275, 1275, 1275, 255, 1530, 1530, 1530, 1530, 1530, 1530, 1530]} ,

    {'': [5100, 5610, 5610, 5610, 5610, 5355, 1530, 1530, 1530, 1530, 1530, 1530, 1530, 1530, 510, 1020, 1020, 1275, 1020, 1275, 1275, 1275, 1275, 0, 1530, 1530, 1530, 1530, 1530, 1530, 1530]} ,

    {'': [5355, 5865, 5610, 5610, 5610, 4590, 1530, 1530, 1530, 1530, 1530, 1530, 1530, 1530, 510, 1020, 1020, 1275, 765, 1275, 1275, 1020, 1020, 510, 1530, 1530, 1530, 1530, 1530, 1530, 1530]} ,

    {'': [5610, 5865, 5865, 5865, 3825, 6120, 1530, 1530, 1530, 1530, 1530, 1530, 1530, 1530, 1275, 1020, 1020, 1020, 1020, 1020, 0, 1275, 1275, 1275, 1530, 1530, 1530, 1530, 1530, 1530, 1530]} ,

    {'': [4845, 5610, 5610, 5610, 5610, 5100, 1530, 1530, 1530, 1530, 1530, 1530, 1530, 1530, 0, 1275, 1275, 1275, 255, 1275, 1275, 1275, 1020, 510, 1530, 1530, 1530, 1530, 1530, 1530, 1530]} ,

    {'': [4590, 5610, 5610, 5610, 5610, 5355, 1530, 1530, 1530, 1530, 1530, 1530, 1530, 1530, 765, 1275, 1275, 1275, 255, 1020, 1020, 1020, 1020, 510, 1530, 1530, 1530, 1530, 1530, 1530, 1530]} ,

    {'': [6120, 6120, 6120, 5100, 5355, 5610, 1530, 1530, 1530, 1530, 1530, 1530, 1530, 1530, 0, 1275, 1275, 1275, 1275, 1275, 1275, 1275, 1275, 1275, 1530, 1530, 1530, 1530, 1530, 1530, 1530]} ,

    {'': [4590, 5610, 5610, 5610, 5610, 4590, 1530, 1530, 1530, 1530, 1530, 1530, 1530, 1530, 510, 1020, 1020, 1020, 510, 1020, 1020, 1020, 1020, 510, 1530, 1530, 1530, 1530, 1530, 1530, 1530]} ,

    {'': [5610, 5610, 5610, 5610, 5610, 4590, 1530, 1530, 1530, 1530, 1530, 1530, 1530, 1530, 510, 1020, 1020, 1020, 255, 1275, 1275, 1275, 1275, 765, 1530, 1530, 1530, 1530, 1530, 1530, 1530]} ,

    ]

    # def __init__(self, feature_vectors=None, filepath=None, page=None):

    obj = Mimvp(num_width=6, feature_vectors=feature_vectors)

    # obj = Mimvp()

    # obj = Mimvp(filepath='temp/')

    ip_port_type_tuple_list = obj.get_mimvp()

    from pprint import pprint

    pprint(ip_port_type_tuple_list)
4.改进方向
记录每个分割数字的x轴实际长度,这样的话考虑到不对图片的上下留白做处理,每个实际数字的h固定,而w不定,因此建立特征向量的时候改为先遍历h,再遍历w。
考虑到在比较余弦相似性的时候由于叉乘需要两个向量具有相同的维度,这里需要每次取最小维度再比较。
如此,在建立特征向量集的时候不需要提前指定每张分割数字为固定宽度。
python之验证码识别 特征向量提取和余弦相似性比较的更多相关文章
- Python - PIL-pytesseract-tesseract验证码识别
N天前实现了简单的验证识别,这玩意以前都觉得是高大上的东西,一直没有去研究,这次花了点时间研究了一下,当然只是一些基础的东西,高深的我也不会,分享一下给大家吧. 关于python验证码识别库,网上主要 ...
- 关于利用python进行验证码识别的一些想法
转载:@小五义http://www.cnblogs.com/xiaowuyi 用python加“验证码”为关键词在baidu里搜一下,可以找到很多关于验证码识别的文章.我大体看了一下,主要方法有几类: ...
- Python之验证码识别功能
Python之pytesseract 识别验证码 1.验证码来一个 2.适合什么样的验证码呢? 只能识别简单.静态.无重叠.只有数字字母的验证码 3.实际应用:模拟人工登录.页面内容识别.爬虫抓取信息 ...
- Mac python Tesseract 验证码识别
Tesseract 简介 Tesseract(/'tesərækt/) 这个词的意思是"超立方体",指的是几何学里的四维标准方体,又称"正八胞体".不过这里要讲 ...
- python 豆瓣验证码识别总结
总结: pytesseract 识别比较标准的图片 识别成功率 还是不错的. 验证码的图片识别 需要先处理好 再用pytesseract 识别 from PIL import Image ...
- python语言验证码识别,以后不用老输入验证码了。
1.Python 3.6 安装包 1.要加环境变量 2.pip安装PIL库 3.pip安装pytesseract模块 2.tesseract-ocr-setup-4.00.00dev.exe -- ...
- python简单验证码识别
在学习python通过接口自动登录网站时,用户名密码.cookies.headers都好解决但是在碰到验证码这个时就有点棘手了:于是通过网上看贴,看官网完成了对简单验证码的识别,如果是复杂的请看大神的 ...
- python+tesseract验证码识别的一点小心得
由于公司需要,最近开始学习验证码的识别 我选用的是tesseract-ocr进行识别,据说以前是惠普公司开发的排名前三的,现在开源了.到目前为止已经出到3.0.2了 当然了,前期我们还是需要对验证码进 ...
- Python:验证码识别
说明:此验证方法很弱,几乎无法识别出正确的验证码
随机推荐
- jsp篇 之 jsp页面中的路径问题
jsp页面中的路径问题: 一般情况下,jsp中路径问题是和我们之前在servlet中讨论的html里面的路径问题是一 样的,但是在[jsp中可以动态获得该项目的url]. 如果在jsp页面的上面写了这 ...
- pgsql 并行相关配置
- spring boot本地调试服务器部署项目
项目本地测试然后发布到服务器上,各种BUG层出不穷.那么下面配置下,然后在本地调试部署在服务器上的程序吧 一.首先idea打开你的项目,服务器上传打包的程序.然后如下命令启动(linux),绿色参数为 ...
- ACM-ICPC 2018 徐州赛区网络预赛 A Hard to prepare(递推)
https://nanti.jisuanke.com/t/31453 题目 有n个格子拉成一个环,给你k,你能使用任意个数的0 ~ 2^k - 1,规定操作 i XNOR j 为~(i ^ j), ...
- [物理学与PDEs]第2章第5节 一维流体力学方程组的 Lagrange 形式 5.2 Lagrange 坐标
1. Lagrange 坐标 $$\beex \bea &\quad 0=\int_\Omega\cfrac{\p \rho}{\p t}+\cfrac{\p}{\p x}(\rho u)\r ...
- jQuery1.9及以上版本检测IE版本号
jQuery 从 1.9 版开始,移除了 $.browser 和 $.browser.version , 取而代之的是 $.support . 在更新的 2.0 版本中,将不再支持 IE 6/7/8. ...
- python 写代码笔记 2017.6.15
其实并不是越复杂的代码越好,简单高效才是好. 关键是思路和逻辑,还有多看别人写的代码. 学习到了:)
- H5——while循环,for循环
[循环结构的步骤] * ① 声明循环变量 * ② 判断循环条件 * ③ 执行循环体(while的{}中的所有代码) * ④ 更改循环变量 * 然后执行② ③ ④ var n=1; // ① 声明循 ...
- Python 入门基础15 --shutil、shelve、log常用模块2、项目结构
今日内容: 一.常用模块 2019.04.10 更新 1.time:时间 2.calendar:日历 3.datatime:可以运算的时间 4.sys:系统 5.os:操作系统 6.os.path:系 ...
- ceph简单用户管理
列出所有用户 ceph auth list 获取指定用户 ceph auth get client.admin 新增用户并输出密钥环 ceph auth get-or-create client.ge ...