
Angular4.x跨域请求
Angular4.x请求
码云地址:
https://gitee.com/ccsoftlucifer/Angular4Study
1. 搭建工程
新建一个工程angulardemo03
ng new angulardemo03
npm install 更新依赖
2. 新建组件
在app目录新建文件夹components,自己自定义的所有的组件都放在这个目录下面.
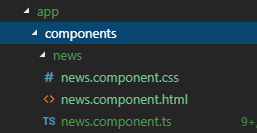
ng g component components/news
目录结构如下:
3.添加请求相关的model
编辑app.modle.ts
import { HttpClientModule } from '@angular/common/http';
 @NgModule({

   declarations: [

     AppComponent,

     NewsComponent

   ],

   imports: [

     BrowserModule,

     AppRoutingModule,

     HttpClientModule

   ],

   providers: [],

   bootstrap: [AppComponent]

 })
4.编写代码
news.component.html 编写一个按钮用来发送请求:
<h2>你好angular</h2>

<p>

  news works!

</p>

<br>

<button (click)="requestData()">请求数据</button>

从服务器拿到的值:

{{value}}
news.component.ts编写逻辑,导入http服务
 import { Component, OnInit } from '@angular/core';

 import {HttpClient} from '@angular/common/http';

 @Component({

   selector: 'app-news',

   templateUrl: './news.component.html',

   styleUrls: ['./news.component.css']

 })

 export class NewsComponent implements OnInit {

   public value:any

   constructor(private http:HttpClient) { }

   ngOnInit() {

     // this.http.get('http://localhost:8080/user/findUser?id=1')

     //  .subscribe(res=>{ this.value = res })

   }

   //请求数据方法

   requestData(){

     console.log('请求数据');

     var url='http://localhost:8080/user/findUser?id=1';//这里定义一个地址,要允许跨域

     this.http.get(url).subscribe(function(data){

       console.log(data);

     },function(err){

       console.log(err);

     })

   }

 }
5.解决跨域
由于前端工程是localhost:4200,请求后端工程Localhost:8080,会出现跨域错误:
Access-Control-Allow-Origin' header is present on the requested resource.
解决办法:
5.1 在项目的根目录添加proxy.config.json文件
 {

     "/": {

         "target": "http://localhost:8080/"

     }

 }
5.2修改package.json文件
 "scripts": {

     "ng": "ng",

     "start": "ng serve --proxy-config proxy.config.json",

     "build": "ng build",

     "test": "ng test",

     "lint": "ng lint",

     "e2e": "ng e2e"

   },
5.3修改angular.json
 "serve": {

           "builder": "@angular-devkit/build-angular:dev-server",

           "options": {

             "browserTarget": "angulardemo03:build",

             "proxyConfig":"proxy.config.json"

           },

           "configurations": {

             "production": {

               "browserTarget": "angulardemo03:build:production"

             }

           }

         },
5.4服务器端添加注解
@CrossOrigin(origins = "http://localhost:4200",allowCredentials = "true")
这样数据就拿过来了啦~

使用RxJS进行请求发送:
 import { Observable, Subject, asapScheduler, pipe, of, from, interval, merge, fromEvent,  SubscriptionLike, PartialObserver, concat } from 'rxjs';

 import { map, filter, scan } from 'rxjs/operators';

 import { webSocket } from 'rxjs/webSocket';

 import { ajax } from 'rxjs/ajax';

 import { TestScheduler } from 'rxjs/testing';
请求:
 //另外一种请求方式

     useRxJsRequestData(){

       var _result=this;

       console.log('请求数据');

       if(this.inputValue==''){

           //用户没有输入

           alert('请先输入值');

       }else{

           //用户有输入的值

           var url='http://localhost:8080/user/findUser?id='+this.inputValue;

           this.http.get(url).subscribe(res =>{

             console.log(res);

             console.log(typeof(res));

             console.log(res['id']);

             var _this = this;

            _this.obj.id=res['id'];

             _this.obj.useName=res['userName'];

             _this.obj.password=res['password'];

             _this.obj.age=res['age'];

           })

          //console.log(map);

       }

     }
Angular4.x跨域请求的更多相关文章
- Laravel中的ajax跨域请求
最近接触Laravel框架ajax跨域请求的过程中遇到一些问题,在这里做下总结. 一开始发起ajax请求一直报500错误,搜索相关资料后发现Laravel要允许跨域请求可以加入Cors中间件,代码如下 ...
- 跨域请求——WebClient通过get和post请求api
AJAX不可以实现跨域请求,经过特殊处理才行.一般后台可以通过WebClient实现跨域请求~ //get 请求 string url = string.Format("htt ...
- 原生js封装ajax,实现跨域请求
描述: 需要ajax跨域请求,用cors跨域方案.服务端设置: header('Access-Control-Allow-Origin: http://front.ls-la.me'); header ...
- 关于试用jquery的jsonp实现ajax跨域请求数据的问题
我们在开发过程中遇到要获取另一个系统数据时,就造成跨域问题,这就是下文要说的解决办法: 先我们熟悉下json和jsonp的区别: 使用AJAX就会不可避免的面临两个问题,第一个是AJAX以何种格式来交 ...
- 【JavaScript】--重点解析之跨域请求
JSON JSON(JavaScript Object Notation) 是一种轻量级的数据交换格式. JSON是用字符串来表示Javascript对象,例如可以在django中发送一个JSON格式 ...
- 利用CORS实现跨域请求(转载)
跨域请求一直是网页编程中的一个难题,在过去,绝大多数人都倾向于使用JSONP来解决这一问题.不过现在,我们可以考虑一下W3C中一项新的特性--CORS(Cross-Origin Resource Sh ...
- Ajax_05之跨域请求
1.跨域请求: Cross Domain Request:跨域名的HTTP请求,浏览器从某个域名下的资源访问了另一域名下的另一资源(协议.域名或是端口号不同): ①浏览器允许跨域请求的情形: < ...
- 浅谈linux 下,利用Nginx服务器代理实现ajax跨域请求。
ajax跨域请求对于前端开发者几乎在任何一个项目中都会用到,众所周知,跨域请求有三种方式: jsonp; XHR2 代理: jsonp: 这种应该是开发中是使用的最多的,最常见的跨域请求方法,其实aj ...
- 解决ajax跨域请求 (总结)
ajax跨域请求,目前已用几种方法实现: 1)用原生js的xhr对象实现. var url="http://freegeoip.net/json/" ...
随机推荐
- MySQL:select command denied to user for table 'proc'案例
使用EMS MySQL Manager Pro(3.4.0.1)连接MySQL 5.6.20时,报错:"SELECT command denied to user xxx@xxx.xxx.x ...
- docker根据配置文件启动redis
更多docker基本命令请自行查询. 1.首先拉取合适版本的docker镜像 docker pull redis:5 2.如果不需要更改什么配置或者仅仅测试用可以直接启动镜像运行容器,这里要说明的是根 ...
- 解析SQL Server之任务调度
在前面两篇文章中( 浅谈SQL Server内部运行机制 and 浅谈SQL Server数据内部表现形式 ),我们交流了一些关于SQL Server的一些术语,SQL Sever引擎 与SSMS抽象 ...
- sql 按年月日统计
1.每年select year(ordertime) 年,sum(Total) 销售合计from 订单表group by year(ordertime) 2.每月select year(orderti ...
- cent os 7 与cent os 6 修改主机名称
centos6 需要修改两处:一处是/etc/sysconfig/network,另一处是/etc/hosts,只修改任一处会导致系统启动异常.零时修改用hostname your-name cnet ...
- 4.16 反射和jvm
- 从jsp到java文件再返回到前台页面的过程
客户端请求jsp页面总共分为三个阶段: <%@ page language="java" contentType="text/html; charset=utf-8 ...
- flask轻量级框架入门
# -*- encoding: utf-8 -*- #导入Flask类, 导入重定向,url_for是简易寻址跳转, from flask import Flask,redirect,url_for, ...
- JSP中常用的的EL表达式的汇总
Jsp基础知识 jsp的组成 html静态页面(css.javascript) java代码 <% %> (_jspService方法中) 内置对象 out request 表达式 < ...
- MySQL二进预编译制安装
+++++++++++++++++++++++++++++++++++++++++++标题:MySQL二进预编译制安装时间:2019年2月25日内容:MySQL二进制预编译安装重点:MySQL二进制预 ...