Python3基础(5)常用模块:time、datetime、random、os、sys、shutil、shelve、xml处理、ConfigParser、hashlib、re
---------------个人学习笔记---------------
----------------本文作者疆--------------
------点击此处链接至博客园原文------
1. 同级目录中import导入模块、包
import module1 调用时为module1.fun1()
from module1 import * 调用时为fun1()
from module1 import fun1 as f 调用时为f()
from . import xxx(.表示同级目录)
包(package):从逻辑上组织模块,本质上是一个目录(含__init__.py文件)
导入模块本质是将模块xxx全部(import xxx)或模块内某部分###(from xxx import ###)加载解释一遍,导入包本质是执行__init__.py文件
若在与包同级的文件中需要调用包中与__init__.py同级的模块,则需在__init__.py中from . import xxx,而import xxx却无效!
模块包含(标准库+开源模块+自定义模块)
2.time与datetime
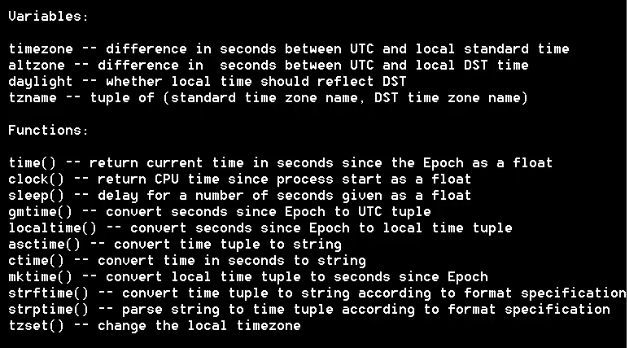
-----------------------------------------time----------------------------------------------------
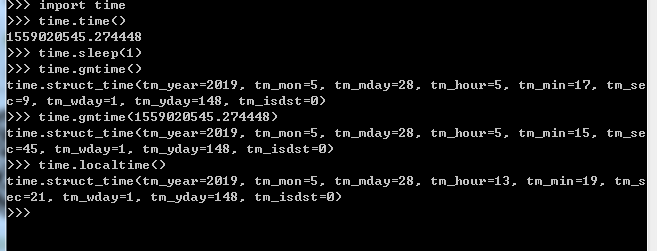
time.time() 获取时间戳,单位为秒,从1970年1月1日0时0分0秒计算

time.sleep() 延时

time.gmtime() 转换时间戳为UTC时区元组,不传参数默认当前时间戳

time.localtime()  转换时间戳为本地时间(UTC时区+8)元组,不传参数默认当前时间戳
time.mktime() 转换本地时间元组为时间戳,必须传入参数

time.strftime(time_format,tuple)  time_format = "%Y-%m:%d %H:%M:%S"  转换时间元组为字符串,传入参数为time_format和tuple,默认tuple为当前时间

time.strptime(string,time_format) 转换时间的字符串为元组,要求必须传string和字符串的time_format

time.asctime() 转换元组为字符串(类似于"Sat Aug 20 14:59:45 2019"),无参数则默认传入localtime()

time.ctime() 转换时间戳为字符串(类似于"Sat Aug 20 14:59:45 2019"),无参数则默认传入localtime()
------------------------------------datatime:基于time的高层封装---------------------------------------------------
date类,年月日
time类,时分秒
datetime类,年月日分时秒
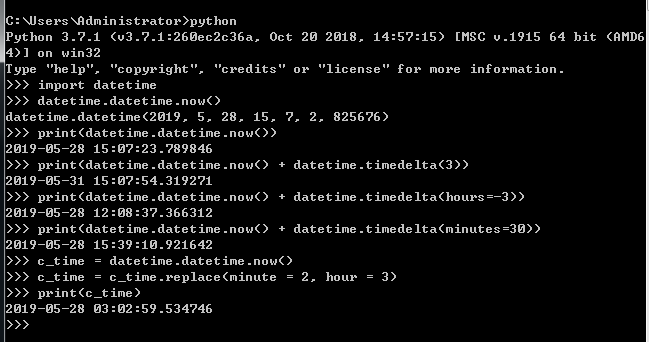
datetime.datetime.now() 获取当前时间
datetime.timedelta() 时间加减,需与datetime.datetime.now() 同时使用
c_time = datetime.datetime.now() print(c_time.replace(minute = 3, hour = 2)) 时间替换
3.random模块
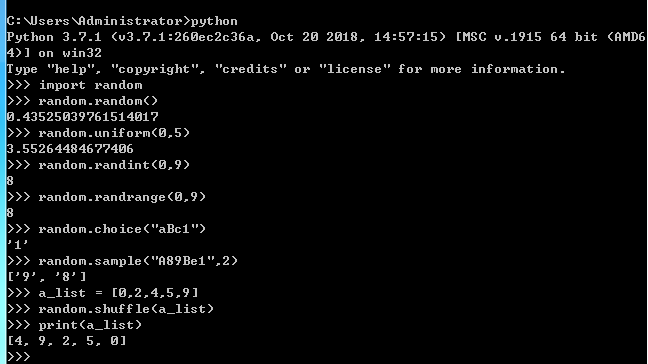
random.random() 返回0~1随机浮点数

random.uniform(x,y) 返回指定区间x~y的随机浮点数

random.randint(x,y) 返回[x,y]随机整数

random.randrange(x,y) 返回范围为[x,y)的随机整数,不包含y

random.choice(序列) 返回序列(列表、字符串、元组)中任意一个元素

random.sample(序列,num) 返回序列中任意num个元素组成的列表

random.shuffle(列表) 列表洗牌
# -*- coding:utf-8 -*-

# Author: WUJiang

# 生成4位随机验证码(字母、数字),random模块实际应用

import random

auth_code = ""

for i in range(4):

    random_num = random.randrange(0, 4)

    if i == random_num:

        code_element = chr(random.randint(65,90)) # chr()内建函数,转换数字为对应的ASCII码

    else:

        code_element = random.randint(0,9)

    auth_code += str(code_element)

print(auth_code)
4.os模块(对操作系统的一些调用)
os.getcwd() 获取当前工作目录路径

os.chdir("路径") 切换路径(windows中需要多加\转译,或在路径前面加r) 相当于cd

os.curdir 当前目录.

os.pardir 当前目录的父目录字符串名..

os.makedirs() 多层递归创建目录,如os.makedirs(r"C:a\b\c\d")

os.removedirs() 递归逐级删除目录,如果为空就删除

os.mkdir() 创建单级目录,前级目录需要存在

os.rmdir() 删除单级目录,若目录不为空则无法删除

os.listdir() 列出指定目录所有文件和子目录,若不传参则默认当前目录

os.remove() 删除一个文件

os.rename("old","new")  重命名文件/目录

os.stat() 获取文件/目录状态信息元组,必须传参

os.sep 操作系统特定的路径分隔符

os.linsep 当前平台使用的行终止符

os.pathsep 用于分割文件路径的字符串,如;

os.name 字符串指示当前使用平台(win:nt Linux:posix)

os.system("shell 命令") 运行shell命令,如os.system("dir")

os.environ 获取系统环境变量

os.path.abspath(path) 将path规范化的绝对路径

os.path.split(path) 将path分割成目录和文件名元组返回

os.path.dirname(path) 返回path的上级目录路径

os.path.basename(path) 返回path最后的文件名

os.path.exists(path) 判断path是否存在

os.path.isabs(path) 判断path是否为绝对路径

os.path.isfile(path) 判断是否为一个存在的文件

os.path.isdir(path) 判断是否为一个存在的目录

os.path.join(path1,path2,path3) 组合多个路径,绝对路径之前的第一个参数会被忽略

os.path.getatime(path) 返回path指向的文件或目录最后存取时间戳

os.path.getmtime(path) 返回path指向的文件或目录最后修改时间戳
5.sys模块
sys.argv 命令行参数列表,第一个元素为程序名称

sys.exit(n) 退出程序,正常退出时exit(0)

sys.version 获取Python解释器版本信息

sys.path  为Python环境变量

sys.platform 返回操作系统平台名称,即使64位机器也会显示win32(32位和64位windows操作系统都是运行在NT内核之上的win32子系统)

sys.stdout.write() 标准输出

sys.stdin.readline() 获取标准输入,包括\n
6.shutil模块
用于copy文件

shutil.copyfileobj(fsrc,fdst,length)  拷贝文件,参数为文件句柄,length指定长度,默认为全部内容copy

shutil.copyfile(src,dst) 拷贝文件,参数为文件名

shutil.copymode(src,dst) 仅拷贝权限

shutil.copystat(src,dst) 拷贝状态信息,如最后更新时间

shutil.copy(src,dst)  拷贝文件和权限

shutil.copy2(src,dst) 拷贝文件和状态信息

shutil.copytree(src,dst) 递归拷贝文件,即拷贝目录,参数为文件名

shutil.rmtree() 递归删除目录(文件),参数为文件名

shutil.move(src,dst) 递归地移动文件

shutil.make_archive(base_name,format,root_dir...) 创建压缩包,base_name为压缩后的文件名或含文件名的路径,format为压缩格式(zip、rar...),root_dir为待压缩的文件/目录

shutil对压缩包的处理是调用zipfile模块或tarfile模块进行的,“w”、“r”分别代表压缩、解压,详情可参考相关模块帮助
7.shelve模块
shelve是一个简单的key-value将内存通过文件持久化的模块,可以持久化任何pickle可支持的Python数据格式
# -*- coding:utf-8 -*-

# Author: WUJiang

# shelve模块

import shelve

s = shelve.open("shelve_file")

name = ["zhangsan", "lisi", "wangwu"]

info = {

    "age": 22,

    "sex": "male"

}

s["name"] = name  # 持久化list

s["info"] = info  # 持久化dict

print(s["name"])

print(s["info"])

# ...
8.xml处理模块
<?xml version="1.0"?>

<data>

    <country name="Liechtenstein">

        <rank updated="yes">2</rank>

        <year>2008</year>

        <gdppc>141100</gdppc>

        <neighbor name="Austria" direction="E"/>

        <neighbor name="Switzerland" direction="W"/>

    </country>

    <country name="Singapore">

        <rank updated="yes">5</rank>

        <year>2011</year>

        <gdppc>59900</gdppc>

        <neighbor name="Malaysia" direction="N"/>

    </country>

    <country name="Panama">

        <rank updated="yes">69</rank>

        <year>2011</year>

        <gdppc>13600</gdppc>

        <neighbor name="Costa Rica" direction="W"/>

        <neighbor name="Colombia" direction="E"/>

    </country>

</data>
# -*- coding:utf-8 -*-

# Author: WUJiang

# 解析xml文件

import xml.etree.ElementTree as ET

tree = ET.parse("test.xml")

root = tree.getroot()

print(root.tag)  # data

# 遍历xml文档

for child in root:

    print(child.tag, child.attrib)

    for i in child:

        print(i.tag, i.text)

# 只遍历某个节点,如year结点

for node in root.iter("year"):

    print(node.tag, node.text)

# 修改

for node in root.iter("year"):

    new_year = str(int(node.text) + 1)

    node.text = new_year        # 更改结点内容

    node.set("updated", "yes")  # 添加属性

tree.write("test.xml")  # 修改写回

# 删除

for i in root.findall("country"):

    rank = int(i.find("rank").text)

    if rank > 50:

        root.remove(i)

tree.write("output.xml")
# -*- coding:utf-8 -*-

# Author: WUJiang

# 创建xml文件

import xml.etree.ElementTree as ET

new_xml = ET.Element("infolist")  # 根节点

info = ET.SubElement(new_xml, "info", attrib={"enrolled": "yes"})  # new_xml的子节点

name = ET.SubElement(info, "name")

age = ET.SubElement(info, "age", attrib={"checked": "no"})

sex = ET.SubElement(info, "sex")

name.text = "laowang"

age.text = ""   # cannot serialize 24 (type int)

sex.text = "male"

info2 = ET.SubElement(new_xml, "info", attrib={"enrolled": "yes"})  # new_xml的子节点

name2 = ET.SubElement(info2, "name")

age2 = ET.SubElement(info2, "age", attrib={"checked": "no"})

sex2 = ET.SubElement(info2, "sex")

name2.text = "xiaoli"

age2.text = ""   # cannot serialize 24 (type int)

sex2.text = "female"

et = ET.ElementTree(new_xml)  # 生成文档对象

et.write("info.xml", xml_declaration=True)

# ET.dump(new_xml)  # 打印生成的格式
<?xml version='1.0' encoding='us-ascii'?>

<infolist>

    <info enrolled="yes">

        <name>laowang</name>

        <age checked="no">24</age>

        <sex>male</sex>

    </info>

    <info enrolled="yes">

        <name>xiaoli</name>

        <age checked="no">25</age>

        <sex>female</sex>

    </info>

</infolist>
8.Configparser
用于生成和修改常见配置文档(.conf文件、.ini文件),在Python3中模块名变更为configparser
# -*- coding:utf-8 -*-

# Author: WUJiang

# 生成.ini文件

import configparser

config = configparser.ConfigParser()

config["DEFAULT"] = {

    "ServerAliveInterval": "",

    "Compression": "yes",

    "CompressionLevel": ""

}

config["DEFAULT"]["ForwardX11"] = "yes"

config["bitbucket.org"] = {}

config["bitbucket.org"]["User"] = "hg"

config["topsecret.server.com"] = {}

topsecret = config["topsecret.server.com"]

topsecret["Port"] = ""

topsecret["ForwardX11"] = "yes"

with open("example.ini", "w") as configfile:

    config.write(configfile)
[DEFAULT]

serveraliveinterval = 45

compression = yes

compressionlevel = 9

forwardx11 = yes

[bitbucket.org]

user = hg

[topsecret.server.com]

port = 50022

forwardx11 = yes
# -*- coding:utf-8 -*-

# Author: WUJiang

# 利用configparser模块读、改配置文件

import configparser

# 读取

conf = configparser.ConfigParser()

conf.read("example.ini")

print(conf.sections())  # ['bitbucket.org', 'topsecret.server.com']

print("bitbucket.org" in conf)  # True

print(conf["bitbucket.org"]["User"])  # hg

# 删除

sec = conf.remove_section("bitbucket.org")

conf.write(open("example.cfg", "w"))
9.hashlib模块
用于加密相关操作,主要提供SHA1、SHA224、SHA256、SHA384、SHA512、MD5算法
# -*- coding:utf-8 -*-

# Author: WUJiang

import hashlib

m = hashlib.md5()

m.update(b"hello")

print(m.digest())  # 2进制hash

print(m.hexdigest())  # 16进制hash

m2 = hashlib.sha1()

m2.update(b"hello")

print(m2.digest())  # 2进制sha1

print(m2.hexdigest())  # 16进制sha1
10.re模块
------------------常用正则表达式符号,动态模糊匹配----------------------
---------------------------应用:爬虫、文字处理-------------------------------
‘.’ 默认匹配除\n之外的任意一个字符
'^' 匹配字符开头,如“^a”
'$' 匹配字符结尾,如“a$”要求待匹配字符串结尾应为a
'*' 匹配*前的字符0次或多次
'+' 匹配前一个字符1次或多次
'?' 匹配前一个字符1次或0次
'{m}' 匹配前一个字符m次
'{n,m}' 匹配前一个字符n~m次
'|' 匹配|左或|右的字符,如“abc|ABC”
'(...)' 分组匹配,如“(abc){2}”
'\A' 从开头匹配,同‘^’
'\z' 匹配字符结尾,同$
'\d' 匹配一个数字0~9
'\D' 匹配一个非数字,包含特殊字符
'\w' 匹配一个数字或字母[A-Za-z0-9] ‘[0-9]’、‘a-z’、‘A-Z’
'\W' 匹配特殊字符
'\s' 匹配空白字符\t、\n、\r
'(?P<name>...)' 分组匹配,可与groupdict()搭配使用返回字典,比如读取身份号分组
------------------------------------常用的匹配语法------------------------------------------------------
re.match() 从头开始匹配
re.search() 匹配包含,常用,只匹配第一次
re.findall() 把所有匹配到的字符以列表返回,无group方法
re.split() 分割,如re.split("[0-9]+","abc12de3f45GH")得到["abc","de","f","GH"]
re.sub() 替换,如re.sub("[0-9]+","|","abc12de3f45GH",count=2)得到“abc|de|f45GH”
import re

re.match(匹配模式,待匹配字符串)

res = re.match print(res.group())

如res = re.match(^wu\d+","wu123jiang")  print(res.group()) #为wu123
Python3基础(5)常用模块:time、datetime、random、os、sys、shutil、shelve、xml处理、ConfigParser、hashlib、re的更多相关文章
- Python常用模块(time, datetime, random, os, sys, hashlib)
time模块 在Python中,通常有这几种方式来表示时间: 时间戳(timestamp) : 通常来说,时间戳表示的是从1970年1月1日00:00:00开始按秒计算的偏移量.我们运 ...
- 模块、包及常用模块(time/random/os/sys/shutil)
一.模块 模块的本质就是一个.py 文件. 导入和调用模块: import module from module import xx from module.xx.xx import xx as re ...
- day19:常用模块(collections,time,random,os,sys)
1,正则复习,re.S,这个在用的最多,re.M多行模式,这个主要改变^和$的行为,每一行都是新串开头,每个回车都是结尾.re.L 在Windows和linux里面对一些特殊字符有不一样的识别,re. ...
- python学习道路(day6note)(time &datetime,random,shutil,shelve,xml处理,configparser,hashlib,logging模块,re正则表达式)
1.tiim模块,因为方法较多我就写在code里面了,后面有注释 #!/usr/bin/env python #_*_coding:utf-8_*_ print("time".ce ...
- python笔记-1(import导入、time/datetime/random/os/sys模块)
python笔记-6(import导入.time/datetime/random/os/sys模块) 一.了解模块导入的基本知识 此部分此处不展开细说import导入,仅写几个点目前的认知即可.其 ...
- 常用模块之 time,datetime,random,os,sys
time与datetime模块 先认识几个python中关于时间的名词: 时间戳(timestamp):通常来说,时间戳表示的是从1970年1月1日00:00:00开始按秒计算的偏移量.我们运行“ty ...
- Python3基础笔记--常用模块
目录: 参考博客:Python 之路 Day5 - 常用模块学习 Py西游攻关之模块 一.time模块 二.random模块 三.os模块 四.sys模块 五.hashlib模块 六.logging模 ...
- Python常用模块time & datetime &random 模块
时间模块前言 在Python中,与时间处理有关的模块就包括:time,datetime 一.在Python中,通常有这几种方式来表示时间: 时间戳 格式化的时间字符串 元组(struct_time)共 ...
- CSIC_716_20191116【常用模块的用法 time ,datetime, random, os, sys, hashlib】
import time import datetime import os import sys import random import hashlib time模块 时间戳(Timestamp) ...
- python基础语法11 内置模块time,datatime,random,os,sys,hashlib模块
time模块 在python的三种时间表现形式: 1.时间戳: 给电脑看的. - 自1970-01-01 00:00:00到当前时间,按秒计算,计算了多少秒. 2.格式化时间(Format Strin ...
随机推荐
- 杂项-权限管理:Ralasafe
ylbtech-杂项-权限管理:Ralasafe Ralasafe 是用Java编写的开源(MIT协议)访问控制中间件.它能够轻松处理登录控制.URL权限控制和(业务级)数据级权限管理,实现权限与业务 ...
- bzoj2118
最短路 很早以前做的了 数据范围太大,不能直接算 mn=min(a[i]) 算出d[i]表示sum%mn=i最小能构成的数,这个用最短路就行了,然后计算d[i],d[i]+mn的个数统计答案 #inc ...
- WPF实现右键菜单
ContextMenu类就是用来做右键菜单的对象,对于任何的控件都可以进行对ContextMenu属性的操作进行设置右键菜单的功能. 下面代码就是对一个按钮添加一个WPF右键菜单的功能: < B ...
- Sql server 2008 R2 导出/导入数据报错之无法打开全局共享内存以与性能 DLL 通信
- (转)JAVA中的权限修饰符
注:本博文是转载的,原文地址:http://blog.csdn.net/xk632172748/article/details/51755438 Java中修饰符总结: 访问控制修饰符 访问控制修饰符 ...
- Ping++中的AlipaySDK和AlicloudUTDID冲突解决方案
今天维护一个老项目发现阿里框架冲突 问题截图: 解决方案: 去阿里文档中心 https://docs.open.alipay.com/54/104509 重新下载没有UTDID冲突的库 下载SDK解压 ...
- C# EventHandler委托事件小结--百度
最近遇到一个委托的问题,+=这个符号 this.Activated += new EventHandler(Form1_Activated);//Form1_Activated为方法名12 这个语句拆 ...
- Unity 中动态修改碰撞框(位置,大小,方向)
在Unity中,玩家处于不同的状态,要求的碰撞框的 位置/大小/方向 会有所改变,怎么动态的修改碰撞框呢? 下面是Capsure Collider(胶囊体)的修改: CapsuleCollider.d ...
- Java中的变量传递机制以及JS中的参数传递机制
JAVA: 传递基本类型是 就是基本的值传递 不会影响值本身. package com.wuqi.p1; public class ValuePassTest { public static void ...
- 萌新在线模板--keyboarder_zsq
好像马上就要出去打铁了QAQ,所以是不是要做个模板带过去也玩一玩? 那就做吧... 标题就设为萌新模板吧...各种萌新讲解对吧.... 图论 拓扑排序 最短路 最小生成树 二分匹配 强连通Tarjan ...