Spring Cloud之Commons如何通过配置文件配置服务实例?
Spring Cloud Commons 主要包括如下模块的接口和默认实现:
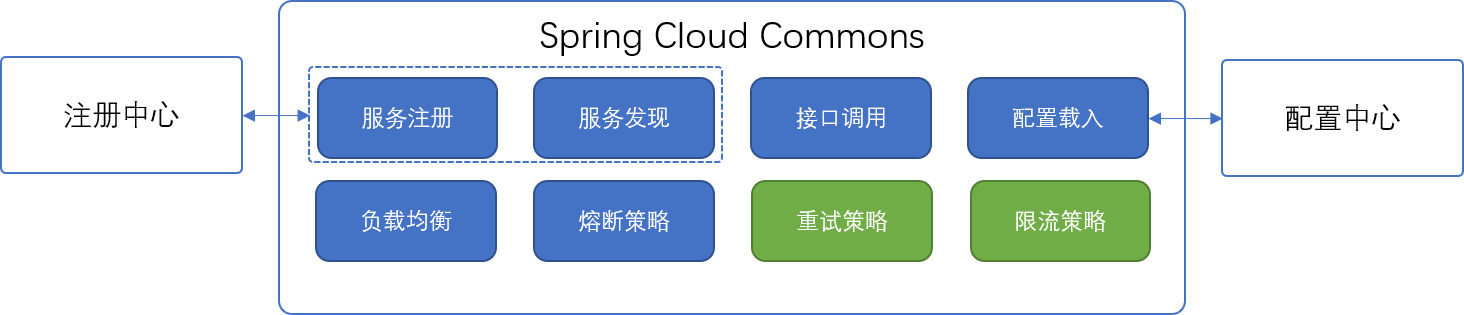
其中的限流策略以及重试策略是没有天然带的,但是其他模块的实现一般会带上这些功能。我们先从服务发现相关接口开始分析
服务发现相关
核心接口DiscoveryClient
DiscoveryClient
public interface DiscoveryClient extends Ordered {

	int DEFAULT_ORDER = 0;

	//描述

    String description();

    //通过 serviceId 获取服务实例

    List<ServiceInstance> getInstances(String serviceId);

    //获取所有服务的名称

	List<String> getServices();

	@Override

	default int getOrder() {

		return DEFAULT_ORDER;

	}

}
DiscoveryClient 扩展了Ordered接口,这个和之前提到的@Order注解的作用是一样的。
服务实例的信息包括:
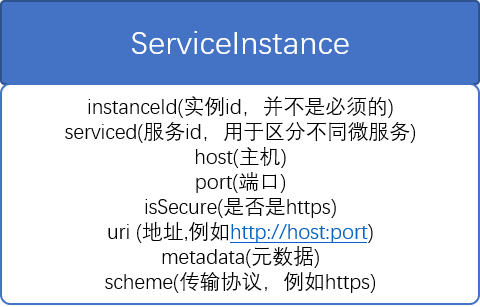
public interface ServiceInstance {

	//实例id,并不是必须的

	default String getInstanceId() {

		return null;

	}

	//服务id,用于区分不同微服务

	String getServiceId();

	//服务实例提供服务的地址

	String getHost();

	//服务实例提供服务的端口

	int getPort();

	//是否使用的是 HTTPS

	boolean isSecure();

	//提供服务的 URI 地址

	URI getUri();

	//一些元数据信息

	Map<String, String> getMetadata();

	//使用的传输协议,例如 http,https 等等

	default String getScheme() {

		return null;

	}

}
Spring Cloud 从 Feinchley 版本之后,越来越重视异步 Reactor 编程与 WebFlux,所以所有同步的接口基本上都有对应的异步接口,这里的DiscoveryClient对应的就是ReactiveDiscoveryClient:
public interface ReactiveDiscoveryClient extends Ordered {

    int DEFAULT_ORDER = 0;

    //描述

    String description();

    //通过 serviceId 获取服务实例,这里返回的是 Flux,究竟如何使用会在后面的例子中详细阐明

    Flux<ServiceInstance> getInstances(String serviceId);

    //获取所有服务的名称,这里返回的是 Flux,究竟如何使用会在后面的例子中详细阐明

    Flux<String> getServices();

    @Override

    default int getOrder() {

        return 0;

    }

}
如何通过配置文件配置服务实例?
使用SimpleDiscoveryClient与SimpleReactiveDiscoveryClient
假设要调用的微服务的域名是固定的,我们可以直接通过将这些域名写入配置文件。这个场景一般发生在:
- 基于 Kubernetes ingress nginx 与 coredns 的内网域名解析负载均衡
- 外网统一提供服务的域名
我们通过一个例子来说明下SimpleDiscoveryClient与SimpleReactiveDiscoveryClient,这里的代码可以从这里下载,首先引入依赖:
<parent>

    <groupId>org.springframework.boot</groupId>

    <artifactId>spring-boot-starter-parent</artifactId>

    <version>2.4.1</version>

</parent>

<dependencies>

    <dependency>

        <groupId>org.springframework.cloud</groupId>

        <artifactId>spring-cloud-commons</artifactId>

    </dependency>

    <dependency>

        <groupId>org.springframework.boot</groupId>

        <artifactId>spring-boot-starter-actuator</artifactId>

    </dependency>

    <dependency>

        <groupId>org.springframework.boot</groupId>

        <artifactId>spring-boot-starter-web</artifactId>

    </dependency>

    <dependency>

        <groupId>org.springframework.boot</groupId>

        <artifactId>spring-boot-starter-webflux</artifactId>

    </dependency>

    <dependency>

        <groupId>junit</groupId>

        <artifactId>junit</artifactId>

        <version>4.12</version>

    </dependency>

    <dependency>

        <groupId>org.springframework.boot</groupId>

        <artifactId>spring-boot-starter-test</artifactId>

    </dependency>

</dependencies>

<dependencyManagement>

    <dependencies>

        <dependency>

            <groupId>org.springframework.cloud</groupId>

            <artifactId>spring-cloud-dependencies</artifactId>

            <version>2020.0.0</version>

            <type>pom</type>

            <scope>import</scope>

        </dependency>

    </dependencies>

</dependencyManagement>
编写application.yml,这里列举了SimpleDiscoveryClient与SimpleReactiveDiscoveryClient所有可能的配置:
spring:

  cloud:

    discovery:

      client:

        # SimpleDiscoveryClient与SimpleReactiveDiscoveryClient的配置

        simple:

          instances:

            #微服务1

            service1:

              #实例1

              - host: instance1 #地址

                port: 8080 #端口

                instanceId: 'instance1:8080' #可以不填,实例id

              #实例2

              - uri: 'https://instance2:443' #指定了 scheme 为 https,host 为 instance2,端口为443

            #微服务2

            service2:

              #实例3

              - host: instance3 #地址

                port: 80 #端口

                instanceId: ${spring.cloud.discovery.client.simple.instances.service2[0].host}:${spring.cloud.discovery.client.simple.instances.service2[0].port} #可以不填,实例id

              #实例4

              - uri: 'https://instance4:8080' #指定了 scheme 为 https,host 为 instance4,端口为8080

          # 指定 SimpleDiscoveryClient的排序顺序为1,默认是0,越小越优先

          order: 1

# actuator 配置

management:

  endpoint:

    health:

      # health 接口总是输出详细信息

      show-details: always

  endpoints:

    jmx:

      exposure:

        # jmx 不暴露任何 actuator 接口

        exclude: '*'

    web:

      exposure:

        # http 暴露所有 actuator 接口

        include: '*'
我们配置了四个不同实例: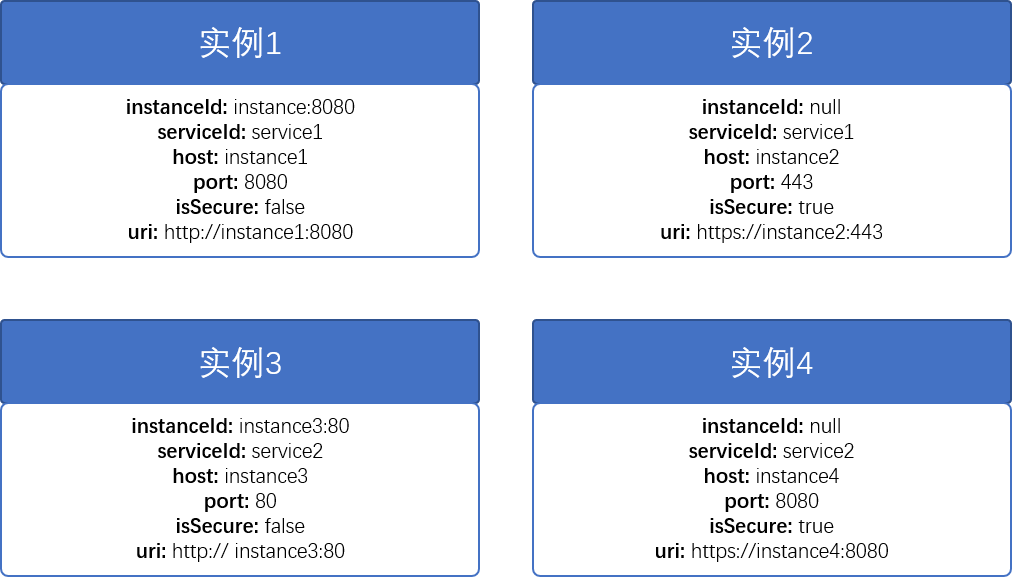
我们可以直接通过 uri 配置,也可以具体配置其中的 host,port 和 isSecure,两者是等价的。例如:
spring:

  cloud:

    discovery:

      client:

        # SimpleDiscoveryClient与SimpleReactiveDiscoveryClient的配置

        simple:

          instances:

            #微服务1

            service1:

              #实例1

              - host: instance1 #地址

                port: 8080 #端口
等价于
spring:

  cloud:

    discovery:

      client:

        # SimpleDiscoveryClient与SimpleReactiveDiscoveryClient的配置

        simple:

          instances:

            #微服务1

            service1:

              #实例1

              - uri: http://instance1:8080
instanceId 不一定需要指定,serviceId 会根据实例配置的上一级取,就算自己配置了,例如:
spring:

  cloud:

    discovery:

      client:

        # SimpleDiscoveryClient与SimpleReactiveDiscoveryClient的配置

        simple:

          instances:

            #微服务1

            service1:

              #实例1

              - host: instance1 #地址

                port: 8080 #端口

                serviceId: service2 #无效,实际还是service1
serviceId 还是实际合理的那个,也就是 service1。
这些机制在后面的源码分析就会理解了。
我们的测试代码会用到 Spring Boot 的事件机制,也就是在 ApplicationContext 到某一生命周期的时候,这些事件会被发布出来,由实现了对应事件的ApplicationListener接口的 Bean 消费,Spring boot 中,事件主要包括:
ApplicationStartingEvent:这个是spring boot应用一开始启动时,发出的事件,只是用来标识,应用开始启动了,一般没什么用ApplicationEnvironmentPreparedEvent:这个是在创建好Environment(通过上下文配置,判断到底创建StandardServletEnvironment(针对Servlet环境),StandardReactiveWebEnvironment(针对Reactive环境)还是StandardEnvironment(针对无servlet环境))之后发出的事件。ApplicationContextInitializedEvent: 这个是在创建好Context并调用ApplicationContextInitializer初始化context之后发布这个事件,在加载bean信息之前ApplicationPreparedEvent:加载bean信息之后,但是还没有创建bean的时候,发步这个事件。这个事件是和调用ApplicationContextAware设置ApplicationContext一起进行的,可以看出,setApplicationContext方法里面不能去获取bean,因为bean可能还没有初始化完成ApplicationStartedEvent: 加载初始化各种需要的bean并依赖注入之后,在运行ApplicationRunner做一些用户自定义的初始化操作之前,会发布这个事件。ApplicationReadyEvent:运行ApplicationRunner做一些用户自定义的初始化操作之后,会发布这个事件。
我们使用ApplicationReadyEvent的ApplicationListener确保所有的DiscoveryClient都初始化完成并可以使用作为测试类。
编写测试类:TestSimpleDiscoveryClient
/**

 * 通过消费 ApplicationReadyEvent 来确保 DiscoveryClient 初始化完成并可用

 */

@Slf4j

@Component

public class TestSimpleDiscoveryClient implements ApplicationListener<ApplicationReadyEvent> {

    /**

     * 初始化的方法返回类型是 DiscoveryClient 并且不是 Primary,这里只能通过 @Resource 自动装载不能通过 @Autowired

     * 这里不排除以后返回类型修改为 SimpleDiscoveryClient 的可能性

     * @see org.springframework.cloud.client.discovery.simple.SimpleDiscoveryClientAutoConfiguration

     */

    @Resource

    private SimpleDiscoveryClient simpleDiscoveryClient;

    @Override

    public void onApplicationEvent(ApplicationReadyEvent applicationReadyEvent) {

        List<String> services = simpleDiscoveryClient.getServices();

        services.forEach(serviceId -> {

            log.info("{}: {}", serviceId, simpleDiscoveryClient.getInstances(serviceId));

        });

    }

}
TestSimpleReactiveDiscoveryClient
/**

 * 通过消费 ApplicationReadyEvent 来确保 DiscoveryClient 初始化完成并可用

 */

@Slf4j

@Component

public class TestSimpleReactiveDiscoveryClient implements ApplicationListener<ApplicationReadyEvent> {

    @Autowired

    private SimpleReactiveDiscoveryClient simpleReactiveDiscoveryClient;

    @Override

    public void onApplicationEvent(ApplicationReadyEvent event) {

        simpleReactiveDiscoveryClient.getServices().subscribe(serviceId -> {

            simpleReactiveDiscoveryClient.getInstances(serviceId).collect(Collectors.toList()).subscribe(serviceInstances -> {

                log.info("{}: {}", serviceId, serviceInstances);

            });

        });

    }

}
启动类:DiscoveryClientMain
@SpringBootApplication

public class DiscoveryClientMain {

    public static void main(String[] args) {

        SpringApplication.run(DiscoveryClientMain.class, args);

    }

}
启动后,可以看到日志:
2021-01-19 09:38:05.646  INFO 6168 --- [           main] .h.s.c.i.s.d.s.TestSimpleDiscoveryClient : service2: [DefaultServiceInstance{instanceId='instance3:80', serviceId='service2', host='instance3', port=80, secure=false, metadata={}}, DefaultServiceInstance{instanceId='null', serviceId='service2', host='instance4', port=8080, secure=true, metadata={}}]

2021-01-19 09:38:05.647  INFO 6168 --- [           main] .h.s.c.i.s.d.s.TestSimpleDiscoveryClient : service1: [DefaultServiceInstance{instanceId='instance:8080', serviceId='service1', host='instance1', port=8080, secure=false, metadata={}}, DefaultServiceInstance{instanceId='null', serviceId='service1', host='instance2', port=443, secure=true, metadata={}}]

2021-01-19 09:38:05.913  INFO 6168 --- [           main] .s.d.s.TestSimpleReactiveDiscoveryClient : service2: [DefaultServiceInstance{instanceId='instance3:80', serviceId='service2', host='instance3', port=80, secure=false, metadata={}}, DefaultServiceInstance{instanceId='null', serviceId='service2', host='instance4', port=8080, secure=true, metadata={}}]

2021-01-19 09:38:05.913  INFO 6168 --- [           main] .s.d.s.TestSimpleReactiveDiscoveryClient : service1: [DefaultS
Spring Cloud之Commons如何通过配置文件配置服务实例?的更多相关文章
- Spring Cloud Alibaba基础教程:Nacos配置的多文件加载与共享配置
前情回顾: <Spring Cloud Alibaba基础教程:使用Nacos实现服务注册与发现> <Spring Cloud Alibaba基础教程:支持的几种服务消费方式> ...
- Spring Cloud Alibaba基础教程:Nacos配置的多环境管理
前情回顾: <Spring Cloud Alibaba基础教程:使用Nacos实现服务注册与发现> <Spring Cloud Alibaba基础教程:支持的几种服务消费方式> ...
- Spring Cloud(十四)Config 配置中心与客户端的使用与详细
前言 在上一篇 文章 中我们直接用了本应在本文中配置的Config Server,对Config也有了一个基本的认识,即 Spring Cloud Config 是一种用来动态获取Git.SVN.本地 ...
- spring cloud config使用mysql存储配置文件
spring cloud config使用mysql存储配置文件 1.结构图 2.pom.xml: <?xml version="1.0" encoding="UT ...
- Spring Cloud Config、Apollo、Nacos配置中心选型及对比
Spring Cloud Config.Apollo.Nacos配置中心选型及对比 1.Nacos 1.1 Nacos主要提供以下四大功能 2.Spring Cloud Config 3.Apollo ...
- Spring Cloud系列(六):配置中心
在使用Spring Boot的时候,我们往往会在application.properties配置文件中写一些值,供应用使用,这样做的好处是可以在代码中引用这些值,当这些值需要作出修改的时候,可以直接修 ...
- spring cloud bus 消息总线 动态刷新配置文件 【actuator 与 RabbitMQ配合完成】
1.前言 单机刷新配置文件,使用actuator就足够了 ,但是 分布式微服务 不可能是单机 ,将会有很多很多的工程 ,无法手动一个一个的发送刷新请求, 因此引入了消息中间件 ,常用的 消息中间件 是 ...
- 微服务架构 | *2.3 Spring Cloud 启动及加载配置文件源码分析(以 Nacos 为例)
目录 前言 1. Spring Cloud 什么时候加载配置文件 2. 准备 Environment 配置环境 2.1 配置 Environment 环境 SpringApplication.prep ...
- Spring Cloud Alibaba基础教程:Nacos配置的加载规则详解
前情回顾: <Spring Cloud Alibaba基础教程:使用Nacos实现服务注册与发现> <Spring Cloud Alibaba基础教程:支持的几种服务消费方式(Res ...
- spring cloud: zuul(四): 正则表达式匹配其他微服务(给其他微服务加版本号)
spring cloud: zuul(四): 正则表达式匹配其他微服务(给其他微服务加版本号) 比如我原来有,spring-boot-user微服务,后台进行迭代更新,另外其了一个微服务: sprin ...
随机推荐
- Ellyn-Golang调用级覆盖率&方法调用链插桩采集方案
词语解释 Ellyn要解决什么问题? 在应用程序并行执行的情况下,精确获取单个用例.流量.单元测试走过的方法链(有向图).出入参数.行覆盖等运行时数据,经过一定的加工之后,应用在覆盖率.影响面评估.流 ...
- biancheng-HBase
目录http://c.biancheng.net/view/6509.html 1HBase是什么?2HBase的优势有哪些?3Hadoop与HBase的关系4HDFS5HDFS的特点与使用场景6HB ...
- Mac使用经验汇总
在此记录使用Mac的一些经验技巧. 安装brew 如果按照官网提示安装,巨慢无比,如下: /bin/bash -c "$(curl -fsSL https://raw.githubuserc ...
- 2024年春秋杯网络安全联赛冬季赛部分wp
部分附件下载地址: https://pan.baidu.com/s/1Q6FjD5K-XLI-EuRLhxLq1Q 提取码: jay1 Misc day1-简单算术 根据提示应该是异或 下载文件是一个 ...
- 使用SOUI4中的STreeView控件
STreeView控件是一个基于虚表技术实现的高性能树形控件. 和STreeCtrl这种传统的树形控件将数据和控件固定在一起不同,STreeView数据和控件分离,使用一个adapter进行连接. 用 ...
- nginx适配Overlay以及测试工具
本文分享自天翼云开发者社区<nginx适配Overlay以及测试工具>,作者:pan Overlay与Underlay介绍 Overlay网络和Underlay网络是一组相对概念,Over ...
- java连接mysql遇到sql执行错误,异常判断和抛出源码分析
一.代码处理过程
- 让 LLM 来评判 | 评估你的评估结果
评估你的评估结果 这是 让 LLM 来评判 系列文章的第三篇,敬请关注系列文章: 基础概念 选择 LLM 评估模型 设计你自己的评估 prompt 评估你的评估结果 奖励模型相关内容 技巧与提示 在生 ...
- 技术前瞻: ECMAScript 2025 已定稿特性解析:让 JavaScript 更优雅
作为全球应用最广泛的编程语言之一,JavaScript 每年都在通过 ECMAScript 标准持续进化.2025 年,ECMAScript 再次带来多项重磅更新,本文将带你深入解读已正式定稿的核心特 ...
- vue+elementui怎样点击table中的单元格触发事件--弹框
可以先看一下官网中table的自定义列模板代码 <template> <el-table :data="tableData" border s ...