学Shiro完结版-5
第二十一章 授予身份及切换身份——《跟我学Shiro》
在一些场景中,比如某个领导因为一些原因不能进行登录网站进行一些操作,他想把他网站上的工作委托给他的秘书,但是他不想把帐号/密码告诉他秘书,只是想把工作委托给他;此时和我们可以使用Shiro的RunAs功能,即允许一个用户假装为另一个用户(如果他们允许)的身份进行访问。
本章代码基于《第十六章 综合实例》,请先了解相关数据模型及基本流程后再学习本章。
表及数据SQL
请运行shiro-example-chapter21/sql/ shiro-schema.sql 表结构
请运行shiro-example-chapter21/sql/ shiro-schema.sql 数据
实体
具体请参考com.github.zhangkaitao.shiro.chapter21包下的实体。
- public class UserRunAs implements Serializable {
- private Long fromUserId;//授予身份帐号
- private Long toUserId;//被授予身份帐号
- }
该实体定义了授予身份帐号(A)与被授予身份帐号(B)的关系,意思是B帐号将可以假装为A帐号的身份进行访问。
DAO
具体请参考com.github.zhangkaitao.shiro.chapter21.dao包下的DAO接口及实现。
Service
具体请参考com.github.zhangkaitao.shiro.chapter21.service包下的Service接口及实现。
- public interface UserRunAsService {
- public void grantRunAs(Long fromUserId, Long toUserId);
- public void revokeRunAs(Long fromUserId, Long toUserId);
- public boolean exists(Long fromUserId, Long toUserId);
- public List<Long> findFromUserIds(Long toUserId);
- public List<Long> findToUserIds(Long fromUserId);
- }
提供授予身份、回收身份、关系存在判断及查找API。
Web控制器RunAsController
该控制器完成:授予身份/回收身份/切换身份功能。
展示当前用户能切换到身份列表,及授予给其他人的身份列表:
- @RequestMapping
- public String runasList(@CurrentUser User loginUser, Model model) {
- model.addAttribute("fromUserIds",
- userRunAsService.findFromUserIds(loginUser.getId()));
- model.addAttribute("toUserIds", userRunAsService.findToUserIds(loginUser.getId()));
- List<User> allUsers = userService.findAll();
- allUsers.remove(loginUser);
- model.addAttribute("allUsers", allUsers);
- Subject subject = SecurityUtils.getSubject();
- model.addAttribute("isRunas", subject.isRunAs());
- if(subject.isRunAs()) {
- String previousUsername =
- (String)subject.getPreviousPrincipals().getPrimaryPrincipal();
- model.addAttribute("previousUsername", previousUsername);
- }
- return "runas";
- }
1、Subject.isRunAs():表示当前用户是否是RunAs用户,即已经切换身份了;
2、Subject.getPreviousPrincipals():得到切换身份之前的身份,一个用户可以切换很多次身份,之前的身份使用栈数据结构来存储;
授予身份
把当前用户身份授予给另一个用户,这样另一个用户可以切换身份到该用户。
- @RequestMapping("/grant/{toUserId}")
- public String grant(
- @CurrentUser User loginUser,
- @PathVariable("toUserId") Long toUserId,
- RedirectAttributes redirectAttributes) {
- if(loginUser.getId().equals(toUserId)) {
- redirectAttributes.addFlashAttribute("msg", "自己不能切换到自己的身份");
- return "redirect:/runas";
- }
- userRunAsService.grantRunAs(loginUser.getId(), toUserId);
- redirectAttributes.addFlashAttribute("msg", "操作成功");
- return "redirect:/runas";
- }
1、自己不能授予身份给自己;
2、调用UserRunAsService. grantRunAs把当前登录用户的身份授予给相应的用户;
回收身份
把授予给某个用户的身份回收回来。
- @RequestMapping("/revoke/{toUserId}")
- public String revoke(
- @CurrentUser User loginUser,
- @PathVariable("toUserId") Long toUserId,
- RedirectAttributes redirectAttributes) {
- userRunAsService.revokeRunAs(loginUser.getId(), toUserId);
- redirectAttributes.addFlashAttribute("msg", "操作成功");
- return "redirect:/runas";
- }
切换身份
- @RequestMapping("/switchTo/{switchToUserId}")
- public String switchTo(
- @CurrentUser User loginUser,
- @PathVariable("switchToUserId") Long switchToUserId,
- RedirectAttributes redirectAttributes) {
- Subject subject = SecurityUtils.getSubject();
- User switchToUser = userService.findOne(switchToUserId);
- if(loginUser.equals(switchToUser)) {
- redirectAttributes.addFlashAttribute("msg", "自己不能切换到自己的身份");
- return "redirect:/runas";
- }
- if(switchToUser == null || !userRunAsService.exists(switchToUserId, loginUser.getId())) {
- redirectAttributes.addFlashAttribute("msg", "对方没有授予您身份,不能切换");
- return "redirect:/runas";
- }
- subject.runAs(new SimplePrincipalCollection(switchToUser.getUsername(), ""));
- redirectAttributes.addFlashAttribute("msg", "操作成功");
- redirectAttributes.addFlashAttribute("needRefresh", "true");
- return "redirect:/runas";
- }
1、首先根据switchToUserId查找到要切换到的身份;
2、然后通过UserRunAsService. exists()判断当前登录用户是否可以切换到该身份;
3、通过Subject.runAs()切换到该身份;
切换到上一个身份
- @RequestMapping("/switchBack")
- public String switchBack(RedirectAttributes redirectAttributes) {
- Subject subject = SecurityUtils.getSubject();
- if(subject.isRunAs()) {
- subject.releaseRunAs();
- }
- redirectAttributes.addFlashAttribute("msg", "操作成功");
- redirectAttributes.addFlashAttribute("needRefresh", "true");
- return "redirect:/runas";
- }
1、通过Subject.releaseRunAs()切换会上一个身份;
此处注意的是我们可以切换多次身份,如A切换到B,然后再切换到C;那么需要调用两次Subject. releaseRunAs()才能切换会A;即内部使用栈数据结构存储着切换过的用户;Subject. getPreviousPrincipals()得到上一次切换到的身份,比如当前是C;那么调用该API将得到B的身份。
其他代码和配置和《第十六章 综合实例》一样,请参考该章。
测试
1、首先访问http://localhost:8080/chapter21/,输入admin/123456进行登录;会看到如下界面:

2、点击切换身份按钮,跳到如下界面:

在该界面可以授权身份给其他人(点击授权身份可以把自己的身份授权给其他人/点击回收身份可以把之前授予的身份撤回)、或切换到其他身份(即假装为其他身份运行);
3、点击切换到该身份按钮,切换到相应的身份运行,如:
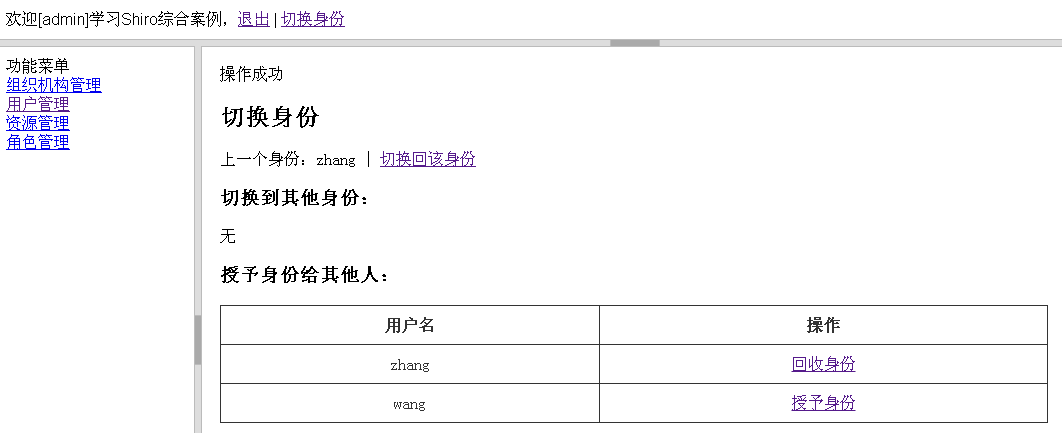
此时zhang用户切换到admin身份;如果点击切换回该身份,会把当前身份切换会zhang。
第二十二章 集成验证码——《跟我学Shiro》
在做用户登录功能时,很多时候都需要验证码支持,验证码的目的是为了防止机器人模拟真实用户登录而恶意访问,如暴力破解用户密码/恶意评论等。目前也有一些验证码比较简单,通过一些OCR工具就可以解析出来;另外还有一些验证码比较复杂(一般通过如扭曲、加线条/噪点等干扰)防止OCR工具识别;但是在中国就是人多,机器干不了的可以交给人来完成,所以在中国就有很多打码平台,人工识别验证码;因此即使比较复杂的如填字、算数等类型的验证码还是能识别的。所以验证码也不是绝对可靠的,目前比较可靠还是手机验证码,但是对于用户来说相对于验证码还是比较麻烦的。
对于验证码图片的生成,可以自己通过如Java提供的图像API自己去生成,也可以借助如JCaptcha这种开源Java类库生成验证码图片;JCaptcha提供了常见的如扭曲、加噪点等干扰支持。本章代码基于《第十六章 综合实例》。
一、添加JCaptcha依赖
- <dependency>
- <groupId>com.octo.captcha</groupId>
- <artifactId>jcaptcha</artifactId>
- <version>2.0-alpha-1</version>
- </dependency>
- <dependency>
- <groupId>com.octo.captcha</groupId>
- <artifactId>jcaptcha-integration-simple-servlet</artifactId>
- <version>2.0-alpha-1</version>
- <exclusions>
- <exclusion>
- <artifactId>servlet-api</artifactId>
- <groupId>javax.servlet</groupId>
- </exclusion>
- </exclusions>
- </dependency>
com.octo.captcha . jcaptcha 提供了jcaptcha 核心;而jcaptcha-integration-simple-servlet提供了与Servlet集成。
二、GMailEngine
来自https://code.google.com/p/musicvalley/source/browse/trunk/musicvalley/doc/springSecurity/springSecurityIII/src/main/java/com/spring/security/jcaptcha/GMailEngine.java?spec=svn447&r=447(目前无法访问了),仿照JCaptcha2.0编写类似GMail验证码的样式;具体请参考com.github.zhangkaitao.shiro.chapter22.jcaptcha.GMailEngine。
三、MyManageableImageCaptchaService
提供了判断仓库中是否有相应的验证码存在。
- public class MyManageableImageCaptchaService extends
- DefaultManageableImageCaptchaService {
- public MyManageableImageCaptchaService(
- com.octo.captcha.service.captchastore.CaptchaStore captchaStore,
- com.octo.captcha.engine.CaptchaEngine captchaEngine,
- int minGuarantedStorageDelayInSeconds,
- int maxCaptchaStoreSize,
- int captchaStoreLoadBeforeGarbageCollection) {
- super(captchaStore, captchaEngine, minGuarantedStorageDelayInSeconds,
- maxCaptchaStoreSize, captchaStoreLoadBeforeGarbageCollection);
- }
- public boolean hasCapcha(String id, String userCaptchaResponse) {
- return store.getCaptcha(id).validateResponse(userCaptchaResponse);
- }
- }
四、JCaptcha工具类
提供相应的API来验证当前请求输入的验证码是否正确。
- public class JCaptcha {
- public static final MyManageableImageCaptchaService captchaService
- = new MyManageableImageCaptchaService(new FastHashMapCaptchaStore(),
- new GMailEngine(), 180, 100000, 75000);
- public static boolean validateResponse(
- HttpServletRequest request, String userCaptchaResponse) {
- if (request.getSession(false) == null) return false;
- boolean validated = false;
- try {
- String id = request.getSession().getId();
- validated =
- captchaService.validateResponseForID(id, userCaptchaResponse)
- .booleanValue();
- } catch (CaptchaServiceException e) {
- e.printStackTrace();
- }
- return validated;
- }
- public static boolean hasCaptcha(
- HttpServletRequest request, String userCaptchaResponse) {
- if (request.getSession(false) == null) return false;
- boolean validated = false;
- try {
- String id = request.getSession().getId();
- validated = captchaService.hasCapcha(id, userCaptchaResponse);
- } catch (CaptchaServiceException e) {
- e.printStackTrace();
- }
- return validated;
- }
- }
validateResponse():验证当前请求输入的验证码否正确;并从CaptchaService中删除已经生成的验证码;
hasCaptcha():验证当前请求输入的验证码是否正确;但不从CaptchaService中删除已经生成的验证码(比如Ajax验证时可以使用,防止多次生成验证码);
五、JCaptchaFilter
用于生成验证码图片的过滤器。
- public class JCaptchaFilter extends OncePerRequestFilter {
- protected void doFilterInternal(HttpServletRequest request, HttpServletResponse response, FilterChain filterChain) throws ServletException, IOException {
- response.setDateHeader("Expires", 0L);
- response.setHeader("Cache-Control", "no-store, no-cache, must-revalidate");
- response.addHeader("Cache-Control", "post-check=0, pre-check=0");
- response.setHeader("Pragma", "no-cache");
- response.setContentType("image/jpeg");
- String id = request.getRequestedSessionId();
- BufferedImage bi = JCaptcha.captchaService.getImageChallengeForID(id);
- ServletOutputStream out = response.getOutputStream();
- ImageIO.write(bi, "jpg", out);
- try {
- out.flush();
- } finally {
- out.close();
- }
- }
- }
CaptchaService使用当前会话ID当作key获取相应的验证码图片;另外需要设置响应内容不进行浏览器端缓存。
- <!-- 验证码过滤器需要放到Shiro之后 因为Shiro将包装HttpSession 如果不,可能造成两次的sesison id 不一样 -->
- <filter>
- <filter-name>JCaptchaFilter</filter-name>
- <filter-class>
- com.github.zhangkaitao.shiro.chapter22.jcaptcha.JCaptchaFilter
- </filter-class>
- </filter>
- <filter-mapping>
- <filter-name>JCaptchaFilter</filter-name>
- <url-pattern>/jcaptcha.jpg</url-pattern>
- </filter-mapping>
这样就可以在页面使用/jcaptcha.jpg地址显示验证码图片。
六、JCaptchaValidateFilter
用于验证码验证的Shiro过滤器。
- public class JCaptchaValidateFilter extends AccessControlFilter {
- private boolean jcaptchaEbabled = true;//是否开启验证码支持
- private String jcaptchaParam = "jcaptchaCode";//前台提交的验证码参数名
- private String failureKeyAttribute = "shiroLoginFailure"; //验证失败后存储到的属性名
- public void setJcaptchaEbabled(boolean jcaptchaEbabled) {
- this.jcaptchaEbabled = jcaptchaEbabled;
- }
- public void setJcaptchaParam(String jcaptchaParam) {
- this.jcaptchaParam = jcaptchaParam;
- }
- public void setFailureKeyAttribute(String failureKeyAttribute) {
- this.failureKeyAttribute = failureKeyAttribute;
- }
- protected boolean isAccessAllowed(ServletRequest request, ServletResponse response, Object mappedValue) throws Exception {
- //1、设置验证码是否开启属性,页面可以根据该属性来决定是否显示验证码
- request.setAttribute("jcaptchaEbabled", jcaptchaEbabled);
- HttpServletRequest httpServletRequest = WebUtils.toHttp(request);
- //2、判断验证码是否禁用 或不是表单提交(允许访问)
- if (jcaptchaEbabled == false || !"post".equalsIgnoreCase(httpServletRequest.getMethod())) {
- return true;
- }
- //3、此时是表单提交,验证验证码是否正确
- return JCaptcha.validateResponse(httpServletRequest, httpServletRequest.getParameter(jcaptchaParam));
- }
- protected boolean onAccessDenied(ServletRequest request, ServletResponse response) throws Exception {
- //如果验证码失败了,存储失败key属性
- request.setAttribute(failureKeyAttribute, "jCaptcha.error");
- return true;
- }
- }
七、MyFormAuthenticationFilter
用于验证码验证的Shiro拦截器在用于身份认证的拦截器之前运行;但是如果验证码验证拦截器失败了,就不需要进行身份认证拦截器流程了;所以需要修改下如FormAuthenticationFilter身份认证拦截器,当验证码验证失败时不再走身份认证拦截器。
- public class MyFormAuthenticationFilter extends FormAuthenticationFilter {
- protected boolean onAccessDenied(ServletRequest request, ServletResponse response, Object mappedValue) throws Exception {
- if(request.getAttribute(getFailureKeyAttribute()) != null) {
- return true;
- }
- return super.onAccessDenied(request, response, mappedValue);
- }
- }
即如果之前已经错了,那直接跳过即可。
八、spring-config-shiro.xml
- <!-- 基于Form表单的身份验证过滤器 -->
- <bean id="authcFilter"
- class="com.github.zhangkaitao.shiro.chapter22.jcaptcha.MyFormAuthenticationFilter">
- <property name="usernameParam" value="username"/>
- <property name="passwordParam" value="password"/>
- <property name="rememberMeParam" value="rememberMe"/>
- <property name="failureKeyAttribute" value="shiroLoginFailure"/>
- </bean>
- <bean id="jCaptchaValidateFilter"
- class="com.github.zhangkaitao.shiro.chapter22.jcaptcha.JCaptchaValidateFilter">
- <property name="jcaptchaEbabled" value="true"/>
- <property name="jcaptchaParam" value="jcaptchaCode"/>
- <property name="failureKeyAttribute" value="shiroLoginFailure"/>
- </bean>
- <!-- Shiro的Web过滤器 -->
- <bean id="shiroFilter" class="org.apache.shiro.spring.web.ShiroFilterFactoryBean">
- <property name="securityManager" ref="securityManager"/>
- <property name="loginUrl" value="/login"/>
- <property name="filters">
- <util:map>
- <entry key="authc" value-ref="authcFilter"/>
- <entry key="sysUser" value-ref="sysUserFilter"/>
- <entry key="jCaptchaValidate" value-ref="jCaptchaValidateFilter"/>
- </util:map>
- </property>
- <property name="filterChainDefinitions">
- <value>
- /static/** = anon
- /jcaptcha* = anon
- /login = jCaptchaValidate,authc
- /logout = logout
- /authenticated = authc
- /** = user,sysUser
- </value>
- </property>
- </bean>
九、login.jsp登录页面
- <c:if test="${jcaptchaEbabled}">
- 验证码:
- <input type="text" name="jcaptchaCode">
- <img class="jcaptcha-btn jcaptcha-img"
- src="${pageContext.request.contextPath}/jcaptcha.jpg" title="点击更换验证码">
- <a class="jcaptcha-btn" href="javascript:;">换一张</a>
- <br/>
- </c:if>
根据jcaptchaEbabled来显示验证码图片。
十、测试
输入http://localhost:8080/chapter22将重定向到登录页面;输入正确的用户名/密码/验证码即可成功登录,如果输入错误的验证码,将显示验证码错误页面:

第二十三章 多项目集中权限管理及分布式会话——《跟我学Shiro》
在做一些企业内部项目时或一些互联网后台时;可能会涉及到集中权限管理,统一进行多项目的权限管理;另外也需要统一的会话管理,即实现单点身份认证和授权控制。
学习本章之前,请务必先学习《第十章 会话管理》和《第十六章 综合实例》,本章代码都是基于这两章的代码基础上完成的。
本章示例是同域名的场景下完成的,如果跨域请参考《第十五章 单点登录》和《第十七章 OAuth2集成》了解使用CAS或OAuth2实现跨域的身份验证和授权。另外比如客户端/服务器端的安全校验可参考《第二十章 无状态Web应用集成》。
部署架构
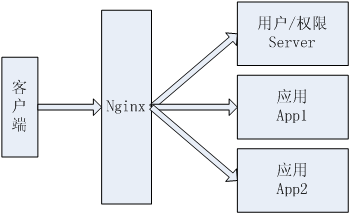
1、有三个应用:用于用户/权限控制的Server(端口:8080);两个应用App1(端口9080)和App2(端口10080);
2、使用Nginx反向代理这三个应用,nginx.conf的server配置部分如下:
- server {
- listen 80;
- server_name localhost;
- charset utf-8;
- location ~ ^/(chapter23-server)/ {
- proxy_pass http://127.0.0.1:8080;
- index /;
- proxy_set_header Host $host;
- }
- location ~ ^/(chapter23-app1)/ {
- proxy_pass http://127.0.0.1:9080;
- index /;
- proxy_set_header Host $host;
- }
- location ~ ^/(chapter23-app2)/ {
- proxy_pass http://127.0.0.1:10080;
- index /;
- proxy_set_header Host $host;
- }
- }
如访问http://localhost/chapter23-server会自动转发到http://localhost:8080/chapter23-server;
访问http://localhost/chapter23-app1会自动转发到http://localhost:9080/chapter23-app1;访问http://localhost/chapter23-app3会自动转发到http://localhost:10080/chapter23-app3;
Nginx的安装及使用请自行搜索学习,本文不再阐述。
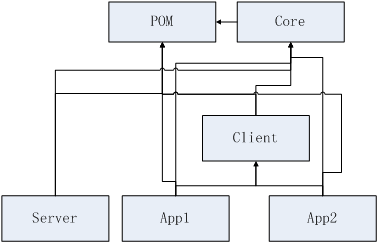
项目架构
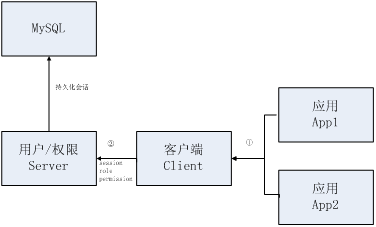
1、首先通过用户/权限Server维护用户、应用、权限信息;数据都持久化到MySQL数据库中;
2、应用App1/应用App2使用客户端Client远程调用用户/权限Server获取会话及权限信息。
此处使用Mysql存储会话,而不是使用如Memcached/Redis之类的,主要目的是降低学习成本;如果换成如Redis也不会很难;如:
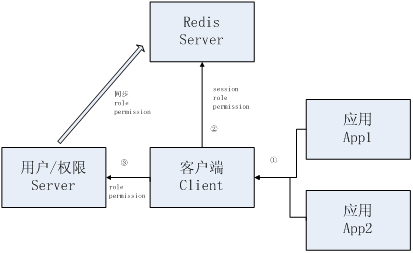
使用如Redis还一个好处就是无需在用户/权限Server中开会话过期调度器,可以借助Redis自身的过期策略来完成。
模块关系依赖
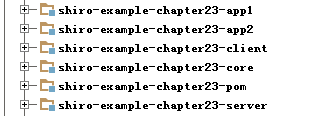
1、shiro-example-chapter23-pom模块:提供了其他所有模块的依赖;这样其他模块直接继承它即可,简化依赖配置,如shiro-example-chapter23-server:
- <parent>
- <artifactId>shiro-example-chapter23-pom</artifactId>
- <groupId>com.github.zhangkaitao</groupId>
- <version>1.0-SNAPSHOT</version>
- </parent>
2、shiro-example-chapter23-core模块:提供给shiro-example-chapter23-server、shiro-example-chapter23-client、shiro-example-chapter23-app*模块的核心依赖,比如远程调用接口等;
3、shiro-example-chapter23-server模块:提供了用户、应用、权限管理功能;
4、shiro-example-chapter23-client模块:提供给应用模块获取会话及应用对应的权限信息;
5、shiro-example-chapter23-app*模块:各个子应用,如一些内部管理系统应用;其登录都跳到shiro-example-chapter23-server登录;另外权限都从shiro-example-chapter23-server获取(如通过远程调用)。
shiro-example-chapter23-pom模块
其pom.xml的packaging类型为pom,并且在该pom中加入其他模块需要的依赖,然后其他模块只需要把该模块设置为parent即可自动继承这些依赖,如shiro-example-chapter23-server模块:
- <parent>
- <artifactId>shiro-example-chapter23-pom</artifactId>
- <groupId>com.github.zhangkaitao</groupId>
- <version>1.0-SNAPSHOT</version>
- </parent>
简化其他模块的依赖配置等。
shiro-example-chapter23-core模块
提供了其他模块共有的依赖,如远程调用接口:
- public interface RemoteServiceInterface {
- public Session getSession(String appKey, Serializable sessionId);
- Serializable createSession(Session session);
- public void updateSession(String appKey, Session session);
- public void deleteSession(String appKey, Session session);
- public PermissionContext getPermissions(String appKey, String username);
- }
提供了会话的CRUD,及根据应用key和用户名获取权限上下文(包括角色和权限字符串);shiro-example-chapter23-server模块服务端实现;shiro-example-chapter23-client模块客户端调用。
另外提供了com.github.zhangkaitao.shiro.chapter23.core.ClientSavedRequest,其扩展了org.apache.shiro.web.util.SavedRequest;用于shiro-example-chapter23-app*模块当访问一些需要登录的请求时,自动把请求保存下来,然后重定向到shiro-example-chapter23-server模块登录;登录成功后再重定向回来;因为SavedRequest不保存URL中的schema://domain:port部分;所以才需要扩展SavedRequest;使得ClientSavedRequest能保存schema://domain:port;这样才能从一个应用重定向另一个(要不然只能在一个应用内重定向):
- public String getRequestUrl() {
- String requestURI = getRequestURI();
- if(backUrl != null) {//1
- if(backUrl.toLowerCase().startsWith("http://") || backUrl.toLowerCase().startsWith("https://")) {
- return backUrl;
- } else if(!backUrl.startsWith(contextPath)) {//2
- requestURI = contextPath + backUrl;
- } else {//3
- requestURI = backUrl;
- }
- }
- StringBuilder requestUrl = new StringBuilder(scheme);//4
- requestUrl.append("://");
- requestUrl.append(domain);//5
- //6
- if("http".equalsIgnoreCase(scheme) && port != 80) {
- requestUrl.append(":").append(String.valueOf(port));
- } else if("https".equalsIgnoreCase(scheme) && port != 443) {
- requestUrl.append(":").append(String.valueOf(port));
- }
- //7
- requestUrl.append(requestURI);
- //8
- if (backUrl == null && getQueryString() != null) {
- requestUrl.append("?").append(getQueryString());
- }
- return requestUrl.toString();
- }
1、如果从外部传入了successUrl(登录成功之后重定向的地址),且以http://或https://开头那么直接返回(相应的拦截器直接重定向到它即可);
2、如果successUrl有值但没有上下文,拼上上下文;
3、否则,如果successUrl有值,直接赋值给requestUrl即可;否则,如果successUrl没值,那么requestUrl就是当前请求的地址;
5、拼上url前边的schema,如http或https;
6、拼上域名;
7、拼上重定向到的地址(带上下文);
8、如果successUrl没值,且有查询参数,拼上;
9返回该地址,相应的拦截器直接重定向到它即可。
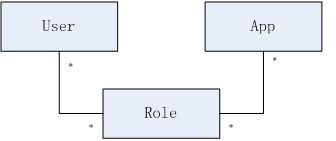
shiro-example-chapter23-server模块
简单的实体关系图
简单数据字典
用户(sys_user)
|
名称 |
类型 |
长度 |
描述 |
|
id |
bigint |
编号 主键 |
|
|
username |
varchar |
100 |
用户名 |
|
password |
varchar |
100 |
密码 |
|
salt |
varchar |
50 |
盐 |
|
locked |
bool |
账户是否锁定 |
应用(sys_app)
|
名称 |
类型 |
长度 |
描述 |
|
id |
bigint |
编号 主键 |
|
|
name |
varchar |
100 |
应用名称 |
|
app_key |
varchar |
100 |
应用key(唯一) |
|
app_secret |
varchar |
100 |
应用安全码 |
|
available |
bool |
是否锁定 |
授权(sys_authorization)
|
名称 |
类型 |
长度 |
描述 |
|
id |
bigint |
编号 主键 |
|
|
user_id |
bigint |
所属用户 |
|
|
app_id |
bigint |
所属应用 |
|
|
role_ids |
varchar |
100 |
角色列表 |
用户:比《第十六章 综合实例》少了role_ids,因为本章是多项目集中权限管理;所以授权时需要指定相应的应用;而不是直接给用户授权;所以不能在用户中出现role_ids了;
应用:所有集中权限的应用;在此处需要指定应用key(app_key)和应用安全码(app_secret),app在访问server时需要指定自己的app_key和用户名来获取该app对应用户权限信息;另外app_secret可以认为app的密码,比如需要安全访问时可以考虑使用它,可参考《第二十章 无状态Web应用集成》。另外available属性表示该应用当前是否开启;如果false表示该应用当前不可用,即不能获取到相应的权限信息。
授权:给指定的用户在指定的app下授权,即角色是与用户和app存在关联关系。
因为本章使用了《第十六章 综合实例》代码,所以还有其他相应的表结构(本章未使用到)。
表/数据SQL
具体请参考
sql/ shiro-schema.sql (表结构)
sql/ shiro-data.sql (初始数据)
实体
具体请参考com.github.zhangkaitao.shiro.chapter23.entity包下的实体,此处就不列举了。
DAO
具体请参考com.github.zhangkaitao.shiro.chapter23.dao包下的DAO接口及实现。
Service
具体请参考com.github.zhangkaitao.shiro.chapter23.service包下的Service接口及实现。以下是出了基本CRUD之外的关键接口:
- public interface AppService {
- public Long findAppIdByAppKey(String appKey);// 根据appKey查找AppId
- }
- public interface AuthorizationService {
- //根据AppKey和用户名查找其角色
- public Set<String> findRoles(String appKey, String username);
- //根据AppKey和用户名查找权限字符串
- public Set<String> findPermissions(String appKey, String username);
- }
根据AppKey和用户名查找用户在指定应用中对于的角色和权限字符串。
UserRealm
- protected AuthorizationInfo doGetAuthorizationInfo(PrincipalCollection principals) {
- String username = (String)principals.getPrimaryPrincipal();
- SimpleAuthorizationInfo authorizationInfo = new SimpleAuthorizationInfo();
- authorizationInfo.setRoles(
- authorizationService.findRoles(Constants.SERVER_APP_KEY, username));
- authorizationInfo.setStringPermissions(
- authorizationService.findPermissions(Constants.SERVER_APP_KEY, username));
- return authorizationInfo;
- }
此处需要调用AuthorizationService的findRoles/findPermissions方法传入AppKey和用户名来获取用户的角色和权限字符串集合。其他的和《第十六章 综合实例》代码一样。
ServerFormAuthenticationFilter
- public class ServerFormAuthenticationFilter extends FormAuthenticationFilter {
- protected void issueSuccessRedirect(ServletRequest request, ServletResponse response) throws Exception {
- String fallbackUrl = (String) getSubject(request, response)
- .getSession().getAttribute("authc.fallbackUrl");
- if(StringUtils.isEmpty(fallbackUrl)) {
- fallbackUrl = getSuccessUrl();
- }
- WebUtils.redirectToSavedRequest(request, response, fallbackUrl);
- }
- }
因为是多项目登录,比如如果是从其他应用中重定向过来的,首先检查Session中是否有“authc.fallbackUrl”属性,如果有就认为它是默认的重定向地址;否则使用Server自己的successUrl作为登录成功后重定向到的地址。
MySqlSessionDAO
将会话持久化到Mysql数据库;此处大家可以将其实现为如存储到Redis/Memcached等,实现策略请参考《第十章 会话管理》中的会话存储/持久化章节的MySessionDAO,完全一样。
MySqlSessionValidationScheduler
和《第十章 会话管理》中的会话验证章节部分中的MySessionValidationScheduler完全一样。如果使用如Redis之类的有自动过期策略的DB,完全可以不用实现SessionValidationScheduler,直接借助于这些DB的过期策略即可。
RemoteService
- public class RemoteService implements RemoteServiceInterface {
- @Autowired private AuthorizationService authorizationService;
- @Autowired private SessionDAO sessionDAO;
- public Session getSession(String appKey, Serializable sessionId) {
- return sessionDAO.readSession(sessionId);
- }
- public Serializable createSession(Session session) {
- return sessionDAO.create(session);
- }
- public void updateSession(String appKey, Session session) {
- sessionDAO.update(session);
- }
- public void deleteSession(String appKey, Session session) {
- sessionDAO.delete(session);
- }
- public PermissionContext getPermissions(String appKey, String username) {
- PermissionContext permissionContext = new PermissionContext();
- permissionContext.setRoles(authorizationService.findRoles(appKey, username));
- permissionContext.setPermissions(authorizationService.findPermissions(appKey, username));
- return permissionContext;
- }
- }
将会使用HTTP调用器暴露为远程服务,这样其他应用就可以使用相应的客户端调用这些接口进行Session的集中维护及根据AppKey和用户名获取角色/权限字符串集合。此处没有实现安全校验功能,如果是局域网内使用可以通过限定IP完成;否则需要使用如《第二十章 无状态Web应用集成》中的技术完成安全校验。
然后在spring-mvc-remote-service.xml配置文件把服务暴露出去:
- <bean id="remoteService"
- class="com.github.zhangkaitao.shiro.chapter23.remote.RemoteService"/>
- <bean name="/remoteService"
- class="org.springframework.remoting.httpinvoker.HttpInvokerServiceExporter">
- <property name="service" ref="remoteService"/>
- <property name="serviceInterface"
- value="com.github.zhangkaitao.shiro.chapter23.remote.RemoteServiceInterface"/>
- </bean>
Shiro配置文件spring-config-shiro.xml
和《第十六章 综合实例》配置类似,但是需要在shiroFilter中的filterChainDefinitions中添加如下配置,即远程调用不需要身份认证:
- /remoteService = anon
对于userRealm的缓存配置直接禁用;因为如果开启,修改了用户权限不会自动同步到缓存;另外请参考《第十一章 缓存机制》进行缓存的正确配置。
服务器端数据维护
1、首先开启ngnix反向代理;然后就可以直接访问http://localhost/chapter23-server/;
2、输入默认的用户名密码:admin/123456登录
3、应用管理,进行应用的CRUD,主要维护应用KEY(必须唯一)及应用安全码;客户端就可以使用应用KEY获取用户对应应用的权限了。
4、授权管理,维护在哪个应用中用户的角色列表。这样客户端就可以根据应用KEY及用户名获取到对应的角色/权限字符串列表了。
shiro-example-chapter23-client模块
Client模块提供给其他应用模块依赖,这样其他应用模块只需要依赖Client模块,然后再在相应的配置文件中配置如登录地址、远程接口地址、拦截器链等等即可,简化其他应用模块的配置。
配置远程服务spring-client-remote-service.xml
- <bean id="remoteService"
- class="org.springframework.remoting.httpinvoker.HttpInvokerProxyFactoryBean">
- <property name="serviceUrl" value="${client.remote.service.url}"/>
- <property name="serviceInterface"
- value="com.github.zhangkaitao.shiro.chapter23.remote.RemoteServiceInterface"/>
- </bean>
client.remote.service.url是远程服务暴露的地址;通过相应的properties配置文件配置,后续介绍。然后就可以通过remoteService获取会话及角色/权限字符串集合了。
ClientRealm
- public class ClientRealm extends AuthorizingRealm {
- private RemoteServiceInterface remoteService;
- private String appKey;
- public void setRemoteService(RemoteServiceInterface remoteService) {
- this.remoteService = remoteService;
- }
- public void setAppKey(String appKey) {
- this.appKey = appKey;
- }
- protected AuthorizationInfo doGetAuthorizationInfo(PrincipalCollection principals) {
- String username = (String) principals.getPrimaryPrincipal();
- SimpleAuthorizationInfo authorizationInfo = new SimpleAuthorizationInfo();
- PermissionContext context = remoteService.getPermissions(appKey, username);
- authorizationInfo.setRoles(context.getRoles());
- authorizationInfo.setStringPermissions(context.getPermissions());
- return authorizationInfo;
- }
- protected AuthenticationInfo doGetAuthenticationInfo(AuthenticationToken token) throws AuthenticationException {
- //永远不会被调用
- throw new UnsupportedOperationException("永远不会被调用");
- }
- }
ClientRealm提供身份认证信息和授权信息,此处因为是其他应用依赖客户端,而这些应用不会实现身份认证,所以doGetAuthenticationInfo获取身份认证信息直接无须实现。另外获取授权信息,是通过远程暴露的服务RemoteServiceInterface获取,提供appKey和用户名获取即可。
ClientSessionDAO
- public class ClientSessionDAO extends CachingSessionDAO {
- private RemoteServiceInterface remoteService;
- private String appKey;
- public void setRemoteService(RemoteServiceInterface remoteService) {
- this.remoteService = remoteService;
- }
- public void setAppKey(String appKey) {
- this.appKey = appKey;
- }
- protected void doDelete(Session session) {
- remoteService.deleteSession(appKey, session);
- }
- protected void doUpdate(Session session) {
- remoteService.updateSession(appKey, session);
- }
- protected Serializable doCreate(Session session) {
- Serializable sessionId = remoteService.createSession(session);
- assignSessionId(session, sessionId);
- return sessionId;
- }
- protected Session doReadSession(Serializable sessionId) {
- return remoteService.getSession(appKey, sessionId);
- }
- }
Session的维护通过远程暴露接口实现,即本地不维护会话。
ClientAuthenticationFilter
- public class ClientAuthenticationFilter extends AuthenticationFilter {
- protected boolean isAccessAllowed(ServletRequest request, ServletResponse response, Object mappedValue) {
- Subject subject = getSubject(request, response);
- return subject.isAuthenticated();
- }
- protected boolean onAccessDenied(ServletRequest request, ServletResponse response) throws Exception {
- String backUrl = request.getParameter("backUrl");
- saveRequest(request, backUrl, getDefaultBackUrl(WebUtils.toHttp(request)));
- return false;
- }
- protected void saveRequest(ServletRequest request, String backUrl, String fallbackUrl) {
- Subject subject = SecurityUtils.getSubject();
- Session session = subject.getSession();
- HttpServletRequest httpRequest = WebUtils.toHttp(request);
- session.setAttribute("authc.fallbackUrl", fallbackUrl);
- SavedRequest savedRequest = new ClientSavedRequest(httpRequest, backUrl);
- session.setAttribute(WebUtils.SAVED_REQUEST_KEY, savedRequest);
- }
- private String getDefaultBackUrl(HttpServletRequest request) {
- String scheme = request.getScheme();
- String domain = request.getServerName();
- int port = request.getServerPort();
- String contextPath = request.getContextPath();
- StringBuilder backUrl = new StringBuilder(scheme);
- backUrl.append("://");
- backUrl.append(domain);
- if("http".equalsIgnoreCase(scheme) && port != 80) {
- backUrl.append(":").append(String.valueOf(port));
- } else if("https".equalsIgnoreCase(scheme) && port != 443) {
- backUrl.append(":").append(String.valueOf(port));
- }
- backUrl.append(contextPath);
- backUrl.append(getSuccessUrl());
- return backUrl.toString();
- }
- }
ClientAuthenticationFilter是用于实现身份认证的拦截器(authc),当用户没有身份认证时;
1、首先得到请求参数backUrl,即登录成功重定向到的地址;
2、然后保存保存请求到会话,并重定向到登录地址(server模块);
3、登录成功后,返回地址按照如下顺序获取:backUrl、保存的当前请求地址、defaultBackUrl(即设置的successUrl);
ClientShiroFilterFactoryBean
- public class ClientShiroFilterFactoryBean extends ShiroFilterFactoryBean implements ApplicationContextAware {
- private ApplicationContext applicationContext;
- public void setApplicationContext(ApplicationContext applicationContext) {
- this.applicationContext = applicationContext;
- }
- public void setFiltersStr(String filters) {
- if(StringUtils.isEmpty(filters)) {
- return;
- }
- String[] filterArray = filters.split(";");
- for(String filter : filterArray) {
- String[] o = filter.split("=");
- getFilters().put(o[0], (Filter)applicationContext.getBean(o[1]));
- }
- }
- public void setFilterChainDefinitionsStr(String filterChainDefinitions) {
- if(StringUtils.isEmpty(filterChainDefinitions)) {
- return;
- }
- String[] chainDefinitionsArray = filterChainDefinitions.split(";");
- for(String filter : chainDefinitionsArray) {
- String[] o = filter.split("=");
- getFilterChainDefinitionMap().put(o[0], o[1]);
- }
- }
- }
1、setFiltersStr:设置拦截器,设置格式如“filterName=filterBeanName; filterName=filterBeanName”;多个之间分号分隔;然后通过applicationContext获取filterBeanName对应的Bean注册到拦截器Map中;
2、setFilterChainDefinitionsStr:设置拦截器链,设置格式如“url=filterName1[config],filterName2; url=filterName1[config],filterName2”;多个之间分号分隔;
Shiro客户端配置spring-client.xml
提供了各应用通用的Shiro客户端配置;这样应用只需要导入相应该配置即可完成Shiro的配置,简化了整个配置过程。
- <context:property-placeholder location=
- "classpath:client/shiro-client-default.properties,classpath:client/shiro-client.properties"/>
提供给客户端配置的properties属性文件,client/shiro-client-default.properties是客户端提供的默认的配置;classpath:client/shiro-client.properties是用于覆盖客户端默认配置,各应用应该提供该配置文件,然后提供各应用个性配置。
- <bean id="remoteRealm" class="com.github.zhangkaitao.shiro.chapter23.client.ClientRealm">
- <property name="cachingEnabled" value="false"/>
- <property name="appKey" value="${client.app.key}"/>
- <property name="remoteService" ref="remoteService"/>
- </bean>
appKey:使用${client.app.key}占位符替换,即需要在之前的properties文件中配置。
- <bean id="sessionIdCookie" class="org.apache.shiro.web.servlet.SimpleCookie">
- <constructor-arg value="${client.session.id}"/>
- <property name="httpOnly" value="true"/>
- <property name="maxAge" value="-1"/>
- <property name="domain" value="${client.cookie.domain}"/>
- <property name="path" value="${client.cookie.path}"/>
- </bean>
Session Id Cookie,cookie名字、域名、路径等都是通过配置文件配置。
- <bean id="sessionDAO"
- class="com.github.zhangkaitao.shiro.chapter23.client.ClientSessionDAO">
- <property name="sessionIdGenerator" ref="sessionIdGenerator"/>
- <property name="appKey" value="${client.app.key}"/>
- <property name="remoteService" ref="remoteService"/>
- </bean>
SessionDAO的appKey,也是通过${ client.app.key }占位符替换,需要在配置文件配置。
- <bean id="sessionManager"
- class="org.apache.shiro.web.session.mgt.DefaultWebSessionManager">
- <property name="sessionValidationSchedulerEnabled" value="false"/>//省略其他
- </bean>
其他应用无须进行会话过期调度,所以sessionValidationSchedulerEnabled=false。
- <bean id="clientAuthenticationFilter"
- class="com.github.zhangkaitao.shiro.chapter23.client.ClientAuthenticationFilter"/>
应用的身份认证使用ClientAuthenticationFilter,即如果没有身份认证,则会重定向到Server模块完成身份认证,身份认证成功后再重定向回来。
- <bean id="shiroFilter"
- class="com.github.zhangkaitao.shiro.chapter23.client.ClientShiroFilterFactoryBean">
- <property name="securityManager" ref="securityManager"/>
- <property name="loginUrl" value="${client.login.url}"/>
- <property name="successUrl" value="${client.success.url}"/>
- <property name="unauthorizedUrl" value="${client.unauthorized.url}"/>
- <property name="filters">
- <util:map>
- <entry key="authc" value-ref="clientAuthenticationFilter"/>
- </util:map>
- </property>
- <property name="filtersStr" value="${client.filters}"/>
- <property name="filterChainDefinitionsStr" value="${client.filter.chain.definitions}"/>
- </bean>
ShiroFilter使用我们自定义的ClientShiroFilterFactoryBean,然后loginUrl(登录地址)、successUrl(登录成功后默认的重定向地址)、unauthorizedUrl(未授权重定向到的地址)通过占位符替换方式配置;另外filtersStr和filterChainDefinitionsStr也是使用占位符替换方式配置;这样就可以在各应用进行自定义了。
默认配置client/ shiro-client-default.properties
- #各应用的appKey
- client.app.key=
- #远程服务URL地址
- client.remote.service.url=http://localhost/chapter23-server/remoteService
- #登录地址
- client.login.url=http://localhost/chapter23-server/login
- #登录成功后,默认重定向到的地址
- client.success.url=/
- #未授权重定向到的地址
- client.unauthorized.url=http://localhost/chapter23-server/unauthorized
- #session id 域名
- client.cookie.domain=
- #session id 路径
- client.cookie.path=/
- #cookie中的session id名称
- client.session.id=sid
- #cookie中的remember me名称
- client.rememberMe.id=rememberMe
- #过滤器 name=filter-ref;name=filter-ref
- client.filters=
- #过滤器链 格式 url=filters;url=filters
- client.filter.chain.definitions=/**=anon
在各应用中主要配置client.app.key、client.filters、client.filter.chain.definitions。
shiro-example-chapter23-app*模块
继承shiro-example-chapter23-pom模块
- <parent>
- <artifactId>shiro-example-chapter23-pom</artifactId>
- <groupId>com.github.zhangkaitao</groupId>
- <version>1.0-SNAPSHOT</version>
- </parent>
依赖shiro-example-chapter23-client模块
<dependency>

    <groupId>com.github.zhangkaitao</groupId>

    <artifactId>shiro-example-chapter23-client</artifactId>

    <version>1.0-SNAPSHOT</version>

</dependency>
客户端配置client/shiro-client.properties
配置shiro-example-chapter23-app1
- client.app.key=645ba612-370a-43a8-a8e0-993e7a590cf0
- client.success.url=/hello
- client.filter.chain.definitions=/hello=anon;/login=authc;/**=authc
client.app.key是server模块维护的,直接拷贝过来即可;client.filter.chain.definitions定义了拦截器链;比如访问/hello,匿名即可。
配置shiro-example-chapter23-app2
- client.app.key=645ba613-370a-43a8-a8e0-993e7a590cf0
- client.success.url=/hello
- client.filter.chain.definitions=/hello=anon;/login=authc;/**=authc
和app1类似,client.app.key是server模块维护的,直接拷贝过来即可;client.filter.chain.definitions定义了拦截器链;比如访问/hello,匿名即可。
web.xml
- <context-param>
- <param-name>contextConfigLocation</param-name>
- <param-value>
- classpath:client/spring-client.xml
- </param-value>
- </context-param>
- <listener>
- <listener-class>
- org.springframework.web.context.ContextLoaderListener
- </listener-class>
- </listener>
指定加载客户端Shiro配置,client/spring-client.xml。
- <filter>
- <filter-name>shiroFilter</filter-name>
- <filter-class>org.springframework.web.filter.DelegatingFilterProxy</filter-class>
- <init-param>
- <param-name>targetFilterLifecycle</param-name>
- <param-value>true</param-value>
- </init-param>
- </filter>
- <filter-mapping>
- <filter-name>shiroFilter</filter-name>
- <url-pattern>/*</url-pattern>
- </filter-mapping>
配置ShiroFilter拦截器。
控制器
shiro-example-chapter23-app1
- @Controller
- public class HelloController {
- @RequestMapping("/hello")
- public String hello() {
- return "success";
- }
- @RequestMapping(value = "/attr", method = RequestMethod.POST)
- public String setAttr(
- @RequestParam("key") String key, @RequestParam("value") String value) {
- SecurityUtils.getSubject().getSession().setAttribute(key, value);
- return "success";
- }
- @RequestMapping(value = "/attr", method = RequestMethod.GET)
- public String getAttr(
- @RequestParam("key") String key, Model model) {
- model.addAttribute("value",
- SecurityUtils.getSubject().getSession().getAttribute(key));
- return "success";
- }
- @RequestMapping("/role1")
- @RequiresRoles("role1")
- public String role1() {
- return "success";
- }
- }
shiro-example-chapter23-app2的控制器类似,role2方法使用@RequiresRoles("role2")注解,即需要角色2。
其他配置请参考源码。
测试
1、安装配置启动nginx
1、首先到http://nginx.org/en/download.html下载,比如我下载的是windows版本的;
2、然后编辑conf/nginx.conf配置文件,在server部分添加如下部分:
- location ~ ^/(chapter23-server)/ {
- proxy_pass http://127.0.0.1:8080;
- index /;
- proxy_set_header Host $host;
- }
- location ~ ^/(chapter23-app1)/ {
- proxy_pass http://127.0.0.1:9080;
- index /;
- proxy_set_header Host $host;
- }
- location ~ ^/(chapter23-app2)/ {
- proxy_pass http://127.0.0.1:10080;
- index /;
- proxy_set_header Host $host;
- }
3、最后双击nginx.exe启动Nginx即可。
已经配置好的nginx请到shiro-example-chapter23-nginx模块下下周nginx-1.5.11.rar即可。
2、安装依赖
1、首先安装shiro-example-chapter23-core依赖,到shiro-example-chapter23-core模块下运行mvn install安装core模块。
2、接着到shiro-example-chapter23-client模块下运行mvn install安装客户端模块。
3、启动Server模块
到shiro-example-chapter23-server模块下运行mvn jetty:run启动该模块;使用http://localhost:8080/chapter23-server/即可访问,因为启动了nginx,那么可以直接访问http://localhost/chapter23-server/。
4、启动App*模块
到shiro-example-chapter23-app1和shiro-example-chapter23-app2模块下分别运行mvn jetty:run启动该模块;使用http://localhost:9080/chapter23-app1/和http://localhost:10080/chapter23-app2/即可访问,因为启动了nginx,那么可以直接访问http://localhost/chapter23-app1/和http://localhost/chapter23-app2/。
5、服务器端维护
1、访问http://localhost/chapter23-server/;
2、输入默认的用户名密码:admin/123456登录
3、应用管理,进行应用的CRUD,主要维护应用KEY(必须唯一)及应用安全码;客户端就可以使用应用KEY获取用户对应应用的权限了。
4、授权管理,维护在哪个应用中用户的角色列表。这样客户端就可以根据应用KEY及用户名获取到对应的角色/权限字符串列表了。
6、App*模块身份认证及授权
1、在未登录情况下访问http://localhost/chapter23-app1/hello,看到下图:
2、登录地址是http://localhost/chapter23-app1/login?backUrl=/chapter23-app1,即登录成功后重定向回http://localhost/chapter23-app1(这是个错误地址,为了测试登录成功后重定向地址),点击登录按钮后重定向到Server模块的登录界面:
3、登录成功后,会重定向到相应的登录成功地址;接着访问http://localhost/chapter23-app1/hello,看到如下图:
4、可以看到admin登录,及其是否拥有role1/role2角色;可以在server模块移除role1角色或添加role2角色看看页面变化;
5、可以在http://localhost/chapter23-app1/hello页面设置属性,如key=123;接着访问http://localhost/chapter23-app2/attr?key=key就可以看到刚才设置的属性,如下图:
另外在app2,用户默认拥有role2角色,而没有role1角色。
到此整个测试就完成了,可以看出本示例实现了:会话的分布式及权限的集中管理。
本示例缺点
1、没有加缓存;
2、客户端每次获取会话/权限都需要通过客户端访问服务端;造成服务端单点和请求压力大;单点可以考虑使用集群来解决;请求压力大需要考虑配合缓存服务器(如Redis)来解决;即每次会话/权限获取时首先查询缓存中是否存在,如果有直接获取即可;否则再查服务端;降低请求压力;
3、会话的每次更新(比如设置属性/更新最后访问时间戳)都需要同步到服务端;也造成了请求压力过大;可以考虑在请求的最后只同步一次会话(需要对Shiro会话进行改造,通过如拦截器在执行完请求后完成同步,这样每次请求只同步一次);
4、只能同域名才能使用,即会话ID是从同一个域名下获取,如果跨域请考虑使用CAS/OAuth2之实现。
所以实际应用时可能还是需要改造的,但大体思路是差不多的。
第二十四章 在线会话管理——《跟我学Shiro》
有时候需要显示当前在线人数、当前在线用户,有时候可能需要强制某个用户下线等;此时就需要获取相应的在线用户并进行一些操作。
本章基于《第十六章 综合实例》代码构建。
会话控制器
- @RequiresPermissions("session:*")
- @Controller
- @RequestMapping("/sessions")
- public class SessionController {
- @Autowired
- private SessionDAO sessionDAO;
- @RequestMapping()
- public String list(Model model) {
- Collection<Session> sessions = sessionDAO.getActiveSessions();
- model.addAttribute("sessions", sessions);
- model.addAttribute("sesessionCount", sessions.size());
- return "sessions/list";
- }
- @RequestMapping("/{sessionId}/forceLogout")
- public String forceLogout(@PathVariable("sessionId") String sessionId,
- RedirectAttributes redirectAttributes) {
- try {
- Session session = sessionDAO.readSession(sessionId);
- if(session != null) {
- session.setAttribute(
- Constants.SESSION_FORCE_LOGOUT_KEY, Boolean.TRUE);
- }
- } catch (Exception e) {/*ignore*/}
- redirectAttributes.addFlashAttribute("msg", "强制退出成功!");
- return "redirect:/sessions";
- }
- }
1、list方法:提供了展示所有在线会话列表,通过sessionDAO.getActiveSessions()获取所有在线的会话。
2、forceLogout方法:强制退出某一个会话,此处只在指定会话中设置Constants.SESSION_FORCE_LOGOUT_KEY属性,之后通过ForceLogoutFilter判断并进行强制退出。
此处展示会话列表的缺点是:sessionDAO.getActiveSessions()提供了获取所有活跃会话集合,如果做一般企业级应用问题不大,因为在线用户不多;但是如果应用的在线用户非常多,此种方法就不适合了,解决方案就是分页获取:
- Page<Session> getActiveSessions(int pageNumber, int pageSize);
Page对象除了包含pageNumber、pageSize属性之外,还包含totalSessions(总会话数)、Collection<Session> (当前页的会话)。
分页获取时,如果是MySQL这种关系数据库存储会话比较好办,如果使用Redis这种数据库可以考虑这样存储:
- session.id=会话序列化数据
- session.ids=会话id Set列表(接着可以使用LLEN获取长度,LRANGE分页获取)
会话创建时(如sessionId=123),那么redis命令如下所示:
- SET session.123 "Session序列化数据"
- LPUSH session.ids 123
会话删除时(如sessionId=123),那么redis命令如下所示:
- DEL session.123
- LREM session.ids 123
获取总活跃会话:
- LLEN session.ids
分页获取活跃会话:
- LRANGE key 0 10 #获取到会话ID
- MGET session.1 session.2…… #根据第一条命令获取的会话ID获取会话数据
ForceLogoutFilter
- public class ForceLogoutFilter extends AccessControlFilter {
- protected boolean isAccessAllowed(ServletRequest request, ServletResponse response, Object mappedValue) throws Exception {
- Session session = getSubject(request, response).getSession(false);
- if(session == null) {
- return true;
- }
- return session.getAttribute(Constants.SESSION_FORCE_LOGOUT_KEY) == null;
- }
- protected boolean onAccessDenied(ServletRequest request, ServletResponse response) throws Exception {
- try {
- getSubject(request, response).logout();//强制退出
- } catch (Exception e) {/*ignore exception*/}
- String loginUrl = getLoginUrl() + (getLoginUrl().contains("?") ? "&" : "?") + "forceLogout=1";
- WebUtils.issueRedirect(request, response, loginUrl);
- return false;
- }
- }
强制退出拦截器,如果用户会话中存在Constants.SESSION_FORCE_LOGOUT_KEY属性,表示被管理员强制退出了;然后调用Subject.logout()退出,且重定向到登录页面(自动拼上fourceLogout请求参数)。
登录控制器
在LoginController类的showLoginForm方法中最后添加如下代码:
- if(req.getParameter("forceLogout") != null) {
- model.addAttribute("error", "您已经被管理员强制退出,请重新登录");
- }
即如果有请求参数forceLogout表示是管理员强制退出的,在界面上显示相应的信息。
Shiro配置spring-config-shiro.xml
和之前的唯一区别是在shiroFilter中的filterChainDefinitions拦截器链定义中添加了forceLogout拦截器:
- /** = forceLogout,user,sysUser
测试
1、首先输入http://localhost:8080/chapter24/跳转到登录页面输入admin/123456登录;
2、登录成功后,点击菜单的“会话管理”,可以看到当前在线会话列表:
3、点击“强制退出”按钮,会话相应的用户再点击界面的话会看到如下界面,表示已经被强制退出了: 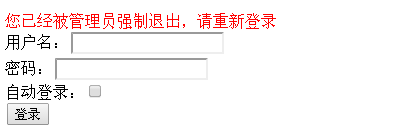
学Shiro完结版-5的更多相关文章
- 跟我学Shiro目录贴
转发地址:https://www.iteye.com/blog/jinnianshilongnian-2018398 扫一扫,关注我的公众号 购买地址 历经三个月左右时间,<跟我学Shiro&g ...
- 【知识整理】这可能是最好的RxJava 2.x 教程(完结版)
为什么要学 RxJava? 提升开发效率,降低维护成本一直是开发团队永恒不变的宗旨.近两年来国内的技术圈子中越来越多的开始提及 RxJava ,越来越多的应用和面试中都会有 RxJava ,而就目前的 ...
- 第十七章 OAuth2集成——《跟我学Shiro》
目录贴:跟我学Shiro目录贴 目前很多开放平台如新浪微博开放平台都在使用提供开放API接口供开发者使用,随之带来了第三方应用要到开放平台进行授权的问题,OAuth就是干这个的,OAuth2是OAut ...
- 第一章 Shiro简介——《跟我学Shiro》(转)
目录贴:跟我学Shiro目录贴 1.1 简介 Apache Shiro是Java的一个安全框架.目前,使用Apache Shiro的人越来越多,因为它相当简单,对比Spring Security,可 ...
- 跟开涛老师学shiro -- 编码/加密
在涉及到密码存储问题上,应该加密/生成密码摘要存储,而不是存储明文密码.比如之前的600w csdn账号泄露对用户可能造成很大损失,因此应加密/生成不可逆的摘要方式存储. 5.1 编码/解码 Shir ...
- 跟开涛老师学shiro -- INI配置
之前章节我们已经接触过一些INI配置规则了,如果大家使用过如spring之类的IoC/DI容器的话,Shiro提供的INI配置也是非常类似的,即可以理解为是一个IoC/DI容器,但是区别在于它从一个根 ...
- 跟开涛老师学shiro -- 授权
授权,也叫访问控制,即在应用中控制谁能访问哪些资源(如访问页面/编辑数据/页面操作等).在授权中需了解的几个关键对象:主体(Subject).资源(Resource).权限(Permission).角 ...
- 跟开涛老师学shiro -- 身份验证
身份验证,即在应用中谁能证明他就是他本人.一般提供如他们的身份ID一些标识信息来表明他就是他本人,如提供身份证,用户名/密码来证明. 在shiro中,用户需要提供principals (身份)和cre ...
- 跟开涛老师学shiro -- shiro简介
1.1 简介 Apache Shiro是Java的一个安全框架.目前,使用Apache Shiro的人越来越多,因为它相当简单,对比Spring Security,可能没有Spring Securi ...
- 【转】Android 开发规范(完结版)
摘要 1 前言 2 AS 规范 3 命名规范 4 代码样式规范 5 资源文件规范 6 版本统一规范 7 第三方库规范 8 注释规范 9 测试规范 10 其他的一些规范 1 前言 为了有利于项目维护.增 ...
随机推荐
- DearPyGui环境配置
DearPyGui 是一个基于Python的图形用户界面(GUI)工具包,它以简单易用而著称.这个库利用GPU加速渲染和高效的C/C++底层代码,确保了出色的性能和稳定性.DearPyGui支持异步函 ...
- 3-2 C++ string类型
目录 3.2.1 定义和初始化 3.2.2 对string的操作 (一)重要操作一览 (二)读写操作 cin/cout getline : 可读取整行 (三)获取大小 .size() (四)比较.赋值 ...
- 安卓微信小程序开发之“蓝牙”
一.写在前面 在微信当中是支持两种蓝牙模式,分别是"经典蓝牙--BT"和"低功耗蓝牙--BLE".通常在和外围单片机设备进行连接的时候用的是低功耗蓝牙这个模式, ...
- 小米R3G刷了padavan后时间不同步和定时关闭外网(wan)端口
怎么刷openwrt或者padavan请见我2022年3月份的帖子 https://www.cnblogs.com/jar/p/15954037.html 最近遇到个新环境,遂拿出来用用 有1个问题和 ...
- 2023NOIP A层联测32 T3 sakuya
2023NOIP A层联测32 T3 sakuya 虚伪的期望,彬彬赛时都能 A 的数学题. 思路 考虑算出来总的花费,再除以 \(m!\) 求期望. 对于某个排列的花费为:\(\sum\limits ...
- Windows 杜比OEM授权
我们中高端的windows笔记本上都可以看到Dolby音效,TV电视上也有支持Dolby显示选项. 杜比主要有几类:Dolby全景声(也叫Atmos).Dolby视界(Vision).杜比影院(Dol ...
- flask 中的request【转载】
每个框架中都有处理请求的机制(request),但是每个框架的处理方式和机制是不同的,为了了解flask的request中都有什么东西,首先我们要写一个前后端的交互 基于HTML+Flask 写一段前 ...
- golang之操作kafka
安装第三方包: go get github.com/IBM/sarama 生产者实例: package main import ( "fmt" "github.com/I ...
- 再也不用写请求HttpHelper了,HttpClient帮助你
前言 在C#7.1之后,net推出HttpClient类代替WebRequest, HttpWebRequest, ServicePoint, and WebClient ,先来看下他们在以前的作用 ...
- 协议Fuzz技术
文章一开始发表在微信公众号 https://mp.weixin.qq.com/s?__biz=MzUyNzc4Mzk3MQ==&mid=2247486230&idx=1&sn= ...