
微信小程序(15)--上传图片公用组件(2)
接下来开始写写上传图片的公用组件,可以自定义上传几张图片。
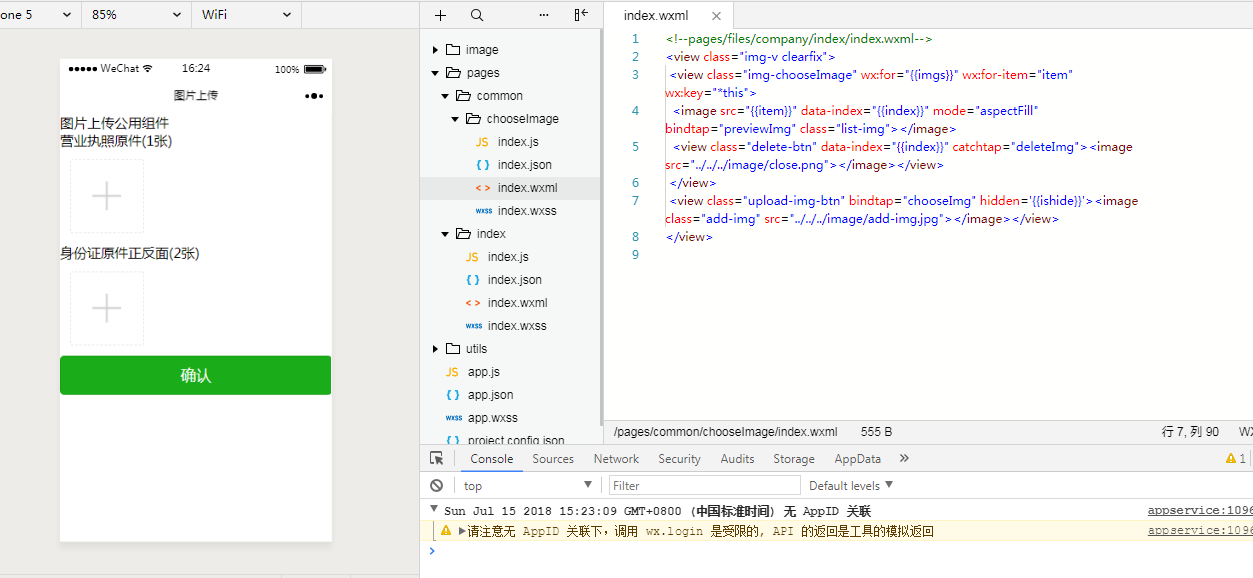
chooseImage文件夹里面的index.wxml和index.js,涉及图片上传,删除,预览。
<view class="img-v clearfix">

 <view class="img-chooseImage" wx:for="{{imgs}}" wx:for-item="item" wx:key="*this">

  <image src="{{item}}" data-index="{{index}}" mode="aspectFill" bindtap="previewImg" class="list-img"></image>

  <view class="delete-btn" data-index="{{index}}" catchtap="deleteImg"><image  src="../../../image/close.png"></image></view>

 </view>

 <view class="upload-img-btn" bindtap="chooseImg" hidden='{{ishide}}'><image class="add-img" src="../../../image/add-img.jpg"></image></view>

</view>
Component({

  options: {

    multipleSlots: true // 在组件定义时的选项中启用多slot支持

  },

  properties: {

    count: String   //父子传参

  },

  /**

   * 页面的初始数据

   */

  data: {

    imgs: [],

    count:,

    ishide:false

  },

  // 上传图片

  methods: {

    chooseImg: function (e) {

      var that = this;

      var imgs = this.data.imgs;

      if (imgs.length >= ) {

        this.setData({

          lenMore:

        });

        setTimeout(function () {

          that.setData({

            lenMore:

          });

        }, );

        return false;

      }

      wx.chooseImage({

        sizeType: ['original', 'compressed'], // 可以指定是原图还是压缩图,默认二者都有

        sourceType: ['album', 'camera'], // 可以指定来源是相册还是相机,默认二者都有

        success: function (res) {

          // 返回选定照片的本地文件路径列表,tempFilePath可以作为img标签的src属性显示图片

          var tempFilePaths = res.tempFilePaths;

          var imgs = that.data.imgs;

          // console.log(tempFilePaths + '----');

          console.log(that.data.count);

          for (var i = ; i < tempFilePaths.length; i++) {

            if (imgs.length > that.data.count-) {

              that.setData({

                imgs: imgs

              });

              return false;

            } else {

              imgs.push(tempFilePaths[i]);

              if (imgs.length > that.data.count-){

                that.setData({

                  ishide: true

                });

              }

            }

          }

          // console.log(imgs);

          that.setData({

            imgs: imgs

          });

          that.triggerEvent("chooseImg");//触发回调

        }

      });

    },

    // 删除图片

    deleteImg: function  (e) {

      var imgs = this.data.imgs;

      var index = e.currentTarget.dataset.index;

      imgs.splice(index, );

      this.setData({

        imgs: imgs

      });

      if (imgs.length < this.data.count) {

        // console.log(imgs.length);

        this.setData({

          ishide: false

        });

      }

      this.triggerEvent("deleteImg");//触发回调

    },

    // 预览图片

    previewImg: function  (e) {

      //获取当前图片的下标

      var index = e.currentTarget.dataset.index;

      //所有图片

      var imgs = this.data.imgs;

      wx.previewImage({

        //当前显示图片

        current: imgs[index],

        //所有图片

        urls: imgs

      })

    }

  }

})
index文件夹的index.json和index.wxml和index.js
{

  "navigationBarTitleText": "图片上传",

  "usingComponents": {

    "pop": "../common/chooseImage/index",

    "popnum": "../common/chooseImage/index"

  }

}
 <view class="perfect-title">图片上传公用组件</view>

  <view class="pop-box">

    <view class="upload-title">营业执照原件(1张)</view>

      <view style="margin:30rpx;">

        <pop id="pop" bind:chooseImg="chooseImg" bind:deleteImg="deleteImg" bind:previewImg="previewImg" count="{{count}}"></pop>

      </view>

  </view>

  <view class="pop-box">

    <view class="upload-title">身份证原件正反面(2张)</view>

      <view style="margin:30rpx;">

        <popnum id="popnum" bind:chooseImg="chooseImgnum" bind:deleteImg="deleteImgnum" bind:previewImg="previewImg" count="{{countnum}}"></popnum>

      </view>

  </view>

  <view class="btn-area" id="buttonContainer2">

    <button type="primary" bindtap="submitBtn">确认</button>

  </view>
Page({

  /**

   * 页面的初始数据

   */

  data: {

   imgs:[],

   imgsnum: [],

   count:,

   countnum:

  },

  /**

   * 生命周期函数--监听页面加载

   */

  onLoad: function (options) {

    //获得pop组件

    this.pop = this.selectComponent("#pop");

    this.popnum = this.selectComponent("#popnum");

  },

  chooseImg: function (e) {

    // console.log(this.pop.data.imgs);

    this.setData({

      imgs: this.pop.data.imgs

    })

  },

  deleteImg: function (e) {

    // console.log(this.pop.data.imgs);

    this.setData({

      imgs: this.pop.data.imgs

    })

  },

  chooseImgnum: function (e) {

    // console.log(this.pop.data.imgs);

    this.setData({

      imgsnum: this.popnum.data.imgs

    })

  },

  deleteImgnum: function (e) {

    // console.log(this.pop.data.imgs);

    this.setData({

      imgsnum: this.popnum.data.imgs

    })

  },

  submitBtn: function(){

    console.log(this.data.imgs);

    console.log(this.data.imgsnum);

  },

  /**

   * 生命周期函数--监听页面初次渲染完成

   */

  onReady: function () {

  }

})
微信小程序(15)--上传图片公用组件(2)的更多相关文章
- 微信小程序批量上传图片 All In One
微信小程序批量上传图片 All In One open-data https://developers.weixin.qq.com/miniprogram/dev/component/open-dat ...
- [小程序开发] 微信小程序audio音频播放组件+api_wx.createAudioContext
引言: audio是微信小程序中的音频组件,可以轻松实现小程序中播放/停止音频等自定义动作. 附上微信小程序audio组件的相关属性说明:https://mp.weixin.qq.com/debug/ ...
- 微信小程序页面调用自定义组件内的事件
微信小程序页面调用自定义组件内的事件 page page.json { "usingComponents": { "my-component": ". ...
- 微信小程序(二十)-UI组件(Vant Weapp)-01按装配置
1.官网 https://vant-contrib.gitee.io/vant-weapp/#/intro https://gitee.com/vant-contrib/vant-weapp 2.按装 ...
- 关于微信小程序 modal弹框组件的介绍
微信小程序 modal: 这里对微信小程序中 modal组件进行详细解析,我想开发微信小程序的小伙伴可以用到,这里小编就记录下modal的知识要点. modal modal类似于javascript中 ...
- 微信小程序开发—快速掌握组件及API的方法
微信小程序框架为开发者提供了一系列的组件和API接口. 组件主要完成小程序的视图部分,例如文字.图片显示.API主要完成逻辑功能,例如网络请求.数据存储.音视频播放控制,以及微信开放的微信登录.微信支 ...
- 微信小程序开发—快速掌握组件及API的方法---转载
微信小程序框架为开发者提供了一系列的组件和API接口. 组件主要完成小程序的视图部分,例如文字.图片显示.API主要完成逻辑功能,例如网络请求.数据存储.音视频播放控制,以及微信开放的微信登录.微信支 ...
- (干货)微信小程序之上传图片和图片预览
这几天一直负责做微信小程序这一块,也可以说是边做边学习吧,把自己做的微信小程序的一些功能分享出来,与大家探讨一下,相互学习相互进步. 先看下效果图 只写了一下效果样式的话希望大家不要太在意,下面马路杀 ...
- 微信小程序开发05-日历组件的实现
接上文:微信小程序开发04-打造自己的UI库 github地址:https://github.com/yexiaochai/wxdemo 我们这里继续实现我们的日历组件,这个日历组件稍微有点特殊,算是 ...
- 微信小程序/网站 上传图片到腾讯云COS
COS简介: 腾讯云提供的一种对象存储服务,供开发者存储海量文件的分布式存储服务.可以将自己开发的应用的存储部分全部接入COS的存储桶中,有效减少应用服务器的带宽,请求等.个人也可以通过腾讯云账号免费 ...
随机推荐
- python数据库操作-mysql数据库
一:连接 1:本地连接 mysql -u用户名 -p密码 2:连接远程服务器 mysql -u用户名 -p密码 -hip地址 -P端口号 线下修改远程服务端上部署的mysql服务器 二:创建数 ...
- javaSE之运行时异常和编译时异常
运行时异常继承自RuntimeException; package foundationEnhance; public class Person { private int age; public P ...
- php prev()函数 语法
php prev()函数 语法 作用:将内部指针指向数组中的上一个元素,并输出.直线电机选型 语法:prev(array) 参数: 参数 描述 array 必需.指定需要操作的数组. 说明:如果数组包 ...
- selenium设定请求头
如果只是需要设定User-Agent可以用如下所示方式 dcap = dict(DesiredCapabilities.PHANTOMJS)dcap["phantomjs.page.sett ...
- noi.ac #712 练级
分析 把船当作点 练级当作边 发现一个连通块大于n-1的边的条数的奇偶性影响这个连通块的答案 于是并查集维护即可 代码 #include<bits/stdc++.h> using name ...
- 移动端调试 — Pure|微信环境调试方案|App环境调试方案
Pure 详细参见: 中文文档:http://leeluolee.github.io/2014/10/24/use-puer-helpus-developer-frontend/ 源码:https:/ ...
- Linux运维知识之linux shell date 用当天时间做备份文件名
本文主要向大家介绍了Linux运维知识之linux shell date 用当天时间做备份文件名,通过具体的内容向大家展现,希望对大家学习Linux运维知识有所帮助. #!/bin/bash #dat ...
- linux使用pigz多线程压缩
因为tar zip是单线程的压缩,压缩起来很慢,这个使用使用pigz工具辅助就会使用多线程了. 安装 sudo apt install pigz 压缩 tar cvf - test.txt | pig ...
- Borland C++ Builder 编译绿色Exe程序
按照“打开Project/Option 翻到Packages页,去掉Build with runtime packages前面的勾. http://www.jinyuanbao.cn翻到Linker页 ...
- linux flock()
表头文件 #include<sys/file.h> 定义函数 int flock(int fd,int operation); 函数说明 flock()会依参数operation所指 ...