hci0 command 0xfc20 tx timeout(Realtek 8761B Chipset, Bluetooth 5.0)
当前使用的Linux内核版本: 4.4.189
插上USB Bluetooth 5.0 Adapter后,dmesg显示如下log:
[  240.348480] usb 3-1.2: new full-speed USB device number 6 using ehci-platform

[  240.437834] usb 3-1.2: New USB device found, idVendor=0bda, idProduct=8771

[  240.438541] usb 3-1.2: New USB device strings: Mfr=1, Product=2, SerialNumber=3

[  240.439311] usb 3-1.2: Product: Bluetooth Radio

[  240.439730] usb 3-1.2: Manufacturer: Realtek

[  240.440124] usb 3-1.2: SerialNumber: 00E04C239987

[  240.447374] Bluetooth: hci0: rtl: examining hci_ver=0a hci_rev=000b lmp_ver=0a lmp_subver=8761

[  240.448393] Bluetooth: hci0: rtl: loading rtl_bt/rtl8761a_fw.bin

[  240.451607] Bluetooth: hci0: rom_version status=0 version=1

[  242.616194] Bluetooth: hci0 command 0xfc20 tx timeout

[  250.612377] Bluetooth: hci0: download fw command failed (-110)
由于蓝牙适配器的芯片组较新,为Realtek RTL8761B,4.4版本的内核并不支持这个型号的蓝牙适配器,所以驱动报错。
解决办法:
1. 把较高内核版本的驱动移植到4.4.189上来:
这里我们选择 kernel4.17.19 版本的驱动,可以从这个仓库获取驱动源码: https://git.kernel.org/pub/scm/linux/kernel/git/torvalds/linux.git
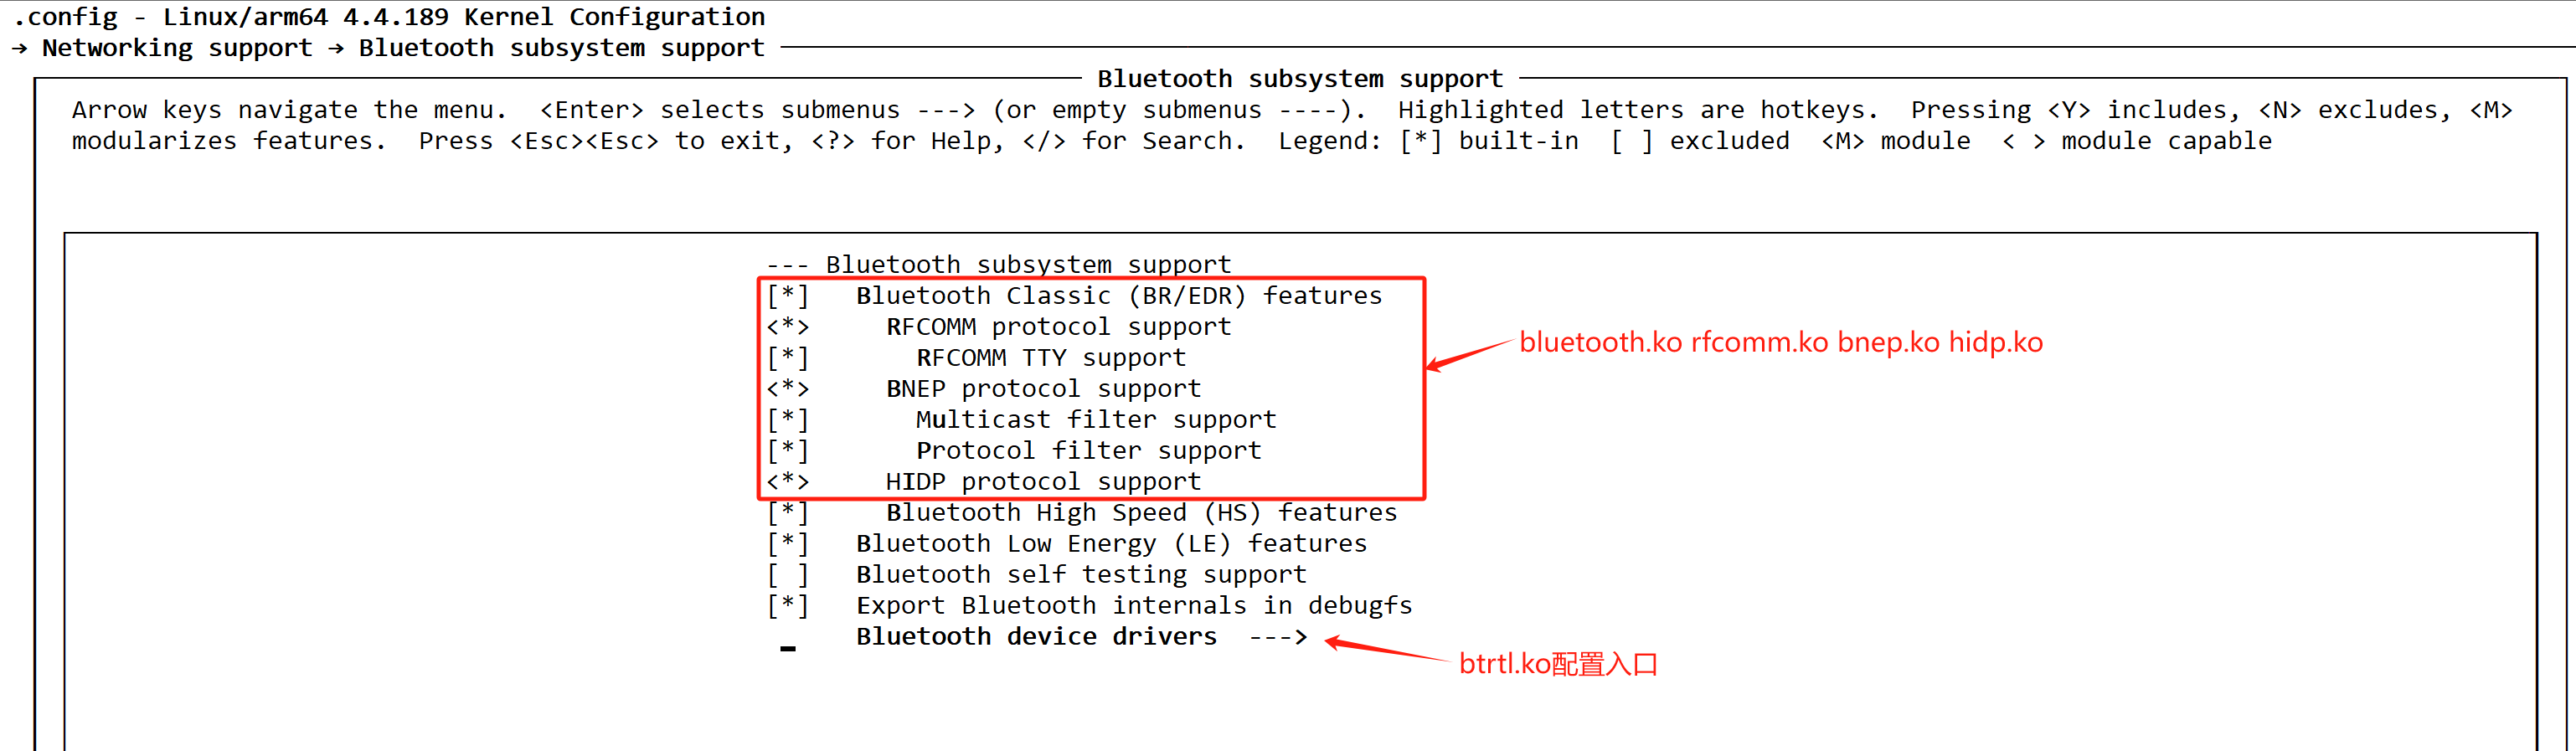
Realtek USB bluetooth适配器的驱动文件为:
- drivers/bluetooth/btrtl.h
- drivers/bluetooth/btrtl.c
用上述btrtl.c和btrtl.h替换掉 kernel4.4.189 版本里对应的文件。
注意:这里也可以移植更高内核版本的驱动,比如 kernel5.4 版本的驱动。但是有个缺点,选择的驱动版本的跨度越大需要修改的地方就越多。
2. 修改4.17.19内核版本Realtek bluetooth驱动源码:
修改 drivers/bluetooth/btrtl.c 和 drivers/bluetooth/btrtl.h
这里我做了一个修改后的patch:support_RTL8761B_chipset_from_kernel4.4_to_kernel4.17.patch, patch内容如下:
diff --git a/kernel/drivers/bluetooth/btrtl.c b/kernel/drivers/bluetooth/btrtl.c

index 437f080..bd00d25 100644

--- a/kernel/drivers/bluetooth/btrtl.c

+++ b/kernel/drivers/bluetooth/btrtl.c

@@ -32,7 +32,7 @@

 #define RTL_ROM_LMP_8723A      0x1200

 #define RTL_ROM_LMP_8723B      0x8723

 #define RTL_ROM_LMP_8821A      0x8821

-#define RTL_ROM_LMP_8761A      0x8761

+#define RTL_ROM_LMP_8761B      0x8761

 #define RTL_ROM_LMP_8822B      0x8822

 #define IC_MATCH_FL_LMPSUBV    (1 << 0)

@@ -76,11 +76,11 @@ static const struct id_table ic_id_table[] = {

          .fw_name  = "rtl_bt/rtl8821c_fw.bin",

          .cfg_name = "rtl_bt/rtl8821c_config.bin" },

-       /* 8761A */

-       { IC_MATCH_FL_LMPSUBV, RTL_ROM_LMP_8761A, 0x0,

+       /* 8761B */

+       { IC_MATCH_FL_LMPSUBV, RTL_ROM_LMP_8761B, 0x0,

          .config_needed = false,

-         .fw_name  = "rtl_bt/rtl8761a_fw.bin",

-         .cfg_name = "rtl_bt/rtl8761a_config.bin" },

+         .fw_name  = "rtl_bt/rtl8761b_fw.bin",

+         .cfg_name = "rtl_bt/rtl8761b_config.bin" },

        /* 8822B */

        { IC_INFO(RTL_ROM_LMP_8822B, 0xb),

@@ -140,10 +140,10 @@ static int rtlbt_parse_firmware(struct hci_dev *hdev, u16 lmp_subver,

                { RTL_ROM_LMP_8723A, 0 },

                { RTL_ROM_LMP_8723B, 1 },

                { RTL_ROM_LMP_8821A, 2 },

-               { RTL_ROM_LMP_8761A, 3 },

                { RTL_ROM_LMP_8822B, 8 },

                { RTL_ROM_LMP_8723B, 9 },       /* 8723D */

                { RTL_ROM_LMP_8821A, 10 },      /* 8821C */

+               { RTL_ROM_LMP_8761B, 14 },  /* 8761BU */

        };

        ret = rtl_read_rom_version(hdev, &rom_version);

@@ -514,7 +514,7 @@ int btrtl_setup_realtek(struct hci_dev *hdev)

                return btrtl_setup_rtl8723a(hdev);

        case RTL_ROM_LMP_8723B:

        case RTL_ROM_LMP_8821A:

-       case RTL_ROM_LMP_8761A:

+       case RTL_ROM_LMP_8761B:

        case RTL_ROM_LMP_8822B:

                return btrtl_setup_rtl8723b(hdev, hci_rev, lmp_subver);

        default:
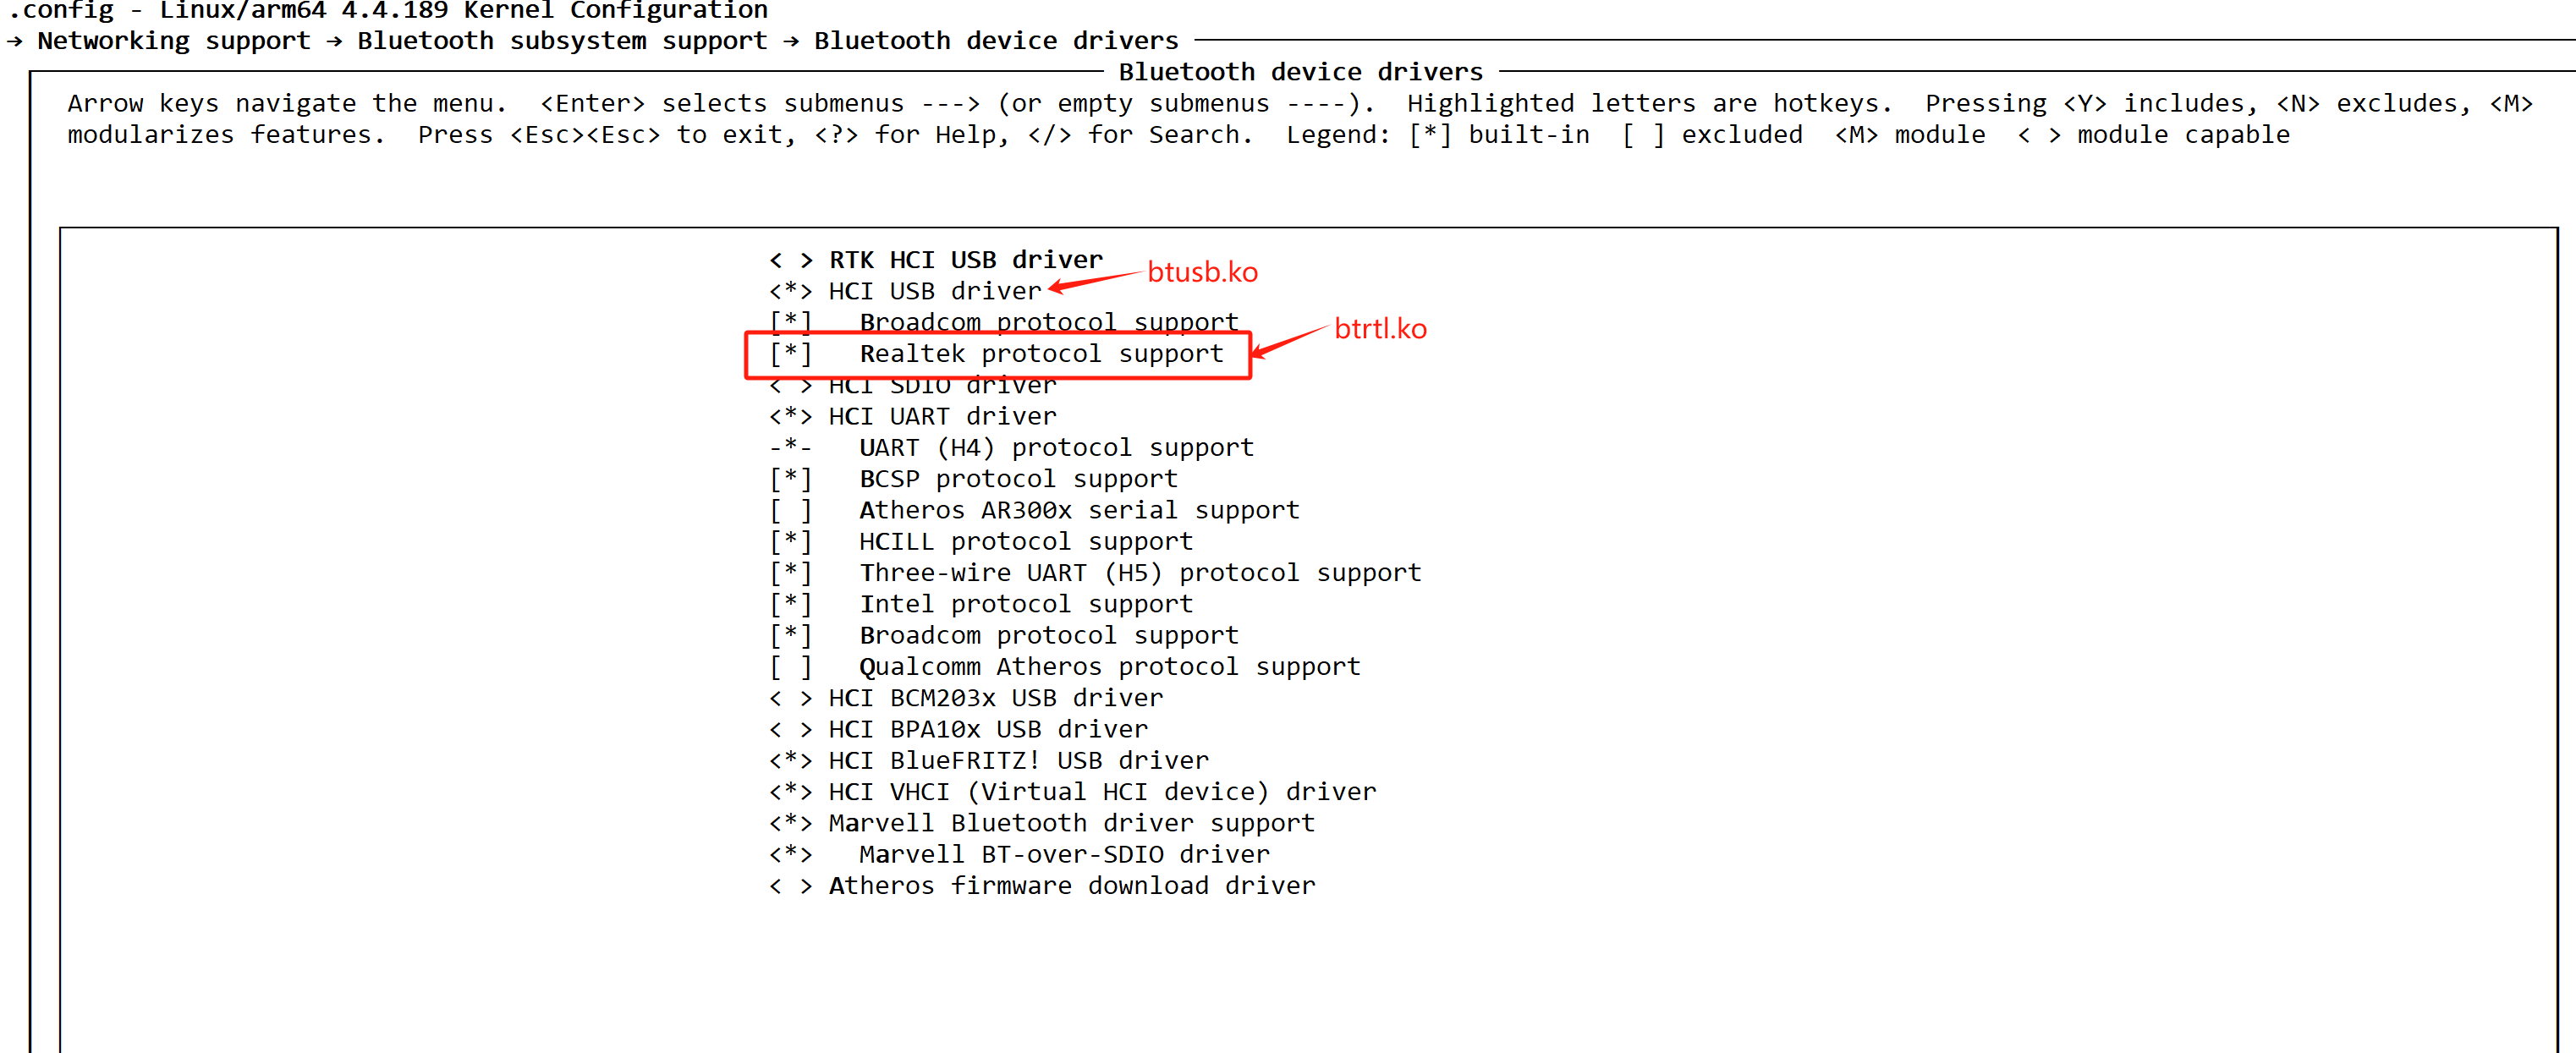
内核编译选项:
重新编译内核和更新内核,内核重新启动后,插入RTL8761B chipset蓝牙适配器,dmesg打印log如下:
[   13.340498] usb 4-1.2: new full-speed USB device number 4 using ehci-platform

[   13.428053] usb 4-1.2: New USB device found, idVendor=0bda, idProduct=8771

[   13.428738] usb 4-1.2: New USB device strings: Mfr=1, Product=2, SerialNumber=3

[   13.429457] usb 4-1.2: Product: Bluetooth Radio

[   13.429875] usb 4-1.2: Manufacturer: Realtek

[   13.430296] usb 4-1.2: SerialNumber: 00E04C239987

[   13.437530] Bluetooth: hci1: rtl: examining hci_ver=0a hci_rev=000b lmp_ver=0a lmp_subver=8761

[   13.438361] Bluetooth: hci1: rtl: loading rtl_bt/rtl8761b_config.bin

[   13.441437] Bluetooth: hci1: rtl: loading rtl_bt/rtl8761b_fw.bin

[   13.443434] Bluetooth: hci1: rom_version status=0 version=1

[   13.444009] Bluetooth: hci1: cfg_sz 14, total size 11678
上述使用的固件版本rtl8761b_config.bin和rtl8761b_fw.bin可以用此仓库获得: git://git.kernel.org/pub/scm/linux/kernel/git/firmware/linux-firmware.git ,或者从ubuntu20.04(kernel版本>= 5.4)的/lib/firmware/rtl_bt/目录下拷贝来直接用。
如果bluetoothd程序已经启动了的话,执行 hciconfig 结果如下:
# hciconfig

hci0:   Type: Primary  Bus: USB

        BD Address: E8:EA:6A:8C:20:ED  ACL MTU: 1021:6  SCO MTU: 255:12

        UP RUNNING

        RX bytes:12651 acl:0 sco:0 events:414 errors:0

        TX bytes:14146 acl:0 sco:0 commands:101 errors:0
执行 bluetoothctl scan on 进行扫描,结果如下:
# bluetoothctl scan on

Discovery started

[CHG] Controller E8:EA:6A:8C:20:ED Discovering: yes

[NEW] Device 52:FB:49:66:89:C0 52-FB-49-66-89-C0

[NEW] Device 4D:A3:E2:E0:D1:8A 4D-A3-E2-E0-D1-8A

[NEW] Device 5C:73:91:E3:7C:23 5C-73-91-E3-7C-23

[NEW] Device 7A:AC:FF:A1:12:49 7A-AC-FF-A1-12-49

[NEW] Device 52:EE:DB:DF:78:F1 52-EE-DB-DF-78-F1

[NEW] Device 67:6A:97:56:84:F2 67-6A-97-56-84-F2

[NEW] Device 42:B8:EB:55:82:D8 42-B8-EB-55-82-D8

[NEW] Device C8:28:32:8F:C9:96 C8-28-32-8F-C9-96

[NEW] Device 50:B3:3E:9A:94:2E 50-B3-3E-9A-94-2E

[NEW] Device 63:E1:C1:03:78:FB 63-E1-C1-03-78-FB

[NEW] Device 63:B5:8F:19:01:3E 63-B5-8F-19-01-3E

[NEW] Device 63:7E:AA:D0:47:1E 63-7E-AA-D0-47-1E

[NEW] Device 46:3C:37:25:5E:EE 46-3C-37-25-5E-EE

[NEW] Device 44:28:A3:BE:B3:A1 MI RC

[NEW] Device 47:C0:B7:D4:A8:9F 47-C0-B7-D4-A8-9F

[NEW] Device 70:28:24:F1:24:7B 70-28-24-F1-24-7B

[NEW] Device 63:F8:74:A3:4A:39 63-F8-74-A3-4A-39

[NEW] Device 5B:6E:56:B5:4F:F1 5B-6E-56-B5-4F-F1

[NEW] Device 47:B7:9C:97:E0:30 47-B7-9C-97-E0-30

[NEW] Device 4D:94:FC:E5:F8:29 4D-94-FC-E5-F8-29

[NEW] Device 68:94:22:61:95:9D 68-94-22-61-95-9D

[NEW] Device 78:35:4A:C5:99:2A 78-35-4A-C5-99-2A
从上面的扫描结果来看,蓝牙适配器已经能正常工作了。
至此,从kernel4.4到kernel.4.17版本的内核,都可以使用上述修改过的驱动来支持RTL8761B芯片组的蓝牙适配器。
hci0 command 0xfc20 tx timeout(Realtek 8761B Chipset, Bluetooth 5.0)的更多相关文章
- org.openqa.selenium.WebDriverException: f.QueryInterface is not a function Command duration or timeout:
今天偶遇一个问题,运行项目时,发现这个问题: org.openqa.selenium.WebDriverException: f.QueryInterface is not a functionCom ...
- error: command 'C:\\Program Files (x86)\\Microsoft Visual Studio 14.0\\VC\\BIN\\x86_amd64\\cl.exe' failed with exit status 2
安装mysql是出现这个错误. python3.和python2.两个的版本不一样,所以安装的东西也不一样:MySQLdb 安装mysql的连接包.工具安装 Python3.x版本:Pip insta ...
- RealTek WiFi 模块 RTL8710AF RTL8711AF RTL8711AM RTL8195AM
瑞昱 8710 是一个完整且自成体系的 WiFi 网络解决方案, 能够独立运行,也可以作为从机搭载于其他主机 MCU 运行. 瑞昱 8710 在搭载应用并作为设备中唯⼀的应⽤处理器时,能够直接从外接闪 ...
- driver.startActivity 启动app出现 An unknown server-side error occurred while processing the command
driver.startActivity("com.xxx.module.xxx", "com.xxx.module.xxx.hibox.ui.entry.EntryAc ...
- 0406-服务注册与发现-客户端feign-使用、配置、日志、timeout
官方地址:https://cloud.spring.io/spring-cloud-static/Edgware.SR3/single/spring-cloud.html#spring-cloud-f ...
- arcmap Command
The information in this document is useful if you are trying to programmatically find a built-in com ...
- 大熊君说说JS与设计模式之------命令模式Command
一,总体概要 1,笔者浅谈 日常生活中,我们在看电视的时候,通过遥控器选择我们喜欢的频道时,此时我们就是客户端的角色,遥控器的按钮相当于客户请求,而具体执行的对象就是命令对象, 命令模式把一个请求或者 ...
- TCPDUMP Command Examples
tcpdump command is also called as packet analyzer. tcpdump command will work on most flavors of unix ...
- How to install IIS 7.5 on Windows 7 using the Command Line
原文 How to install IIS 7.5 on Windows 7 using the Command Line On Windows Vista, to install IIS 7.0 f ...
- mysql source 报错 Unknown command '\'' 解决办法
系统:Windows2008 R2 source 导入数据总是报错. ERROR:Unknown command '\''.ERROR:Unknown command '\"'.ERROR ...
随机推荐
- 你真正了解Spring的工作原理吗
Spring 1.1 什么是Spring IOC 和DI ? ① 控制反转(IOC):Spring容器使用了工厂模式为我们创建了所需要的对象,我们使用时不需要自己去创建,直接调用Spring ...
- 2021-10-08 Core的LaunchSettings文件说明
{ "iisSettings": { //是否以IIS Express启动 "windowsAuthentication": false, //是否启用wind ...
- Django: ERRORS: ?: (staticfiles.E001) The STATICFILES_DIRS setting is not a tuple or list. HINT: Perhaps you forgot a trailing comma?
必须是数组或者列表类型 如下所示: # 错误# STATICFILES_DIRS = { # os.path.join(BASE_DIR, 'static'), # }# 正确 STATICFILES ...
- CentOS7系统初始化个人配置
以下内容为个人最小化安装后的配置步骤 更换yum源为阿里云 yum install -y epel-release lrzsz wget yum-axelget mv /etc/yum.repos.d ...
- 利用pytorch自定义CNN网络(二):数据集的准备
本文是利用pytorch自定义CNN网络系列的第二篇,主要介绍构建网络前数据集的准备,关于本系列的全文见这里. 笔者的运行设备与软件:CPU (AMD Ryzen 5 4600U) + pytorch ...
- 【Unity3D】激光雷达特效
1 由深度纹理重构世界坐标 屏幕深度和法线纹理简介中对深度和法线纹理的来源.使用及推导过程进行了讲解,本文将介绍使用深度纹理重构世界坐标的方法,并使用重构后的世界坐标模拟激光雷达特效. 本文完 ...
- Linux虚拟机报错Job for network.service failed because the control process exited with error codeLinux虚拟机报错的解决方法
发布于 2 天前 3 次阅读 Linux虚拟机设置静态ip后,突然发现联网连不上了,ssh也无法使用,重启network后仍旧无法使用.按照网络上的方法发现没有效果后,右键如下位置将nat模式转换为 ...
- 问题排查:nginx的反向代理感觉失效了一样
背景 最近,负责基础设施的同事,要对一批测试环境机器进行回收,回收就涉及到应用迁移,问题是整个过程一团乱.比如服务器A上一堆应用要调用服务器B上一堆服务,结果服务器B被回收了,然后服务器A上一堆应用报 ...
- redis分布式锁,setnx+lua脚本的java实现
1 前言 在现在工作中,为保障服务的高可用,应对单点故障.负载量过大等单机部署带来的问题,生产环境常用多机部署.为解决多机房部署导致的数据不一致问题,我们常会选择用分布式锁. 目前其他比较常见的实现方 ...
- 《小白WEB安全入门》02. 开发篇
@ 目录 初识HTML潜在漏洞 初识CSS潜在漏洞 初识JS潜在漏洞 初识后端潜在漏洞 后端能做什么 后端种类 后端框架 潜在漏洞 本系列文章只叙述一些超级基础理论知识,极少有实践部分 本文涉及到的语 ...