
SpringBoot 启动流程分析(寻找扩展点)
1、SpringBoot maven 依赖版本
<?xml version="1.0" encoding="UTF-8"?>

<project xmlns="http://maven.apache.org/POM/4.0.0"

         xmlns:xsi="http://www.w3.org/2001/XMLSchema-instance"

         xsi:schemaLocation="http://maven.apache.org/POM/4.0.0 http://maven.apache.org/xsd/maven-4.0.0.xsd">

    <modelVersion>4.0.0</modelVersion>

    <groupId>org.example</groupId>

    <artifactId>SpringBootStudy</artifactId>

    <version>1.0-SNAPSHOT</version>

    <properties>

        <maven.compiler.source>8</maven.compiler.source>

        <maven.compiler.target>8</maven.compiler.target>

        <project.build.sourceEncoding>UTF-8</project.build.sourceEncoding>

    </properties>

    <dependencies>

        <dependency>

            <groupId>org.springframework.boot</groupId>

            <artifactId>spring-boot-starter-web</artifactId>

            <version>2.7.14</version>

        </dependency>

    </dependencies>

</project>
2、启动代码
package com.springboot.study;

import org.springframework.boot.SpringApplication;

import org.springframework.boot.autoconfigure.SpringBootApplication;

@SpringBootApplication

public class Main {

    public static void main(String[] args) {

        SpringApplication springApplication = new SpringApplication(Main.class);

        springApplication.run(args);

    }

}
3、启动流程分析
1、获取Spring工厂实例
  private <T> Collection<T> getSpringFactoriesInstances(Class<T> type, Class<?>[] parameterTypes, Object... args) {

        ClassLoader classLoader = getClassLoader();

        // Use names and ensure unique to protect against duplicates

        Set<String> names = new LinkedHashSet<>(SpringFactoriesLoader.loadFactoryNames(type, classLoader));

        List<T> instances = createSpringFactoriesInstances(type, parameterTypes, classLoader, args, names);

        AnnotationAwareOrderComparator.sort(instances);

        return instances;

    }
  public static List<String> loadFactoryNames(Class<?> factoryType, @Nullable ClassLoader classLoader) {

        ClassLoader classLoaderToUse = classLoader;

        if (classLoaderToUse == null) {

            classLoaderToUse = SpringFactoriesLoader.class.getClassLoader();

        }

        String factoryTypeName = factoryType.getName();

        return loadSpringFactories(classLoaderToUse).getOrDefault(factoryTypeName, Collections.emptyList());

    }
  private static Map<String, List<String>> loadSpringFactories(ClassLoader classLoader) {

        Map<String, List<String>> result = cache.get(classLoader);

        if (result != null) {

            return result;

        }

        result = new HashMap<>();

        try {

            Enumeration<URL> urls = classLoader.getResources(FACTORIES_RESOURCE_LOCATION);

            while (urls.hasMoreElements()) {

                URL url = urls.nextElement();

                UrlResource resource = new UrlResource(url);

                Properties properties = PropertiesLoaderUtils.loadProperties(resource);

                for (Map.Entry<?, ?> entry : properties.entrySet()) {

                    String factoryTypeName = ((String) entry.getKey()).trim();

                    String[] factoryImplementationNames =

                            StringUtils.commaDelimitedListToStringArray((String) entry.getValue());

                    for (String factoryImplementationName : factoryImplementationNames) {

                        result.computeIfAbsent(factoryTypeName, key -> new ArrayList<>())

                                .add(factoryImplementationName.trim());

                    }

                }

            }

            // Replace all lists with unmodifiable lists containing unique elements

            result.replaceAll((factoryType, implementations) -> implementations.stream().distinct()

                    .collect(Collectors.collectingAndThen(Collectors.toList(), Collections::unmodifiableList)));

            cache.put(classLoader, result);

        }

        catch (IOException ex) {

            throw new IllegalArgumentException("Unable to load factories from location [" +

                    FACTORIES_RESOURCE_LOCATION + "]", ex);

        }

        return result;

    }
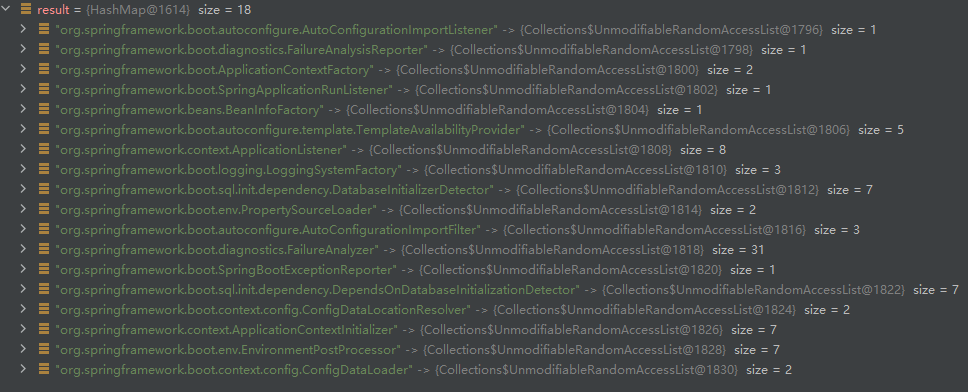
这个地方会扫描项目中 resource 目录下的 META-INF/spring.factories 文件,默认如果不添加其他依赖,会扫描到如下项目:
- spring-boot-2.7.14.jar
- spring-boot-autoconfigure-2.7.14.jar
- spring-beans-5.3.29.jar
最终会扫描到如下对象:
2、run 方法分析
  public ConfigurableApplicationContext run(String... args) {

        long startTime = System.nanoTime();

        DefaultBootstrapContext bootstrapContext = createBootstrapContext();

        ConfigurableApplicationContext context = null;

        configureHeadlessProperty();

        SpringApplicationRunListeners listeners = getRunListeners(args);

        listeners.starting(bootstrapContext, this.mainApplicationClass);

        try {

            ApplicationArguments applicationArguments = new DefaultApplicationArguments(args);

            ConfigurableEnvironment environment = prepareEnvironment(listeners, bootstrapContext, applicationArguments);

            configureIgnoreBeanInfo(environment);

            Banner printedBanner = printBanner(environment);

            context = createApplicationContext();

            context.setApplicationStartup(this.applicationStartup);

            prepareContext(bootstrapContext, context, environment, listeners, applicationArguments, printedBanner);

            refreshContext(context);

            afterRefresh(context, applicationArguments);

            Duration timeTakenToStartup = Duration.ofNanos(System.nanoTime() - startTime);

            if (this.logStartupInfo) {

                new StartupInfoLogger(this.mainApplicationClass).logStarted(getApplicationLog(), timeTakenToStartup);

            }

            listeners.started(context, timeTakenToStartup);

            callRunners(context, applicationArguments);

        }

        catch (Throwable ex) {

            handleRunFailure(context, ex, listeners);

            throw new IllegalStateException(ex);

        }

        try {

            Duration timeTakenToReady = Duration.ofNanos(System.nanoTime() - startTime);

            listeners.ready(context, timeTakenToReady);

        }

        catch (Throwable ex) {

            handleRunFailure(context, ex, null);

            throw new IllegalStateException(ex);

        }

        return context;

    }
1、首先是 createBootstrapContext 方法,该方法会调用第一个扩展点:BootstrapRegistryInitializer->initializer,但是项目中没有该接口的实现类。
2、其次就是 listeners.starting 方法, 该方法中会调用第二个扩展点 SpringApplicationRunListener->starting,这个 SpringApplicationRunListener 项目中只存在一个实现类:EventPublishingRunListener,它会触发所有的 ApplicationListener 监听 ApplicationStartingEvent 的事件,后文就不特别声明这个实现类了。
2.1、配置属性(prepareEnvironment->configureEnvironment)
  protected void configurePropertySources(ConfigurableEnvironment environment, String[] args) {

        MutablePropertySources sources = environment.getPropertySources();

        if (!CollectionUtils.isEmpty(this.defaultProperties)) {

            DefaultPropertiesPropertySource.addOrMerge(this.defaultProperties, sources);

        }

        if (this.addCommandLineProperties && args.length > 0) {

            String name = CommandLinePropertySource.COMMAND_LINE_PROPERTY_SOURCE_NAME;

            if (sources.contains(name)) {

                PropertySource<?> source = sources.get(name);

                CompositePropertySource composite = new CompositePropertySource(name);

                composite

                    .addPropertySource(new SimpleCommandLinePropertySource("springApplicationCommandLineArgs", args));

                composite.addPropertySource(source);

                sources.replace(name, composite);

            }

            else {

                sources.addFirst(new SimpleCommandLinePropertySource(args));

            }

        }

    }
3、然后就是 prepareEnvironment 方法,该方法会调用第三个扩展点:SpringApplicationRunListener->environmentPrepared,它会触发所有的 ApplicationListener 监听 ApplicationEnvironmentPreparedEvent 的事件。
2.2、配置 Banner
  private Banner getBanner(Environment environment) {

        Banners banners = new Banners();

        banners.addIfNotNull(getImageBanner(environment));

        banners.addIfNotNull(getTextBanner(environment));

        if (banners.hasAtLeastOneBanner()) {

            return banners;

        }

        if (this.fallbackBanner != null) {

            return this.fallbackBanner;

        }

        return DEFAULT_BANNER;

    }
4、第四个扩展点在 prepareContext->applyInitializers 方法里,ApplicationContextInitializer->initialize。
5、第五个扩展点在 prepareContext->listeners.contextPrepared 方法里,SpringApplicationRunListeners->contextPrepared,它会触发所有的 ApplicationListener 监听 ApplicationContextInitializedEvent 的事件。
6、第六个扩展点在 prepareContext->bootstrapContext.close 方法里,它会触发所有的 ApplicationListener 监听 BootstrapContextClosedEvent 的事件。
2.3、加载 Source(prepareContext)
public Set<Object> getAllSources() {

        Set<Object> allSources = new LinkedHashSet<>();

        if (!CollectionUtils.isEmpty(this.primarySources)) {

            allSources.addAll(this.primarySources);

        }

        if (!CollectionUtils.isEmpty(this.sources)) {

            allSources.addAll(this.sources);

        }

        return Collections.unmodifiableSet(allSources);

    }
  private void load(Object source) {

        Assert.notNull(source, "Source must not be null");

        if (source instanceof Class<?>) {

            load((Class<?>) source);

            return;

        }

        if (source instanceof Resource) {

            load((Resource) source);

            return;

        }

        if (source instanceof Package) {

            load((Package) source);

            return;

        }

        if (source instanceof CharSequence) {

            load((CharSequence) source);

            return;

        }

        throw new IllegalArgumentException("Invalid source type " + source.getClass());

    }
这个地方会从 SpringApplication 中的 primarySources、sources 加载源,然后注册为 Bean。
7、第七个扩展点在 prepareContext->listeners.contextLoaded 方法里,SpringApplicationRunListeners->contextLoaded,会触发 ApplicationListener 监听 ApplicationPreparedEvent 的事件。
2.4、ServletWebServerApplicationContext->refresh
  @Override

    public void refresh() throws BeansException, IllegalStateException {

        synchronized (this.startupShutdownMonitor) {

            StartupStep contextRefresh = this.applicationStartup.start("spring.context.refresh");

            // Prepare this context for refreshing.

            prepareRefresh();

            // Tell the subclass to refresh the internal bean factory.

            ConfigurableListableBeanFactory beanFactory = obtainFreshBeanFactory();

            // Prepare the bean factory for use in this context.

            prepareBeanFactory(beanFactory);

            try {

                // Allows post-processing of the bean factory in context subclasses.

                postProcessBeanFactory(beanFactory);

                StartupStep beanPostProcess = this.applicationStartup.start("spring.context.beans.post-process");

                // Invoke factory processors registered as beans in the context.

                invokeBeanFactoryPostProcessors(beanFactory);

                // Register bean processors that intercept bean creation.

                registerBeanPostProcessors(beanFactory);

                beanPostProcess.end();

                // Initialize message source for this context.

                initMessageSource();

                // Initialize event multicaster for this context.

                initApplicationEventMulticaster();

                // Initialize other special beans in specific context subclasses.

                onRefresh();

                // Check for listener beans and register them.

                registerListeners();

                // Instantiate all remaining (non-lazy-init) singletons.

                finishBeanFactoryInitialization(beanFactory);

                // Last step: publish corresponding event.

                finishRefresh();

            }

            catch (BeansException ex) {

                if (logger.isWarnEnabled()) {

                    logger.warn("Exception encountered during context initialization - " +

                            "cancelling refresh attempt: " + ex);

                }

                // Destroy already created singletons to avoid dangling resources.

                destroyBeans();

                // Reset 'active' flag.

                cancelRefresh(ex);

                // Propagate exception to caller.

                throw ex;

            }

            finally {

                // Reset common introspection caches in Spring's core, since we

                // might not ever need metadata for singleton beans anymore...

                resetCommonCaches();

                contextRefresh.end();

            }

        }

    }
这里我们直接看到 invokeBeanFactoryPostProcessors 方法,不过这个方法蛮长的,就先看一部分:
      for (BeanFactoryPostProcessor postProcessor : beanFactoryPostProcessors) {

                if (postProcessor instanceof BeanDefinitionRegistryPostProcessor) {

                    BeanDefinitionRegistryPostProcessor registryProcessor =

                            (BeanDefinitionRegistryPostProcessor) postProcessor;

                    registryProcessor.postProcessBeanDefinitionRegistry(registry);

                    registryProcessors.add(registryProcessor);

                }

                else {

                    regularPostProcessors.add(postProcessor);

                }

            }
这个地方可以猜到这个 postProcessBeanDefinitionRegistry 也是一个扩展点,但是这个 beanFactoryPostProcessors 的值是从哪里来的呢?
打断点这里是有三个值的:

这里直接说答案,还记得这段代码吗:
context = createApplicationContext();

context.setApplicationStartup(this.applicationStartup);

prepareContext(bootstrapContext, context, environment, listeners, applicationArguments, printedBanner);
这里获取了 context 之后,就调用了 prepareContext 方法,prepareContext 方法里曾提到过有第四、第五、第六、第七个扩展点。
举个例子,就拿第四个扩展点说:
ConfigurationWarningsApplicationContextInitializer 实现了 ApplicationContextInitializer 接口,然后添加了一个值:
  @Override

    public void initialize(ConfigurableApplicationContext context) {

        context.addBeanFactoryPostProcessor(new ConfigurationWarningsPostProcessor(getChecks()));

    }
相同的还有 SharedMetadataReaderFactoryContextInitializer,至于第三个值则是直接在 prepareContext 方法里添加的。
8、第八个扩展点在 refresh->invokeBeanFactoryPostProcessors 方法里,会调用 invokeBeanDefinitionRegistryPostProcessors。
紧接着,就是如下代码:
       String[] postProcessorNames =

                    beanFactory.getBeanNamesForType(BeanDefinitionRegistryPostProcessor.class, true, false);

            for (String ppName : postProcessorNames) {

                if (beanFactory.isTypeMatch(ppName, PriorityOrdered.class)) {

                    currentRegistryProcessors.add(beanFactory.getBean(ppName, BeanDefinitionRegistryPostProcessor.class));

                    processedBeans.add(ppName);

                }

            }
我们看看这个 postProcessorNames 是怎么来的,追踪到 beanFactory.getBeanNamesForType 方法,进去可以看到 doGetBeanNamesForType 方法,总而言之,是从 beanDefinitionNames 和 manualSingletonNames 的值来的,那这些值又是怎么来的呢,仍然是如下一段代码:
       context = createApplicationContext();

            context.setApplicationStartup(this.applicationStartup);

            prepareContext(bootstrapContext, context, environment, listeners, applicationArguments, printedBanner);
在创建 context 的时候,实际上是调用 AnnotationConfigApplicationContext 的构造方法,里面会调用 registerAnnotationConfigProcessors 方法,这个方法会初始化 5 个 beanDefinitionName。
然后就是 prepareContext 方法里,在第四个扩展点会初始化两个 manualSingletonName,prepareContext 方法里的 registerSingleton 方法也添加了两个 manualSingletonName,并且后面的 load 方法也添加了一个 main 的 beanDefinitionName,在最后的第七个扩展点里又添加了 3 个 manualSingletonName,总之在执行 refreshContext 之前,context 的 beanFactory 里包含 6 个 beanDefinitionName 7 个 manualSingletonName,后面的就不分析了,毕竟能扩展的就在这里。
9、第九个扩展点也在 refresh->invokeBeanFactoryPostProcessors 方法里,会调用 invokeBeanFactoryPostProcessors。
不过有一点要注意的是,虽说第八个、第九个也算是扩展点,但其只有在第四到第七个扩展点里面配置了才能进行扩展。
2.5、refresh->onRefresh
    @Override

    protected void onRefresh() {

        super.onRefresh();

        try {

            createWebServer();

        }

        catch (Throwable ex) {

            throw new ApplicationContextException("Unable to start web server", ex);

        }

    }
该方法会调用 createWebServer 创建一个 webserver。
2.6、refresh->finishBeanFactoryInitialization
protected void finishBeanFactoryInitialization(ConfigurableListableBeanFactory beanFactory) {

        // Initialize conversion service for this context.

        if (beanFactory.containsBean(CONVERSION_SERVICE_BEAN_NAME) &&

                beanFactory.isTypeMatch(CONVERSION_SERVICE_BEAN_NAME, ConversionService.class)) {

            beanFactory.setConversionService(

                    beanFactory.getBean(CONVERSION_SERVICE_BEAN_NAME, ConversionService.class));

        }

        // Register a default embedded value resolver if no BeanFactoryPostProcessor

        // (such as a PropertySourcesPlaceholderConfigurer bean) registered any before:

        // at this point, primarily for resolution in annotation attribute values.

        if (!beanFactory.hasEmbeddedValueResolver()) {

            beanFactory.addEmbeddedValueResolver(strVal -> getEnvironment().resolvePlaceholders(strVal));

        }

        // Initialize LoadTimeWeaverAware beans early to allow for registering their transformers early.

        String[] weaverAwareNames = beanFactory.getBeanNamesForType(LoadTimeWeaverAware.class, false, false);

        for (String weaverAwareName : weaverAwareNames) {

            getBean(weaverAwareName);

        }

        // Stop using the temporary ClassLoader for type matching.

        beanFactory.setTempClassLoader(null);

        // Allow for caching all bean definition metadata, not expecting further changes.

        beanFactory.freezeConfiguration();

        // Instantiate all remaining (non-lazy-init) singletons.

        beanFactory.preInstantiateSingletons();

    }
这个方法会调用 beanFactory,实例化所有的 bean。
10、第十个扩展点在 refresh->finishRefresh 方法里,会调用 getLifecycleProcessor().onRefresh(),会调用 SmartLifecycle->start 方法。
11、第十一个扩展点也在 refresh->finishRefresh 方法里,会调用 publishEvent 然后触发 ApplicationListener 监听 ContextRefreshedEvent 的事件。
2.7、最后的三个扩展点-> run 方法
12、第十二个扩展点在 run 方法里,会调用 listeners.started 方法,SpringApplicationRunListener->started。
13、第十三个扩展点也在 run 方法里,会调用 callRunners 方法,ApplicationRunner 或 CommandLineRunner 的 run 方法。
14、第十四个扩展点也在 run 方法里,会调用 listeners.ready方法,SpringApplicationRunListener->ready。
3、结语
第一篇分析 SpringBoot 启动源码到这里就结束了,我们这次的目标是找到 SpringBoot 有哪些地方可以自己进行代码扩展的,其中不免有些遗漏的,欢迎各位补充。
目前看完还是有很多问题,比如 SpringBootApplication 注解的作用是什么、Bean 的实例化流程是什么、以及我们 Web 的 URL 请求是如何到方法上的...等等。
最后,这篇分析完的这些扩展点能干些什么呢?
SpringBoot 启动流程分析(寻找扩展点)的更多相关文章
- SpringBoot启动流程分析(六):IoC容器依赖注入
SpringBoot系列文章简介 SpringBoot源码阅读辅助篇: Spring IoC容器与应用上下文的设计与实现 SpringBoot启动流程源码分析: SpringBoot启动流程分析(一) ...
- SpringBoot启动流程分析(二):SpringApplication的run方法
SpringBoot系列文章简介 SpringBoot源码阅读辅助篇: Spring IoC容器与应用上下文的设计与实现 SpringBoot启动流程源码分析: SpringBoot启动流程分析(一) ...
- SpringBoot启动流程分析(四):IoC容器的初始化过程
SpringBoot系列文章简介 SpringBoot源码阅读辅助篇: Spring IoC容器与应用上下文的设计与实现 SpringBoot启动流程源码分析: SpringBoot启动流程分析(一) ...
- SpringBoot启动流程分析(五):SpringBoot自动装配原理实现
SpringBoot系列文章简介 SpringBoot源码阅读辅助篇: Spring IoC容器与应用上下文的设计与实现 SpringBoot启动流程源码分析: SpringBoot启动流程分析(一) ...
- SpringBoot启动流程分析(一):SpringApplication类初始化过程
SpringBoot系列文章简介 SpringBoot源码阅读辅助篇: Spring IoC容器与应用上下文的设计与实现 SpringBoot启动流程源码分析: SpringBoot启动流程分析(一) ...
- SpringBoot启动流程分析(三):SpringApplication的run方法之prepareContext()方法
SpringBoot系列文章简介 SpringBoot源码阅读辅助篇: Spring IoC容器与应用上下文的设计与实现 SpringBoot启动流程源码分析: SpringBoot启动流程分析(一) ...
- SpringBoot启动流程分析原理(一)
我们都知道SpringBoot自问世以来,一直有一个响亮的口号"约定优于配置",其实一种按约定编程的软件设计范式,目的在于减少软件开发人员在工作中的各种繁琐的配置,我们都知道传统的 ...
- SpringBoot启动流程分析
前景提示 @ComponentScan 的处理都放在org.springframework.context.annotation.ConfigurationClassParser#doProcess ...
- SpringBoot源码学习3——SpringBoot启动流程
系列文章目录和关于我 一丶前言 在 <SpringBoot源码学习1--SpringBoot自动装配源码解析+Spring如何处理配置类的>中我们学习了SpringBoot自动装配如何实现 ...
- SpringBoot启动原理分析
用了差不多两年的SpringBoot了,可以说对SpringBoot已经很熟了,但是仔细一想SpringBoot的启动流程,还是让自己有点懵逼,不得不说是自己工作和学习的失误,所以以此文对Spring ...
随机推荐
- 【Visual Leak Detector】核心源码剖析(VLD 1.0)
说明 使用 VLD 内存泄漏检测工具辅助开发时整理的学习笔记.本篇对 VLD 1.0 源码做内存泄漏检测的思路进行剖析.同系列文章目录可见 <内存泄漏检测工具>目录 目录 说明 1. 源码 ...
- 使用4G通信模块和MQTT协议,完成物联网设备开发。
使用4G通信模块和MQTT协议,完成物联网设备开发. (1)安装并使用4G模块通信模块,建立microPython开发环境: (2)使用提供的Demo开发例程,使用MQTT传输协议连接阿里或腾讯网站, ...
- Django admin管理工具的使用、定制及源码解析
admin组件使用 Django 提供了基于 web 的管理工具. Django 自动管理工具是 django.contrib 的一部分.你可以在项目的 settings.py 中的 INSTALLE ...
- es笔记三之term,match,match_phrase 等查询方法介绍
本文首发于公众号:Hunter后端 原文链接:es笔记三之term,match,match_phrase 等查询方法介绍 首先介绍一下在 es 里有两种存储字符串的字段类型,一个是 keyword,一 ...
- 密码暴力破解工具——九头蛇(hydra)使用详解及实战
转载出处:https://zhuanlan.zhihu.com/p/540998739 二.使用方法 语法:Hydra 参数 IP 服务 参数: -l login 小写,指定用户名进行破解 -L fi ...
- Python基础 - python解释器
Python解释器是什么 Python解释器本身也是个程序, 它是解释执行 Python代码的,所以叫解释器. 没有它,我们的Python代码是没有办法运行的. 怎么下载安装Python解释器 官 ...
- 有关ODOO的ORM操作
1.查询操作 sale_id = self.env['sale.order'].search([]) env将对象实例化,search进行搜索,可以根据需求添加搜索条件 search_count([] ...
- 如何判断Keil MDK ARM中已经破解?如何判断Keil MDK ARM中已经安装了相应的器件库?如何判断CubeMX的器件库已经安装成功?
如何判断CubeMX的器件库已经安装成功?请对照下图 如何判断Keil MDK ARM中已经安装了相应的器件库?请看下图 如何判断CubeMX的器件库已经安装成功?请对照下图
- Spring Boot实现高质量的CRUD-2
(续前文) 5.Dao类 Dao类提供操作访问数据库表的接口方法.常规的CRUD,将考虑下列接口方法: 1)插入单条对象记录: 2)批量插入对象记录: 3)修改单条对象记录: ...
- Rust的类型系统
Rust的类型系统 类型于20世纪50年代被FORTRAN语言引入,其相关的理论和应用已经发展得非常成熟.现在,类型系统已经成为了各大编程语言的核心基础. 通用基础 所谓类型,就是对表示信息的值进行的 ...