【Mybatis-Plus】03 SpringBoot整合
创建SpringBoot工程:

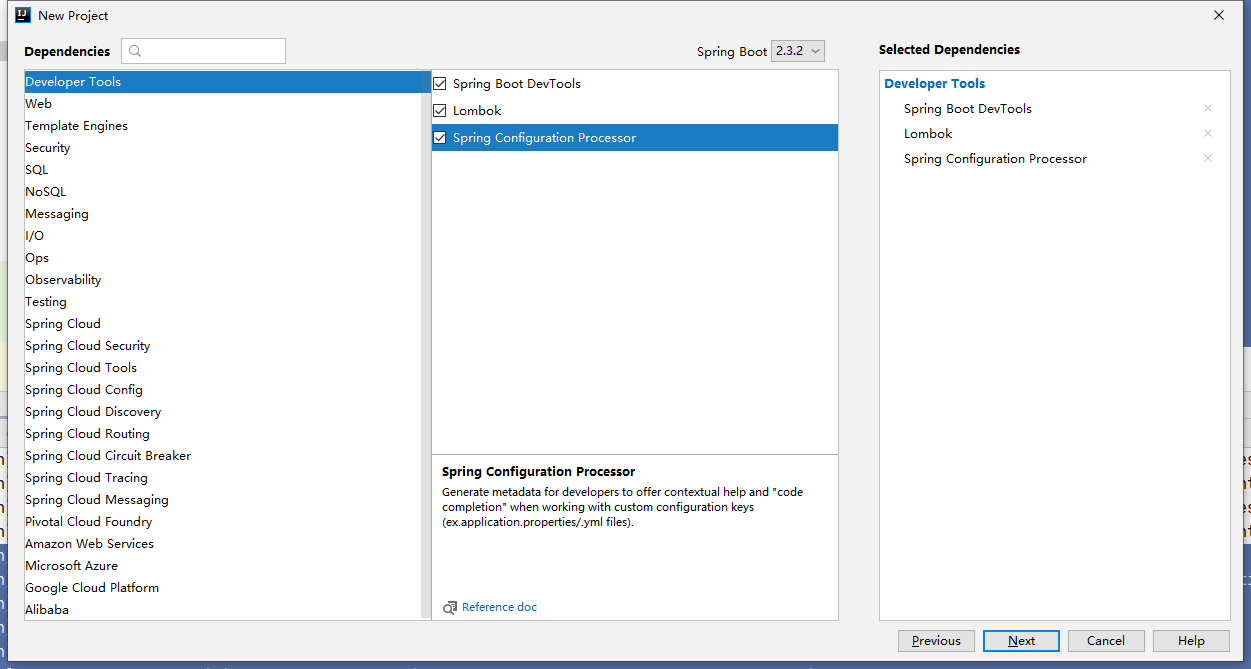
选择辅助三件套:
再导入MP相关依赖坐标:
<!-- jdbc -->

<dependency>

    <groupId>mysql</groupId>

    <artifactId>mysql-connector-java</artifactId>

</dependency>

<!-- mybatis-plus -->

<dependency>

    <groupId>com.baomidou</groupId>

    <artifactId>mybatis-plus-boot-starter</artifactId>

    <version>3.2.0</version>

</dependency>

<!-- spring-jdbc -->

<dependency>

    <groupId>org.springframework.boot</groupId>

    <artifactId>spring-boot-starter-jdbc</artifactId>

</dependency>

<!-- spring-web -->

<dependency>

    <groupId>org.springframework.boot</groupId>

    <artifactId>spring-boot-starter-web</artifactId>

</dependency>
创建MP的分页配置类:
package cn.echo42.configuration;

import com.baomidou.mybatisplus.extension.plugins.PaginationInterceptor;

import org.springframework.boot.autoconfigure.condition.ConditionalOnClass;

import org.springframework.context.annotation.Bean;

import org.springframework.context.annotation.Configuration;

/**

 * @author DaiZhiZhou

 * @file MP-SpringBoot

 * @create 2020-08-06 4:38

 */

@Configuration

@ConditionalOnClass({PaginationInterceptor.class})

public class MybatisPlusConfiguration {

    @Bean

    public PaginationInterceptor  paginationInterceptor() {

        return new PaginationInterceptor();

    }

}
application.yml配置:
#数据源

spring:

  datasource:

    # 数据源类型

    type: org.springframework.jdbc.datasource.DriverManagerDataSource

    # 驱动目录

    driver-class-name: com.mysql.cj.jdbc.Driver

    # 数据库访问url

    url: jdbc:mysql://127.0.0.1:3306/oa?useUnicode=true&characterEncoding=utf8&useSSL=true&serverTimezone=UTC

    # 访问账号

    username: root

    # 访问密码

    password: 123456

#配置mybatis-plus

mybatis-plus:

  # mapper映射器位置

  mapper-locations:

    - classpath:mapper/*Mapper.xml

  # 全局配置

  global-config:

    # 数据库配置

    db-config:

      # 主键类型 自动设置

      id-type: auto

    banner: true
复制之前Spring整合MP的配置:
User.java、UserMapper.java、UserMapper.xml
注意在启动函数这里注解上@MapperScan
package cn.echo42;

import org.mybatis.spring.annotation.MapperScan;

import org.springframework.boot.SpringApplication;

import org.springframework.boot.autoconfigure.SpringBootApplication;

@SpringBootApplication

@MapperScan("cn.echo42.mapper")

public class MpSpringbootApplication {

    public static void main(String[] args) {

        SpringApplication.run(MpSpringbootApplication.class, args);

    }

}
测试类则是SpringBoot现成提供好的:
我们需要自动装配下userMapper,测试方法CV过来就行
package cn.echo42;

import cn.echo42.mapper.UserMapper;

import cn.echo42.pojo.User;

import com.baomidou.mybatisplus.core.conditions.query.QueryWrapper;

import com.baomidou.mybatisplus.core.conditions.update.UpdateWrapper;

import com.baomidou.mybatisplus.core.metadata.IPage;

import com.baomidou.mybatisplus.extension.plugins.pagination.Page;

import org.junit.jupiter.api.Test;

import org.springframework.beans.factory.annotation.Autowired;

import org.springframework.boot.test.context.SpringBootTest;

import java.io.Serializable;

import java.util.ArrayList;

import java.util.HashMap;

import java.util.List;

import java.util.Map;

@SpringBootTest

class MpSpringbootApplicationTests {

    @Autowired

    UserMapper userMapper;

    @Test

    void contextLoads() {

    }

    @Test

    public void mpInsert() {

        int insert = userMapper.insert(new User(

                null,

                "阿伟001",

                "133778",

                1,

                0

        ));

    }

    @Test

    public void mpUpdate() {

        UpdateWrapper<User> updateWrapper = new UpdateWrapper<User>();

        updateWrapper.eq("user_id", 6); // WHERE user_id = 6

        // updateWrapper.between("id", 10, 20); WHERE id BETWEEN 10 AND 20

        int update = userMapper.update(new User(

                null,

                "杰哥001",

                "133778",

                1,

                0

        ), updateWrapper);

    }

    @Test

    public void mpDelete() {

        UpdateWrapper<User> updateWrapper = new UpdateWrapper<User>();

        updateWrapper.eq("user_id", 6); // WHERE user_id = 6

        // updateWrapper.between("id", 10, 20); WHERE id BETWEEN 10 AND 20

        int delete = userMapper.delete(updateWrapper);

    }

    @Test

    public void mpQuery() {

        User user = userMapper.selectById(3);

        System.out.println(user);

    }

    @Test

    public void mpQuery2() {

        List<Serializable> list = new ArrayList<Serializable>();

        list.add(2);

        list.add(4);

        List<User> userList = userMapper.selectBatchIds(list);

        for (User user : userList) {

            System.out.println(user);

        }

    }

    @Test

    public void mpQuery3() {

        Map<String, Object> columnMapping = new HashMap<String, Object>();

        columnMapping.put("user_is_del", 0);

        columnMapping.put("user_password", "123456");

        List<User> userList = userMapper.selectByMap(columnMapping);

        for (User user : userList) {

            System.out.println(user);

        }

    }

    @Test

    public void mpQuery4() {

        QueryWrapper<User> userWrapper = new QueryWrapper<User>();

        // 假装这是从控制器传递过来的字符串参数

        String fromUrlParam = "user";

        userWrapper.like(fromUrlParam != null , "user_name", fromUrlParam);

        // 用来查询符合筛选条件的记录数量

        Integer integer = userMapper.selectCount(userWrapper);

        System.out.println("return rows : " + integer );

    }

    @Test

    public void mpQuery5() {

        IPage<User> page = new Page<User>(1, 5);

        userMapper.selectPage(page, null);

        long total = page.getTotal();

        System.out.println("TotalRecords : " + total);

        List<User> list = page.getRecords();

        for (User user : list) {

            System.out.println(user);

        }

    }

}
没打印日志,看不到SQL输出结果,但是测试通过就算有效果了
【Mybatis-Plus】03 SpringBoot整合的更多相关文章
- 【SpringBoot】03.SpringBoot整合Servlet的两种方式
SpringBoot整合Servlet的两种方式: 1. 通过注解扫描完成Servlet组件注册 新建Servlet类继承HttpServlet 重写超类doGet方法 在该类使用注解@WebServ ...
- 03.springboot 整合RabbitMQ
1.引入依赖 <dependency> <groupId>org.springframework.boot</groupId> <artifactId> ...
- SpringBoot整合mybatis使用pageHelper插件进行分页操作
SpringBoot整合mybatis分页操作 SpringBoot整合Mybatis进行分页操作,这里需要使用Mybatis的分页插件:pageHelper, 关于pageHelper的介绍,请查看 ...
- 浅谈Mybatis持久化框架在Spring、SSM、SpringBoot整合的演进及简化过程
前言 最近开始了SpringBoot相关知识的学习,作为为目前比较流行.用的比较广的Spring框架,是每一个Java学习者及从业者都会接触到一个知识点.作为Spring框架项目,肯定少不了与数据库持 ...
- SpringBoot整合系列-PageHelper分页插件
原创作品,可以转载,但是请标注出处地址:https://www.cnblogs.com/V1haoge/p/9971043.html SpringBoot整合MyBatis分页插件PageHelper ...
- SpringBoot整合Shiro 四:认证+授权
搭建环境见: SpringBoot整合Shiro 一:搭建环境 shiro配置类见: SpringBoot整合Shiro 二:Shiro配置类 shiro整合Mybatis见:SpringBoot整合 ...
- mybatis源码学习(四)--springboot整合mybatis原理
我们接下来说:springboot是如何和mybatis进行整合的 1.首先,springboot中使用mybatis需要用到mybatis-spring-boot-start,可以理解为mybati ...
- springboot整合druid、mybatis
目的: 1.springboot配置数据库连接池druid 测试druid中url监控 2.springboot整合mybatis 测试查删案例 3.springboot整合pagehelper sp ...
- spring-boot整合mybatis(1)
sprig-boot是一个微服务架构,加快了spring工程快速开发,以及简便了配置.接下来开始spring-boot与mybatis的整合. 1.创建一个maven工程命名为spring-boot- ...
- SpringBoot整合Mybatis之项目结构、数据源
已经有好些日子没有总结了,不是变懒了,而是我一直在奋力学习springboot的路上,现在也算是完成了第一阶段的学习,今天给各位总结总结. 之前在网上找过不少关于springboot的教程,都是一些比 ...
随机推荐
- HTML 使用动态脚本
这个 HTML 图片框架 这个HTML支持的脚本属于动态的插件形式的程序 用分段数方式实现动画 1定时器 2函数 计算机有四则运算加减乘除 还有一个是 ^ (shift + 6这个符号是余数,8^3是 ...
- leetcode | 103. 二叉树的锯齿形层序遍历 | JavaScript实现
题目 给你二叉树的根节点 root ,返回其节点值的 锯齿形层序遍历 .(即先从左往右,再从右往左进行下一层遍历,以此类推,层与层之间交替进行). 思路 按照正常的层序遍历,然后再对下标为奇数的数组进 ...
- CAT监控指标
CAT监控指标 CAT 是基于 Java 开发的实时应用监控平台.官方文档:https://github.com/dianping/cat CAT提供以下几种报表:Transaction报表 一段代码 ...
- hibernate映射对照表
2.3. Basic Types Basic value types usually map a single database column, to a single, non-aggregated ...
- .htaccess伪静态规则
Tips:当你看到这个提示的时候,说明当前的文章是由原emlog博客系统搬迁至此的,文章发布时间已过于久远,编排和内容不一定完整,还请谅解` .htaccess伪静态规则 日期:2017-12-4 阿 ...
- uniapp ios推送 离线推送收不到消息
突然之间收不到离线推送消息了,角标也不显示了. 查了很长时间发现是ios的推送证书过期了. 我用的是appuploader登陆上以后在证书管理中新创建证书就可以了.
- 解决 Visual C++ 17.5 __cplusplus 始终为 199711L 的问题
00. 软件环境 Visual Studio 2022, Visual C++, Version 17.5.4 01. 问题描述 在应用 https://github.com/ToniLipponen ...
- Linux常用耗资源命令汇总
在Linux中,以下命令可能在处理大量数据或复杂操作时比较消耗资源.一般来说,涉及大量数据处理.计算或者I/O操作的命令会比较耗费系统资源. 注意:所有命令资源消耗都是相对的,基于文件的处理量来展 ...
- ARM+DSP!全志T113-i+玄铁HiFi4开发板硬件说明书(1)
前 言 本文档主要介绍开发板硬件接口资源以及设计注意事项等内容,测试板卡为全志T113-i+玄铁HiFi4开发板.由于篇幅问题,本篇文章共分为上下两集,点击账户可查看更多内容详情,开发问题欢迎留言,感 ...
- 关于Precision,Recall,ROC曲线,KS,Lift等模型评价指标的介绍
1.Precision, Recall 准确率 \(Accuracy = \frac{TP+TN}{TP+TN+FP+FN}\) 精确率(或命中率) \(Precision = \frac{TP}{T ...