WCF加密操作(包括证书和证书+帐号密码)
WCF作为.net三大组件之一,伟大之处不用多说,但是其加密配置对于我这样的萌新来说还是颇有难度,因此将几天来的研究成果共享出来,与各位共勉~
首先声明我的开发环境,Win10创意者更新 + Visual Studio 2015 update3 + .Net 4.5 + iis10
一、创建X.509证书
1、创建证书
可通过PowerShell或者makecert工具两种方式,个人建议使用参考资料更多后者,但最新的Windows和VS都不带makecert,所以需要的话可以到文章结尾处下载。
使用CMD运行:
makecert -sr CurrentUser -ss My -n CN=HelloServiceClient -sky exchange -pe -r
提示Succeded即创建完成。
此时将在当前用户下的个人项目中看到这个证书,图中MMC管理单元的使用可以参考这里。

2、设置为信任
由于创建的证书在个人域,且不在信任链中,wcf和iis目前不能使用这个证书,一次需要将其设置为信任。
首先先将其导出到磁盘:证书上右键--所有任务--导出--选择导出私钥--设置私钥密码,完成后将得到一个pfx文件。
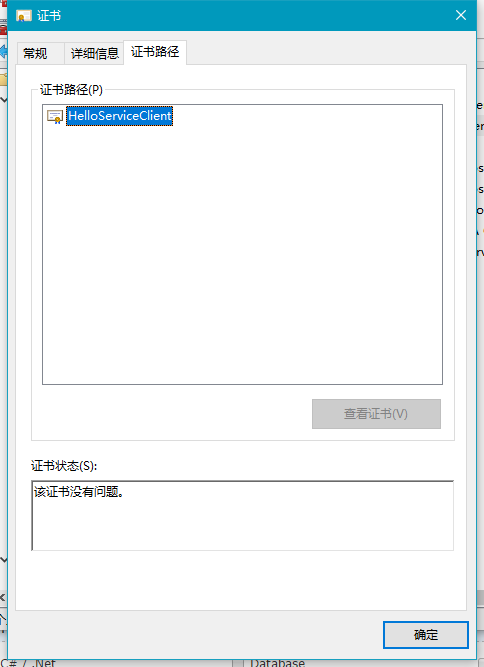
然后进入上图的本地计算机,在个人域导入刚才那个pfx文件,完成后双击证书,在“证书路径”标签中提示“由于CA 根证书不在“受信任的根证书颁发机构”存储区中,所以它不受信任。”,此时证书仍然不能被使用,我的做法是在本地计算机的“受信任的根证书颁发机构”重复导入一次。此时两个证书都变成可信,即使将第二次导入的删除也没关系。
以上做完没问题的话,双击证书后的状态应该是这样的:
二、通过证书加密的项目
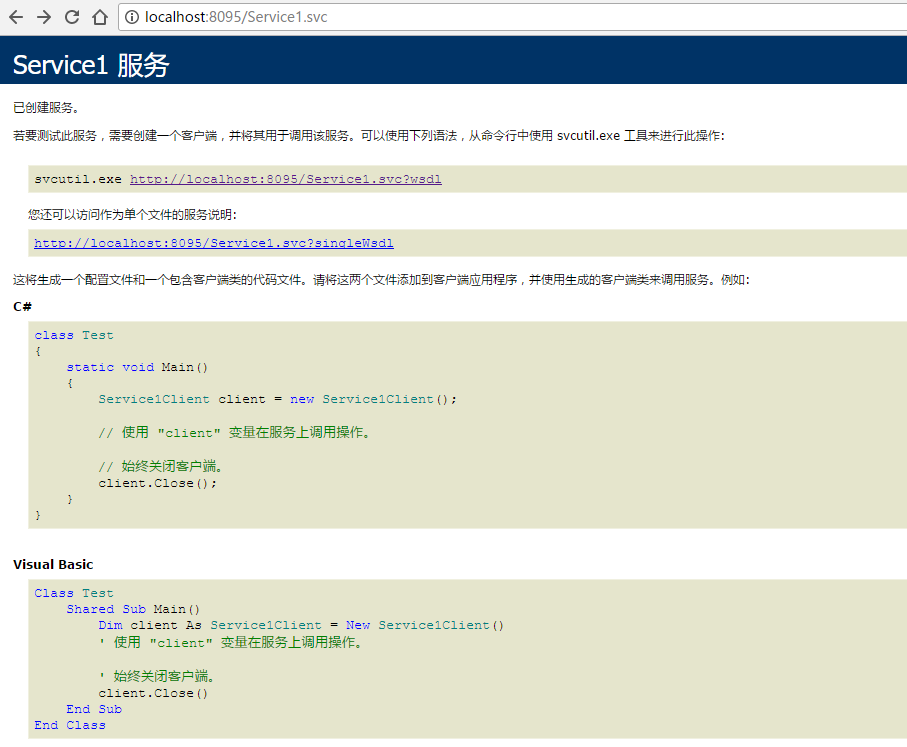
1、创建wcf服务
VS中新建“WCF服务应用程序”的项目,命名为WCF_HelloService,此时不用任何修改,已经是可运行的wcf服务,然后将其部署到iis,在浏览器中可使用http访问到服务信息:
并重写Service1.scv.cs中的GetData()方法:
        public string GetData(int value)

        {

            if (ServiceSecurityContext.Current != null)

            {

                if (!ServiceSecurityContext.Current.IsAnonymous)

                {

                    return "Hello:" + ServiceSecurityContext.Current.PrimaryIdentity.Name + ";type=" + ServiceSecurityContext.Current.PrimaryIdentity.AuthenticationType;

                }

                return "Hello,你输入的是:" + value;

            }

            return "Hello ||未检测到证书:" + value;

        }
下面是重点,编辑服务的Web.config文件,使其访问证书,这里尤其注意要注意用于各项配置互调的名称设置,如behaviorConfiguration和bindingConfiguration等:
<?xml version="1.0" encoding="utf-8"?>

<configuration>

  <appSettings>

    <add key="aspnet:UseTaskFriendlySynchronizationContext" value="true"/>

  </appSettings>

  <system.web>

    <compilation debug="true" targetFramework="4.5.2"/>

    <httpRuntime targetFramework="4.5.2"/>

    <httpModules>

      <add name="ApplicationInsightsWebTracking" type="Microsoft.ApplicationInsights.Web.ApplicationInsightsHttpModule, Microsoft.AI.Web"/>

    </httpModules>

  </system.web>

  <system.webServer>

    <modules runAllManagedModulesForAllRequests="true">

      <remove name="ApplicationInsightsWebTracking"/>

      <add name="ApplicationInsightsWebTracking" type="Microsoft.ApplicationInsights.Web.ApplicationInsightsHttpModule, Microsoft.AI.Web"

        preCondition="managedHandler"/>

    </modules>

    <!--

        若要在调试过程中浏览 Web 应用程序根目录,请将下面的值设置为 True。

        在部署之前将该值设置为 False 可避免泄露 Web 应用程序文件夹信息。

      -->

    <directoryBrowse enabled="true"/>

    <validation validateIntegratedModeConfiguration="false"/>

  </system.webServer>

  <system.serviceModel>

    <services>

      <service name="WCF_HelloService.HelloService" behaviorConfiguration="CustomBehavior">

        <endpoint

    binding="mexHttpBinding"

    contract="IMetadataExchange"

    address="mex" />

        <endpoint address="" binding="wsHttpBinding" contract="WCF_HelloService.IHelloService" bindingConfiguration="CustomBinding"/>

      </service>

    </services>

    <behaviors>

      <serviceBehaviors>

        <behavior name="CustomBehavior">

          <!-- 为避免泄漏元数据信息,请在部署前将以下值设置为 false 并删除上面的元数据终结点 -->

          <serviceMetadata httpGetEnabled="true"/>

          <!-- 要接收故障异常详细信息以进行调试,请将以下值设置为 true。在部署前设置为 false 以避免泄漏异常信息 -->

          <serviceDebug includeExceptionDetailInFaults="false"/>

          <!--add by Lbh-->

          <serviceCredentials>

            <!-- 服务端采用证书详细配置    findValue :创建证书名称   storeName:证书储存详细位于哪    storeLocation :证书储存位于当前本机用户  X509FindType : x509查找证书主题名-->

            <serviceCertificate findValue="HelloServiceClient" storeName="My" storeLocation="LocalMachine" x509FindType="FindBySubjectName"/>

            <!--客户端验证方式-->

            <clientCertificate>

              <authentication certificateValidationMode="None"/>

            </clientCertificate>

          </serviceCredentials>

        </behavior>

      </serviceBehaviors>

    </behaviors>

    <serviceHostingEnvironment multipleSiteBindingsEnabled="true" />

    <!--add by Lbh-->

    <bindings>

      <wsHttpBinding>

        <binding name="CustomBinding">

          <!--验证方式-->

          <security mode="Message">

            <message clientCredentialType="Certificate"/>

          </security>

        </binding>

      </wsHttpBinding>

    </bindings>

  </system.serviceModel>

</configuration>
添加add by 注释是添加的内容,注意serviceCertificate节点,这里定义了目的证书的信息,请务必使其指向我们刚才配置好的证书,其他诸如命名空间、接口、类名等也应与项目对应。
配置完成后如无问题,刷新刚才的web页面,我们仍然能看到服务启动成功的页面。
2、配置客户端
随便添加个winform程序,首先引用上面的服务,然后修改其app.config,同样需要注意behaviorConfiguration设置:
<?xml version="1.0" encoding="utf-8" ?>

<configuration>

    <startup>

        <supportedRuntime version="v4.0" sku=".NETFramework,Version=v4.5.2" />

    </startup>

    <system.serviceModel>

        <bindings>

            <wsHttpBinding>

                <binding name="WSHttpBinding_IHelloService">

                    <security mode="Message">

                        <transport clientCredentialType="Windows" />

                        <message clientCredentialType="Certificate" />

                    </security>

                </binding>

            </wsHttpBinding>

        </bindings>

      <!--add by Lau-->

      <behaviors>

        <endpointBehaviors>

          <behavior name="CustomBehavior">

            <clientCredentials>

              <clientCertificate findValue="HelloServiceClient" storeName="My" storeLocation="LocalMachine" x509FindType="FindBySubjectName"/>

              <serviceCertificate>

                <authentication certificateValidationMode="None"/>

              </serviceCertificate>

            </clientCredentials>

          </behavior>

        </endpointBehaviors>

      </behaviors>

      <client>

        <endpoint address="http://localhost:8096/HelloService.svc" behaviorConfiguration="CustomBehavior"

          binding="wsHttpBinding" bindingConfiguration="WSHttpBinding_IHelloService"

          contract="HelloService.IHelloService" name="WSHttpBinding_IHelloService">

          <identity>

            <certificate encodedValue="AwAAAAEAAAAUAAAAmIXXyLpHnm+H6oDaCP03aIn03SsgAAAAAQAAABUCAAAwggIRMIIBeqADAgECAhC1V8uCAl/avEkX078G+PlRMA0GCSqGSIb3DQEBBAUAMB0xGzAZBgNVBAMTEkhlbGxvU2VydmljZUNsaWVudDAeFw0xNzA1MDgwNzE1NDBaFw0zOTEyMzEyMzU5NTlaMB0xGzAZBgNVBAMTEkhlbGxvU2VydmljZUNsaWVudDCBnzANBgkqhkiG9w0BAQEFAAOBjQAwgYkCgYEA1+nEnhCxXtfAFxOGgFgzBjcPeO2WmxQI5SC14e6S4yEz+ymJtfKBcEnRSCX7onQDRE5H9dPl9CqoNjI/nkU5OKZ789f5Jh7ISfDK0jfHPa2EYwKK3FwOwGFmx5YY2/7Eb/nmyq6gbroronBIioFU6mcZjkFmTQTDa2WnZJMIsikCAwEAAaNSMFAwTgYDVR0BBEcwRYAQhYkF0TiSQwHAV/0wgMmvE6EfMB0xGzAZBgNVBAMTEkhlbGxvU2VydmljZUNsaWVudIIQtVfLggJf2rxJF9O/Bvj5UTANBgkqhkiG9w0BAQQFAAOBgQA0LvNliWDaWtU4YkqXI8JU9/2mIHO2PK4EVUmUYJu0oxFNEeRcX8ZpAAAA26gRYN+J4IjC1F33NjRG/tzkGJeaTBdOl2SkJo8LqD2D7YfOcMaXfrAsAOcEP5e4z2Z4aZlZp1tOjf0X5SZ6QL4FbPiiJog+1UbF/z5J097peDU7Bw==" />

          </identity>

        </endpoint>

      </client>

    </system.serviceModel>

</configuration>
与服务端类似地,clientCertificate节点定义了客户端证书,本例中使用了服务端相同的证书,也可以创建另一个专供客户端使用。certificate节点的内容来自服务端,引用WCF服务操作完成后会自动生成,如果没有,请检查WCF的web.config中是否定义为baseHttpBinding而不是wsHttpBinding(正确的是后者)。
最后在winform加上基本的button和txtResult,并在button按钮事件写入代码:
        private void button1_Click(object sender, EventArgs e)

        {

            try

            {

                HelloService.HelloServiceClient client = new HelloService.HelloServiceClient();

                string result = client.GetData(DateTime.Now.Second);

                txtResult.Text = result;

            }

            catch (Exception ex)

            {

                this.txtResult.Text = ex.ToString();

            }

        }
运行程序,得到正常结果如图:

并且通过http拦截到的都是密文:

至此,第一个证书项目完成,demo请到文章结尾处下载。
三、通过证书+帐号密码加密的项目
1、创建WCF服务
按上面步骤创建好服务,首先添加IdentityModel库的引用:

然后创建用于校验的CustomUserPassword类,代码如下:
using System.IdentityModel.Selectors;

using System.ServiceModel;

namespace TestUserPassService

{

    public class CustomUserPassword : UserNamePasswordValidator

    {

        public override void Validate(string userName, string password)

        {

            if (userName != "admin" || password != "admin")

            {

                //throw new SecurityNegotiationException("验证用户名和密码时,未通过检测");// 此异常可能无法被客户端捕获

                throw new FaultException("用户名或者密码错误!");

            }

        }

    }

}
最后修改web.config文件,可以看到增加了userNameAuthentication节点,定义的正是自定义的校验类:
<?xml version="1.0" encoding="utf-8"?>

<configuration>

  <appSettings>

    <add key="aspnet:UseTaskFriendlySynchronizationContext" value="true"/>

  </appSettings>

  <system.web>

    <compilation debug="true" targetFramework="4.5.2"/>

    <httpRuntime targetFramework="4.5.2"/>

    <httpModules>

      <add name="ApplicationInsightsWebTracking" type="Microsoft.ApplicationInsights.Web.ApplicationInsightsHttpModule, Microsoft.AI.Web"/>

    </httpModules>

  </system.web>

  <system.webServer>

    <modules runAllManagedModulesForAllRequests="true">

      <remove name="ApplicationInsightsWebTracking"/>

      <add name="ApplicationInsightsWebTracking" type="Microsoft.ApplicationInsights.Web.ApplicationInsightsHttpModule, Microsoft.AI.Web"

        preCondition="managedHandler"/>

    </modules>

    <!--

        若要在调试过程中浏览 Web 应用程序根目录,请将下面的值设置为 True。

        在部署之前将该值设置为 False 可避免泄露 Web 应用程序文件夹信息。

      -->

    <directoryBrowse enabled="true"/>

    <validation validateIntegratedModeConfiguration="false"/>

  </system.webServer>

  <system.serviceModel>

    <services>

      <service name="TestUserPassService.Service1" behaviorConfiguration="CustomBehavior">

        <endpoint

    binding="mexHttpBinding"

    contract="IMetadataExchange"

    address="mex" />

        <endpoint address="" binding="wsHttpBinding" contract="TestUserPassService.IService1" bindingConfiguration="CustomBinding"/>

      </service>

    </services>

    <!--add by Lbh-->

    <behaviors>

      <serviceBehaviors>

        <behavior name="CustomBehavior">

          <!-- 为避免泄漏元数据信息,请在部署前将以下值设置为 false -->

          <serviceMetadata httpGetEnabled="true" httpsGetEnabled="true"/>

          <!-- 要接收故障异常详细信息以进行调试,请将以下值设置为 true。在部署前设置为 false 以避免泄漏异常信息 -->

          <serviceDebug includeExceptionDetailInFaults="false"/>

          <serviceCredentials>

            <!-- 服务端采用证书详细配置    findValue :创建证书名称   storeName:证书储存详细位于哪    storeLocation :证书储存位于当前本机用户  X509FindType : x509查找证书主题名-->

            <serviceCertificate findValue="HelloServiceClient" storeName="My" storeLocation="LocalMachine" x509FindType="FindBySubjectName"/>

            <!--客户端验证方式-->

            <clientCertificate>

              <authentication certificateValidationMode="None"/>

            </clientCertificate>

            <userNameAuthentication  customUserNamePasswordValidatorType="TestUserPassService.CustomUserPassword,TestUserPassService" userNamePasswordValidationMode="Custom"/>

          </serviceCredentials>

        </behavior>

      </serviceBehaviors>

    </behaviors>

    <protocolMapping>

        <add binding="basicHttpsBinding" scheme="https"/>

    </protocolMapping>

    <serviceHostingEnvironment aspNetCompatibilityEnabled="true" multipleSiteBindingsEnabled="true"/>

    <!--add by Lbh-->

    <bindings>

      <wsHttpBinding>

        <binding name="CustomBinding">

          <security mode="Message">

            <transport clientCredentialType="Windows"/>

            <message clientCredentialType="UserName"/>

          </security>

        </binding>

      </wsHttpBinding>

    </bindings>

  </system.serviceModel>

</configuration>
注意clientCredentialType节点,这里采用映射到Windows账户的方式,这是颇为常用和可靠的方式。
部署到iis,没问题的话,我们仍然可以使用浏览器通过http访问到服务。
2、创建测试客户端
新建winform客户端,首先添加引用,修改后的app.config如下:
<?xml version="1.0" encoding="utf-8" ?>

<configuration>

    <startup>

        <supportedRuntime version="v4.0" sku=".NETFramework,Version=v4.5.2" />

    </startup>

    <system.serviceModel>

        <bindings>

            <wsHttpBinding>

                <binding name="WSHttpBinding_IService1">

                  <!--add by Lbh-->

                    <security mode="Message">

                        <transport clientCredentialType="Windows" />

                        <message clientCredentialType="UserName" />

                    </security>

                </binding>

            </wsHttpBinding>

        </bindings>

        <client>

            <endpoint address="http://localhost:8095/Service1.svc" binding="wsHttpBinding"

                bindingConfiguration="WSHttpBinding_IService1" contract="Service1.IService1"

                name="WSHttpBinding_IService1">

                <identity>

                    <certificate encodedValue="AwAAAAEAAAAUAAAAmIXXyLpHnm+H6oDaCP03aIn03SsgAAAAAQAAABUCAAAwggIRMIIBeqADAgECAhC1V8uCAl/avEkX078G+PlRMA0GCSqGSIb3DQEBBAUAMB0xGzAZBgNVBAMTEkhlbGxvU2VydmljZUNsaWVudDAeFw0xNzA1MDgwNzE1NDBaFw0zOTEyMzEyMzU5NTlaMB0xGzAZBgNVBAMTEkhlbGxvU2VydmljZUNsaWVudDCBnzANBgkqhkiG9w0BAQEFAAOBjQAwgYkCgYEA1+nEnhCxXtfAFxOGgFgzBjcPeO2WmxQI5SC14e6S4yEz+ymJtfKBcEnRSCX7onQDRE5H9dPl9CqoNjI/nkU5OKZ789f5Jh7ISfDK0jfHPa2EYwKK3FwOwGFmx5YY2/7Eb/nmyq6gbroronBIioFU6mcZjkFmTQTDa2WnZJMIsikCAwEAAaNSMFAwTgYDVR0BBEcwRYAQhYkF0TiSQwHAV/0wgMmvE6EfMB0xGzAZBgNVBAMTEkhlbGxvU2VydmljZUNsaWVudIIQtVfLggJf2rxJF9O/Bvj5UTANBgkqhkiG9w0BAQQFAAOBgQA0LvNliWDaWtU4YkqXI8JU9/2mIHO2PK4EVUmUYJu0oxFNEeRcX8ZpAAAA26gRYN+J4IjC1F33NjRG/tzkGJeaTBdOl2SkJo8LqD2D7YfOcMaXfrAsAOcEP5e4z2Z4aZlZp1tOjf0X5SZ6QL4FbPiiJog+1UbF/z5J097peDU7Bw==" />

                </identity>

            </endpoint>

        </client>

    </system.serviceModel>

</configuration>
可以看到,配置相比上一个项目简单许多,因为这里的客户端无需调用证书,只需定义加密类型。
添加两个textbox一个button和一个textResult,定义按钮事件代码:
using System;

using System.Windows.Forms;

namespace TestUserPassService_Client

{

    public partial class Form1 : Form

    {

        public Form1()

        {

            InitializeComponent();

        }

        private void textBox1_TextChanged(object sender, EventArgs e)

        {

        }

        private void textBox2_TextChanged(object sender, EventArgs e)

        {

        }

        private void button1_Click(object sender, EventArgs e)

        {

            try

            {

                Service1.Service1Client client = new Service1.Service1Client();

                // 传入帐号密码

                client.ClientCredentials.UserName.UserName = this.textBox1.Text;

                client.ClientCredentials.UserName.Password = this.textBox2.Text;

                string result = client.GetData(DateTime.Now.Second);

                txtResult.Text = result;

            }

            catch (Exception ex)

            {

                this.txtResult.Text = ex.ToString();

            }

        }

    }

}
运行客户端,正确的结果如图:
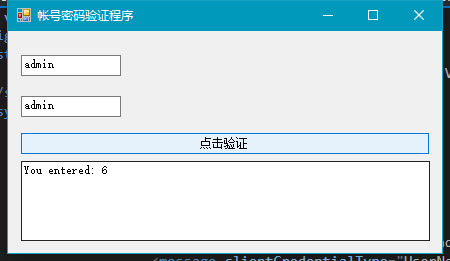
假若修改传入的帐号密码,结果如下:

查看http传输内容,同样是密文:

至此,本项目完成,demo可在文章结尾处下载。
四、总结
其实wcf加密操作没有太高深的内容(或者说暂且不用理会里面高深的内容),繁琐的部分在于web.config和app.config的配置,尤其bindingConfiguration这类名称命名上,由于网上教程众多,东拉一块西扯一块拼起来是用不了的。比如我这样的萌新调通两个项目就花了2天时间,因此这篇文章也尽可能将容易踩到的雷点暴露出来,供后来者们借鉴。当然篇幅和能力有限不能面面俱到,也请各位谅解,有问题可以在下面回复或者请教谷歌。
五、demo下载
--------------------------------------------------------------------------------更新01------------------------------------------------------------------------------------------------------
如果web访问配置好的服务提示“密钥集不存在”的问题,请按一下方法处理:
进入路径:C:\ProgramData\Microsoft\Crypto\RSA\MachineKeys(vista之后可用)
找到刚才创建的证书文件,如果你不确定,可以参考这里
然后右键-属性-安全,保证IIS_IUSRS用户有读取该文件的权限(本机测试时IIS是由这个用户运行的,其他电脑可能会有不同。)即可。
WCF加密操作(包括证书和证书+帐号密码)的更多相关文章
- Wireshark分析实战:某达速递登录帐号密码提取
- 准备工作 首先,备好Wireshark,打开,在外网网卡上抓包. 其次,用浏览器访问http://www.yundaex.com/cn/index.php,并在手机上下载安装其APP,找到登录页面 ...
- Squid配置之使用帐号密码验证
转自: https://blog.csdn.net/atco/article/details/43448885 1.安装squid使用root用户进行操作.先使用rpm检测是否已经安装了sql ...
- 用firefox 31配合KeePass密码管理器实现web帐号密码自动填写登录
原文:http://bbs.kafan.cn/thread-1754676-1-1.html KeePass的优势:1.这是一款完全开源的密码管理器2.很多人都使用lastpass来保存密码,而这种严 ...
- 如何破解linux用户帐号密码一
ENCRYPT_METHOD SHA512 定义帐号密码的加密方式 1.第一步拿到散列,也就是加密后的密码hash值 2.可以去一些彩虹表(rainbow)网站查询这些hash对应的密码明文,稍微花些 ...
- 如何修改SharePoint2013服务器场帐号密码
服务器远程登录帐号密码修改密码后,如何修改sharepoint服务器场管理员账户密码,今天登录了一下N久以前的搭建sharepoint2013服务器场的一台服务器器,登录进去以后直接提示帐号密码过期需 ...
- python3登录极路由并读取宽带帐号帐号密码.py
python3登录极路由并读取宽带帐号帐号密码,fiddler抓包分析过程略... 步骤:1.登录路由,提取stok. 2.用stok拼成url,post请求 3.解析json数据 代码: " ...
- 开发Chrome Extension截取你微博的帐号密码
Google允许开发者对Chrome浏览器做扩展,所以有了之前火爆的12306抢票软件,我 也用它抢过票,一直很好奇它怎么注入js到12306上面的.这周有空研究了下Chrome Extension, ...
- Ubuntu 12.04 64bit 配置完android 5.0编译环境后出现“could not write bytes: Broken pipe.”而无法进入输入帐号密码的登陆界面
Ubuntu 12.04 64bit 配置完android 5.0编译环境后出现“could not write bytes: Broken pipe.”而无法进入输入帐号密码的登陆界面.上网问了问百 ...
- foxmail收取163企业邮箱设置,不能直接用foxmail默认的配置,否则一直提示帐号密码错误
foxmail收取163企业邮箱设置,不能直接用foxmail默认的配置,否则一直提示帐号密码错误,收件.发件服务器配置需要用imap.ym.163.com,smtp.ym.163.com三级域名,帐 ...
随机推荐
- HDU 5531
题目大意: 给定一个n边形的顶点 以每个顶点为圆心画圆(半径可为0) 每个顶点的圆要和它相邻顶点的圆相切(不相邻的可相交) 求所有圆的最小面积总和并给出所有圆的半径 设半径为r1 r2 ... rn, ...
- leetcode 题型 数据结构 解法 分类总结
第2章 线性表 2.1 数组 2.1.1 Remove Duplicates from Sorted Array 2.1.2 Remove Duplicates from Sorted Array I ...
- 2019-8-16-调试时限制程序使用-CPU-核心数模拟低端设备
title author date CreateTime categories 调试时限制程序使用 CPU 核心数模拟低端设备 lindexi 2019-08-16 16:11:32 +0800 20 ...
- java四种引用与回调函数
JAVA四种引用 java对象的引用包括: 强引用 软引用 弱引用 虚引用 Java中提供这四种引用类型主要有两个目的: 第一是可以让程序员通过代码的方式决定某些对象的生命周期: 第二是有利于JVM进 ...
- 获取linux性能数据
import reimport osimport sysimport jsonimport socketfrom urllib import request,parseimport urllibfro ...
- 神经网络 (1)- Alexnet
文章目录 模型结构 conv1层 conv2层 conv3层 conv4层 conv5层 FC6全链接图: fc7全连接层:和fc6类似. fc8链接层: 模型优化 选择ReLU作为激活函数 多GPU ...
- gevent实现并发
#_author:来童星#date:2019/12/12import geventimport timedef func1(): print('\033[31;1mfun1 starting...\0 ...
- day13 python-001 简介及循环、判断、复制等
Python之路,Day1 = Python基础1 本节内容 1.Python历史简介以及安装.环境变量的配置: 2.Pycharm的简单设置: 3.变量的使用及定义: 4.获取键盘输入及打印: 5. ...
- JLOI 2013 卡牌游戏 bzoj3191
题目描述 N个人坐成一圈玩游戏.一开始我们把所有玩家按顺时针从1到N编号.首先第一回合是玩家1作为庄家.每个回合庄家都会随机(即按相等的概率)从卡牌堆里选择一张卡片,假设卡片上的数字为X,则庄家首先把 ...
- VS2010-MFC(MFC常用类:CString类)
转自:http://www.jizhuomi.com/software/228.html CString类简介 CString类作为MFC的常用类,当之无愧.可以这样说,只要是从事MFC开发,基本都会 ...