Spring Boot 鉴权之—— springboot2.0.4+mybatis 整合的完整用例
自上一篇文章的基础上,Spring Boot 鉴权之—— JWT 鉴权我做了一波springboot2.0.4+mybatis 的整合。
参考文章: Spring Boot+Spring Security+JWT 实现 RESTful Api 权限控制
源码地址:
码云:https://gitee.com/region/spring-security-oauth-example/tree/master/spring-security-jwt
springboot2.0.4+mybatis pom.xml:
这里由于springboot2.0.4没有默认的passwordencoder,也就是说我们登录不能明文登录,所以为了方便期间,我直接使用了数据库。
<!-- https://mvnrepository.com/artifact/org.apache.commons/commons-lang3 -->

        <dependency>

            <groupId>org.apache.commons</groupId>

            <artifactId>commons-lang3</artifactId>

        </dependency>

         <!-- Spring-Mybatis -->

        <dependency>

            <groupId>org.mybatis.spring.boot</groupId>

            <artifactId>mybatis-spring-boot-starter</artifactId>

            <version>1.3.0</version>

            </dependency>

        <!-- MySQL 连接驱动依赖 -->

        <dependency>

            <groupId>mysql</groupId>

            <artifactId>mysql-connector-java</artifactId>

        </dependency>
config配置修改:
import org.springframework.beans.factory.annotation.Autowired;

import org.springframework.beans.factory.annotation.Qualifier;

import org.springframework.context.annotation.Configuration;

import org.springframework.security.config.annotation.authentication.builders.AuthenticationManagerBuilder;

import org.springframework.security.config.annotation.web.builders.HttpSecurity;

import org.springframework.security.config.annotation.web.builders.WebSecurity;

import org.springframework.security.config.annotation.web.configuration.WebSecurityConfigurerAdapter;

import org.springframework.security.core.userdetails.UserDetailsService;

import org.springframework.security.crypto.bcrypt.BCryptPasswordEncoder;

import com.jwt.server.filter.JwtAuthenticationFilter;

import com.jwt.server.filter.JwtLoginFilter;

import com.jwt.server.provider.CustomAuthenticationProvider;

/**

 * 通过SpringSecurity的配置,将JWTLoginFilter,JWTAuthenticationFilter组合在一起

 *

 * @Order(SecurityProperties.ACCESS_OVERRIDE_ORDER) 在springboot1.5.8的时候该注解是可以用的

 *                                                  具体看源码

 * @author zyl

 *

 */

@Configuration

public class SecurityConfiguration extends WebSecurityConfigurerAdapter {

    @Qualifier("userDetailServiceImpl")

    @Autowired

    private UserDetailsService userDetailsService;

    @Autowired

    private BCryptPasswordEncoder bCryptPasswordEncoder;

    @Override

    public void configure(WebSecurity web) throws Exception {

        super.configure(web);

    }

    @Override

    protected void configure(HttpSecurity http) throws Exception {

        // 自定义 默认

        http.cors().and().csrf().disable().authorizeRequests().antMatchers("/users/signup").permitAll().anyRequest()

                .authenticated().and().addFilter(new JwtLoginFilter(authenticationManager()))// 默认登录过滤器

                .addFilter(new JwtAuthenticationFilter(authenticationManager()));// 自定义过滤器

    }

    // 该方法是登录的时候会进入

    @Override

    public void configure(AuthenticationManagerBuilder auth) throws Exception {

//        auth.userDetailsService(userDetailsService).passwordEncoder(new BCryptPasswordEncoder());

        // 使用自定义身份验证组件   手动注入加密类

        auth.authenticationProvider(new CustomAuthenticationProvider(userDetailsService, bCryptPasswordEncoder));

    }

}
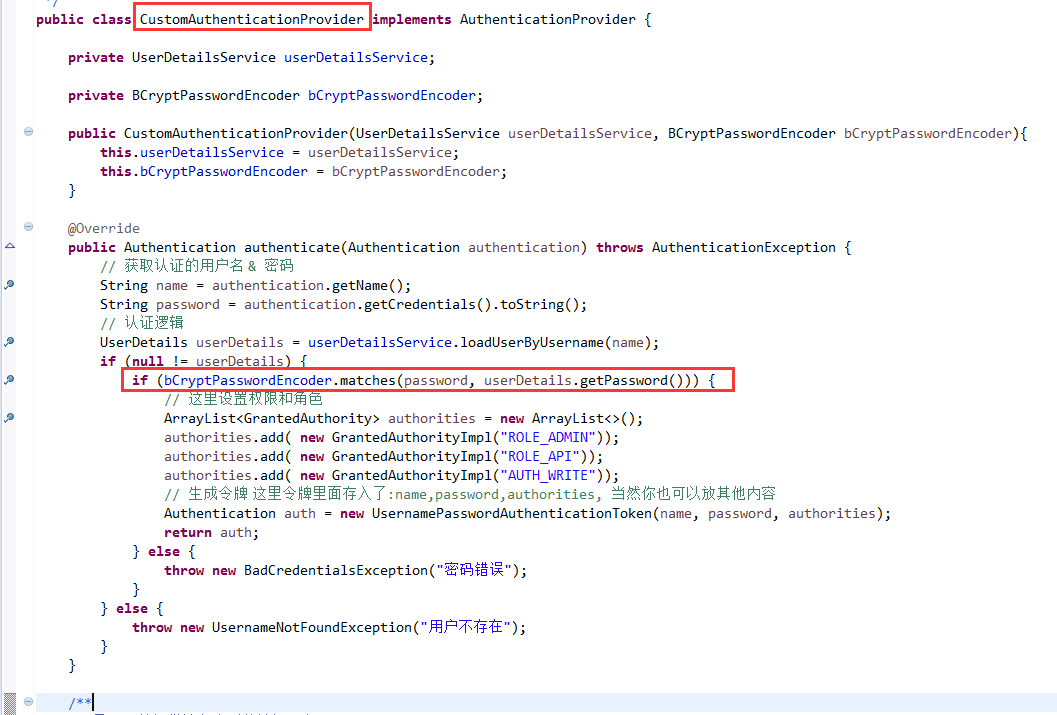
自定义身份验证组件
package com.jwt.server.provider;

import java.util.ArrayList;

import org.springframework.security.authentication.AuthenticationProvider;

import org.springframework.security.authentication.BadCredentialsException;

import org.springframework.security.authentication.UsernamePasswordAuthenticationToken;

import org.springframework.security.core.Authentication;

import org.springframework.security.core.AuthenticationException;

import org.springframework.security.core.GrantedAuthority;

import org.springframework.security.core.userdetails.UserDetails;

import org.springframework.security.core.userdetails.UserDetailsService;

import org.springframework.security.core.userdetails.UsernameNotFoundException;

import org.springframework.security.crypto.bcrypt.BCryptPasswordEncoder;

/**

 * 自定义身份认证验证组件

 * @author zyl

 *

 */

public class CustomAuthenticationProvider implements AuthenticationProvider {

    private UserDetailsService userDetailsService;

    private BCryptPasswordEncoder bCryptPasswordEncoder;

    public CustomAuthenticationProvider(UserDetailsService userDetailsService, BCryptPasswordEncoder bCryptPasswordEncoder){

        this.userDetailsService = userDetailsService;

        this.bCryptPasswordEncoder = bCryptPasswordEncoder;

    }

    @Override

    public Authentication authenticate(Authentication authentication) throws AuthenticationException {

        // 获取认证的用户名 & 密码

        String name = authentication.getName();

        String password = authentication.getCredentials().toString();

        // 认证逻辑

        UserDetails userDetails = userDetailsService.loadUserByUsername(name);

        if (null != userDetails) {

            if (bCryptPasswordEncoder.matches(password, userDetails.getPassword())) {

                // 这里设置权限和角色

                ArrayList<GrantedAuthority> authorities = new ArrayList<>();

                authorities.add( new GrantedAuthorityImpl("ROLE_ADMIN"));

                authorities.add( new GrantedAuthorityImpl("ROLE_API"));

                authorities.add( new GrantedAuthorityImpl("AUTH_WRITE"));

                // 生成令牌 这里令牌里面存入了:name,password,authorities, 当然你也可以放其他内容

                Authentication auth = new UsernamePasswordAuthenticationToken(name, password, authorities);

                return auth;

            } else {

                throw new BadCredentialsException("密码错误");

            }

        } else {

            throw new UsernameNotFoundException("用户不存在");

        }

    }

    /**

     * 是否可以提供输入类型的认证服务

     * @param authentication

     * @return

     */

    @Override

    public boolean supports(Class<?> authentication) {

        return authentication.equals(UsernamePasswordAuthenticationToken.class);

    }

}
权限类型,负责存储权限和角色
package com.jwt.server.provider;

import org.springframework.security.core.GrantedAuthority;

/**

 * 权限类型,负责存储权限和角色

 *

 * @author zyl

 */

public class GrantedAuthorityImpl implements GrantedAuthority {

    /**

     *

     */

    private static final long serialVersionUID = 1L;

    private String authority;

    public GrantedAuthorityImpl(String authority) {

        this.authority = authority;

    }

    public void setAuthority(String authority) {

        this.authority = authority;

    }

    @Override

    public String getAuthority() {

        return this.authority;

    }

}
定义数据库service、dao文件
package com.jwt.server.service;

import com.jwt.server.domain.UserInfo;

/**

 * 用户service

 * @author zyl

 *

 */

public interface UserService {

    /**

     * 根据用户名查询用户是否存在

     * @param username

     * @return

     */

    public UserInfo findByUsername(String username);

    /**

     * 添加用户

     * @param user

     * @return

     */

    public UserInfo save(UserInfo user);

}
package com.jwt.server.service.impl;

import org.springframework.beans.factory.annotation.Autowired;

import org.springframework.stereotype.Service;

import com.jwt.server.domain.UserInfo;

import com.jwt.server.mapper.UserMapper;

import com.jwt.server.service.UserService;

@Service

public class UserServiceImpl implements UserService {

    @Autowired

    private UserMapper  usermapper;

    @Override

    public UserInfo findByUsername(String username) {

        return usermapper.findByUsername(username);

    }

    @Override

    public UserInfo save(UserInfo user) {

        return usermapper.save(user);

    }

}
修改之前定义的UserDetailServiceImpl文件为:
package com.jwt.server.service.impl;

import static java.util.Collections.emptyList;

import org.springframework.beans.factory.annotation.Autowired;

import org.springframework.security.core.userdetails.UserDetails;

import org.springframework.security.core.userdetails.UserDetailsService;

import org.springframework.security.core.userdetails.UsernameNotFoundException;

import org.springframework.stereotype.Service;

import com.jwt.server.domain.UserInfo;

import com.jwt.server.service.UserService;

/**

 *

 * @author zyl

 *

 */

@Service

public class UserDetailServiceImpl implements UserDetailsService {

    @Autowired

    protected UserService userService;

    @Override

    public UserDetails loadUserByUsername(String username) throws UsernameNotFoundException {

        UserInfo user = userService.findByUsername(username);

        if (user == null) {

            throw new UsernameNotFoundException(username);

        }

        return new org.springframework.security.core.userdetails.User(user.getUsername(), user.getPassword(),

                emptyList());

    }

}
增加IdGenerator id生成类
package com.jwt.server.util;

import java.net.InetAddress;

import java.net.UnknownHostException;

import org.apache.commons.lang3.time.DateFormatUtils;

import lombok.extern.slf4j.Slf4j;

/**

 * 与snowflake算法区别,返回字符串id,占用更多字节,但直观从id中看出生成时间

 *

 */

@Slf4j

public enum IdGenerator {

    /**

     * 每个要生成的序号类型对应一个序号

     */

    USER_TRANSID("1");

    private long workerId;   //用ip地址最后几个字节标示

    private long datacenterId = 0L; //可配置在properties中,启动时加载,此处默认先写成0

    private long sequence = 0L;

    private final long twepoch = 1516175710371L;

    private final long workerIdBits = 1L;

    private final long datacenterIdBits = 2L;

    private final long sequenceBits = 3L;

    private final long workerIdShift = sequenceBits;

    private final long datacenterIdShift = sequenceBits + workerIdBits;

    private final long timestampLeftShift = sequenceBits + workerIdBits + datacenterIdBits;

    private long sequenceMask = -1L ^ (-1L << sequenceBits); //

    private long lastTimestamp = -1L;

    private String index;

    IdGenerator(String ind) {

        this.index = ind;

        workerId = 0x000000FF & getLastIP();

    }

    public synchronized String nextId() {

        long timestamp = timeGen(); //获取当前毫秒数

        //如果服务器时间有问题(时钟后退) 报错。

        if (timestamp < lastTimestamp) {

            throw new RuntimeException(String.format(

                    "Clock moved backwards.  Refusing to generate id for %d milliseconds", lastTimestamp - timestamp));

        }

        //如果上次生成时间和当前时间相同,在同一毫秒内

        if (lastTimestamp == timestamp) {

            //sequence自增,因为sequence只有12bit,所以和sequenceMask相与一下,去掉高位

            sequence = (sequence + 1) & sequenceMask;

            //判断是否溢出,也就是每毫秒内超过4095,当为4096时,与sequenceMask相与,sequence就等于0

            if (sequence == 0) {

                timestamp = tilNextMillis(lastTimestamp); //自旋等待到下一毫秒

            }

        } else {

            sequence = 0L; //如果和上次生成时间不同,重置sequence,就是下一毫秒开始,sequence计数重新从0开始累加

        }

        lastTimestamp = timestamp;

        long suffix =  ((timestamp - twepoch) << timestampLeftShift) | (datacenterId << datacenterIdShift) | (workerId << workerIdShift) | sequence;

        String datePrefix = DateFormatUtils.format(timeGen(), "yyyyMMddHHmmss");

        return datePrefix +index + suffix;

    }

    private long tilNextMillis(long lastTimestamp) {

        long timestamp = timeGen();

        while (timestamp <= lastTimestamp) {

            timestamp = timeGen();

        }

        return timestamp;

    }

    private long timeGen() {

        return System.currentTimeMillis();

    }

    private byte getLastIP(){

        byte lastip = 0;

        try{

            InetAddress ip = InetAddress.getLocalHost();

            byte[] ipByte = ip.getAddress();

            lastip = ipByte[ipByte.length - 1];

        } catch (UnknownHostException e) {

            log.error("UnknownHostException error:{}", e.getMessage());

        }

        return lastip;

    }

    public static void main(String[] args) {

        IdGenerator id = IdGenerator.USER_TRANSID;

        for (int i = 0; i < 1000; i++) {

            String serialNo = id.nextId();

            System.out.println(serialNo + "===" + serialNo.length());

        }

    }

}
mapper
package com.jwt.server.mapper;

import com.jwt.server.domain.UserInfo;

public interface UserMapper {

    /**

     * 根据用户名查询用户是否存在

     *

     * @param username

     * @return

     */

    public UserInfo findByUsername(String username);

    /**

     * 添加用户

     *

     * @param user

     * @return

     */

    public UserInfo save(UserInfo user);

}
mapper.xml
<?xml version="1.0" encoding="UTF-8"?>

<!DOCTYPE mapper PUBLIC "-//mybatis.org//DTD Mapper 3.0//EN" "http://mybatis.org/dtd/mybatis-3-mapper.dtd">

<mapper namespace="com.jwt.server.mapper.UserMapper">

  <resultMap id="BaseResultMap" type="com.jwt.server.domain.UserInfo">

    <id column="id" jdbcType="VARCHAR" property="id" />

    <result column="username" jdbcType="VARCHAR" property="username" />

    <result column="password" jdbcType="VARCHAR" property="password" />

  </resultMap>

  <!--用户登录查询  -->

  <select id="findByUsername" parameterType="java.lang.String" resultMap="BaseResultMap">

     select id,username,password from tb_user where username=#{username,jdbcType=VARCHAR}

  </select>

  <insert id="save" parameterType="com.jwt.server.domain.UserInfo">

        INSERT INTO tb_user

        (id,username,password) VALUES

        (#{id,jdbcType=VARCHAR},#{username,jdbcType=VARCHAR},#{password,jdbcType=VARCHAR})

  </insert>

</mapper>
mybatis-config.xml
<?xml version="1.0" encoding="UTF-8" ?>

<!DOCTYPE configuration

        PUBLIC "-//mybatis.org//DTD Config 3.0//EN"

        "http://mybatis.org/dtd/mybatis-3-config.dtd">

<configuration>

    <typeAliases>

        <typeAlias alias="Integer" type="java.lang.Integer" />

        <typeAlias alias="Long" type="java.lang.Long" />

        <typeAlias alias="HashMap" type="java.util.HashMap" />

        <typeAlias alias="LinkedHashMap" type="java.util.LinkedHashMap" />

        <typeAlias alias="ArrayList" type="java.util.ArrayList" />

        <typeAlias alias="LinkedList" type="java.util.LinkedList" />

    </typeAliases>

</configuration>
application.yml配置
#公共配置与profiles选择无关 mapperLocations指的路径是src/main/resources

mybatis:

  typeAliasesPackage: com.jwt.server.domain

  mapperLocations: classpath:mapper/*.xml

---

#开发配置

spring:

  datasource:

    driver-class-name: com.mysql.jdbc.Driver

    url: jdbc:mysql://localhost:3306/test?prepStmtCacheSize=517&cachePrepStmts=true&autoReconnect=true&characterEncoding=utf-8&allowMultiQueries=true

    username: root

    password: tiger
修改启动类扫描包
package com.jwt.server;

import org.mybatis.spring.annotation.MapperScan;

import org.springframework.boot.SpringApplication;

import org.springframework.boot.autoconfigure.SpringBootApplication;

import org.springframework.context.annotation.Bean;

import org.springframework.security.crypto.bcrypt.BCryptPasswordEncoder;

@SpringBootApplication

@MapperScan("com.jwt.server.mapper")//

public class SpringJwtApplication {

    public static void main(String[] args) {

        SpringApplication.run(SpringJwtApplication.class, args);

    }

    @Bean

    public BCryptPasswordEncoder bCryptPasswordEncoder() {

        return new BCryptPasswordEncoder();

    }

}
测试:
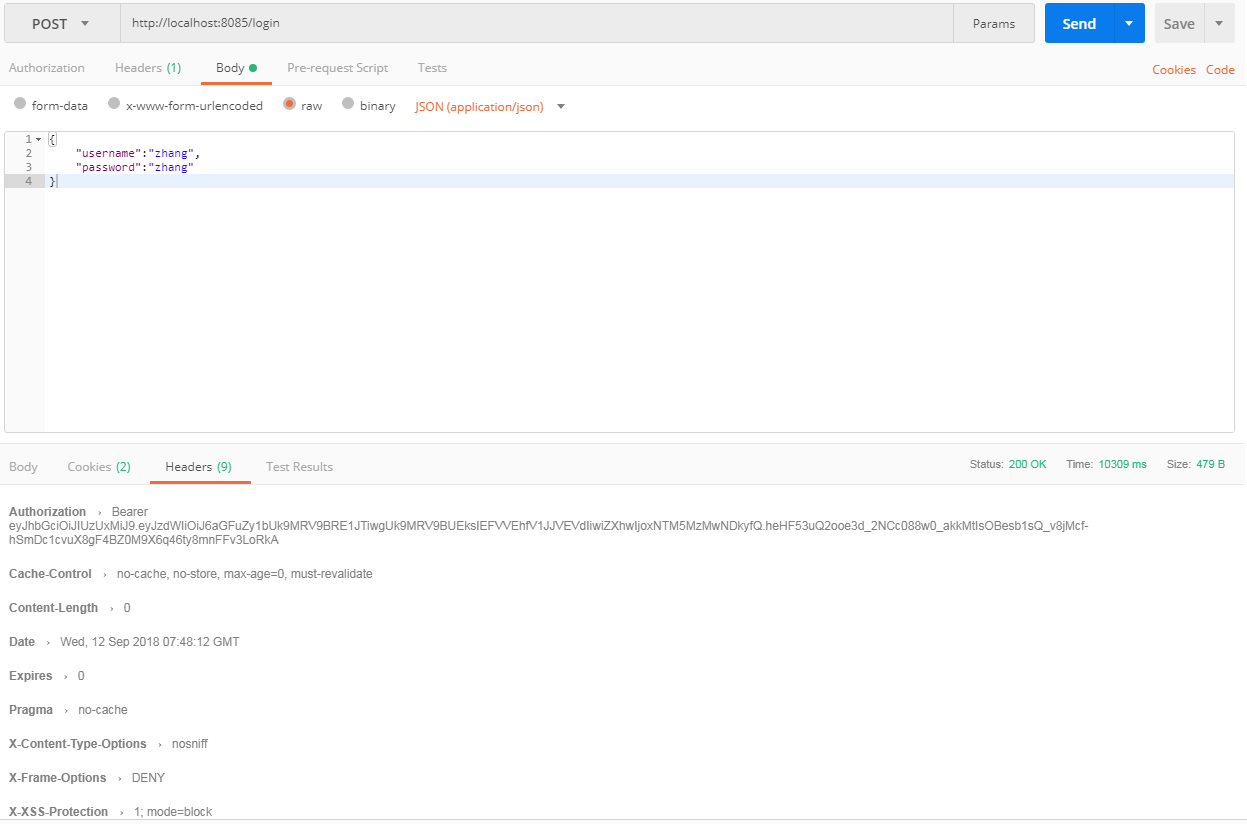
自定义登录测试:
好了ok啦。
需要注意的是:
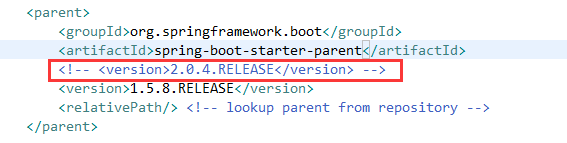
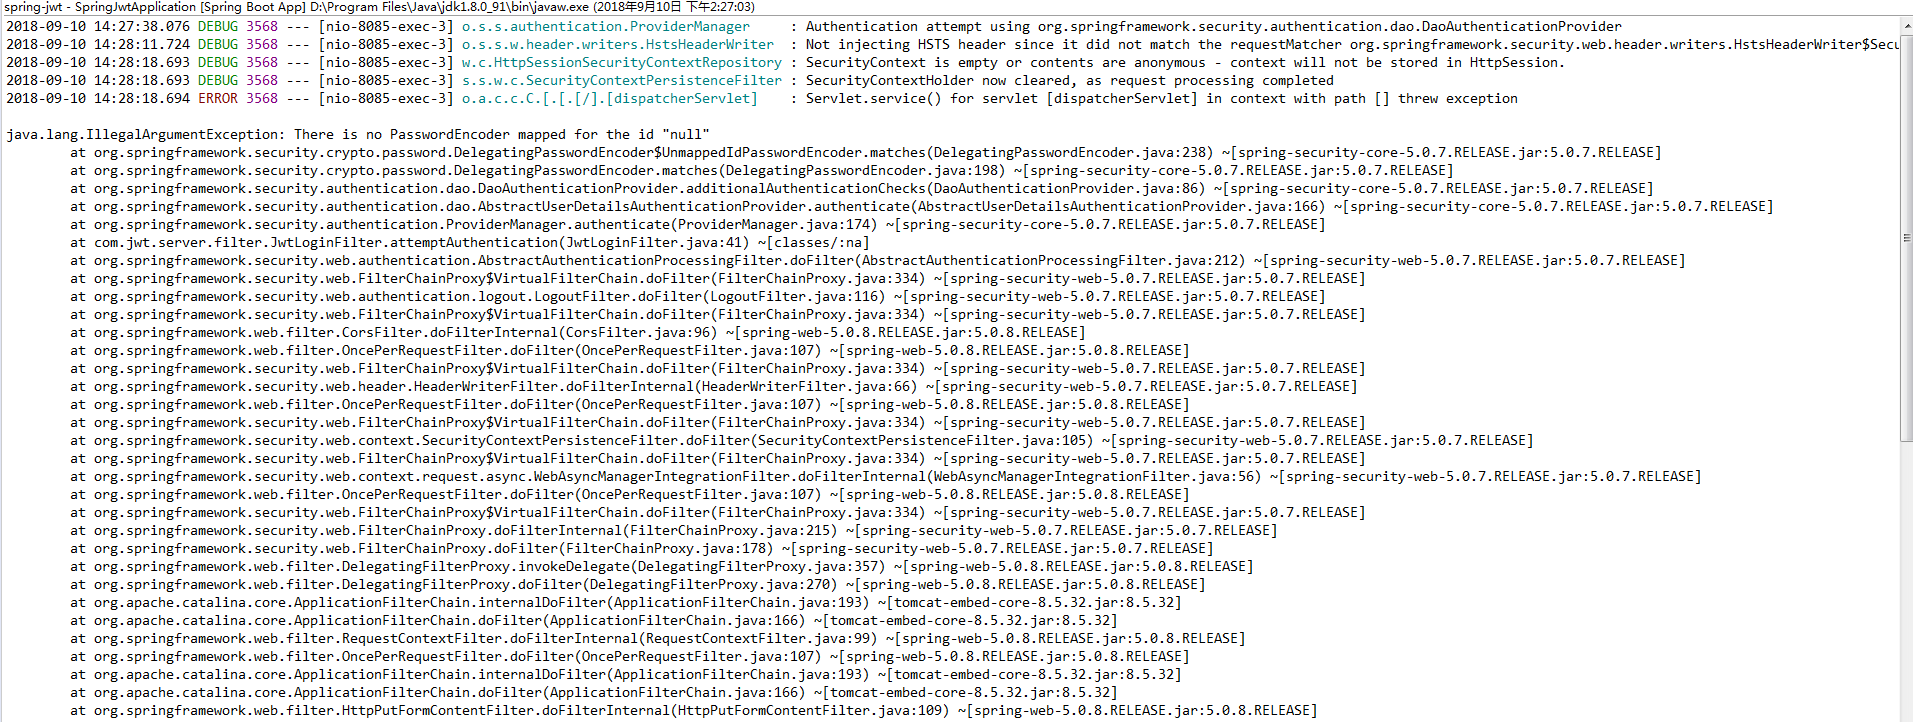
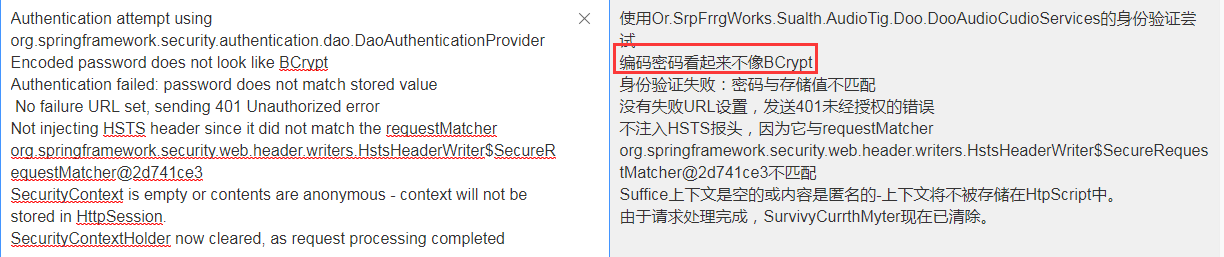
在springboot2.0.4版本的时候由于没有默认的passwordencoder,因此需要手动注入。如果不注入会在鉴权的时候报如下错误
如果测试会会有如下情况,说明你注入后未给密码加密
并且这里如果没有存储我们登录的信息时,可能也会有个坑,就是密码加密后与原密码做对比会报如下错误
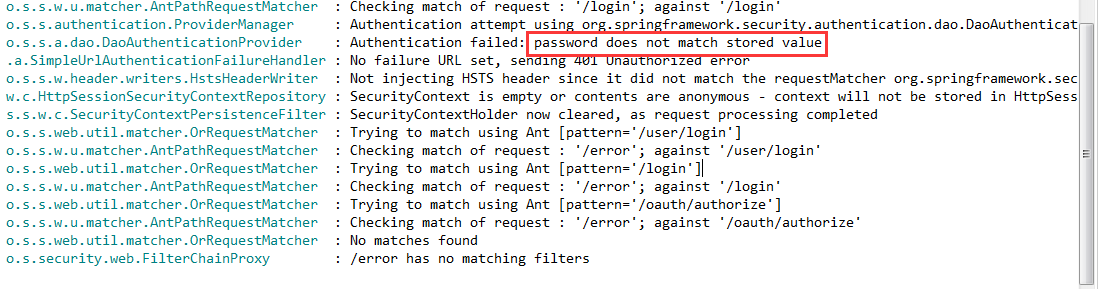
一般情况下我们用加密后,在授权的时候回去对比密码

这个错误就是会在这个地方产生的。解决办法
自定义身份验证类
自行调用,确保密码一致就ok。具体请看源码分析。
Spring Boot 鉴权之—— springboot2.0.4+mybatis 整合的完整用例的更多相关文章
- Spring Boot 鉴权之—— JWT 鉴权
第一:什么是JWT鉴权 1. JWT即JSON Web Tokens,是为了在网络应用环境间传递声明而执行的一种基于JSON的开放标准((RFC 7519),他可以用来安全的传递信息,因为传递的信息是 ...
- 开放平台鉴权以及OAuth2.0介绍
OAuth 2.0 协议 OAuth是一个开发标准,允许用户授权第三方网站或应用访问他们存储在另外的服务提供者上的信息,而不需要将用户名和密码提供给第三方网站或分享他们数据的内容. OAuth 2.0 ...
- SpringBoot2.0+Shiro+JWT 整合
SpringBoot2.0+Shiro+JWT 整合 JSON Web Token(JWT)是一个非常轻巧的规范.这个规范允许我们使用 JWT 在用户和服务器之间传递安全可靠的信息. 我们利用一定的编 ...
- Spring Boot 2.x基础教程:使用MyBatis的XML配置方式
上一篇我们介绍了如何在Spring Boot中整合我们国人最常用的MyBatis来实现对关系型数据库的访问.但是上一篇中使用了注解方式来实现,而对于很多MyBatis老用户还是习惯于XML的开发方式, ...
- Spring Boot从入门到精通(九)整合Spring Data JPA应用框架
JPA是什么? JPA全称Java Persistence API,是Sun官方提出的Java持久化规范.是JDK 5.0注解或XML描述对象-关系表的映射关系,并将运行期的实体对象持久化到数据库中. ...
- spring boot中连接数据库报错500(mybatis)
spring boot中连接数据库报错500(mybatis) pom.xml中的依赖 <!-- 集成mybatis--> <dependency> <groupId&g ...
- spring boot、cloud v2.1.0.RELEASE 使用及技术整理
2018年10月30日 springboot v2.1.0.RELEASE 发布: https://github.com/spring-projects/spring-boot/releases/ta ...
- SpringBoot2.0之四 简单整合MyBatis
从最开始的SSH(Struts+Spring+Hibernate),到后来的SMM(SpringMVC+Spring+MyBatis),到目前的S(SpringBoot),随着框架的不断更新换代,也为 ...
- spring boot(六):如何优雅的使用mybatis
*:first-child{margin-top: 0 !important}.markdown-body>*:last-child{margin-bottom: 0 !important}.m ...
随机推荐
- 18)C++对C的增强
在C++中所有的变量都必须有类型,但是在C语言中没有这个要求,C语言中的默认类型在C++中不合法, #include<stdio.h> f() { ; } int main() { int ...
- urlopen error [errno 10060]的解决思路
当用多线程爬取某个网站的数据的时候,爬取一段时间后,总出现urlopen error [errno 10060]的错误,结果线程无端的被挂掉,一开始的解决思路是每次连接的时候换用不同的useragen ...
- elasticsearch-hadoop 扩展定制 官方包以支持 update upsert doc
官方源码地址https://github.com/elastic/elasticsearch-hadoop 相关文档 https://www.elastic.co/guide/en/elasticse ...
- JdbcRDD连接MySQL
(1)添加依赖 <dependencies> <dependency> <groupId>org.apache.spark</groupId> < ...
- 从git上拉取项目 如果数据库密码不一致 会报错 500
解决方法 在该路径下设置 数据库的密码
- HDU-4578 Transformation(线段树的多种区间操作)
http://acm.hdu.edu.cn/showproblem.php?pid=4578 Time Limit: 15000/8000 MS (Java/Others) Memory Lim ...
- 6)HTML中a链接跳转地址怎么写
(1)看 thinkphp5的 附录--->助手函数 --->url 利用url进行书写地址跳转: 比如,你想跳转到cate控制器下的lst方法: <a href=" ...
- JacksonConfig
package org.linlinjava.litemall.core.config; import com.fasterxml.jackson.annotation.JsonInclude; im ...
- python Pandas Profiling 一行代码EDA 探索性数据分析
文章大纲 1. 探索性数据分析 代码样例 效果 解决pandas profile 中文显示的问题 1. 探索性数据分析 数据的筛选.重组.结构化.预处理等都属于探索性数据分析的范畴,探索性数据分析是帮 ...
- BucketSort(桶排序)原理及C++代码实现
桶排序假设输入数据服从均匀分布,平均情况下它的时间复杂度为O(n). 桶排序将输入数据的区间均匀分成若干份,每一份称作“桶”.分别对每一个桶的内容进行排序,再按桶的顺序输出则完成排序. 通常使用链表来 ...