Spring Cloud Gateway限流实战
欢迎访问我的GitHub
https://github.com/zq2599/blog_demos
内容:所有原创文章分类汇总及配套源码,涉及Java、Docker、Kubernetes、DevOPS等;
本篇概览
本文是《Spring Cloud Gateway实战》系列的第八篇,经过前面的学习,咱们对过滤器已了解得差不多,今天来补全过滤器的最后一个版块:限流(RequestRateLimiter )
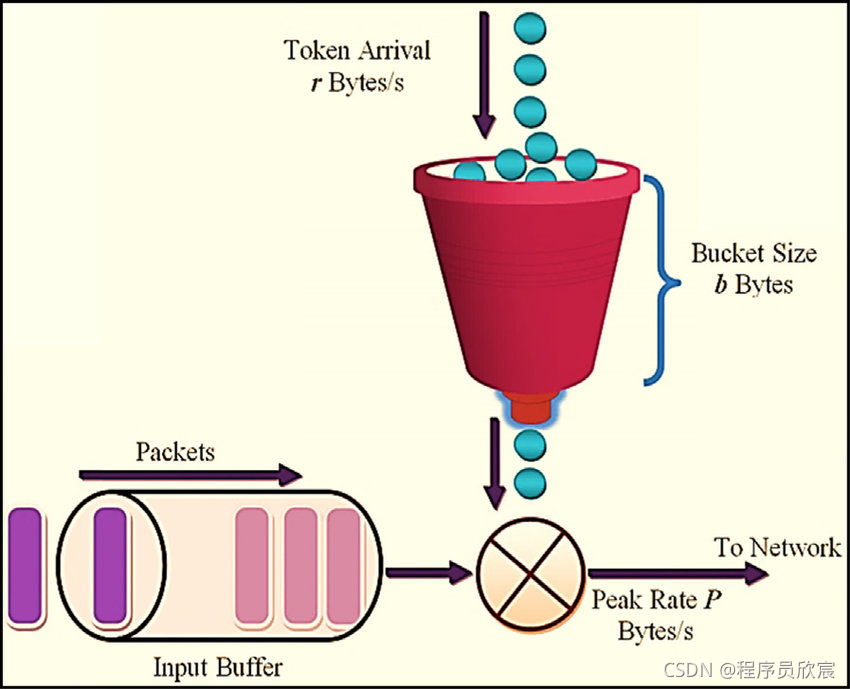
默认的限流器是基于redis实现的,限流算法是大家熟悉的令牌桶(Token Bucket Algorithm),关于令牌捅的原理就不在此展开了,聪明的您看一眼下图应该就懂了:装令牌的桶容量有限,例如最多20个,令牌进入桶的速度恒定(注意,这里是和漏桶算法的区别),例如每秒10个,底部每个请求能拿到令牌才会被处理:
RequestRateLimiter基本套路
- 使用RequestRateLimiter过滤器的步骤非常简单:
- 准备可用的redis
- maven或者gradle中添加依赖org.springframework.boot:spring-boot-starter-data-redis-reactive
- 确定按照什么维度限流,例如按照请求中的username参数限流,这是通过编写KeyResolver接口的实现来完成的
- 配置application.yml文件,添加过滤器
- 以上就是使用RequestRateLimiter过滤器的套路了,简单么?接下来,咱们先编码再验证
源码下载
- 本篇实战中的完整源码可在GitHub下载到,地址和链接信息如下表所示(https://github.com/zq2599/blog_demos):
| 名称 | 链接 | 备注 |
|---|---|---|
| 项目主页 | https://github.com/zq2599/blog_demos | 该项目在GitHub上的主页 |
| git仓库地址(https) | https://github.com/zq2599/blog_demos.git | 该项目源码的仓库地址,https协议 |
| git仓库地址(ssh) | git@github.com:zq2599/blog_demos.git | 该项目源码的仓库地址,ssh协议 |
- 这个git项目中有多个文件夹,本篇的源码在spring-cloud-tutorials文件夹下,如下图红框所示:

- spring-cloud-tutorials文件夹下有多个子工程,本篇的代码是gateway-requestratelimiter,如下图红框所示:

准备工作
- 为了更好的演示Gateway的效果,在服务提供者provider-hello的代码(Hello.java)中新增一个web接口,可以接受一个入参:
    @GetMapping("/userinfo")

    public String userInfo(@RequestParam("username") String username) {

        return Constants.HELLO_PREFIX + " " + username + ", " + dateStr();

    }
- 后面的测试咱们就用上述接口;
编码
- 在父工程spring-cloud-tutorials之下新增子工程gateway-requestratelimiter,其pom.xml内容如下,重点是org.springframework.boot:spring-boot-starter-data-redis-reactive:
<?xml version="1.0" encoding="UTF-8"?>

<project xmlns="http://maven.apache.org/POM/4.0.0"

         xmlns:xsi="http://www.w3.org/2001/XMLSchema-instance"

         xsi:schemaLocation="http://maven.apache.org/POM/4.0.0 http://maven.apache.org/xsd/maven-4.0.0.xsd">

    <parent>

        <artifactId>spring-cloud-tutorials</artifactId>

        <groupId>com.bolingcavalry</groupId>

        <version>1.0-SNAPSHOT</version>

    </parent>

    <modelVersion>4.0.0</modelVersion>

    <artifactId>gateway-requestratelimiter</artifactId>

    <dependencies>

        <dependency>

            <groupId>com.bolingcavalry</groupId>

            <artifactId>common</artifactId>

            <version>${project.version}</version>

        </dependency>

        <dependency>

            <groupId>org.springframework.cloud</groupId>

            <artifactId>spring-cloud-starter-gateway</artifactId>

        </dependency>

        <dependency>

            <groupId>org.springframework.boot</groupId>

            <artifactId>spring-boot-starter-data-redis-reactive</artifactId>

        </dependency>

    </dependencies>

</project>
- 配置文件application.yml,请注意RequestRateLimiter的几个参数,已经用中文添加了详细的注释:
server:

  #服务端口

  port: 8081

spring:

  application:

    name: circuitbreaker-gateway

  # redis配置

  redis:

    host: 192.168.50.43

    port: 6379

  cloud:

    gateway:

      routes:

        - id: path_route

          uri: http://127.0.0.1:8082

          predicates:

            - Path=/hello/**

          filters:

            - name: RequestRateLimiter

              args:

              	# 令牌入桶的速度为每秒100个,相当于QPS

                redis-rate-limiter.replenishRate: 100

                # 桶内能装200个令牌,相当于峰值,要注意的是:第一秒从桶内能去200个,但是第二秒只能取到100个了,因为入桶速度是每秒100个

                redis-rate-limiter.burstCapacity: 200

                # 每个请求需要的令牌数

                redis-rate-limiter.requestedTokens: 1
- 指定限流维度的代码CustomizeConfig.java,这里是根据请求参数username的值来限流的,假设真实请求中一半请求的username的等于Tom,另一半的username的等于Jerry,按照application.yml的配置,Tom的请求QPS为10,Jerry的QPS也是10:
package com.bolingcavalry.gateway.config;

import org.springframework.cloud.gateway.filter.ratelimit.KeyResolver;

import org.springframework.context.annotation.Bean;

import org.springframework.context.annotation.Configuration;

import reactor.core.publisher.Mono;

import java.util.Objects;

@Configuration

public class CustomizeConfig {

    @Bean

    KeyResolver userKeyResolver() {

        return exchange -> Mono.just(exchange.getRequest().getQueryParams().getFirst("username"));

    }

}
- 毫无营养的启动类RequestRateLimiterApplication.java:
package com.bolingcavalry.gateway;

import org.springframework.boot.SpringApplication;

import org.springframework.boot.autoconfigure.SpringBootApplication;

@SpringBootApplication

public class RequestRateLimiterApplication {

    public static void main(String[] args) {

        SpringApplication.run(RequestRateLimiterApplication.class,args);

    }

}
- 代码写完了,接下来开始验证;
验证(桶容量等于入桶速度)
首先验证的是桶容量等于入桶速度时的效果,请修改gateway-requestratelimiter应用的application.yml中文件,使得redis-rate-limiter.replenishRate和redis-rate-limiter.burstCapacity的值都等于100,也就是说桶的大小等于100,每秒放入的令牌数也是100
确保redis已经启动,并且与application.yml中的配置保持一直
启动nacos(provider-hello依赖)
启动服务提供者provider-hello
启动gateway-requestratelimiter
为了模拟web请求,我这里使用了Apache Benchmark,windows版本的下载地址:
https://www.apachelounge.com/download/VS16/binaries/httpd-2.4.48-win64-VS16.zip上述文件下载解压后即可使用,在控制台进入Apache24\bin后执行以下命令,意思是向指定地址发送10000个请求,并发数为2:
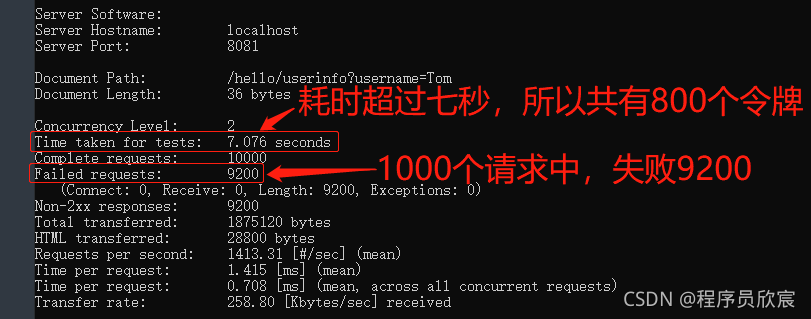
ab -n 10000 -c 2 http://localhost:8081/hello/userinfo?username=Tom
- 控制台输出如下,可见不到八秒的时间,只成功了800个,证明限流符合预期:
验证(桶容量大于入桶速度)
接下来试试桶容量大于入桶速度时的限流效果,这对于我们控制峰值响应有很重要的参考价值
请修改gateway-requestratelimiter应用的application.yml中文件,redis-rate-limiter.replenishRate维持100不变,但是redis-rate-limiter.burstCapacity改成200,也就是说每秒放入的令牌数还是100,但桶的容量翻倍了
重启应用gateway-requestratelimiter
再次执行以下命令,意思是向指定地址发送10000个请求,并发数为2:
ab -n 10000 -c 2 http://localhost:8081/hello/userinfo?username=Tom
- 测试结果如下图,可见符合预期,可以将桶内令牌全部用掉,以支撑峰值超过QPS的场景:

验证(根据username的维度限流)
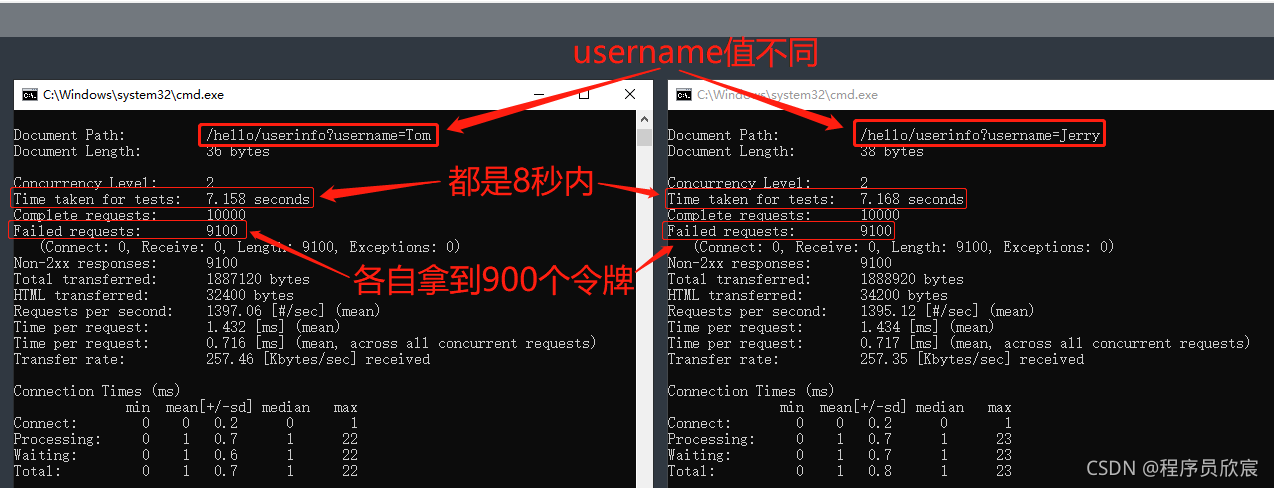
接下来验证限流的维度,究竟是不是按照请求参数username的值来限流的
咱们打开两个命令行,同时发送请求(动作要快),第一个的username等于Tom,第二个等于Jerry,理论上推测,如果都是8秒内完成,那么每个命令都有900个请求能成功
测试结果如下图,可见符合预期,每个username用的是自己的令牌:
- 至此,Spring Cloud Gateway限流实战已经完成,如此简单易用的限流方案,希望能给您的学习和使用带来参考
你不孤单,欣宸原创一路相伴
欢迎关注公众号:程序员欣宸
微信搜索「程序员欣宸」,我是欣宸,期待与您一同畅游Java世界...
https://github.com/zq2599/blog_demos
Spring Cloud Gateway限流实战的更多相关文章
- Spring Cloud 微服务五:Spring cloud gateway限流
前言:在互联网应用中,特别是电商,高并发的场景非常多,比如:秒杀.抢购.双11等,在开始时间点会使流量爆发式地涌入,如果对网络流量不加控制很有可能造成后台实例资源耗尽.限流是指通过指定的策略削减流量, ...
- 深入学习spring cloud gateway 限流熔断
前言 Spring Cloud Gateway 目前,Spring Cloud Gateway是仅次于Spring Cloud Netflix的第二个最受欢迎的Spring Cloud项目(就GitH ...
- spring cloud gateway 限流做法
标题 随风倒十分 反对法
- Spring Cloud Gateway自定义过滤器实战(观测断路器状态变化)
欢迎访问我的GitHub https://github.com/zq2599/blog_demos 内容:所有原创文章分类汇总及配套源码,涉及Java.Docker.Kubernetes.DevOPS ...
- Spring Cloud Zuul 限流详解(附源码)(转)
在高并发的应用中,限流往往是一个绕不开的话题.本文详细探讨在Spring Cloud中如何实现限流. 在 Zuul 上实现限流是个不错的选择,只需要编写一个过滤器就可以了,关键在于如何实现限流的算法. ...
- Spring Cloud(十二):Spring Cloud Zuul 限流详解(附源码)(转)
前面已经介绍了很多zuul的功能,本篇继续介绍它的另一大功能.在高并发的应用中,限流往往是一个绕不开的话题.本文详细探讨在Spring Cloud中如何实现限流. 在 Zuul 上实现限流是个不错的选 ...
- spring cloud gateway 之限流篇
转载请标明出处: https://www.fangzhipeng.com 本文出自方志朋的博客 在高并发的系统中,往往需要在系统中做限流,一方面是为了防止大量的请求使服务器过载,导致服务不可用,另一方 ...
- Spring Cloud Gateway 网关限流
Spring Cloud Gateway 限流 一.背景 二.实现功能 三.网关层限流 1.使用默认的redis来限流 1.引入jar包 2.编写配置文件 3.网关正常响应 4.网关限流响应 2.自定 ...
- spring cloud gateway整合sentinel作网关限流
说明: sentinel可以作为各微服务的限流,也可以作为gateway网关的限流组件. spring cloud gateway有限流功能,但此处用sentinel来作为替待. 说明:sentine ...
随机推荐
- 无服务计算应用场景探讨及 FaaS 应用实战
作者 | 宋文龙(闻可) 阿里云全球技术服务部高级交付专家 什么是无服务计算 无服务器计算(Serverless Computing)在构建和运行应用时无需管理服务器等基础设施.它描述了一个细粒度的 ...
- bzoj3073Journeys(线段树优化最短路)
这里还是一道涉及到区间连边的问题. 如果暴力去做,那么就会爆炸 那么这时候就需要线段树来优化了. 因为是双向边 所以需要两颗线段树来分别对应入边和出边 QwQ然后做就好了咯 不过需要注意的是,这个边数 ...
- C# 三种方式实现Socket数据接收(经典)
Stream.Read 方法 当在派生类中重写时,从当前流读取字节序列,并将此流中的位置提升读取的字节数. 语法: public abstract int Read(byte[] buffer, in ...
- 用NXOpen.CAM.CAMSetup.CopyObjects复制刻字操作
复制刻字操作 手动时,报粘贴对象失败: 用代码执行,报内部错误: Dim destinationObject As NXOpen.CAM.CAMObject = CType(NXOpen.Utilit ...
- gitk
gitk gitk [<options>] [<revision range>] [--] [<path>-] 查看单个文件的变更历史 gitk -- CppPri ...
- 2.3 Core Building Blocks 核心构件
Core Building Blocks 核心构件 DDD mostly focuses on the Domain & Application Layers and ignores the ...
- 《手把手教你》系列技巧篇(三十三)-java+ selenium自动化测试-单选和多选按钮操作-上篇(详解教程)
1.简介 在实际自动化测试过程中,我们同样也避免不了会遇到单选和多选的测试,特别是调查问卷或者是答题系统中会经常碰到.因此宏哥在这里直接分享和介绍一下,希望小伙伴或者童鞋们在以后工作中遇到可以有所帮助 ...
- 原生js-无缝滚动
<!DOCTYPE html> <html lang="en"> <head> <meta charset="UTF-8&quo ...
- [Beta]the Agiles Scrum Meeting 5
会议时间:2020.5.19 20:00 1.每个人的工作 今天已完成的工作 成员 已完成的工作 issue yjy 为评测机增加更多评测指标 评测部分增加更多评测指标 tq 为评测机增加更多评测指标 ...
- 2021.9.26考试总结[NOIP模拟62]
T1 set 从\(0\)到\(n\)前缀余数有\(n+1\)个,但只有\(n\)种取值,找到一样的两个输出区间即可. \(code:\) T1 #include<bits/stdc++.h&g ...