linux下nginx编译安装、版本信息修改
环境
centos 7
安装依赖包
yum install -y  gcc gcc-c++ glibc glibc-devel pcre pcre-devel zlib zlib-devel openssl openssl-devel \
unzip psmisc bash-completion  libxml2 libxml2-devel libxslt libxslt-devel perl perl-ExtUtils-Embed
下载源码包
mkdir /usr/local/src
cd /usr/local/src
wget  http://nginx.org/download/nginx-1.20.1.tar.gz

tar -xf nginx-1.20.1.tar.gz
下载nginx_upstream_check_module模块
yum install -y git

cd /usr/local/src/

git clone https://github.com/yaoweibin/nginx_upstream_check_module.git
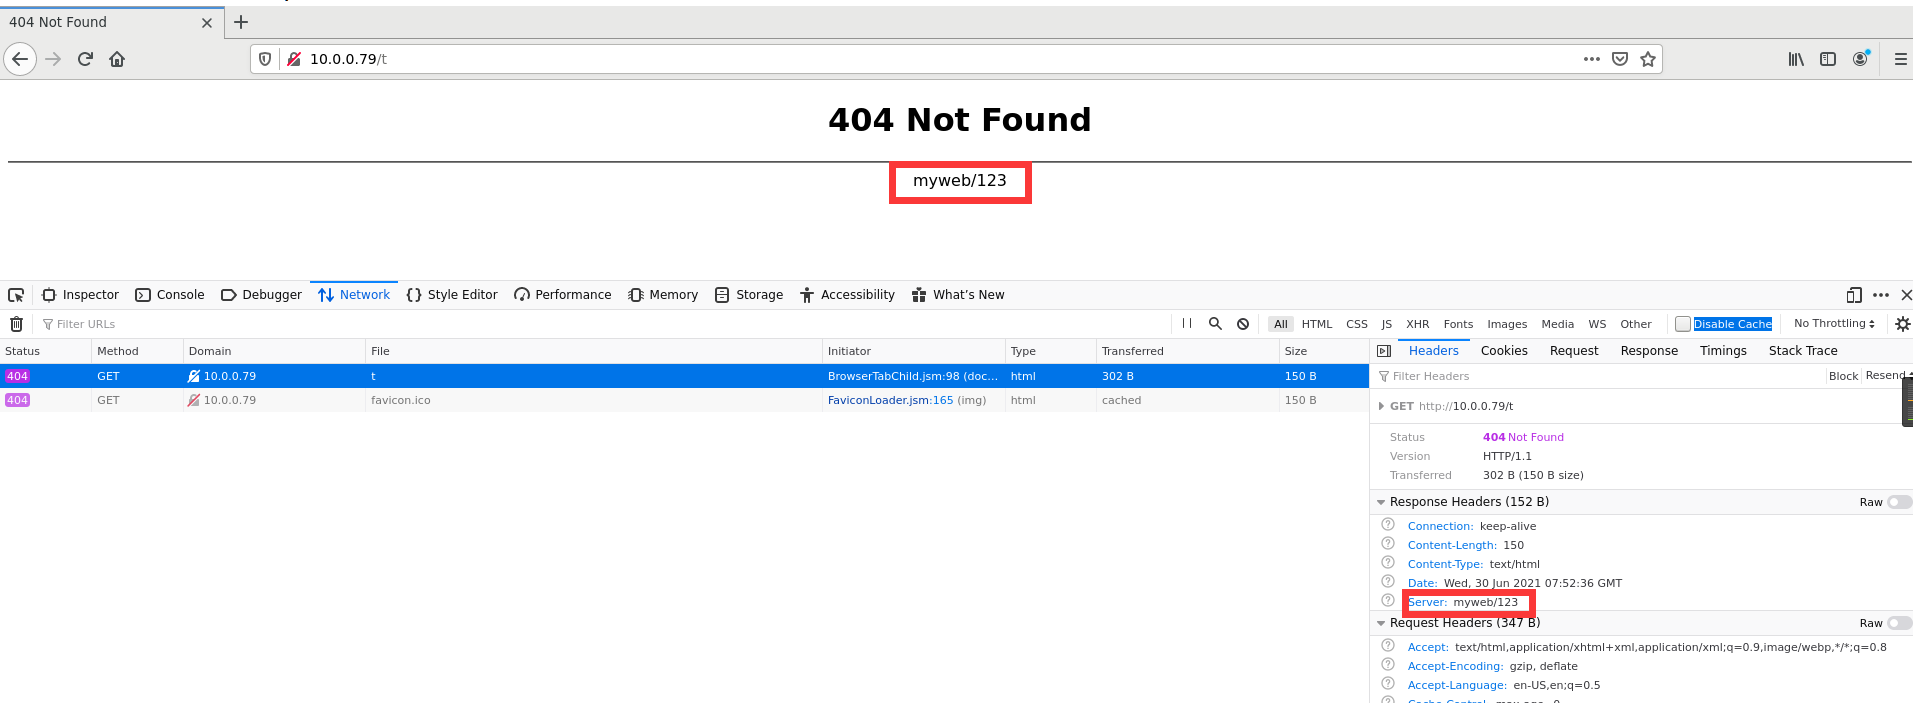
定制版本信息
版本号、服务器类型、错误页显示
cd /usr/local/src/nginx-1.20.1
修改版本
(本例修改为myweb)
src/core/nginx.h 文件
第13行#define NGINX_VERSION
第14行#define NGINX_VER "nginx/" NGINX_VERSION
sed -i '/define NGINX_VERSION/s/1.20.1/123/' src/core/nginx.h

sed -i '/^#define NGINX_VER.*NGINX_VERSION$/s/nginx/myweb/' src/core/nginx.h
修改HTTP 响应头
src/http/ngx_http_header_filter_module.c 文件
第49行 static u_char ngx_http_server_string[] = "Server: nginx" CRLF;
sed -i '/static u_char ngx_http_server_string/s/nginx/myweb/' src/http/ngx_http_header_filter_module.c
修改错误页底部提示
src/http/ngx_http_special_response.c 文件
第36行 static u_char ngx_http_error_tail[] =
"<hr><center>nginx</center>" CRLF
sed -i '36s#nginx#myweb#' src/http/ngx_http_special_response.c
最终效果
添加nginx用户
useradd -r nginx -s /sbin/nologin
编译安装
./configure --prefix=/usr/local/nginx \
--user=nginx --group=nginx \
--pid-path=/usr/local/nginx/nginx.pid \
--with-http_ssl_module \
--with-http_realip_module \
--with-http_stub_status_module \
--with-http_gzip_static_module \
--with-http_gunzip_module \
--with-http_v2_module \
--with-pcre \
--with-threads \
--with-file-aio \--with-stream \
--with-stream_ssl_module \
--with-stream_realip_module \
--add-module=/usr/local/src/nginx_upstream_check_module
make -j 4
make install
服务及开机自启
开机启动
系统服务(systemctl)
使用systemctl管理:systemctl start | stop | reload | enable | disable nginx
/usr/lib/systemd/system/nginx.service 文件
[Unit]
Description=The nginx HTTP and reverse proxy server
After=network-online.target remote-fs.target nss-lookup.target
Wants=network-online.target
[Service]
Type=forking
PIDFile=/usr/local/nginx/nginx.pid
# Nginx will fail to start if /run/nginx.pid already exists but has the wrong
# SELinux context. This might happen when running `nginx -t` from the cmdline.
# https://bugzilla.redhat.com/show_bug.cgi?id=1268621
ExecStartPre=/usr/bin/rm -f /run/nginx.pid
ExecStartPre=/usr/local/nginx/sbin/nginx -t
ExecStart=/usr/local/nginx/sbin/nginx
ExecReload=/usr/local/nginx/sbin/nginx -s reload
KillSignal=SIGQUIT
TimeoutStopSec=5
KillMode=process
PrivateTmp=true
[Install]
WantedBy=multi-user.target
使用rc.local自启
不便或不需写为服务脚本放置于/etc/rc.d/init.d/目录,且又想开机时自动运行的命令,可直接放置于/etc/rc.d/rc.local文件中
cat >>/etc/rc.d/rc.local<<EOF

/usr/local/nginx/sbin/nginx

EOF
添加执行权限
chmod 755 /etc/rc.d/rc.local
环境变量
使用二进制nginx管理,不用每次都写一长串的绝对路径 nginx [-s reload | stop ]
方法1:PATH变量
cat >>/etc/profile.d/nginx.sh <<EOF
export PATH=/usr/local/nginx/sbin:$PATH
EOF
soure /etc/profile.d/nginx.sh
方法2:软链接
ln -s /usr/local/nginx/sbin/nginx /usr/bin
不显示版本号
主配置文件中添加
server_tokens off;
linux下nginx编译安装、版本信息修改的更多相关文章
- Linux下nginx编译安装教程和编译参数详解
这篇文章主要介绍了Linux下nginx编译安装教程和编译参数详解,需要的朋友可以参考下 一.必要软件准备1.安装pcre 为了支持rewrite功能,我们需要安装pcre 复制代码代码如下: # y ...
- Linux 下Nginx编译安装
Untitled .note-content {font-family: 'Helvetica Neue', Arial, 'Hiragino Sans GB', STHeiti, 'Microsof ...
- centOS linux 下nginx编译安装详解
Nginx的官方网站是 www.nginx.org Nginx的下载地址是:http://nginx.org/en/download.html 由 于官网的设计非常简洁不大气不上档次,所以我们 ...
- linux下nginx编译安装
步骤: 1.获取nginx安装包. 进入nginx官网:http://nginx.org/ 找到稳定版本: 点击红框内的链接. 使用wget获取安装包. wget http://nginx.org/d ...
- Linux下Nginx的安装(二)
一.安装Nginx ## 安装前准备 ## #GNU编译器集合 #Nginx编译需要PCRE #在Nginx的各种模块中需要使用gzip压缩 #在Nginx中,如果服务器提供安全网页时则会用到Open ...
- Nginx 1.9.7.2 + PHP 5.6.18(FastCGI)在CentOS Linux下的编译安装
本文参考张宴的Nginx 0.8.x + PHP 5.2.13(FastCGI)搭建胜过Apache十倍的Web服务器(第6版)[原创]完成.所有操作命令都在CentOS 6.x 64位操作系统下实践 ...
- Linux下Nginx的安装、升级及动态添加模块
系统基于ubuntu server 14.04.4 amd64 安装 第一步 下载并解压Nginx压缩包 从Nginx官网下载Nginx,或者在Linux上执行wget http://nginx.or ...
- linux下nginx的安装和配置
准备目录 [root@sqh ~]# mkdir /usr/local/nginx [root@sqh ~]# cd /usr/local/nginx 添加一些支持和依赖 1.安装gcc 安装redi ...
- Linux下Nginx的安装与配置
安装前需要安装pcre:ftp://ftp.csx.cam.ac.uk/pub/software/programming/pcre/1.解压缩: tar xjpf pcre-7.8.tar.b ...
随机推荐
- Git修改历史commit的author信息
前言 "嘀嗒嘀嗒",抬头看向墙上的钟表,此时已是凌晨1点.小明终于把Go语言圣经第二章的笔记写完,保存commit,提交,然后睡觉. 额,等等,不对,小明发现他用的是公司的git账 ...
- freeswitch简介
freeswitch简介 freeswitch是开源的,免费的. freeswitch是一款非常好用的电话软交换框架,支持跨平台,扩展性良好,配置灵活. freeswitch可以在很多平台上运行,包括 ...
- linux系统下查看svn服务是否启动,重启及设置开机重启
Linux系统中svn服务是否启动,重启及设置开机启动 安装完svn服务器后虽然好用但是因为经常重启Linux服务器,每次重启完就要去手动启动svn服务器,很是麻烦,于是在网上找了一些方法后,自己 ...
- [源码解析] 深度学习流水线并行之PopeDream(1)--- Profile阶段
[源码解析] 深度学习流水线并行之PopeDream(1)--- Profile阶段 目录 [源码解析] 深度学习流水线并行之PopeDream(1)--- Profile阶段 0x00 摘要 0x0 ...
- python manage.py migrate出错
python manage.py migrate出错 在建立Django项目过程中执行 python manage.py migrate命令,出现如下错误: 解决办法: 编辑D:\install fi ...
- Android中TextView和EditView常用属性设置
Android中TextView和EditView常用属性设置 点击跳转
- 从kratos分析BBR限流源码实现
什么是自适应限流 自适应限流从整体维度对应用入口流量进行控制,结合应用的 Load.CPU 使用率.总体平均 RT.入口 QPS 和并发线程数等几个维度的监控指标,通过自适应的流控策略,让系统的入口流 ...
- 各种插值法的python实现
一维插值 插值不同于拟合.插值函数经过样本点,拟合函数一般基于最小二乘法尽量靠近所有样本点穿过.常见插值方法有拉格朗日插值法.分段插值法.样条插值法. 拉格朗日插值多项式:当节点数n较大时,拉格朗日插 ...
- Python习题集(九)
每天一习题,提升Python不是问题!!有更简洁的写法请评论告知我! https://www.cnblogs.com/poloyy/category/1676599.html 题目 已知一个数列:1. ...
- Pytest 系列(26)- 清空 allure 历史报告记录
如果你还想从头学起Pytest,可以看看这个系列的文章哦! https://www.cnblogs.com/poloyy/category/1690628.html 背景 pytest 运行 测试用例 ...