实验 4 :Open vSwitch 实验 —— Mininet 中使用 OVS 命令
实验 4 :Open vSwitch 实验 —— Mininet 中使用 OVS 命令
一、实验目的
Mininet 安装之后,会连带安装 Open vSwitch,可以直接通过 Python 脚本调用 Open vSwitch 命令,从而直接控制 Open vSwitch,通过实验了解调用控制的方法。
二 、实验任务
在本实验中,使用 Mininet 基于 Python 的脚本,调用“ovs-vsctl”命令直接控制Open vSwitch。使用默认的交换机泛洪规则,设置更高的优先级规则进行预先定义 IP 报文的转发。在多个交换机中通过设置不同 TOS 值的数据包将通过不同的方式到达目的地址,验证主机间的连通性及到达目的地址的时间。
三 、 实验步骤
1. 实验环境
安装了 Ubuntu 18.04.5 Desktop amd64 的虚拟机
2. 实验过程
SDNLAB 实验参考资料:https://www.sdnlab.com/15083.html
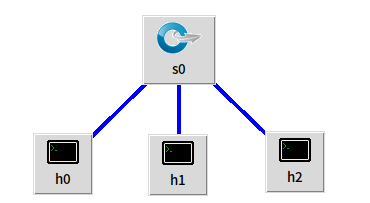
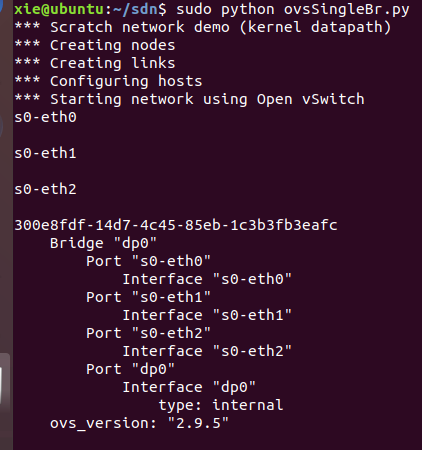
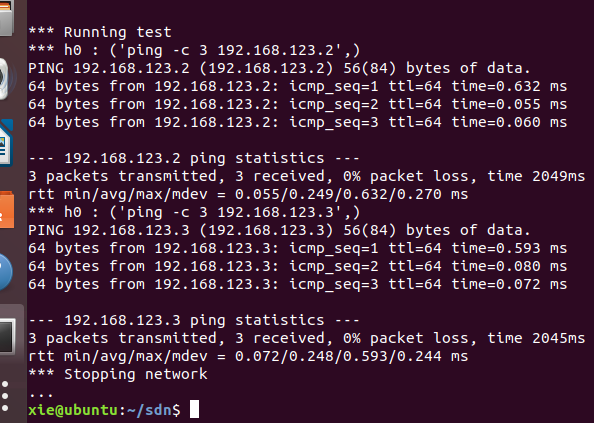
( 1 )创建 ovsSingleBr.py 脚本并添加内容,代码参考SDNLAB脚本对应的拓扑如上图所示,执行 ovsSingleBr.py,在没有控制器的情况下,在 Mininet 脚本中通过调用 ovs 命令直接向 switch0 交换机下发流表,将入端口号为 1/2/3 的数据包泛洪广播,并对目的地址为 192.168.123.1/2/3 的数据包分别从1/2/3 端口转发出去。之后测试 h0 ping h1,h0 ping h2,网络连通。
# ovsSingleBr.py

#!/usr/bin/python

from mininet.net import Mininet

from mininet.node import Node

from mininet.link import Link

from mininet.log import  setLogLevel, info

def myNet():

    "Create network from scratch using Open vSwitch."

    info( "*** Creating nodes\n" )

    switch0 = Node( 's0', inNamespace=False )

    h0 = Node( 'h0' )

    h1 = Node( 'h1' )

    h2 = Node( 'h2' )

    info( "*** Creating links\n" )

    Link( h0, switch0)

    Link( h1, switch0)

    Link( h2, switch0)

    info( "*** Configuring hosts\n" )

    h0.setIP( '192.168.123.1/24' )

    h1.setIP( '192.168.123.2/24' )

    h2.setIP( '192.168.123.3/24' )

    info( "*** Starting network using Open vSwitch\n" )

    switch0.cmd( 'ovs-vsctl del-br dp0' )

    switch0.cmd( 'ovs-vsctl add-br dp0' )

    for intf in switch0.intfs.values():

        print intf

        print switch0.cmd( 'ovs-vsctl add-port dp0 %s' % intf )

    # Note: controller and switch are in root namespace, and we

    # can connect via loopback interface

    #switch0.cmd( 'ovs-vsctl set-controller dp0 tcp:127.0.0.1:6633' )

    print switch0.cmd(r'ovs-vsctl show')

    print switch0.cmd(r'ovs-ofctl add-flow dp0 idle_timeout=0,priority=1,in_port=1,actions=flood' )

    print switch0.cmd(r'ovs-ofctl add-flow dp0 idle_timeout=0,priority=1,in_port=2,actions=flood' )

    print switch0.cmd(r'ovs-ofctl add-flow dp0 idle_timeout=0,priority=1,in_port=3,actions=flood' )

    print switch0.cmd(r'ovs-ofctl add-flow dp0 idle_timeout=0,priority=10,ip,nw_dst=192.168.123.1,actions=output:1' )

    print switch0.cmd(r'ovs-ofctl add-flow dp0 idle_timeout=0,priority=10,ip,nw_dst=192.168.123.2,actions=output:2' )

    print switch0.cmd(r'ovs-ofctl add-flow dp0 idle_timeout=0,priority=10,ip,nw_dst=192.168.123.3,actions=output:3')

    #switch0.cmd('tcpdump -i s0-eth0 -U -w aaa &')

    #h0.cmd('tcpdump -i h0-eth0 -U -w aaa &')

    info( "*** Running test\n" )

    h0.cmdPrint( 'ping -c 3 ' + h1.IP() )

    h0.cmdPrint( 'ping -c 3 ' + h2.IP() )

    #print switch0.cmd( 'ovs-ofctl show dp0' )

    #print switch0.cmd( 'ovs-ofctl dump-tables  dp0' )

    #print switch0.cmd( 'ovs-ofctl dump-ports   dp0' )

    #print switch0.cmd( 'ovs-ofctl dump-flows  dp0' )

    #print switch0.cmd( 'ovs-ofctl dump-aggregate  dp0' )

    #print switch0.cmd( 'ovs-ofctl queue-stats dp0' )

    info( "*** Stopping network\n" )

    switch0.cmd( 'ovs-vsctl del-br dp0' )

    switch0.deleteIntfs()

    info( '\n' )

if __name__ == '__main__':

    setLogLevel( 'info' )

    info( '*** Scratch network demo (kernel datapath)\n' )

    Mininet.init()

    myNet()
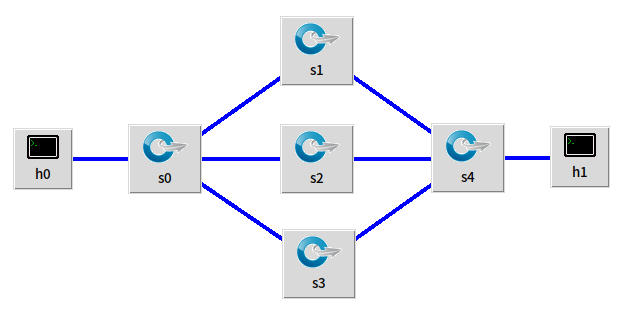
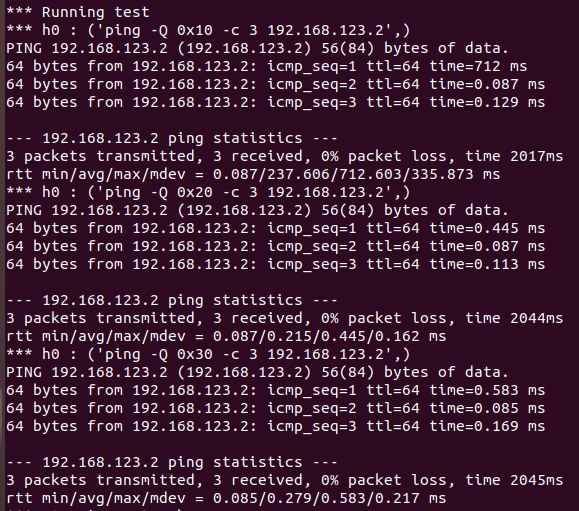
( 2 ) 创建 ovsMultiBr.py 脚本并添加内容,代码参考 SDNLAB 脚本对应的拓扑如上图所示,执行 ovsMultiBr.py,在没有控制器的情况下,在Mininet 脚本中通过调用 ovs 命令给多个交换机下发流表,通过 h0 ping h1 操作测试验证主机间的连通性,并通过 -Q 参数设置不通的 tos 值查看主机间的连通性。通过验证发现,tos 值设置越大,时间使用越少。

# ovsMultiBr.py

#!/usr/bin/python

from mininet.net import Mininet

from mininet.node import Node

from mininet.link import TCLink

from mininet.log import  setLogLevel, info

def myNet():

    "Create network from scratch using Open vSwitch."

    info( "*** Creating nodes\n" )

    switch0 = Node( 's0', inNamespace=False )

    switch1 = Node( 's1', inNamespace=False )

    switch2 = Node( 's2', inNamespace=False )

    switch3 = Node( 's3', inNamespace=False )

    switch4 = Node( 's4', inNamespace=False )

    h0 = Node( 'h0' )

    h1 = Node( 'h1' )

    info( "*** Creating links\n" )

    linkopts0=dict(bw=100, delay='1ms', loss=0)

    linkopts1=dict(bw=1, delay='100ms', loss=0)

    linkopts2=dict(bw=10, delay='50ms', loss=0)

    linkopts3=dict(bw=100, delay='1ms', loss=0)

    TCLink( h0, switch0, **linkopts0)

    TCLink( switch0, switch1, **linkopts0)

    TCLink( switch0, switch2, **linkopts0)

    TCLink( switch0, switch3, **linkopts0)

    TCLink( switch1, switch4,**linkopts1)

    TCLink( switch2, switch4,**linkopts2)

    TCLink( switch3, switch4,**linkopts3)

    TCLink( h1, switch4, **linkopts0)

    info( "*** Configuring hosts\n" )

    h0.setIP( '192.168.123.1/24' )

    h1.setIP( '192.168.123.2/24' )

    info( str( h0 ) + '\n' )

    info( str( h1 ) + '\n' )

    info( "*** Starting network using Open vSwitch\n" )

    switch0.cmd( 'ovs-vsctl del-br dp0' )

    switch0.cmd( 'ovs-vsctl add-br dp0' )

    switch1.cmd( 'ovs-vsctl del-br dp1' )

    switch1.cmd( 'ovs-vsctl add-br dp1' )

    switch2.cmd( 'ovs-vsctl del-br dp2' )

    switch2.cmd( 'ovs-vsctl add-br dp2' )

    switch3.cmd( 'ovs-vsctl del-br dp3' )

    switch3.cmd( 'ovs-vsctl add-br dp3' )

    switch4.cmd( 'ovs-vsctl del-br dp4' )

    switch4.cmd( 'ovs-vsctl add-br dp4' )

    for intf in switch0.intfs.values():

        print intf

        print switch0.cmd( 'ovs-vsctl add-port dp0 %s' % intf )

    for intf in switch1.intfs.values():

        print intf

        print switch1.cmd( 'ovs-vsctl add-port dp1 %s' % intf )

    for intf in switch2.intfs.values():

        print intf

        print switch2.cmd( 'ovs-vsctl add-port dp2 %s' % intf )

    for intf in switch3.intfs.values():

        print intf

        print switch3.cmd( 'ovs-vsctl add-port dp3 %s' % intf )

    for intf in switch4.intfs.values():

        print intf

        print switch4.cmd( 'ovs-vsctl add-port dp4 %s' % intf )

    print switch1.cmd(r'ovs-ofctl add-flow dp1 idle_timeout=0,priority=1,in_port=1,actions=flood' )

    print switch1.cmd(r'ovs-ofctl add-flow dp1 idle_timeout=0,priority=1,in_port=1,actions=output:2' )

    print switch1.cmd(r'ovs-ofctl add-flow dp1 idle_timeout=0,priority=1,in_port=2,actions=output:1' )

    print switch2.cmd(r'ovs-ofctl add-flow dp2 idle_timeout=0,priority=1,in_port=1,actions=output:2' )

    print switch2.cmd(r'ovs-ofctl add-flow dp2 idle_timeout=0,priority=1,in_port=2,actions=output:1' )

    print switch3.cmd(r'ovs-ofctl add-flow dp3 idle_timeout=0,priority=1,in_port=1,actions=output:2' )

    print switch3.cmd(r'ovs-ofctl add-flow dp3 idle_timeout=0,priority=1,in_port=2,actions=output:1' )

    print switch4.cmd(r'ovs-ofctl add-flow dp4 idle_timeout=0,priority=1,in_port=1,actions=output:4' )

    print switch4.cmd(r'ovs-ofctl add-flow dp4 idle_timeout=0,priority=1,in_port=2,actions=output:4' )

    print switch4.cmd(r'ovs-ofctl add-flow dp4 idle_timeout=0,priority=1,in_port=3,actions=output:4' )

    print switch4.cmd(r'ovs-ofctl add-flow dp4 idle_timeout=0,priority=1,in_port=4,actions=output:3' )

    #print switch0.cmd(r'ovs-ofctl add-flow dp0 idle_timeout=0,priority=10,ip,nw_dst=192.168.123.2,actions=output:4')

    print switch0.cmd(r'ovs-ofctl add-flow dp0 idle_timeout=0,priority=10,ip,nw_dst=192.168.123.2,nw_tos=0x10,actions=output:2')

    print switch0.cmd(r'ovs-ofctl add-flow dp0 idle_timeout=0,priority=10,ip,nw_dst=192.168.123.2,nw_tos=0x20,actions=output:3')

    print switch0.cmd(r'ovs-ofctl add-flow dp0 idle_timeout=0,priority=10,ip,nw_dst=192.168.123.2,nw_tos=0x30,actions=output:4')

    #print switch0.cmd(r'ovs-ofctl add-flow dp0 idle_timeout=0,priority=10,ip,nw_dst=192.168.123.1,actions=output:1')

    #switch0.cmd('tcpdump -i s0-eth0 -U -w aaa &')

    #h0.cmd('tcpdump -i h0-eth0 -U -w aaa &')

    info( "*** Running test\n" )

    h0.cmdPrint( 'ping -Q 0x10 -c 3 ' + h1.IP() )

    h0.cmdPrint( 'ping -Q 0x20 -c 3 ' + h1.IP() )

    h0.cmdPrint( 'ping -Q 0x30 -c 3 ' + h1.IP() )

    #h1.cmdPrint('iperf -s -p 12345 -u &')

    #h0.cmdPrint('iperf -c ' + h1.IP() +' -u -b 10m -p 12345 -t 10 -i 1')

    #print switch0.cmd( 'ovs-ofctl show dp0' )

    #print switch1.cmd( 'ovs-ofctl show dp1' )

    #print switch2.cmd( 'ovs-ofctl show dp2' )

    #print switch3.cmd( 'ovs-ofctl show dp3' )

    #print switch4.cmd( 'ovs-ofctl show dp4' )

    #print switch0.cmd( 'ovs-ofctl dump-tables  dp0' )

    #print switch0.cmd( 'ovs-ofctl dump-ports   dp0' )

    #print switch0.cmd( 'ovs-ofctl dump-flows  dp0' )

    #print switch0.cmd( 'ovs-ofctl dump-aggregate  dp0' )

    #print switch0.cmd( 'ovs-ofctl queue-stats dp0' )

    #print "Testing video transmission between h1 and h2"

    #h1.cmd('./myrtg_svc -u > myrd &')

    #h0.cmd('./mystg_svc -trace st 192.168.123.2')

    info( "*** Stopping network\n" )

    switch0.cmd( 'ovs-vsctl del-br dp0' )

    switch0.deleteIntfs()

    switch1.cmd( 'ovs-vsctl del-br dp1' )

    switch1.deleteIntfs()

    switch2.cmd( 'ovs-vsctl del-br dp2' )

    switch2.deleteIntfs()

    switch3.cmd( 'ovs-vsctl del-br dp3' )

    switch3.deleteIntfs()

    switch4.cmd( 'ovs-vsctl del-br dp4' )

    switch4.deleteIntfs()

    info( '\n' )

if __name__ == '__main__':

    setLogLevel( 'info' )

    info( '*** Scratch network demo (kernel datapath)\n' )

    Mininet.init()

    myNet()
四 、实验 要求
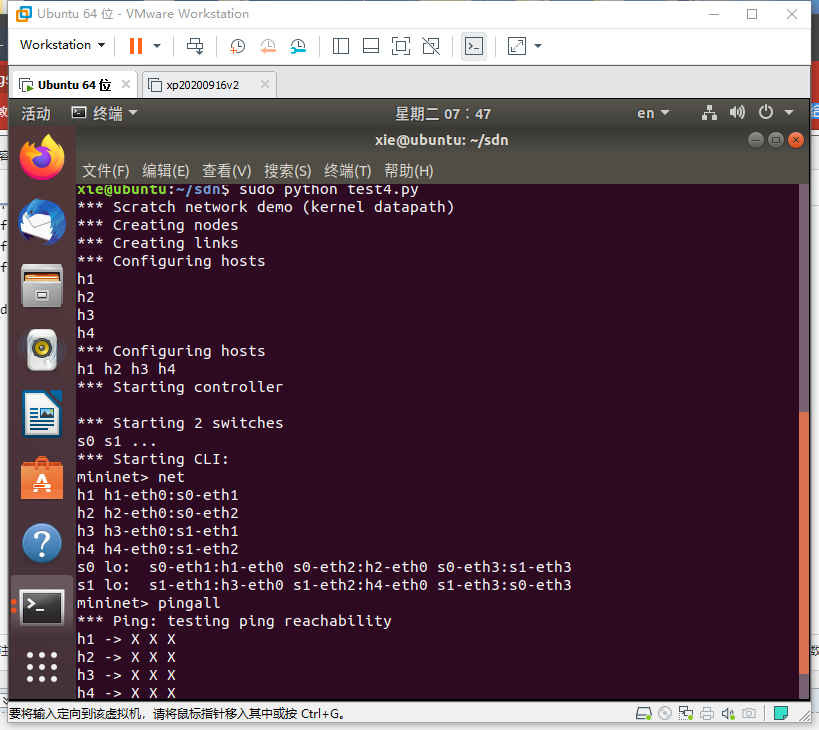
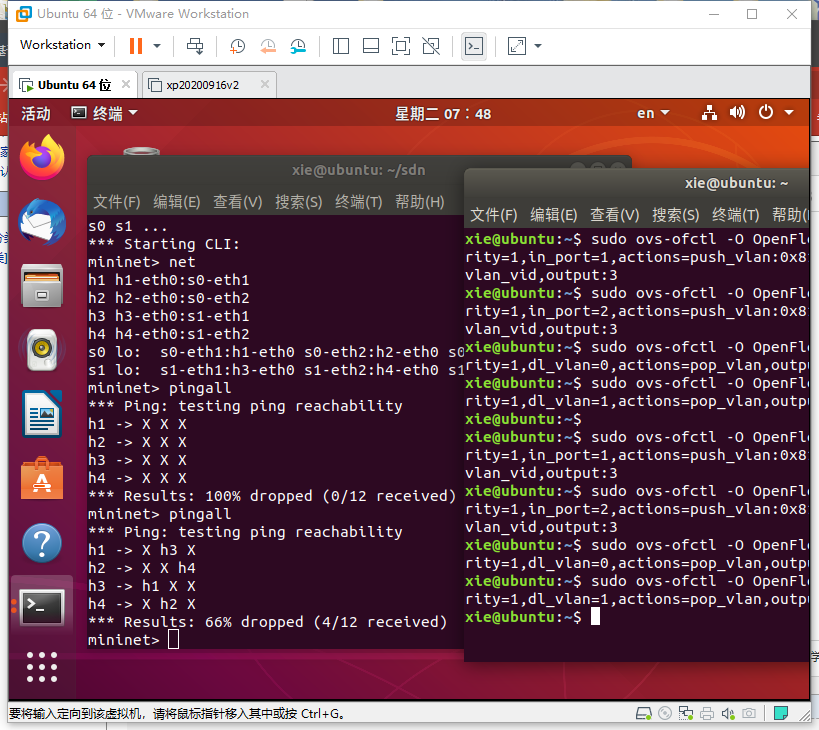
1. 学习 ovsSingleBr.py 和 ovsMultiBr.py,在下图拓扑中实现一个 VLAN。
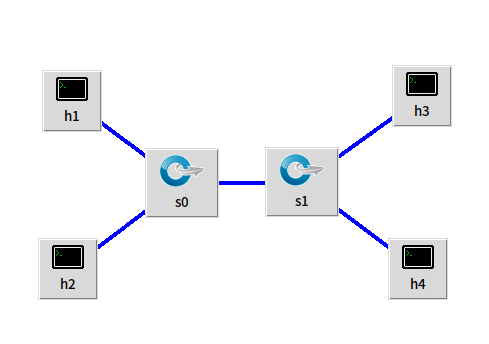
上述代码将 h0 和 h2 划分在 VLAN0 中,h1 和 h3 划分在 VLAN1 中,由于拓扑没有控制器,并且初始化时删除了交换机中的所有流表,因此除非下发流表,否则主机之间网络无法连通。请尝试修改代码,利用 ovs 命令直接下发 VLAN 设置的流表项,最终测试 h0 和 h2 互通,h1 和 h3 互通,其余主机均不通,结果如下图。
(这里用h1和h3互通,h2和h4互通)
# test4.py

# coding=UTF-8

#!/usr/bin/python

from mininet.net import Mininet

from mininet.link import TCLink

from mininet.node import Node

from mininet.log import setLogLevel, info

from mininet.cli import CLI

def test4():

    "Create network from scratch using Open vSwitch."

    net = Mininet()

    info( "*** Creating nodes\n" )

    switch0 = net.addSwitch( 's0' )

    switch1 = net.addSwitch( 's1' )

    h1 = net.addHost( 'h1' )

    h2 = net.addHost( 'h2' )

    h3 = net.addHost( 'h3' )

    h4 = net.addHost( 'h4' )

    info( "*** Creating links\n" )

    net.addLink( h1, switch0 )

    net.addLink( h2, switch0 )

    net.addLink( h3, switch0 )

    net.addLink( h4, switch0 )

    net.addLink( switch1, switch0 )

    info( "*** Configuring hosts\n" )

    h1.setIP( '192.168.123.1/24' )

    h2.setIP( '192.168.123.2/24' )

    h3.setIP( '192.168.123.3/24' )

    h4.setIP( '192.168.123.4/24' )

    info( str( h1 ) + '\n' )

    info( str( h2 ) + '\n' )

    info( str( h3 ) + '\n' )

    info( str( h4 ) + '\n' )

    net.start()

    CLI(net)

    net.stop()

if __name__=='__main__':

    setLogLevel( 'info' )

    info( '*** Scratch network demo (kernel datapath)\n' )

    Mininet.init()

    test4()
sudo ovs-ofctl -O OpenFlow13 add-flow s0 priority=1,in_port=1,actions=push_vlan:0x8100,set_field:4096-\>vlan_vid,output:3

sudo ovs-ofctl -O OpenFlow13 add-flow s0 priority=1,in_port=2,actions=push_vlan:0x8100,set_field:4097-\>vlan_vid,output:3

sudo ovs-ofctl -O OpenFlow13 add-flow s0 priority=1,dl_vlan=0,actions=pop_vlan,output:1

sudo ovs-ofctl -O OpenFlow13 add-flow s0 priority=1,dl_vlan=1,actions=pop_vlan,output:2

sudo ovs-ofctl -O OpenFlow13 add-flow s1 priority=1,in_port=1,actions=push_vlan:0x8100,set_field:4096-\>vlan_vid,output:3

sudo ovs-ofctl -O OpenFlow13 add-flow s1 priority=1,in_port=2,actions=push_vlan:0x8100,set_field:4097-\>vlan_vid,output:3

sudo ovs-ofctl -O OpenFlow13 add-flow s1 priority=1,dl_vlan=0,actions=pop_vlan,output:1

sudo ovs-ofctl -O OpenFlow13 add-flow s1 priority=1,dl_vlan=1,actions=pop_vlan,output:2
OVS 实现 VLAN 可参考博客:https://www.cnblogs.com/fjlinww/p/11791846.html
实验 4 :Open vSwitch 实验 —— Mininet 中使用 OVS 命令的更多相关文章
- 软件定义网络实验记录④--Open vSwitch 实验——Mininet 中使用 OVS 命令
一.实验目的 Mininet 安装之后,会连带安装 Open vSwitch,可以直接通过 Python 脚本调用 Open vSwitch 命令,从而直接控制 Open vSwitch,通过实验了解 ...
- 实验 4:Open vSwitch 实验——Mininet 中使用 OVS 命令
一.安装目的 Mininet 安装之后,会连带安装 Open vSwitch,可以直接通过 Python 脚本调用Open vSwitch 命令,从而直接控制 Open vSwitch,通过实验了解调 ...
- 实验 4:Open vSwitch 实验——Mininet 中使用 OVS 命令
一.实验目的 Mininet 安装之后,会连带安装 Open vSwitch,可以直接通过 Python 脚本调用Open vSwitch 命令,从而直接控制 Open vSwitch,通过实验了解调 ...
- Android实验一(在Android Studio中创建项目和模拟器)
北京电子科技学院(BESTI) 实 验 报 告 课程:移动平台开发 班级:1592 姓名:苏泽楠 学号:20159207 成绩: 指导教师 ...
- SDUT OJ 数据结构实验之二叉树八:(中序后序)求二叉树的深度
数据结构实验之二叉树八:(中序后序)求二叉树的深度 Time Limit: 1000 ms Memory Limit: 65536 KiB Submit Statistic Discuss Probl ...
- SDUT-2804_数据结构实验之二叉树八:(中序后序)求二叉树的深度
数据结构实验之二叉树八:(中序后序)求二叉树的深度 Time Limit: 1000 ms Memory Limit: 65536 KiB Problem Description 已知一颗二叉树的中序 ...
- 实验 6 :OpenDaylight 实验——OpenDaylight 及 Postman实现流表下发
实验 6 :OpenDaylight 实验--OpenDaylight 及 Postman实现流表下发 一.实验目的 熟悉 Postman 的使用:熟悉如何使用 OpenDaylight 通过 Pos ...
- [nRF51822] 10、基础实验代码解析大全 · 实验15 - RTC
一.实验内容: 配置NRF51822 的RTC0 的TICK 频率为8Hz,COMPARE0 匹配事件触发周期为3 秒,并使能了TICK 和COMPARE0 中断. TICK 中断中驱动指示灯D1 翻 ...
- [nRF51822] 9、基础实验代码解析大全 · 实验12 - ADC
一.本实验ADC 配置 分辨率:10 位. 输入通道:5,即使用输入通道AIN5 检测电位器的电压. ADC 基准电压:1.2V. 二.NRF51822 ADC 管脚分布 NRF51822 的ADC ...
随机推荐
- Jsp/servlet分页五要素
分页5要素: * 1)pageIndex 当前页 * 2)startIndex 从第几条数据开始 * 3)countAll 总条目数 * 4)pageSize 每页大小 * 5)pageCount 总 ...
- C++STL标准库学习笔记(三)multiset
C++STL标准库学习笔记(三)multiset STL中的平衡二叉树数据结构 前言: 在这个笔记中,我把大多数代码都加了注释,我的一些想法和注解用蓝色字体标记了出来,重点和需要关注的地方用红色字体标 ...
- jarvisoj_fm(格式字符串)
我又回来了,前几天被timeout问题折磨,还是放弃了 拿到题目还是file一下 看到时32位的程序,于是把程序放入ida*32中 可以看到当x等于4的时候可以拿到shell,上面的printf(bu ...
- 为什么众多软件厂商无法提供APS高级计划排程系统?工厂目前生产计划是怎么排产的?
一.行业现状如想了解一下目前现状,去考察一下上了ERP的企业,会发现一个有趣的现象该企业无论ERP软件搞得如何如火如荼,似乎都与生产调度人员无关. 车间里或者生产线上的生产作业计划.生产过程的调度和管 ...
- live2d
原文来自https://www.fghrsh.net/post/123.html Live2D 看板娘 v1.4 / Demo 3 - 内置 waifu-tips.json (博客园等网站引用推荐) ...
- Springboot MVC 自动配置
Springboot MVC 自动配置 官方文档阅读 https://docs.spring.io/spring-boot/docs/current/reference/html/web.html#w ...
- CF792A New Bus Route 题解
Content 给定一个长度为 \(n\) 的数列 \(a_1,a_2,a_3,...,a_n\),求这个序列当中差的绝对值最小的数对并求出这样的数对的个数. 数据范围:\(2\leqslant n\ ...
- java 数据类型:ArrayList;LinkList性能分析
各种线性表的性能分析. java提供的List就是一个线性表接口,ArrayList和LinkedList是线性表的两种实现.基于数组的线性表和基于链表的线性表. 一般来说,我们无需理会ArrayLi ...
- jquery autocomplete 插件的使用
Autocomplete 自动完成 功能:输入框在输入关键字后,根据输入的内容给出相关的下拉框供用户选择,自动完成输入内容. 插件:使用jqueryUI的自动完成小部件,文档地址:https://jq ...
- Linux(centos)下修改mysql的sql_mode模式
进入MySQL的配置文件 默认是/etc/my.cnf vim my.cnf 在最后一行加入 sql-mode="NO_AUTO_CREATE_USER,NO_ENGINE_SUBSTITU ...