自定义UICollectionLayout布局 —— UIKit之学习UICollectionView记录一《瀑布流》
一、思路
思路一:比较每一行所有列的cell的高度,从上到下(也就是从第一行开始),从最短的开始计算,(记录下b的高度和索引,从开始计算,依次类推)
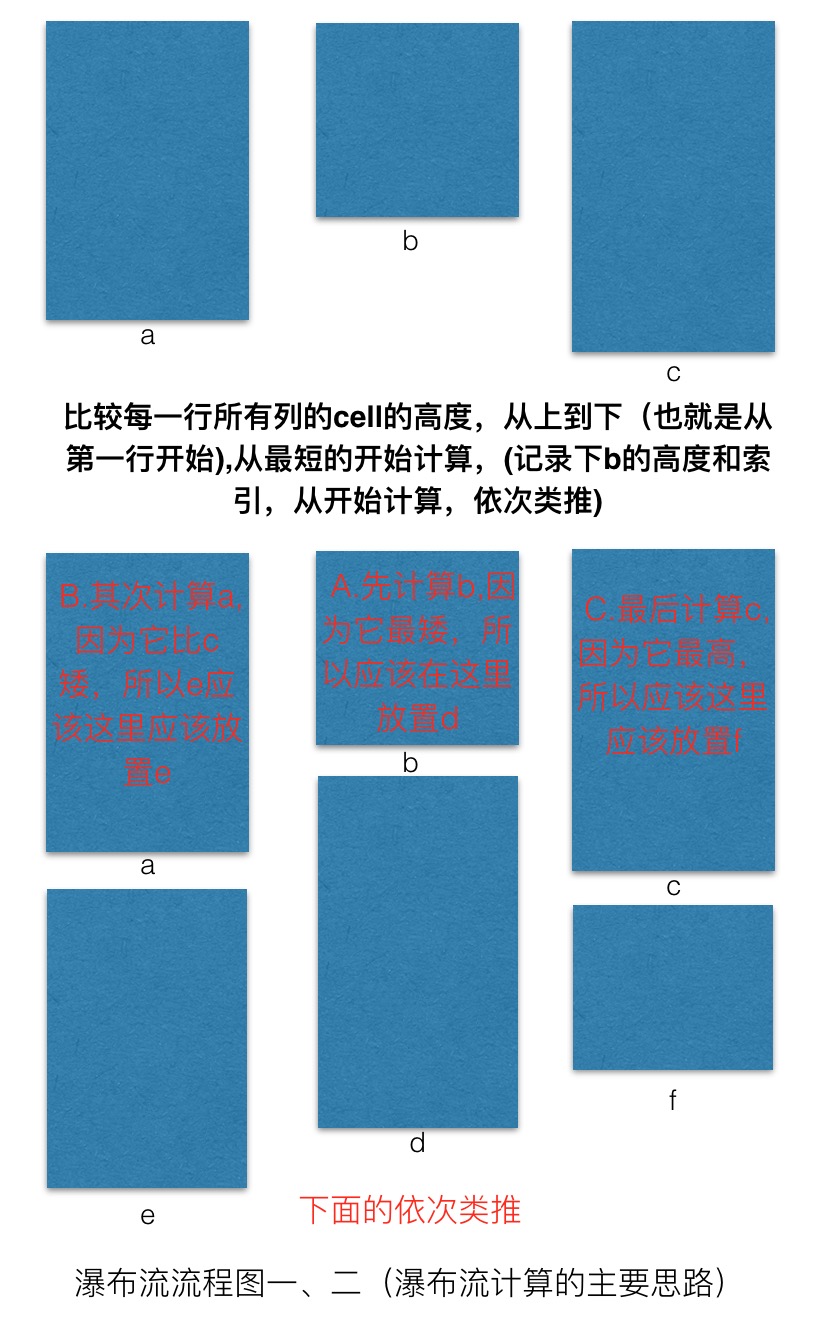
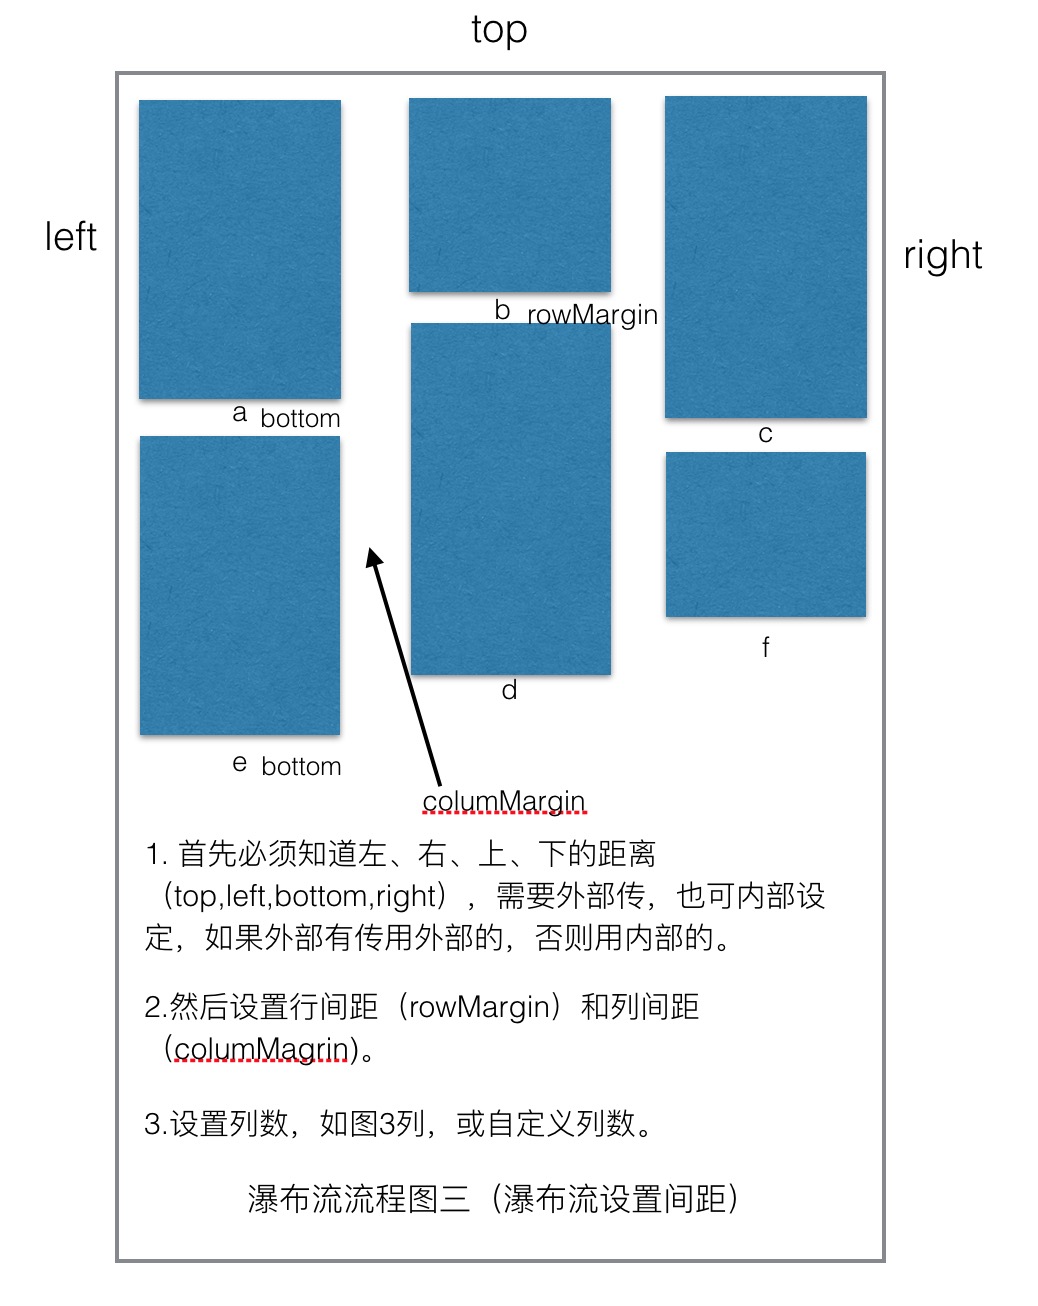
思路二:设置上、下、左、右间距和行间距、列间距及列数。
思路三:实现的重要的方法。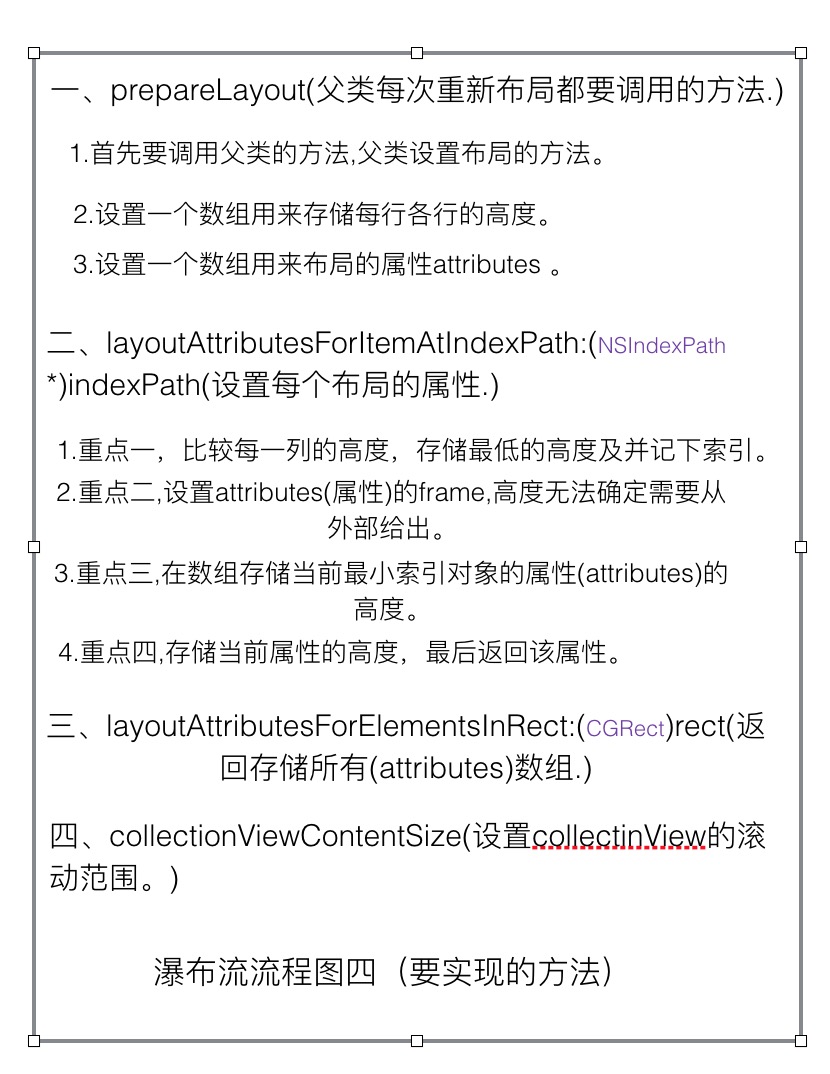
二、代码先行。
1.自定义layout类。
//入口

#import <UIKit/UIKit.h>

@protocol STRWaterLayoutDelegate;

@interface STRWaterLayout : UICollectionViewLayout

@property (nonatomic, weak)id<STRWaterLayoutDelegate>delegate;

@end

@protocol STRWaterLayoutDelegate <NSObject>

@required

- (CGFloat)waterLayout:(STRWaterLayout *)waterLayout layoutHeightAtindexPath:(NSIndexPath *)indexpath layoutItemWidth:(CGFloat)width;

@optional

- (UIEdgeInsets)edgeInsetsWithWaterLayout:(STRWaterLayout *)waterLayout;

- (CGFloat)columsNumberWithWaterLayout:(STRWaterLayout *)waterLayout;

- (CGFloat)rowsMarginWithWaterLayout:(STRWaterLayout *)waterLayout;

- (CGFloat)columsMarginWithWaterLaout:(STRWaterLayout *)waterLayout;

@end
//出口

#import "STRWaterLayout.h"

static const UIEdgeInsets layoutEdgeInsets = {, , , }; //上、下、左、右的间距

static const CGFloat   columsMar = ; //列间距

static const CGFloat   rowMar = ;   //行间距

static const NSInteger columsNums = ; //列数

@interface STRWaterLayout()

/**每个cell的高度等信息*/

@property(nonatomic, strong)NSMutableArray   *columMinGapArray;

/**所有布局信息的数组*/

@property(nonatomic, strong)NSMutableArray *layoutAttributesArray;

/**布局的最终的高度*/

@property(nonatomic, assign)CGFloat  contentHeight;

- (UIEdgeInsets)edgeInsets; //上、下、左、右的间距

- (CGFloat)columsNumber;   //列数

- (CGFloat)rowMargin;      //行间距

- (CGFloat)columsMargin;   //列间距

@end

@implementation STRWaterLayout

#pragma mark --- delegate methods

- (UIEdgeInsets)edgeInsets{

    if (self.delegate && [self.delegate respondsToSelector:@selector(edgeInsetsWithWaterLayout:)]){

        return [self.delegate edgeInsetsWithWaterLayout:self];

    }else{

        return layoutEdgeInsets;

    }

}

- (CGFloat)columsNumber{

    if(self.delegate && [self.delegate respondsToSelector:@selector(columsNumberWithWaterLayout:)]){

        return [self.delegate columsNumberWithWaterLayout:self];

    }else{

        return columsNums;

    }

}

- (CGFloat)columsMargin{

    if(self.delegate && [self.delegate respondsToSelector:@selector(columsMarginWithWaterLaout:)]){

        return [self.delegate columsMarginWithWaterLaout:self];

    }else{

        return columsMar;

    }

}

- (CGFloat)rowMargin{

    if(self.delegate && [self.delegate respondsToSelector:@selector(rowsMarginWithWaterLayout:)]){

        return [self.delegate rowsMarginWithWaterLayout:self];

    }else{

        return rowMar;

    }

}

#pragma mark --- private methods

/**在重新布局时会依次调用这四个方法*/

/**每次重新布局时都会调用它*/

- (void)prepareLayout{

    [super prepareLayout];

    self.contentHeight = ;

    [self.columMinGapArray removeAllObjects];

    [self.layoutAttributesArray removeAllObjects];

    for (NSInteger i = ; i< [self columsNumber]; i++) { //遍历所有的列数

        [self.columMinGapArray addObject: @([self edgeInsets].top)];

    }

    //当前只有一组,所以这么处理

    NSInteger numbers = [self.collectionView numberOfItemsInSection:];

    //处理所有的布局数据

    for (NSInteger y = ; y <numbers;y++) {

        //calls layouts methods,调用布局的方法

        UICollectionViewLayoutAttributes *layoutAttributes = [self layoutAttributesForItemAtIndexPath:[NSIndexPath indexPathForRow:y inSection:]];

        //再把算出来的布局加到布局数组中。

        [self.layoutAttributesArray addObject:layoutAttributes];

    }

}

/**返回横向滚动或纵向滚动的contentSize*/

- (CGSize)collectionViewContentSize{

    return  CGSizeMake(self.collectionView.frame.size.width, self.contentHeight+[self edgeInsets].bottom);

}

/**返回所有UICollectionViewLayoutAttributes的属性的数组*/

- (nullable NSArray<__kindof UICollectionViewLayoutAttributes *> *)layoutAttributesForElementsInRect:(CGRect)rect{

    return self.layoutAttributesArray;

}

/**返回每个indexPath的布局UICollectionViewLayoutAttributes*/

// 1.首先通过indexPath取出每个collectionViewLayout的布局(uicollectionlayoutAttributes).

// 2.从存储每个cell的高度的数组中取出第一个cell的高度,然后遍历,存储最小高度的cell,并记下它的索引,然后在这个索引下的cell增加下一个cell,然后再遍历看看哪个cell的高度最低,再把它的高度和索引记下来,增加下下个cell,依次类推。

// 3.因为布局的宽度和x,y可以自己设定(也就是能控制),不能控制的是布局的高度,需要从外部传进来,因为需要等比例的,所以需要传当前indexPath的布局的宽度,然后外面传的时候用cell的实际宽度*实际高度/当前布局的宽度。

- (nullable UICollectionViewLayoutAttributes *)layoutAttributesForItemAtIndexPath:(NSIndexPath *)indexPath{

    UICollectionViewLayoutAttributes *layoutAttributes = [UICollectionViewLayoutAttributes layoutAttributesForCellWithIndexPath:indexPath];

    CGFloat minContentHeight = [self.columMinGapArray[] doubleValue];

    NSInteger minIndex = ;

    for (NSInteger i = ; i < self.columMinGapArray.count; i++) {

        if (minContentHeight > [self.columMinGapArray[i] doubleValue]) {

            minContentHeight = [self.columMinGapArray[i] doubleValue];

            minIndex = i;

        }

    }

    CGFloat w = (self.collectionView.frame.size.width - [self edgeInsets].left - [self edgeInsets].right - ([self columsNumber]-) * [self columsMargin])/[self columsNumber];

    CGFloat y = (minContentHeight == [self edgeInsets].top  ? minContentHeight : minContentHeight + [self rowMargin]);

    CGFloat x = [self edgeInsets].left + minIndex *(w+[self columsMargin]);

    CGFloat h = [self.delegate waterLayout:self layoutHeightAtindexPath:indexPath layoutItemWidth:w];

    layoutAttributes.frame = CGRectMake(x, y, w, h);

    self.columMinGapArray[minIndex] = @(CGRectGetMaxY(layoutAttributes.frame));

    CGFloat contentHeight = [self.columMinGapArray[minIndex] doubleValue];

    if (self.contentHeight < contentHeight) {

        self.contentHeight = contentHeight;

    }

    return layoutAttributes;

}

#pragma mark --- getters and setters

- (NSMutableArray *)columMinGapArray{

    if (_columMinGapArray == nil) {

        _columMinGapArray = [NSMutableArray array];

    }

    return _columMinGapArray;

}

- (NSMutableArray *)layoutAttributesArray{

    if (_layoutAttributesArray == nil) {

        _layoutAttributesArray = [NSMutableArray array];

    }

    return _layoutAttributesArray;

}

@end
2.设置collectionView.
1).注意事项1,需要设置布局,上面创建的layout布局。
2).注意事项2,需要设置代理和数据源,然后把必须实现的方法实现一下。
3).注意事项3,注册cell有两种形式,一个是xib,一个是自定义的cell类,自定义或xib的cell类一定是设置collectionViewcell方法中的cell对象。
- (UICollectionView *)collectionView{

    if (!_collectionView) {

        STRWaterLayout *layout = [[STRWaterLayout alloc] init];

        layout.delegate = self;

        UICollectionView *collectionView = [[UICollectionView alloc] initWithFrame:CGRectMake(, , self.view.bounds.size.width,self.view.bounds.size.height) collectionViewLayout:layout];

        collectionView.delegate = self;

        collectionView.dataSource = self;

        collectionView.mj_header = [MJRefreshNormalHeader headerWithRefreshingTarget:self refreshingAction:@selector(headRefresh)];

        collectionView.mj_footer = [MJRefreshAutoNormalFooter footerWithRefreshingTarget:self refreshingAction:@selector(foorRefresh)];

        [collectionView registerClass:[CollectionViewCell class] forCellWithReuseIdentifier:customCell];

        [self.view addSubview:collectionView];

        self.collectionView = collectionView;

    }

    return _collectionView;

}
3.实现collectionView的数据源方法或代理方法。
- (NSInteger)collectionView:(UICollectionView *)collectionView numberOfItemsInSection:(NSInteger)section{

    return self.dataArray.count; //存储的是布局模型数据,有宽度、高度(最基本的)及其它对象数据。

}

// The cell that is returned must be retrieved from a call to -dequeueReusableCellWithReuseIdentifier:forIndexPath:

- ( UICollectionViewCell *)collectionView:(UICollectionView *)collectionView cellForItemAtIndexPath:(NSIndexPath *)indexPath{

    CollectionViewCell *cell = [collectionView dequeueReusableCellWithReuseIdentifier:customCell forIndexPath:indexPath];

    cell.layoutModel = self.dataArray[indexPath.row];

       return cell;

}
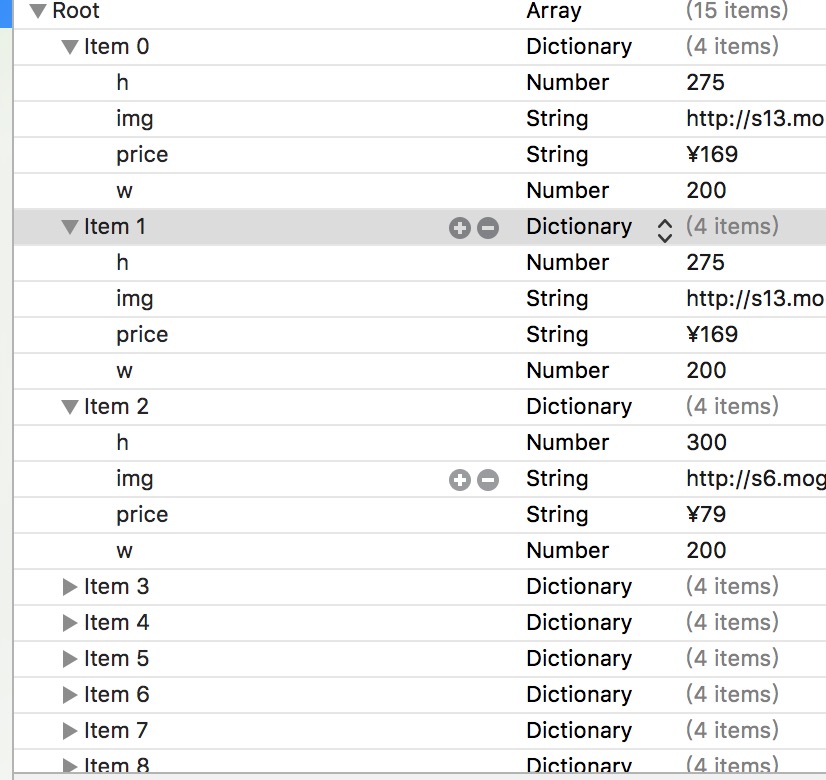
4.获取数据。(我这里是用的plist,这个可以根据项目来设置,这里是举例。)
- (NSMutableArray *)dataArray{

    if (!_dataArray) {

        NSArray *data = [[NSArray alloc] initWithContentsOfFile:[[NSBundle mainBundle]pathForResource:@"" ofType:@"plist"]];

        NSMutableArray *dataA = [NSMutableArray array];

        for (NSDictionary *dic in data) {

            STRWaterLayoutModel *layoutModel = [STRWaterLayoutModel getCollectionModel:dic];

            [dataA addObject:layoutModel];

        }

        _dataArray = dataA;

    }

    return _dataArray;

}
5.实现布局layout的代理,传入当前cell的高度和间距。
- (CGFloat)waterLayout:(STRWaterLayout *)waterLayout layoutHeightAtindexPath:(NSIndexPath *)indexpath layoutItemWidth:(CGFloat)width{

    STRWaterLayoutModel *waterLayoutModel = [self.dataArray objectAtIndex:indexpath.row];

//        return  width * [waterLayoutModel.h doubleValue] / [waterLayoutModel.w doubleValue];

    return [waterLayoutModel.h doubleValue];

}

- (CGFloat)columsNumberWithWaterLayout:(STRWaterLayout *)waterLayout{

    return ;

}

- (CGFloat)columsMarginWithWaterLaout:(STRWaterLayout *)waterLayout{

    return ;

}

- (CGFloat)rowsMarginWithWaterLayout:(STRWaterLayout *)waterLayout{

    return ;

}

- (UIEdgeInsets)edgeInsetsWithWaterLayout:(STRWaterLayout *)waterLayout{

    return  UIEdgeInsetsMake(,, , );

}
三、总结。
1.通过上面瀑布流的核心思想。
2.创建collectionView的一些注意事项。
3.给某个类传数据时,可以用代理,这才是正儿八经遵守MVC的思想,后期改动的话,好扩展,如果用属性的话,后期会很麻烦。
4.代码地址:待后期上传。
自定义UICollectionLayout布局 —— UIKit之学习UICollectionView记录一《瀑布流》的更多相关文章
- UICollectionLayout布局 —— UIKit之学习UICollectionView记录二《流水布局》
重点知识 一. 加载collectionView注意事项 1.创建collectionView,有两种方式 :一种是xib和一种是纯代码:设置代理和数据源,注册cell,配置流水布局的属性,如上.下. ...
- Swift:用UICollectionView整一个瀑布流
本文的例子和Swift版本是基于Xcode7.2的.以后也许不知道什么时候会更新. 我们要干点啥 用新浪微博的Open API做后端来实现我们要提到的功能.把新浪微博的内容,图片和文字展示在colle ...
- iOS开发之窥探UICollectionViewController(三) --使用UICollectionView自定义瀑布流
上篇博客的实例是自带的UICollectionViewDelegateFlowLayout布局基础上来做的Demo, 详情请看<iOS开发之窥探UICollectionViewControlle ...
- UICollectionView Layout自定义 Layout布局
from: http://www.tuicool.com/articles/vuyIriN 当我们使用系统自带的UICollectionViewFlowLayout无法实现我们的布局时,我们就可以 ...
- iOS:UICollectionView纯自定义的布局:瀑布流布局
创建瀑布流有三种方式: 第一种方式:在一个ScrollView里面放入三个单元格高度一样的tableView,禁止tableView滚动,只需让tableView随着ScrollView滚动即可. ...
- 详细分享UICollectionView的自定义布局(瀑布流, 线性, 圆形…)
前言: 本篇文章不是分享collectionView的详细使用教程, 而是属于比较’高级’的collectionView使用技巧, 阅读之前, 我想你已经很熟悉collectionView的基本使用, ...
- 详细分享UICollectionView的自定义布局(瀑布流, 线性, 圆形...)
前言: 本篇文章不是分享collectionView的详细使用教程, 而是属于比较'高级'的collectionView使用技巧, 阅读之前, 我想你已经很熟悉collectionView的基本使用, ...
- 自定义 Layout布局 UICollectionViewLayout
from: http://www.tuicool.com/articles/vuyIriN 当我们使用系统自带的UICollectionViewFlowLayout无法实现我们的布局时,我们就可以 ...
- Objectiv-c - UICollectionViewLayout自定义布局-瀑布流
最近刚写的一个简单的瀑布流. 整体思路可能不是很完善. 不过也算是实现效果了. 高手勿喷 思路: 自定义UICollectionViewLayout实际上就是需要返回每个item的fram就可以了. ...
随机推荐
- 17、ASP.NET MVC入门到精通——Spring.net入门
Spring.NET环境准备 pring.NET 1.3.2下载地址:http://down.51cto.com/data/861700 下载后解压 Spring.NET-1.3.2.7z:这个里面有 ...
- Hibernate总结(一)
Hibernate为了提高性能,提供了缓存与快照机制. 它的缓存分为一级缓存与二级缓存. Hibernate一级缓存:当一个事务中执行一次Sql语句时,就将返回的结果存储在Session中的Map集合 ...
- 监听页面上的checkbox是否选中
第一种 <!DOCTYPE html> <html> <head> <meta charset='UTF-8'> <title>checke ...
- 点击.box跟点击.box.box1
<!DOCTYPE html> <html> <head> <meta charset='UTF-8'> <title>click</ ...
- js(jquery)解决input元素的blur事件和其他非表单元素的click事件冲突的方法
HTML结构:很简单,就一个input,一个div,能说明问题就OK了: <input type="text" value="默认值"><br ...
- 天津政府应急系统之GIS一张图(arcgis api for flex)讲解(五)地图切换以及图层显示模块
config.xml文件的配置如下: <widget right="20" top="55" config="widgets/MapSwitch ...
- gcc boost版本冲突解决日记
问题背景 项目在Ubuntu10 64位 boost 1.55,boost采用的是项目内包含相对目录的形式部署 项目采用了 -Wall -Wextra -Werror -Wconversion 最高的 ...
- 最详细的hadoop2.2.0集群的HA高可靠的最简单配置
简介 [from http://www.open-open.com/lib/view/open1390717631132.html] hadoop中的NameNode好比是人的心脏,非常重要,绝对不可 ...
- Cordova中使用gulp
打开package.json,添加main:gulpfile.js 在dependencies中添加gulp,vs2015十分智能,可以智能从npm中获取依赖如下图: 在添加过程中注意 ...
- 利用split
java.lang.string.splitsplit 方法将一个字符串分割为子字符串,然后将结果作为字符串数组返回.stringObj.split([separator,[limit]])strin ...