前端切图实战(PSD设计稿转化为前端)
课程来源:https://www.imooc.com/learn/668
一:读设计稿
划分:头部、尾部、公共部分、大概分多少块、logo的重用、列表有哪些、各部分用什么技术实现等等。
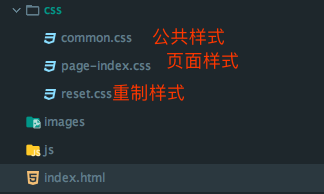
二:建立项目目录
三:编写重置样式
不同的标签有着默认的样式,不同浏览器对标签的解析各不相同,重置css样式可以让标签在不同浏览器下产生相同的效果。
网上有许多现成的重置样式表,可以直接借鉴使用。例如:
html {

    -ms-text-size-adjust: 100%;

    -webkit-text-size-adjust: 100%;

    -webkit-tap-highlight-color: transparent;

    height: 100%;

  }

  body {

    margin:;

    font-size: 14px;

    font-family: "Helvetica Neue", Helvetica, STHeiTi, Arial, sans-serif;

    line-height: 1.5;

    color: #333;

    background-color: #fff;

    min-height: 100%;

  }

  article, aside, details, figcaption, figure, footer, header, hgroup, main, menu, nav, section,summary {

    display: block;

  }

  audio, canvas, progress, video {

    display: inline-block;

  }

  audio:not([controls]) {

    display: none;

    height:;

  }

  progress {

    vertical-align: baseline;

  }

  [hidden], template {

    display: none;

  }

  a {

    background: transparent;

    text-decoration: none;

    color: #08c;

  }

  a:active {

    outline:;

  }

  abbr[title] {

    border-bottom: 1px dotted;

  }

  b, strong {

    font-weight: bold;

  }

  dfn {

    font-style: italic;

  }

  mark {

    background: #ff0; color: #000;

  }

  small {

    font-size: 80%;

  }

  sub, sup {

    font-size: 75%;

    line-height:;

    position: relative;

    vertical-align: baseline;

  }

  sup {

    top: -0.5em;

  }

  sub {

    bottom: -0.25em;

  }

  img {

    max-width: 100%;

    border:;

    vertical-align: middle;

  }

  svg:not(:root) {

    overflow: hidden;

  }

  pre {

    overflow: auto;

    white-space: pre;

    white-space: pre-wrap;

    word-wrap: break-word;

  }

  code, kbd, pre, samp {

    font-family: monospace, monospace;

    font-size: 1em;

  }

  button, input, optgroup, select, textarea {

    color: inherit;

    font: inherit;

    margin:;

    vertical-align: middle;

  }

  button, input, select {

    overflow: visible;

  }

  button, select {

    text-transform: none;

  }

  button, html input[type="button"], input[type="reset"], input[type="submit"] {

    -webkit-appearance: button;

    cursor: pointer;

  }

  [disabled] {

    cursor: default;

  }

  button::-moz-focus-inner, input::-moz-focus-inner {

    border:;

    padding:;

  }

  input {

    line-height: normal;

  }

  input[type="checkbox"], input[type="radio"] {

    box-sizing: border-box;

    padding:;

  }

  input[type="number"]::-webkit-inner-spin-button, input[type="number"]::-webkit-outer-spin-button {

    height: auto;

  }

  input[type="search"] {

    -webkit-appearance: textfield;

    box-sizing: border-box;

  }

   input[type="search"]::-webkit-search-cancel-button, input[type="search"]::-webkit-search-decoration {

    -webkit-appearance: none;

  }

  fieldset {

    border: 1px solid #c0c0c0;

    margin: 0 2px;

    padding: 0.35em 0.625em 0.75em;

  }

  legend {

    border:;

    padding:;

  }

  textarea {

    overflow: auto;

    resize: vertical;

    vertical-align: top;

  }

  optgroup {

    font-weight: bold;

  }

  input, select, textarea {

    outline:;

  }

  textarea, input {

    -webkit-user-modify: read-write-plaintext-only;

  }

  input::-ms-clear, input::-ms-reveal {

    display: none;

  }

  input::-moz-placeholder, textarea::-moz-placeholder {

    color: #999;

  }

  input:-ms-input-placeholder, textarea:-ms-input-placeholder {

    color: #999;

  }

  input::-webkit-input-placeholder, textarea::-webkit-input-placeholder {

    color: #999;

  }

  .placeholder {

    color: #999;

  }

  table {

    border-collapse: collapse;

    border-spacing:;

  }

  td, th {

    padding:;

  }

  h1, h2, h3, h4, h5, h6, p, figure, form, blockquote {

    margin:;

  }

  ul, ol, li, dl, dd {

    margin:; padding:;

  }

  ul, ol {

    list-style: none outside none;

  }

  h1, h2, h3 {

    line-height:;

    font-weight: normal;

  }

  h1 {

    font-size: 18px;

  }

  h2 {

    font-size: 16px;

  }

  h3 {

    font-size: 14px;

  }

  i {

    font-style: normal;

  }

  * {

    box-sizing: border-box;

  }

  .clearfix::before, .clearfix::after {

    content: "";

    display: table;

  }

  .clearfix::after {

    clear: both;

  }
附:常见知名网站重制样式表:https://www.cnblogs.com/staven/p/4818459.html
三:编写页面整体布局框架
使用h5标签或div,搭建起页面的头部、尾部、公共部分等等大的块组成。
Tips:尽量少用id,多用class来区分元素;
class属性值命名注意语义化、范围化,一眼看到就知道:是哪里、什么元素,单词用中划线分割。

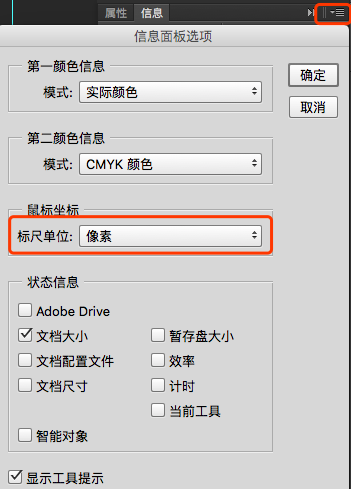
四:获取设计图元素的信息
1)PS中按F8呼出“信息”面板,设置度量单位为像素
2)使用“矩形选取工具”,在psd设计稿上进行测量宽高、间距、行高等

3)选取颜色:鼠标悬停在需要选取颜色处,信息面板即可看见RGB值

五:开始逐个部分进行切图
1)细化div
针对各个部分,使用更细致的布局进行搭建。
2)使用html标签+css样式搭建页面
根据设计图效果,选取最恰当的标签、css样式来实现
前端切图实战(PSD设计稿转化为前端)的更多相关文章
- 前端切图相关ps技术
标签(空格分隔): 前端切图 复制图层到一个新的ps文件 对于单个图层 1.选中图层 2.CTRL+A全选 3.CTRL+C 4.CTRL+N新建文件,文件大小默认就可以(背景透明也在这个面板设置), ...
- 前端切图神器-cutterman
之前我写过一篇关于前端切图的博客:https://www.cnblogs.com/tu-0718/p/9741058.html 但上面的方法在切图量大时依然很费时间,下面向大家推荐这款免费切图神器 c ...
- 前端切图要选择png和jpg呢?
今天特意验证了一下: 切完图分别保存png24.png8和jpg60.jpg80(60和80表示保存图片时品质选择)后, 然后再压缩图片,压缩图片地址:https://tinypng.com/ 图片直 ...
- 【前端切图】用css画一个卡通形象-小猪佩奇
最近在腾讯云技术社区遇到了一位奇才,用css画出了一个社会人小猪佩奇,不得不服.研究了一下他的文章https://segmentfault.com/a/1190000014909658,感觉甚是有趣, ...
- 前端切图:CSS实现隐藏滚动条同时又可以滚动
CSS 实现隐藏滚动条同时又可以滚动 原始功能: 图片发自简书App 添加伪类之后的功能: 图片发自简书App 完整demo如下: <!DOCTYPE html> <html> ...
- ps前端切图常用快捷键
一.新建文件:预设-自定:宽度1920,单位像素,高度自定义:分辨率:72像素/英寸:颜色模式:RGB,8位:背景色:透明:可存储预设,下次新建的时候,直接在预设中,选择那个名称,点确定.视图:显示- ...
- 前端切图|点击按钮div变色
<!DOCTYPE html> <html> <head> <title>点击按钮div变色.html</title> <meta c ...
- 前端切图:一个好看的表格css样式
<!DOCTYPE html><html> <head> <meta charset="UTF-8"> ...
- 前端切图:调用百度地图API
原型图 图片发自简书App <!DOCTYPE html> <html> <head> <meta charset="UTF-8"> ...
随机推荐
- day66 模板小结 [母板继承,块,组件]
小结: day65 1. 老师编辑功能写完 1. magic2函数 --> 用两层for循环解决 全栈8期之殇 问题 2. 模板语言 in 语法 {% if xx in xx_list %} { ...
- day60 pymysql
预知扩展内容,详见地址如下(关于数据库备份和恢复) http://www.cnblogs.com/linhaifeng/articles/7525619.html 我们一般写程序都是在py文件里面,那 ...
- 大数据及Hadoop的概述
一.大数据存储和计算的各种框架即工具 1.存储:HDFS:分布式文件系统 Hbase:分布式数据库系统 Kafka:分布式消息缓存系统 2.计算:Mapreduce:离线计算框架 stor ...
- 1e9个兵临城下
https://ac.nowcoder.com/acm/contest/321#question 代码写得蛮丑的..真的很丑 像是高中教的veen图,并涉及到容斥原理. #include<cst ...
- python专题 --- 递归
如果一个函数在函数内部调用自身本身,这个函数就是递归函数 举例如阶乘函数,其数学递归定义如下: 对应的算法实现 def fact(n): if n==1: return 1 return n * fa ...
- 使用ORM进行前后端数据交互
使用ORM进行数据交互 前期准备 必备知识:ORM操作,数据库多表操作.Django部分知识. 三张表:班级.老师.学生 一对多关系:班级与学生 多对多关系:班级与老师 #创建班级表 class Cl ...
- 002.LVS管理工具的安装与使用
一 安装IPVS 可通过源码安装或yum安装,源码包如下: http://www.linuxvirtualserver.org/software/ipvs.html [root@lvsmaster ~ ...
- Python内存管理以及数据类型
一.内存管理 1.Cpython解释器的垃圾回收机制 什么是垃圾:当一个值身上没有绑定任何变量名(该值的引用计数=0)时,该值就是一个垃圾. Cpython解释器就会自动回收这样的垃圾. #引用计数增 ...
- HOJ3237----BFS/DFS
/* 注意两点 . 不可以使用替换可用节点为不可用节点的方法进行DFS 因为角落也可能有油,替换了就出不来.(某学长指导) . 可用通过开一个数组(例如我的b[][]数组) 用了存储到当前位置剩余最大 ...
- express框架中如何只执行一次res响应操作
在做东西时候遇到一个可能会重复输出res.json的地方,重复输出会产生Error:Cannot set header after they are sent. Node.js不像c++里可以直接通过 ...