SpringMVC 启动流程
首先看一下Web应用部署初始化过程 (Web Application Deployement),官方文档说明:
Web Application Deployment
When a web application is deployed into a container, the following steps must be performed, in this order, before the web application begins processing client requests.
■ Instantiate an instance of each event listener identified by a <listener> element in the deployment descriptor.
■ For instantiated listener instances that implement ServletContextListener, call the contextInitialized() method.
■ Instantiate an instance of each filter identified by a <filter> element in the deployment descriptor and call each filter instance’s init() method.
■ Instantiate an instance of each servlet identified by a <servlet> element that includes a <load-on-startup> element in the order defined by the load-onstartup
element values, and call each servlet instance’s init() method.大致说:
Web应用部署:当一个web应用被部署到一个容器(eg.tomcat),在web应用开始处理客户端请求前,以下步骤会按顺序执行:
1.初始化应用部署描述文件中每一个listener。
2.初始化ServletContextListener实现类,调用contextInitialized()方法。
3.初始化应用部署描述文件中每一个filter,并执行每一个的init()方法。
4.按照顺序<load-on-startup>来初始化servlet,并执行init()方法。
大致总结:先初始化lisener,再filter,最后servlet
SpringMVC启动过程:
常见SpringMVC配置:<web-app>
<display-name>Web Application</display-name>
<!--全局变量配置-->
<context-param>
<param-name>contextConfigLocation</param-name>
<param-value>classpath:applicationContext-*.xml</param-value>
</context-param>
<!--监听器-->
<listener>
<listener-class>org.springframework.web.context.ContextLoaderListener</listener-class>
</listener>
<!--解决乱码问题的filter-->
<filter>
<filter-name>CharacterEncodingFilter</filter-name>
<filter-class>org.springframework.web.filter.CharacterEncodingFilter</filter-class>
<init-param>
<param-name>encoding</param-name>
<param-value>utf-8</param-value>
</init-param>
</filter>
<filter-mapping>
<filter-name>CharacterEncodingFilter</filter-name>
<url-pattern>/*</url-pattern>
</filter-mapping>
<!--Restful前端控制器-->
<servlet>
<servlet-name>mvc</servlet-name>
<servlet-class>org.springframework.web.servlet.DispatcherServlet</servlet-class>
<init-param>
<param-name>contextConfigLocation</param-name>
<param-value>classpath:spring-mvc.xml</param-value>
</init-param>
</servlet>
<servlet-mapping>
<servlet-name>mvc</servlet-name>
<url-pattern>/</url-pattern>
</servlet-mapping>
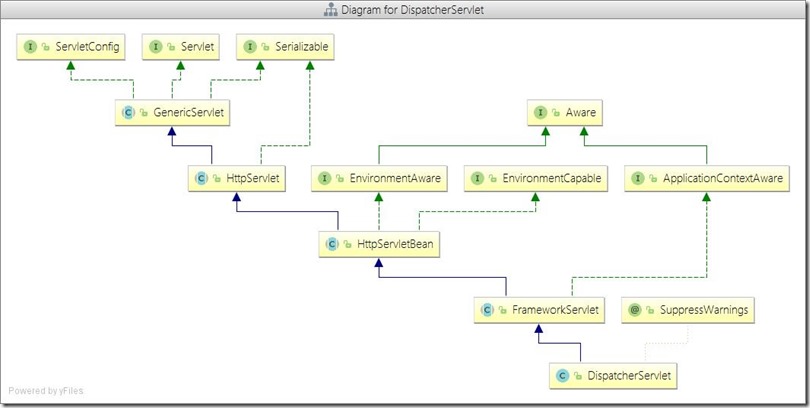
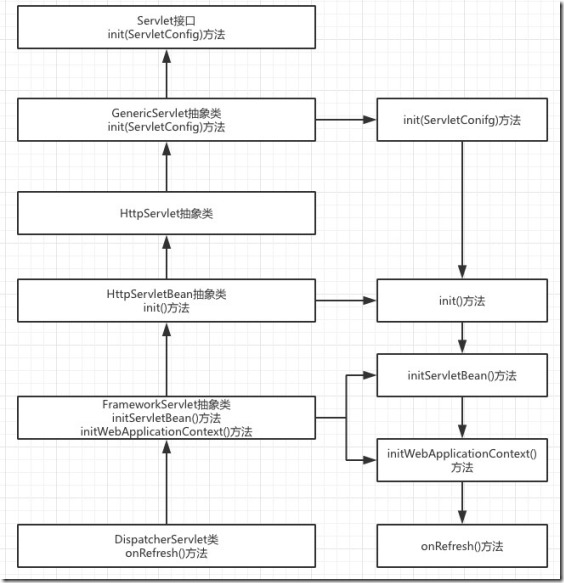
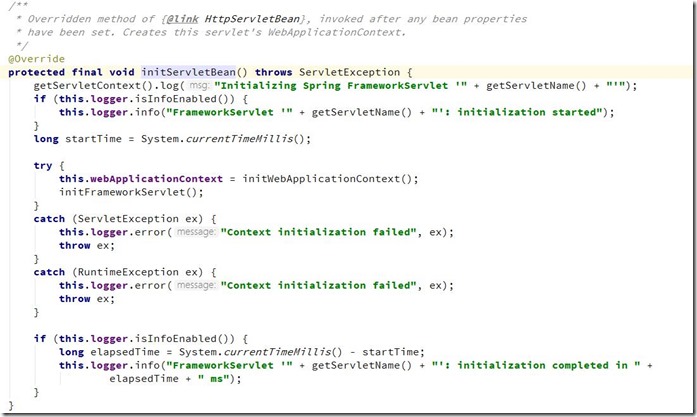
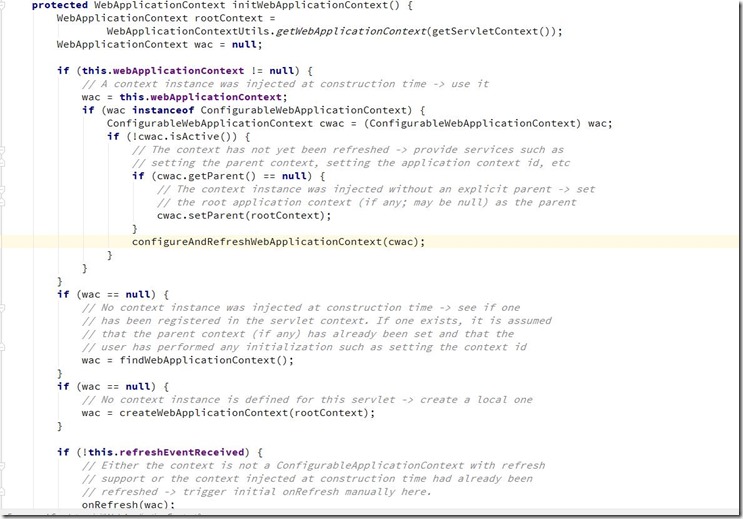
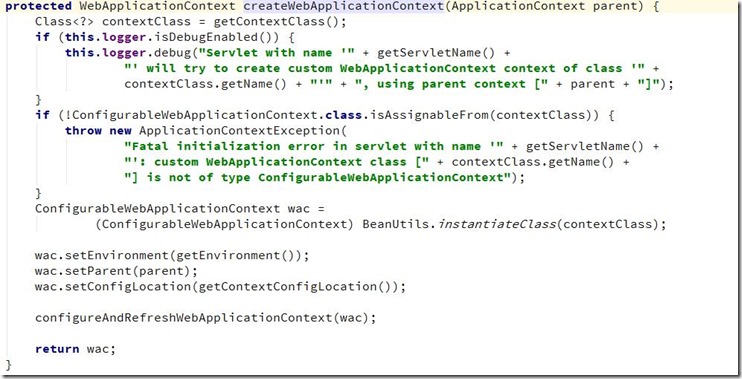
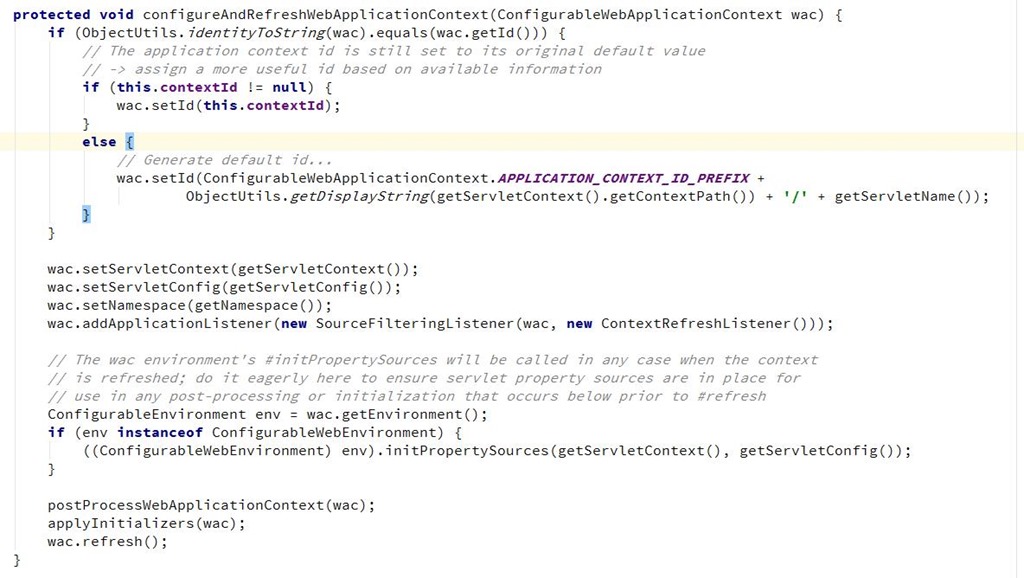
</web-app>DispatchServlet使用说明:其类图如下:可以明显看出DispatchServlet类间接父类实现了Servlet接口,因此其本质上依旧是一个Servlet。DispatchServlet类设计很巧妙,上层父类不同程度的实现了相关接口的部分方法,并留出相关方法用于子类覆盖,将不变的部分统一实现,将变化的部分预留方法用于子类实现。DispatchServlet类初始化过程函数调用图:通过类图和相关初始化函数调用的逻辑来看,DispatchServlet的初始化过程将模板方法,其父类完成不同的统一工作,并预留出相关方法用于子类覆盖去完成不同的可变工作。DispatchServlet类的本质是Servlet,在web应用部署到容器后进行Servelt初始化时会调用相关的init(ServletConfig)方法,因此,DispatchServlet类的初始化过程也由该方法开始。其中FrameworkServlet抽象类中的initServletBean()方法、initWebApplicationContext()方法以及DispatchServlet类中的onFresh()方法。FrameworkServlet initServletBean()方法源码,该方法重写了FrameworkServlet抽象类在执行,终于,initXXXContext的字眼出现了—initWebApplicationContext()方法会首先从ServletContext中获取到由ContextLoaderListener初始化完成并放进入的根容器对象引用(因为创建子容器必须将父容器作为参数传递进去),然后经过层层调用,最终在createWebApplicationContext()中完成了容器的创建工作,该方法的主要代码如下:
* Process the actual dispatching to the handler.
* <p>The handler will be obtained by applying the servlet's HandlerMappings in order.
* The HandlerAdapter will be obtained by querying the servlet's installed HandlerAdapters
* to find the first that supports the handler class.
* <p>All HTTP methods are handled by this method. It's up to HandlerAdapters or handlers
* themselves to decide which methods are acceptable.
* @param request current HTTP request
* @param response current HTTP response
* @throws Exception in case of any kind of processing failure
*/
protected void doDispatch(HttpServletRequest request, HttpServletResponse response) throws Exception {
HttpServletRequest processedRequest = request;
HandlerExecutionChain mappedHandler = null;
boolean multipartRequestParsed = false; WebAsyncManager asyncManager = WebAsyncUtils.getAsyncManager(request); try {
ModelAndView mv = null;
Exception dispatchException = null; try {
processedRequest = checkMultipart(request);
multipartRequestParsed = (processedRequest != request); // Determine handler for the current request.
mappedHandler = getHandler(processedRequest);
if (mappedHandler == null || mappedHandler.getHandler() == null) {
noHandlerFound(processedRequest, response);
return;
} // Determine handler adapter for the current request.
HandlerAdapter ha = getHandlerAdapter(mappedHandler.getHandler()); // Process last-modified header, if supported by the handler.
String method = request.getMethod();
boolean isGet = "GET".equals(method);
if (isGet || "HEAD".equals(method)) {
long lastModified = ha.getLastModified(request, mappedHandler.getHandler());
if (logger.isDebugEnabled()) {
logger.debug("Last-Modified value for [" + getRequestUri(request) + "] is: " + lastModified);
}
if (new ServletWebRequest(request, response).checkNotModified(lastModified) && isGet) {
return;
}
} if (!mappedHandler.applyPreHandle(processedRequest, response)) {
return;
} // Actually invoke the handler.
mv = ha.handle(processedRequest, response, mappedHandler.getHandler()); if (asyncManager.isConcurrentHandlingStarted()) {
return;
} applyDefaultViewName(processedRequest, mv);
mappedHandler.applyPostHandle(processedRequest, response, mv);
}
catch (Exception ex) {
dispatchException = ex;
}
catch (Throwable err) {
// As of 4.3, we're processing Errors thrown from handler methods as well,
// making them available for @ExceptionHandler methods and other scenarios.
dispatchException = new NestedServletException("Handler dispatch failed", err);
}
processDispatchResult(processedRequest, response, mappedHandler, mv, dispatchException);
}
catch (Exception ex) {
triggerAfterCompletion(processedRequest, response, mappedHandler, ex);
}
catch (Throwable err) {
triggerAfterCompletion(processedRequest, response, mappedHandler,
new NestedServletException("Handler processing failed", err));
}
finally {
if (asyncManager.isConcurrentHandlingStarted()) {
// Instead of postHandle and afterCompletion
if (mappedHandler != null) {
mappedHandler.applyAfterConcurrentHandlingStarted(processedRequest, response);
}
}
else {
// Clean up any resources used by a multipart request.
if (multipartRequestParsed) {
cleanupMultipart(processedRequest);
}
}
}
}
SpringMVC 启动流程的更多相关文章
- SpringMVC源码解析-DispatcherServlet启动流程和初始化
在使用springmvc框架,会在web.xml文件配置一个DispatcherServlet,这正是web容器开始初始化,同时会在建立自己的上下文来持有SpringMVC的bean对象. 先从Dis ...
- SpringMVC启动和执行流程
Spring框架大家用得很多,相当熟悉,但是我对里面的运作比较好奇,例如bean的加载和使用,和我们定义的配置文件有什么联系;又例如aop在什么时候起作用,原理又是怎样.经过一个了解后,整理了启动和执 ...
- SpringMVC启动过程详解(li)
通过对SpringMVC启动过程的深入研究,期望掌握Java Web容器启动过程:掌握SpringMVC启动过程:了解SpringMVC的配置文件如何配置,为什么要这样配置:掌握SpringMVC是如 ...
- Spring基础系列-容器启动流程(1)
原创作品,可以转载,但是请标注出处地址:https://www.cnblogs.com/V1haoge/p/9870339.html 概述 我说的容器启动流程涉及两种情况,SSM开发模式和Spri ...
- SpringMVC 工作流程
版权声明:本文为博主原创文章,未经博主允许不得转载. https://blog.csdn.net/baidu_36697353/article/details/64444147 SpringMVC 工 ...
- SpringBoot启动流程分析(六):IoC容器依赖注入
SpringBoot系列文章简介 SpringBoot源码阅读辅助篇: Spring IoC容器与应用上下文的设计与实现 SpringBoot启动流程源码分析: SpringBoot启动流程分析(一) ...
- SpringBoot启动流程及其原理
Spring Boot.Spring MVC 和 Spring 有什么区别? 分别描述各自的特征: Spring 框架就像一个家族,有众多衍生产品例如 boot.security.jpa等等:但他们的 ...
- Spring MVC启动流程分析
本文是Spring MVC系列博客的第一篇,后续会汇总成贴子. Spring MVC是Spring系列框架中使用频率最高的部分.不管是Spring Boot还是传统的Spring项目,只要是Web项目 ...
- 面试高频SpringMVC执行流程最优解(源码分析)
文章已托管到GitHub,大家可以去GitHub查看阅读,欢迎老板们前来Star! 搜索关注微信公众号 码出Offer 领取各种学习资料! SpringMVC执行流程 SpringMVC概述 Spri ...
随机推荐
- Java WEB ----- 文件的上传
最近学到的web阶段的文件的上传,就想记录一下,帮助自己复习以及帮助大家学习,一般我都会把上传的文件存到服务器中的web-inf 下面,因为这样用户不会直接访问到,我们存到数据库的一般都是路径.这里没 ...
- swift3笔记
备注:这里只是个人的观点,有的地方也是copy,多多指教,个人笔记,有侵犯你们版权的地方还望海涵!!! 个人觉得swift和OC最大的区别就是增加了许多现代化的东西,java里面的闭包,private ...
- char与char的区别
char与varchar的区别 : char (13)长度固定, 如'www.qq.net' 存储需要空间 12个字符: varchar(13) 可变长 如'www.qq.net' 需要存储空间 9字 ...
- python笔记13-文件读写
1.打开文件 f=open('a.txt','a+',encoding='utf-8')#f代表的是文件对象,叫句柄 f.seek(0)把文件指针到最前 文件打开模式有3种: 1:w写模式,它是不能读 ...
- JavaScript原型与闭包相关
1什么是对象 js中的值分为引用值和原始值 原始值:undefined null Boolean string number 原始值无法更改 存放在栈中 引用值:Array Object ...
- web 页面上纯js实现按钮倒计数功能(实时计时器也可以)
需求构思:本功能想实现的是,一个按钮在页面载入就显示提醒续费,,,倒数60秒后,完成提醒功能,可以按另外一个页面跳转到主页. 参考网上的大神,实现如下:Button2倒数,Button3跳转,在页面上 ...
- 51单片机小项目电路TwoLed电路图
1.复位电路没有开关,不可控 在电容旁边并联一个开关和10k的电阻支路 2.晶振电路引用的外部晶振, 理论上XTAL2悬空,XTAL1接外部震荡信号 //ProjeceName:TwoLed //wr ...
- C# 网络通信功能 同步数据交互开发
前言 本文将使用一个Nuget公开的组件技术来实现一对多的数据通信功能,提供了一些简单的API,来方便的向服务器进行数据请求. 在visual studio 中的Nuget管理器中可以下载安装,也可以 ...
- Flask关于请求表单的粗浅应用及理解+简单SQL语句温习
1.请求表单 请求表单的知识点是flask数据请求中很小的一部分,首先要了解一下GET和POST请求:http://www.w3school.com.cn/tags/html_ref_httpmeth ...
- Python全栈之路----函数----返回值
函数外部的代码想要获取函数的执行结果,就可以在函数里用return语句,把结果返回. def stu_register(name,age,course='PY',country='CN'): prin ...