How to use the Custom Material node and create Metaballs 官方视频学习笔记
这个视频Youtube没有字幕着实蛋疼,本人英语很渣,几乎听不懂,里面有很多文档没讲的重要信息(文档讲的东西太少了)。
不过学习过后你可以解锁好几个姿势。这个视频主要是教你做DistanceField来写Shader,以下是最终效果:

一开始需要通过 r.ShaderDevelopmentMode 1,r.DumpShaderDebugInfo 1开启着色器开发模式(不过本人没感觉有什么用,可能到了用RHI写HLSL会比较有用)
为了方便之后的各位,本人在此贴上视频以及材质节点:
第一段代码:
float3 CamVec=normalize(WorldPos-View.ViewOrigin);

float3 curpos=WorldPos;

float3 normal=0;

int maxsteps=16;

float curdist,accum=0;

float minstepsize=0.01;

int i=0;

while(i<maxsteps)

{

	curdist=CustomExpression0(Parameters,curpos,k,Spere1,Spere2,Spere3,t);

	if(curdist<thresh)

	{

		return float4(1.0,1.0,1.0,1.0);

	}

	curpos+=CamVec*max(minstepsize,curdist);

	minstepsize+=0.02;

	i++;

}

return 0;
第二个CustomNode,于37:08贴出代码
//evaluate the distance

float s1=distance(Sphere1.xyz,curpos)-Sphere1.w;

float s2=distance(Sphere2.xyz,curpos)-Sphere2.w;

float s3=distance(Sphere3.xyz,curpos)-Sphere3.w;

float dot1=dot(normalize(curpos-Sphere1.xyz),float3(0.707,0.707,0))-1;

float dot2=sin(dot1*2+(t*2))*1.5;

dot2+=sin(dot1*24+(t*8))*0.07;

s1-=dot2;

float h=saturate(0.5+0.5*(s2-s1)/k);

s2=lerp(s2,s1,h)-k*h*(1.0-h);

h=saturate(0.5+0.5(s3-s2)/k);

float curdf=lerp(s3,s2,h)-k*h(1.0-h);

return curdf;
33:20 查看HLSL代码中的 GetMaterialEmissiveRaw,发现这个函数写了连接到自发光上的所有节点信息,也就说把之前的节点都转化为代码了。
50:00为止的完整代码(之前的代码为了方便演示,把法线以为密度部分分离,以下是最后以后的代码):
//metaballs simple

float3 CamVec=normalize(WorldPos-ViewOrigin);

float3 curpos=WorldPos;

float3 normal=0;

int maxsteps=64;

float curdist,accum=0;

float minstepsize=0.01;

int i=0;

while(i<maxsteps)

{

	curdist=CustomExpression0(Parameters,curpos,k,Sphere1,Sphere2,Sphere3,t);

	if(curdist<thresh)

	{

		curpos+=CamVec*curdist;

		normal.x=CustomExpression0(Parameters,curpos+float3(1,0,0)*o,k,Sphere1,Sphere2,Sphere3,t);

		normal.y=CustomExpression0(Parameters,curpos+float3(0,1,0)*o,k,Sphere1,Sphere2,Sphere3,t);

		normal.z=CustomExpression0(Parameters,curpos+float3(0,0,1)*o,k,Sphere1,Sphere2,Sphere3,t);

		normal=normalize(normal);

		CamVec=lerp(CamVec,-normal,Refraction);

		int j=0;

		while(j<16)

		{

			curdist=CustomExpression0(Parameters,curpos,k,Sphere1,Sphere2,Sphere3,t);

			if(curdist<ShadowMult)

			{

				curdist=max(0,curdist);

				accum+=ShadowMult-curdist;

			}

			curpos+=CamVec*10;

			j++;

		}

		return float4(normal,accum);

	}

	curpos+=CamVec*max(minstepsize,curdist);

	minstepsize+=0.02;

	i++;

}

return 0;
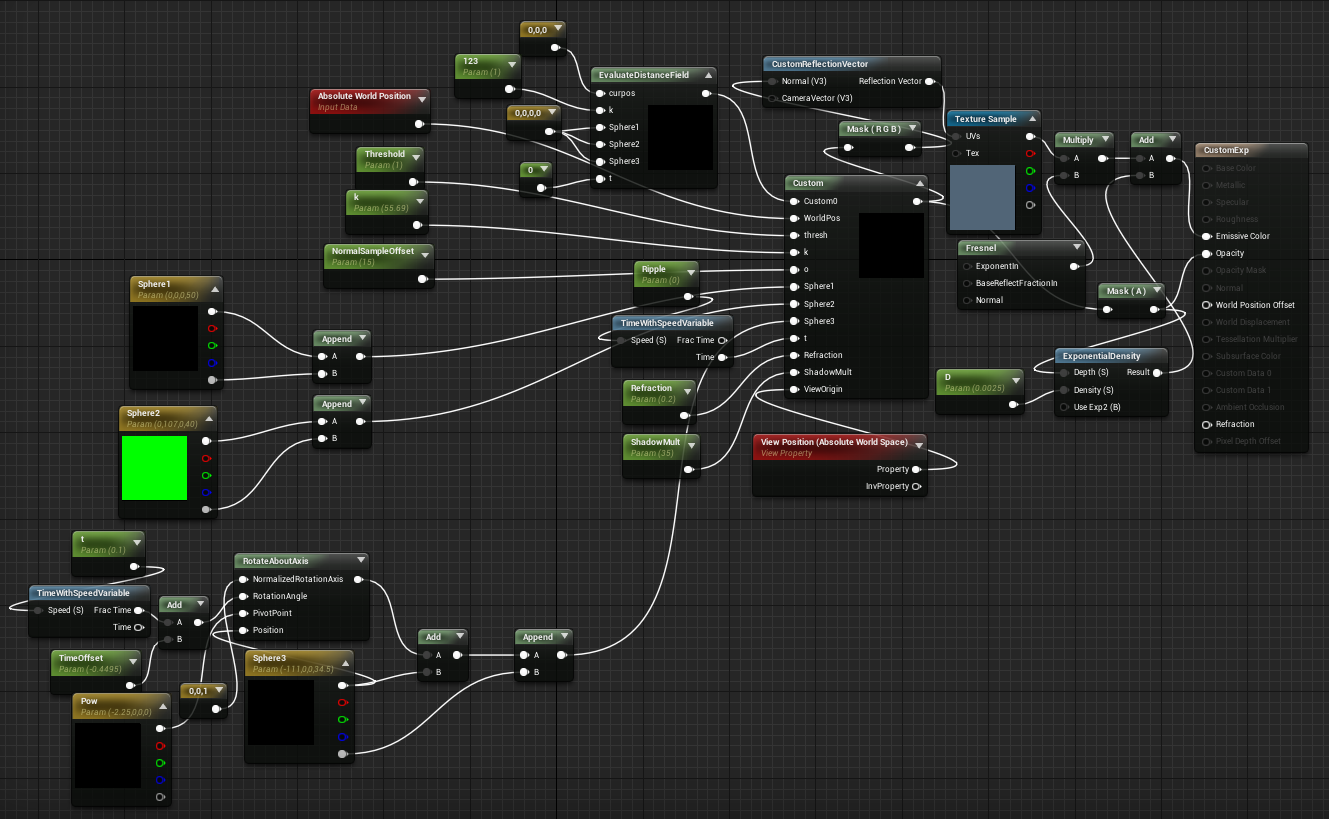
以下是最终的材质节点连线:
50:00之后演示了最终在Demo中用的部分代码(这个我没测试过):
float3 startpos=curpos

float3 accum=0;

float3 normal=0;

int i=0;

	float curdist =CustomExpression2(Parameters,curpos,k,sphere1,sphere2,sphere3,sphere4.t);

	accum-=curdist*TraceVec;

	curpos-=TraceVec*curdist;

	curdist=CustomExpression2(Parameters,curpos,k,sphere1,sphere2,sphere3,sphere4.t);

	accum-=curdist*TraceVec;

	curpos-=TraceVec*curdist;

	curdist=CustomExpression2(Parameters,curpos,k,sphere1,sphere2,sphere3,sphere4.t);

	accum-=curdist*TraceVec;

	curpos-=TraceVec*curdist;

return startpos+accum;
最后传入WorldPositionOffset,可以做出一个球体融合效果。
1:00:00 演示了获取各种屏幕属性
https://docs.unrealengine.com/latest/INT/API/Runtime/Engine/FViewUniformShaderParameters/index.html
在CustomNode中输入View.ExposureScale;当然还有别的几个UniformShader条目,可以得到的属性还挺多。
1:08:50 Height to DF,一个高度图转Distance Field代码(也没测试过,图片用的是引擎里的,可以通过展开EngineContent搜索Texture找到):
heightratio=min(0.2,heightratio);

float 2 texsize=0;

float levels=0;

Tex.GetDimensions(0,texsize.x,texsize.y,levels);

texsize.x=min(texsize.x,256*s);

texsize.y=min(texsize.y,256*s);

float searchlength=max(texsize.x,texsize.y)*heightratio;

float mindist=1;

float3 startpos=float3(UV.x,UV.y,1);

float3 sampledpos=0;

for(int i=-searchlength;i<=searchlength;i++)

{

	for(int j=-searchlength;j<=searchlength;j++)

	{

		sampledpos.xy=UV+float2(i,j)/texsize;

		float texatray=Tex.SampleLevel(TexSampler,sampledpos.xy,0);

		sampledpos.z=lerp(1,1-texatray,heightratio);

		mindist=min(mindist,length(startpos-sampledpos));

	}

}

return mindist/heightratio;

最后推荐了这个网站
http://www.iquilezles.org/www/articles/distfunctions/distfunctions.htm
里面介绍了几个基本形状的距离计算公式
最终输出法线与ALPHA,存在XYZ与w通道中。法线用于从环境贴图中获得颜色信息,做出物体反射效果。
可惜英语不好,不然学起来会更快,所以我只能直接啃代码(第一段的抖动代码让我懵逼了很久),本人自己做了笔记,但是鉴于能力不足就不贴出来,怕误导大家,不过如果有不懂可以在此提问,我可以说一下我一些想法。
看完可以学会四个姿势:
1、距离场的简单计算(没看过距离场算法不好确认)
2、法线计算
3、距离融合算法
4、RayMarching
How to use the Custom Material node and create Metaballs 官方视频学习笔记的更多相关文章
- node.js在windows下的学习笔记(3)---npm
1.什么是npm npm是Node.js的包管理器,它允许开发人员在Node.js的应用程序中创建,共享,重用模块.之前我们通过node的官网的安装程序安装了Node.js,那么npm就已经装好了的. ...
- node.js在windows下的学习笔记(9)---文件I/O模块
开发中我们经常会有文件I/O的需求,node.js中提供一个名为fs的模块来支持I/O操作,fs模块的文件I/O是对标准POSIX函数的简单封装. 1.将"hello world" ...
- node.js在windows下的学习笔记(8)---进程管理Process
process是一个全局内置对象,可以在代码中的任何位置访问此对象,这个对象代表我们的node.js代码宿主的操作系统进程对象. 使用process对象可以截获进程的异常.退出等事件,也可以获取进程的 ...
- node.js在windows下的学习笔记(7)---express的app.js的详细配置说明
var express = require('express'); var path = require('path'); var favicon = require('serve-favicon') ...
- node.js在windows下的学习笔记(6)---安装Express
Express是什么呢? express.js是nodejs的一个MVC开发框架,并且支持jade等多种模板.对于WEB应用程序而言,会有许多诸如模板和路由这样的公共模式在的,虽然也可以自己编写代码解 ...
- node.js在windows下的学习笔记(5)---用NODE.JS创建服务器和客户端
//引入http模块 var http = require('http'); //调用http的createServer的方法,这个方法有一个回调函数,这个回调数 //的作用是当有请求发送给服务器的时 ...
- node.js在windows下的学习笔记(4)---同步,异步,回调的概念
Node.js是使用事件驱动的,非阻塞的I/O模型,用于构建快速的,可扩展的网络应用程序. Node.js想解决的问题是:处理输入,输入,高并发 1.阻塞与非阻塞 阻塞也叫同步,是指每一次执行一个操作 ...
- node.js在windows下的学习笔记(2)---简单熟悉一些命令
1.打开如下的安装 2.输入node -v,显示node的版本号 3.输入node --help.显示帮助命令 4.在命令行中输入node,按下回车键,当出现>符号的时候即进入了node的REP ...
- Node.js模块、包的学习笔记
什么是模块 模块是node应用程序的基本组成部分,文件和模块是一一对应的,就是说,一个node文件就是一个模块,这个文件可能是javascript代码.json或者是编译过的c++扩展等,如: var ...
随机推荐
- bzoj 2301
一道莫比乌斯反演入门题. 首先观察题目要求:的数对数 首先可以发现,这个东西同时有上界和下界,所以并不是很容易计算 那么我们变下形,可以看到:原式= 是不是清晰很多了?(当然没有!) 不,这一步很重要 ...
- excel vba获取拼音
Function PinYin2(Hz As String) Dim PinMa As String Dim MyPinMa As Variant Dim Temp As Integer, i As ...
- 一脸懵逼加从入门到绝望学习hadoop之 org.apache.hadoop.ipc.RemoteException(org.apache.hadoop.security.AccessControlException): Permission denied: user=Administrator, access=WRITE, inode="/":root:supergroup:drwxr-xr报错
1:初学hadoop遇到各种错误,这里贴一下,方便以后脑补吧,报错如下: 主要是在window环境下面搞hadoop,而hadoop部署在linux操作系统上面:出现这个错误是权限的问题,操作hado ...
- Vue2.0 探索之路——生命周期和钩子函数的一些理解
前言 在使用vue一个多礼拜后,感觉现在还停留在初级阶段,虽然知道怎么和后端做数据交互,但是对于mounted这个挂载还不是很清楚的.放大之,对vue的生命周期不甚了解.只知道简单的使用,而不知道为什 ...
- std::string 是什么
#include "stdafx.h" #include <iostream> #include <string> using std::cout; usi ...
- [转] babel入门基础
背景 babel的官网说babel是下一代的js语法编译器,现在自己也在很多项目中使用了babel,可是自己对babel的认识呢,只停留在从google和别人项目中copy的配置代码上,内心感到很不安 ...
- javascript 相关小的知识点集合
本文主要是列出一些javascript 相关的,不限于javascript的,容易记错或者遗忘的小知识,小技巧. 1.javascript中的false 在 JavaScript,常见的 false ...
- bzoj2961 共点圆 bzoj 4140
题解: 比较水的一道题 首先我们化简一下式子发现是维护xxo+yyo的最值 显然是用凸包来做 我们可以直接用支持插入删除的凸包 也是nlogn的 因为没有强制在线,我们也可以cdq,考虑前面一半对答案 ...
- nginx 正则及rewrite常用规则实例
一.正则表达式匹配,其中:* ~ 为区分大小写匹配* ~* 为不区分大小写匹配* !~和!~*分别为区分大小写不匹配及不区分大小写不匹配二.文件及目录匹配,其中:* -f和!-f用来判断是否存在文件* ...
- libsecp256k1 与 openssl ecdsa
1. 历史 区块链节点在接收到的用户发送的交易时,首先会验证交易所涉及utxo的可用性.方法是验证用户签名的合法性,涉及的签名算法就是secp256k1,一种椭圆曲线加密算法. 长期以来,实现了该算法 ...