从hbase到hive,以及sqoop转到mysql解析
https://blog.csdn.net/qq_33689414/article/details/80328665 hive关联hbase的配置文件
hive和hbase同步
https://cwiki.apache.org/confluence/display/Hive
https://cwiki.apache.org/confluence/display/Hive/HBaseIntegration
1、在hive的配置文件增加属性:hive-site.xml
<property>
<name>hbase.zookeeper.quorum</name>
<value>master:2181,node1:2181,node2:2181</value>
</property>
<property>
<name>hbase.zookeeper.quorum</name>
<value>master,node1,node2</value>
</property>
1.1.2 修改hive-env.sh文件
添加一个环境变量
export HIVE_CLASSPATH=$HIVE_CLASSPATH:/hadoop/hbase/lib/*
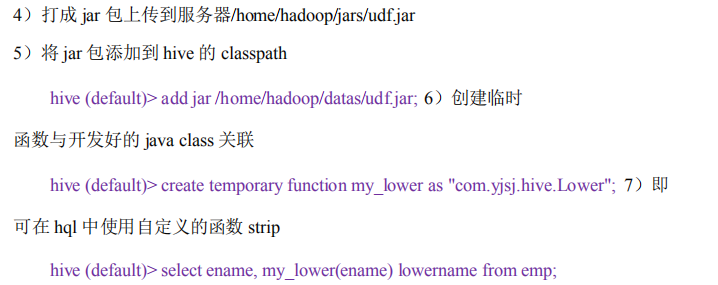
2、在hive中创建临时表
一、
CREATE TABLE hbasetbl(key int, value string)
STORED BY 'org.apache.hadoop.hive.hbase.HBaseStorageHandler'/存储格式的jar包
WITH SERDEPROPERTIES ("hbase.columns.mapping" = ":key,cf1:val")//serdeproperties 属性 一一对应
TBLPROPERTIES ("hbase.table.name" = "xyz", "hbase.mapred.output.outputtable" = "xyz");//输出表名
二、
put 'xyz','1111','cf1:name','zhangsan'
put 'xyz','1111','cf1:val','lisi'
三、
set hive.exec.mode.local.auto=true; //设置为本地模式
insert into hbasetbl values(222,'wangwu');
查看hdfs
hbase> flush 'xyz' //执行刷新后,hdfs才会同步
3.
一、
CREATE EXTERNAL TABLE tmp_order
(key string, id string, user_id string)
STORED BY 'org.apache.hadoop.hive.hbase.HBaseStorageHandler'
WITH SERDEPROPERTIES ("hbase.columns.mapping" = ":key,order:order_id,order:user_id")
TBLPROPERTIES ("hbase.table.name" = "t_order");
外部表必须先在hbase建立表(在hive删除这个表会有什么影响?)
二、
create 't_order','order'
在执行
CREATE EXTERNAL TABLE tmp_order
(key string, id string, user_id string)
STORED BY 'org.apache.hadoop.hive.hbase.HBaseStorageHandler'
WITH SERDEPROPERTIES ("hbase.columns.mapping" = ":key,order:order_id,order:user_id")
TBLPROPERTIES ("hbase.table.name" = "t_order");
put 't_order','1','order:order_id','1'
put 't_order','1','order:user_id','1'
select * from tmp_order;
hive
insert into tmp_order values(2,2,2);
一、两个角度
1.用户
2.会话
二、mysql数据表
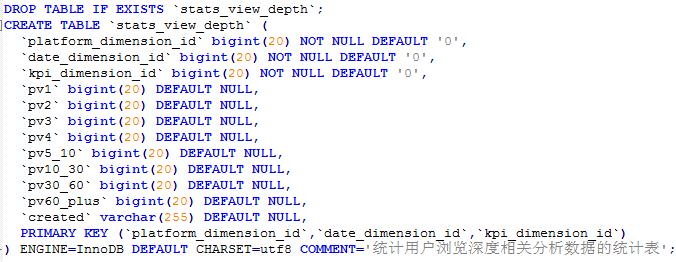
stats_view_depth
CREATE TABLE `stats_view_depth` (
`platform_dimension_id` bigint ,
`data_dimension_id` bigint ,
`kpi_dimension_id` bigint ,
`pv1` bigint ,
`pv2` bigint ,
`pv3` bigint ,
`pv4` bigint ,
`pv5_10` bigint ,
`pv10_30` bigint ,
`pv30_60` bigint ,
`pv60_plus` bigint ,
`created` string
) row format delimited fields terminated by '\t';
三、数据
1.用户ID
2.时间
3.URL
4.PV
四、HIVE和HBASE对应关系
set hive.exec.mode.local.auto=true;
1.在hive中创建hbase的event_log对应表
CREATE EXTERNAL TABLE event_logs(
key string, pl string, en string, s_time bigint, p_url string, u_ud string, u_sd string
) ROW FORMAT SERDE 'org.apache.hadoop.hive.hbase.HBaseSerDe'
STORED BY 'org.apache.hadoop.hive.hbase.HBaseStorageHandler'
with serdeproperties('hbase.columns.mapping'=':key,log:pl,log:en,log:s_time,log:p_url,log:u_ud,log:u_sd')
tblproperties('hbase.table.name'='eventlog');
分组条件
UUID
PL
count(url):1,2,3,4.... (hive_case_when)
3.hive创建临时表:把hql分析之后的中间结果存放到当前的临时表。
CREATE TABLE `stats_view_depth_tmp`(`pl` string, `date` string, `col` string, `ct` bigint);
然后先看第七步的操作SQL,再回头看udf
-- 4. 编写UDF(platformdimension & datedimension)
package com.yjsj.transformer.hive;

import com.yjsj.common.DateEnum;

import com.yjsj.transformer.model.dim.base.DateDimension;

import com.yjsj.transformer.model.dim.base.PlatformDimension;

import com.yjsj.transformer.service.IDimensionConverter;

import com.yjsj.transformer.service.impl.DimensionConverterImpl;

import com.yjsj.util.TimeUtil;

import org.apache.hadoop.hive.ql.exec.UDF;

import org.apache.hadoop.io.IntWritable;

import org.apache.hadoop.io.Text;

import java.io.IOException;

/**

 * 操作日期dimension 相关的udf

 *

 * @author root

 *

 */

public class PlatformDimensionUDF extends UDF {

    private IDimensionConverter converter = new DimensionConverterImpl();

    /**

     * 根据给定的日期(格式为:yyyy-MM-dd)至返回id

     *

     * @param pl

     * @return

     */

    public IntWritable evaluate(Text pl) {

        PlatformDimension dimension = new PlatformDimension(pl.toString());

        try {

            int id = this.converter.getDimensionIdByValue(dimension);

            return new IntWritable(id);

        } catch (IOException e) {

            throw new RuntimeException("获取id异常");

        }

    }

}
package com.yjsj.transformer.hive;

import java.io.IOException;

import org.apache.hadoop.hive.ql.exec.UDF;

import org.apache.hadoop.io.IntWritable;

import org.apache.hadoop.io.Text;

import com.yjsj.common.DateEnum;

import com.yjsj.transformer.model.dim.base.DateDimension;

import com.yjsj.transformer.service.IDimensionConverter;

import com.yjsj.transformer.service.impl.DimensionConverterImpl;

import com.yjsj.util.TimeUtil;

/**

 * 操作日期dimension 相关的udf

 *

 * @author root

 *

 */

public class DateDimensionUDF extends UDF {

    private IDimensionConverter converter = new DimensionConverterImpl();

    /**

     * 根据给定的日期(格式为:yyyy-MM-dd)至返回id

     *

     * @param day

     * @return

     */

    public IntWritable evaluate(Text day) {

        DateDimension dimension = DateDimension.buildDate(TimeUtil.parseString2Long(day.toString()), DateEnum.DAY);

        try {

            int id = this.converter.getDimensionIdByValue(dimension);

            return new IntWritable(id);

        } catch (IOException e) {

            throw new RuntimeException("获取id异常");

        }

    }

}
底层dimension在项目内
-- 5. 上传transformer.jar到hdfs的/yjsj/transformer文件夹中
文件夹放到虚拟机上之后要执行
zip -d wc.jar 'META-INF/.SF' 'META-INF/.RSA' 'META-INF/*SF'
hadoop fs -mkdir -p /yjsj/transformer
hadoop fs -put transformer.jar /yjsj/transformer/
-- 6. 创建hive的function
#create function platform_convert as 'com.yjsj.transformer.hive.PlatformDimensionUDF' using jar 'hdfs://master:9000/yjsj/transformer/transformer.jar';
create function date_convert as 'com.yjsj.transformer.hive.DateDimensionUDF' using jar 'hdfs://master:9000/yjsj/transformer/transformer.jar';
create function platform_convert as 'com.yjsj.transformer.hive.PlatformDimensionUDF' using jar 'hdfs://master:9000/yjsj/transformer/BIG_DATA_SXT_3.jar';
create function date_convert as 'com.yjsj.transformer.hive.DateDimensionUDF' using jar 'hdfs://master:9000/yjsj/transformer/BIG_DATA_SXT_3.jar';
上面的端口号9000要写上,在之前的hive文档里并没有写,如下,是因为默认是8020,而我们修改为9000
7. hql编写(统计用户角度的浏览深度)<注意:时间为外部给定>
select
pl, from_unixtime(cast(s_time/1000 as bigint),'yyyy-MM-dd') as day, u_ud
from event_logs
where
en='e_pv'
and p_url is not null
and pl is not null
and s_time >= unix_timestamp('2019-04-08','yyyy-MM-dd')*1000
and s_time < unix_timestamp('2019-04-09','yyyy-MM-dd')*1000;
下面是上句生成结果(为方便后续综合代码理解,才写的这行SQL语句)
website 2019-04-08 11423967 pv2
website 2019-04-08 11923441 pv1
website 2019-04-08 13117709 pv3
website 2019-04-08 18876987 pv1
website 2019-04-08 22132974 pv5_10
website 2019-04-08 32338628 pv3
website 2019-04-08 32462024 pv1
website 2019-04-08 37100298 pv2
website 2019-04-08 40258369 pv1
website 2019-04-08 43316735 pv4
website 2019-04-08 43367799 pv3
website 2019-04-08 46712177 pv2
website 2019-04-08 48200918 pv2
website 2019-04-08 55242998 pv1
website 2019-04-08 61014907 pv3
website 2019-04-08 66425387 pv2
website 2019-04-08 66752576 pv1
website 2019-04-08 69279477 pv2
website 2019-04-08 69831907 pv2
website 2019-04-08 70509784 pv2
website 2019-04-08 76613477 pv2
website 2019-04-08 76999358 pv4
website 2019-04-08 80101579 pv1
website 2019-04-08 83607412 pv1
website 2019-04-08 87265754 pv2
website 2019-04-08 92096261 pv1
website 2019-04-08 95144920 pv3
from (
select
pl, from_unixtime(cast(s_time/1000 as bigint),'yyyy-MM-dd') as day, u_ud,
(case when count(p_url) = 1 then "pv1"
when count(p_url) = 2 then "pv2"
when count(p_url) = 3 then "pv3"
when count(p_url) = 4 then "pv4"
when count(p_url) >= 5 and count(p_url) <10 then "pv5_10"
when count(p_url) >= 10 and count(p_url) <30 then "pv10_30"
when count(p_url) >=30 and count(p_url) <60 then "pv30_60"
else 'pv60_plus' end) as pv
from event_logs
where
en='e_pv'
and p_url is not null
and pl is not null
and s_time >= unix_timestamp('2019-04-08','yyyy-MM-dd')*1000
and s_time < unix_timestamp('2019-04-09','yyyy-MM-dd')*1000
group by
pl, from_unixtime(cast(s_time/1000 as bigint),'yyyy-MM-dd'), u_ud
) as tmp
insert overwrite table stats_view_depth_tmp
select pl,day,pv,count(u_ud) as ct where u_ud is not null group by pl,day,pv;
select * from stats_view_depth_tmp;
结果如下
website 2019-04-08 pv1 9
website 2019-04-08 pv2 10
website 2019-04-08 pv3 5
website 2019-04-08 pv4 2
website 2019-04-08 pv5_10 1
因为我们需要的内容格式如下
所以之后进行行转列
--把临时表的多行数据,转换一行
UNION 内部的每个 SELECT 语句必须拥有相同数量的列。列也必须拥有相似的数据类型。同时,每个 SELECT 语句中的列的顺序必须相同。
根据where语句筛选要合并的内容项
https://www.runoob.com/sql/sql-union.html
with tmp as
(
select pl,`date` as date1,ct as pv1,0 as pv2,0 as pv3,0 as pv4,0 as pv5_10,0 as pv10_30,0 as pv30_60,0 as pv60_plus from stats_view_depth_tmp where col='pv1' union all
select pl,`date` as date1,0 as pv1,ct as pv2,0 as pv3,0 as pv4,0 as pv5_10,0 as pv10_30,0 as pv30_60,0 as pv60_plus from stats_view_depth_tmp where col='pv2' union all
select pl,`date` as date1,0 as pv1,0 as pv2,ct as pv3,0 as pv4,0 as pv5_10,0 as pv10_30,0 as pv30_60,0 as pv60_plus from stats_view_depth_tmp where col='pv3' union all
select pl,`date` as date1,0 as pv1,0 as pv2,0 as pv3,ct as pv4,0 as pv5_10,0 as pv10_30,0 as pv30_60,0 as pv60_plus from stats_view_depth_tmp where col='pv4' union all
select pl,`date` as date1,0 as pv1,0 as pv2,0 as pv3,0 as pv4,ct as pv5_10,0 as pv10_30,0 as pv30_60,0 as pv60_plus from stats_view_depth_tmp where col='pv5_10' union all
select pl,`date` as date1,0 as pv1,0 as pv2,0 as pv3,0 as pv4,0 as pv5_10,ct as pv10_30,0 as pv30_60,0 as pv60_plus from stats_view_depth_tmp where col='pv10_30' union all
select pl,`date` as date1,0 as pv1,0 as pv2,0 as pv3,0 as pv4,0 as pv5_10,0 as pv10_30,ct as pv30_60,0 as pv60_plus from stats_view_depth_tmp where col='pv30_60' union all
select pl,`date` as date1,0 as pv1,0 as pv2,0 as pv3,0 as pv4,0 as pv5_10,0 as pv10_30,0 as pv30_60,ct as pv60_plus from stats_view_depth_tmp where col='pv60_plus' union all
select 'all' as pl,`date` as date1,ct as pv1,0 as pv2,0 as pv3,0 as pv4,0 as pv5_10,0 as pv10_30,0 as pv30_60,0 as pv60_plus from stats_view_depth_tmp where col='pv1' union all
select 'all' as pl,`date` as date1,0 as pv1,ct as pv2,0 as pv3,0 as pv4,0 as pv5_10,0 as pv10_30,0 as pv30_60,0 as pv60_plus from stats_view_depth_tmp where col='pv2' union all
select 'all' as pl,`date` as date1,0 as pv1,0 as pv2,ct as pv3,0 as pv4,0 as pv5_10,0 as pv10_30,0 as pv30_60,0 as pv60_plus from stats_view_depth_tmp where col='pv3' union all
select 'all' as pl,`date` as date1,0 as pv1,0 as pv2,0 as pv3,ct as pv4,0 as pv5_10,0 as pv10_30,0 as pv30_60,0 as pv60_plus from stats_view_depth_tmp where col='pv4' union all
select 'all' as pl,`date` as date1,0 as pv1,0 as pv2,0 as pv3,0 as pv4,ct as pv5_10,0 as pv10_30,0 as pv30_60,0 as pv60_plus from stats_view_depth_tmp where col='pv5_10' union all
select 'all' as pl,`date` as date1,0 as pv1,0 as pv2,0 as pv3,0 as pv4,0 as pv5_10,ct as pv10_30,0 as pv30_60,0 as pv60_plus from stats_view_depth_tmp where col='pv10_30' union all
select 'all' as pl,`date` as date1,0 as pv1,0 as pv2,0 as pv3,0 as pv4,0 as pv5_10,0 as pv10_30,ct as pv30_60,0 as pv60_plus from stats_view_depth_tmp where col='pv30_60' union all
select 'all' as pl,`date` as date1,0 as pv1,0 as pv2,0 as pv3,0 as pv4,0 as pv5_10,0 as pv10_30,0 as pv30_60,ct as pv60_plus from stats_view_depth_tmp where col='pv60_plus'
)
from tmp
insert overwrite table stats_view_depth
select platform_convert(pl),date_convert(date1),6,sum(pv1),sum(pv2),sum(pv3),sum(pv4),sum(pv5_10),sum(pv10_30),sum(pv30_60),sum(pv60_plus),'2019-04-08' group by pl,date1;
下面则是没有定义UDF时候把下面的select 语句替换掉上面的
select 2,1,6,sum(pv1),sum(pv2),sum(pv3),sum(pv4),sum(pv5_10),sum(pv10_30),sum(pv30_60),sum(pv60_plus),'2019-04-08' group by pl,date1;
select platform_convert(pl),date_convert(date1),6,sum(pv1),sum(pv2),sum(pv3),sum(pv4),sum(pv5_10),sum(pv10_30),sum(pv30_60),sum(pv60_plus),'2019-04-08' group by pl,date1;
select 2,1,6,sum(pv1),sum(pv2),sum(pv3),sum(pv4),sum(pv5_10),sum(pv10_30),sum(pv30_60),sum(pv60_plus),'2019-04-08' group by pl,date1;
select 2,date_convert(date1),6,sum(pv1),sum(pv2),sum(pv3),sum(pv4),sum(pv5_10),sum(pv10_30),sum(pv30_60),sum(pv60_plus),'2019-04-08' group by pl,date1;
查询结果
select * from stats_view_depth;
//上面的前三项
platform_convert(pl),date_convert(date1),6,分别是平台维度id,日期维度id,kpi维度id
而前两项,即平台和日期维度,是通过前面四定义的udf函数来转换的,底层是写的java语句,
(1)继承 org.apache.hadoop.hive.ql.UDF
(2)需要实现 evaluate 函数;evaluate 函数支持重载;
(3)在 hive 的命令行窗口创建函数
a)添加 jar
add jar linux_jar_path b)创
建 function,
create [temporary] function [dbname.]function_name AS class_name;
(4)在 hive 的命令行窗口删除函数
Drop [temporary] function [if exists] [dbname.]function_name; 6)注
意事项
(1)UDF 必须要有返回类型,可以返回 null,但是返回类型不能为 void

sqoop --options-file sqoop_option
-- 7. sqoop脚步编写(统计用户角度)
sqoop export --connect jdbc:mysql://master:3306/result_db --username root --password root --m 1 --columns platform_dimension_id,date_dimension_id,kpi_dimension_id,pv1,pv2,pv3,pv4,pv5_10,pv10_30,pv30_60,pv60_plus,created --export-dir /user/hive/warehouse/stats_view_depth --table stats_view_depth --input-fields-terminated-by '\t'
下面是另外一个维度,方法流程是一样的
-- 8. hql编写(统计会话角度的浏览深度)<注意:时间为外部给定>
from (
select pl, from_unixtime(cast(s_time/1000 as bigint),'yyyy-MM-dd') as day, u_sd,
(case when count(p_url) = 1 then "pv1"
when count(p_url) = 2 then "pv2"
when count(p_url) = 3 then "pv3"
when count(p_url) = 4 then "pv4"
when count(p_url) >= 5 and count(p_url) <10 then "pv5_10"
when count(p_url) >= 10 and count(p_url) <30 then "pv10_30"
when count(p_url) >=30 and count(p_url) <60 then "pv30_60"
else 'pv60_plus' end) as pv
from event_logs
where en='e_pv' and p_url is not null and pl is not null and s_time >= unix_timestamp('2019-04-08','yyyy-MM-dd')*1000 and s_time < unix_timestamp('2019-04-09','yyyy-MM-dd')*1000
group by pl, from_unixtime(cast(s_time/1000 as bigint),'yyyy-MM-dd'), u_sd
) as tmp
insert overwrite table stats_view_depth_tmp
select pl,day,pv,count(distinct u_sd) as ct where u_sd is not null group by pl,day,pv;
with tmp as
(
select pl,date,ct as pv1,0 as pv2,0 as pv3,0 as pv4,0 as pv5_10,0 as pv10_30,0 as pv30_60,0 as pv60_plus from stats_view_depth_tmp where col='pv1' union all
select pl,date,0 as pv1,ct as pv2,0 as pv3,0 as pv4,0 as pv5_10,0 as pv10_30,0 as pv30_60,0 as pv60_plus from stats_view_depth_tmp where col='pv2' union all
select pl,date,0 as pv1,0 as pv2,ct as pv3,0 as pv4,0 as pv5_10,0 as pv10_30,0 as pv30_60,0 as pv60_plus from stats_view_depth_tmp where col='pv3' union all
select pl,date,0 as pv1,0 as pv2,0 as pv3,ct as pv4,0 as pv5_10,0 as pv10_30,0 as pv30_60,0 as pv60_plus from stats_view_depth_tmp where col='pv4' union all
select pl,date,0 as pv1,0 as pv2,0 as pv3,0 as pv4,ct as pv5_10,0 as pv10_30,0 as pv30_60,0 as pv60_plus from stats_view_depth_tmp where col='pv5_10' union all
select pl,date,0 as pv1,0 as pv2,0 as pv3,0 as pv4,0 as pv5_10,ct as pv10_30,0 as pv30_60,0 as pv60_plus from stats_view_depth_tmp where col='pv10_30' union all
select pl,date,0 as pv1,0 as pv2,0 as pv3,0 as pv4,0 as pv5_10,0 as pv10_30,ct as pv30_60,0 as pv60_plus from stats_view_depth_tmp where col='pv30_60' union all
select pl,date,0 as pv1,0 as pv2,0 as pv3,0 as pv4,0 as pv5_10,0 as pv10_30,0 as pv30_60,ct as pv60_plus from stats_view_depth_tmp where col='pv60_plus' union all
select 'all' as pl,date,ct as pv1,0 as pv2,0 as pv3,0 as pv4,0 as pv5_10,0 as pv10_30,0 as pv30_60,0 as pv60_plus from stats_view_depth_tmp where col='pv1' union all
select 'all' as pl,date,0 as pv1,ct as pv2,0 as pv3,0 as pv4,0 as pv5_10,0 as pv10_30,0 as pv30_60,0 as pv60_plus from stats_view_depth_tmp where col='pv2' union all
select 'all' as pl,date,0 as pv1,0 as pv2,ct as pv3,0 as pv4,0 as pv5_10,0 as pv10_30,0 as pv30_60,0 as pv60_plus from stats_view_depth_tmp where col='pv3' union all
select 'all' as pl,date,0 as pv1,0 as pv2,0 as pv3,ct as pv4,0 as pv5_10,0 as pv10_30,0 as pv30_60,0 as pv60_plus from stats_view_depth_tmp where col='pv4' union all
select 'all' as pl,date,0 as pv1,0 as pv2,0 as pv3,0 as pv4,ct as pv5_10,0 as pv10_30,0 as pv30_60,0 as pv60_plus from stats_view_depth_tmp where col='pv5_10' union all
select 'all' as pl,date,0 as pv1,0 as pv2,0 as pv3,0 as pv4,0 as pv5_10,ct as pv10_30,0 as pv30_60,0 as pv60_plus from stats_view_depth_tmp where col='pv10_30' union all
select 'all' as pl,date,0 as pv1,0 as pv2,0 as pv3,0 as pv4,0 as pv5_10,0 as pv10_30,ct as pv30_60,0 as pv60_plus from stats_view_depth_tmp where col='pv30_60' union all
select 'all' as pl,date,0 as pv1,0 as pv2,0 as pv3,0 as pv4,0 as pv5_10,0 as pv10_30,0 as pv30_60,ct as pv60_plus from stats_view_depth_tmp where col='pv60_plus'
)
from tmp
insert overwrite table stats_view_depth select platform_convert(pl),date_convert(date),6,sum(pv1),sum(pv2),sum(pv3),sum(pv4),sum(pv5_10),sum(pv10_30),sum(pv30_60),sum(pv60_plus),'2019-04-08' group by pl,date;
-- 9. sqoop脚步编写(统计会话角度)
sqoop export --connect jdbc:mysql://master:3306/report --username root --password 111111 --table stats_view_depth --export-dir /user/hive/warehouse/stats_view_depth/* --input-fields-terminated-by "\\01" --update-mode allowinsert --update-key platform_dimension_id,data_dimension_id,kpi_dimension_id
-- 10. shell脚步编写
从hbase到hive,以及sqoop转到mysql解析的更多相关文章
- 3.12-3.16 Hbase集成hive、sqoop、hue
一.Hbase集成hive https://cwiki.apache.org/confluence/display/Hive/HBaseIntegration 1.说明 Hive与HBase整合在一起 ...
- hbase结合hive和sqoop实现数据指导mysql
hive综合hbase两个优势表中的: 1.实现数据导入到MYSQL. 2.实现hbase表转换为另外一张hbase表. 三个操作环节: 1.hbase关联hive作为外部 ...
- (MySQL里的数据)通过Sqoop Import HBase 里 和 通过Sqoop Export HBase 里的数据到(MySQL)
Sqoop 可以与HBase系统结合,实现数据的导入和导出,用户需要在 sqoop-env.sh 中添加HBASE_HOME的环境变量. 具体,见我的如下博客: hadoop2.6.0(单节点)下Sq ...
- sqoop将mysql数据导入hbase、hive的常见异常处理
原创不易,如需转载,请注明出处https://www.cnblogs.com/baixianlong/p/10700700.html,否则将追究法律责任!!! 一.需求: 1.将以下这张表(test_ ...
- Sqoop使用,mysql,hbase,hive等相互转换
Sqoop 是一款用来在不同数据存储软件之间进行数据传输的开源软件,它支持多种类型的数据储存软件. 安装 Sqoop 1.下载sqoop并加mysql驱动包 http://mirror.bit.edu ...
- sqoop命令,mysql导入到hdfs、hbase、hive
1.测试MySQL连接 bin/sqoop list-databases --connect jdbc:mysql://192.168.1.187:3306/trade_dev --username ...
- HBASE与hive对比使用以及HBASE常用shell操作。与sqoop的集成
2.6.与 Hive 的集成2.6.1.HBase 与 Hive 的对比1) Hive(1) 数据仓库Hive 的本质其实就相当于将 HDFS 中已经存储的文件在 Mysql 中做了一个双射关系,以方 ...
- Apache的HBase与cdh的sqoop集成(不建议不同版本之间的集成)
1.修改sqoop的配资文件 2.从mysql导入到hbase(import) bin/sqoop import \ --connect jdbc:mysql://linux-hadoop3.ibei ...
- 076 Apache的HBase与cdh的sqoop集成(不建议不同版本之间的集成)
1.修改sqoop的配资文件 2.从mysql导入到hbase(import) bin/sqoop import \ --connect jdbc:mysql://linux-hadoop3.ibei ...
随机推荐
- scala--函数式对象
函数式对象 这次写点关于函数式对象的吧 class Rational(n:Int, d:Int) { // n,d 为类参数,scala会创造出同样带有这两个参数的主构造器.如果这个类没有主体,可以不 ...
- css样式占位和不占位隐藏元素的方法
不占位隐藏:display:none; 占位隐藏:visibility:hidden;
- Bioconductor的历史
---------------------------------------------------------------Bioconductor------------------------- ...
- 发布Maven项目 nexus
1.在pom.xml文件中配置需要发布的工厂 如果想把项目发布到nexus中,需要在pom.xml中配置releases和snapshots版本发布的具体repository <distribu ...
- spring 在web容器启动时执行初始化方法
开发框架:spingMVC+myBatis 解决方案:给web容器添加一个Listener类,在容器启动的时候执行Listener的“初始化”方法,在这个初始化方法中执行查询数据库的所有操作,然后将数 ...
- mysql数据库的卸载
1.控制面板 程序和功能 卸载MySQL相关 2.卸载MySQL的安装目录 与储存目录 3.删除C盘下隐藏MySQL文件:组织-----文件夹和搜索选项-----------查看------ ...
- thymeleaf从session中获取数据
<input th:value="${session.value1}" />
- 早停法(Early Stopping)
一.早停法简介(Early Stopping)当我们训练深度学习神经网络的时候通常希望能获得最好的泛化性能(generalization performance,即可以很好地拟合数据).但是所有的标准 ...
- python之用户登陆作业
实现一个用户登陆的小程序,如果密码错误,可以重试三次,如果三次均错误,则锁定 数据库如下格式,分别用户名|密码|锁定,其中锁定字段0为正常,1为被锁定 root|admin123|0 admin|ad ...
- [leetcode]283. Move Zeroes移零
Given an array nums, write a function to move all 0's to the end of it while maintaining the relativ ...