XMind2TestCase:一个高效测试用例设计的解决方案!
一、背景
软件测试过程中,最重要、最核心就是测试用例的设计,也是测试童鞋、测试团队日常投入最多时间的工作内容之一。
然而,传统的测试用例设计过程有很多痛点:
- 1、使用Excel表格进行测试用例设计,虽然成本低,但版本管理麻烦,维护更新耗时,用例评审繁琐,过程报表统计难...
- 2、使用TestLink、TestCenter、Redmine等传统测试管理工具,虽然测试用例的执行、管理、统计比较方便,但依然存在编写用例效率不高、思路不够发散、在产品快速迭代过程中比较耗时等问题...
- 3、公司自研测试管理工具,这是个不错的选择,但对于大部分小公司、小团队来说,一方面研发维护成本高,另一方面对技术要有一定要求...
- 4、...
基于这些情况,现在越来越多公司选择使用思维导图这种高效的生产力工具进行用例设计,特别是敏捷开发团队。
事实上也证明,思维导图其发散性思维、图形化思维的特点,跟测试用例设计时所需的思维非常吻合,所以在实际工作中极大提升了我们测试用例设计的效率,也非常方便测试用例评审。
但是与此同时,使用思维导图进行测试用例设计的过程中也带来不少问题:
- 1、测试用例难以量化管理、执行情况难以统计;
- 2、测试用例执行结果与BUG管理系统难以打通;
- 3、团队成员用思维导图设计用例的风格各异,沟通成本巨大;
- 4、...
综合以上情况,我们可以发现不同的测试用例设计方式,各有各个的优劣。
那么问题来了,我们能不能将它们各自优点合在一起呢?这样不就可以提升我们的效率了!
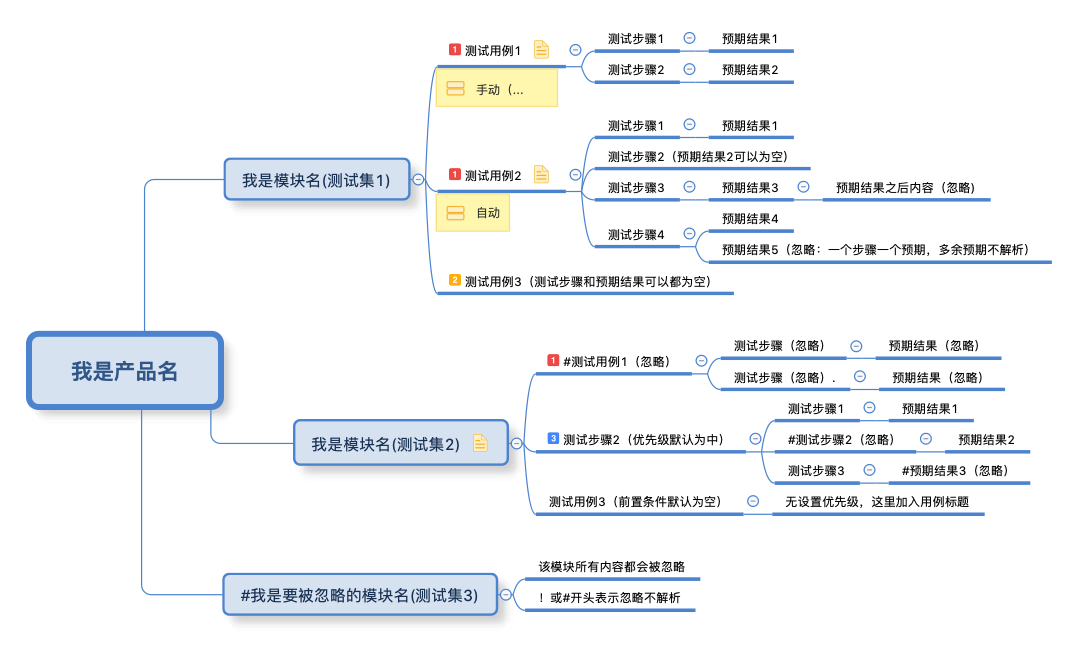
于是,这时候 XMind2TestCase 就应运而生了,该工具基于 Python 实现,通过制定测试用例通用模板,
然后使用 XMind 这款广为流传且开源的思维导图工具进行用例设计。
其中制定测试用例通用模板是一个非常核心的步骤(具体请看使用指南),有了通用的测试用例模板,我们就可以在 XMind 文件上解析并提取出测试用例所需的基本信息,
然后合成常见测试用例管理系统所需的用例导入文件。这样就将 XMind 设计测试用例的便利与常见测试用例系统的高效管理结合起来了!
当前 XMind2TestCase 已实现从 XMind 文件到 TestLink 和 Zentao(禅道) 两大常见用例管理系统的测试用例转换,同时也提供 XMind 文件解析后的两种数据接口
(TestSuites、TestCases两种级别的JSON数据),方便快速与其他测试用例管理系统打通。
二、使用示例
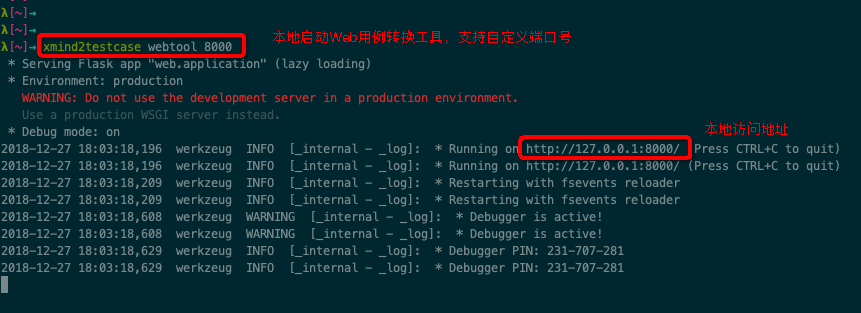
1、Web工具示例

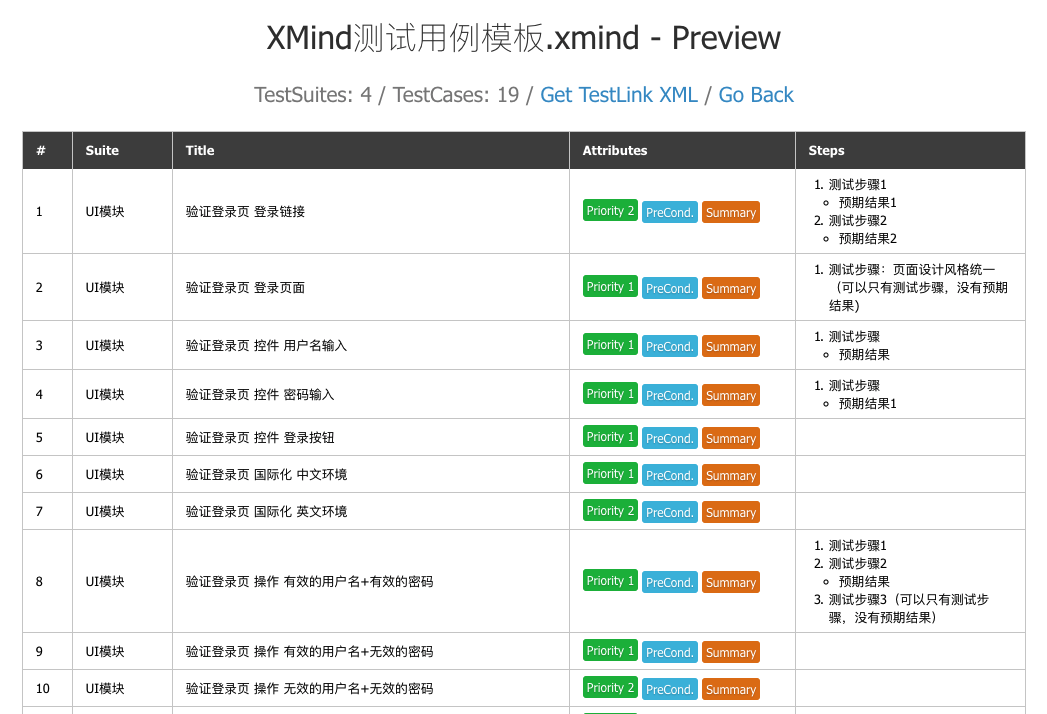
2、转换后用例预览
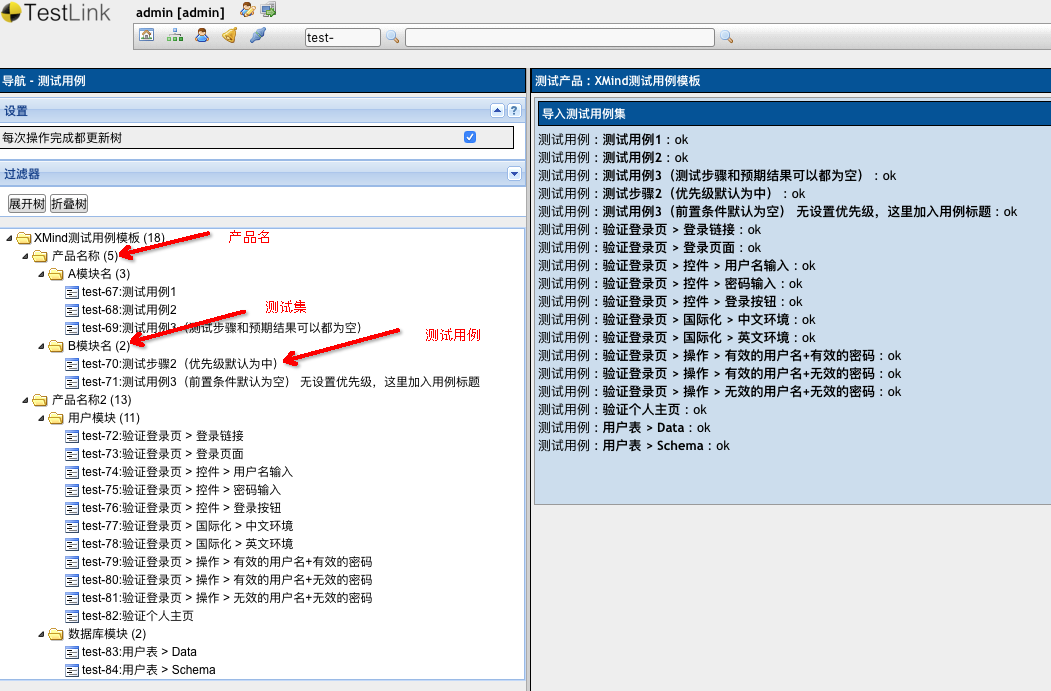
3、TestLink导入结果示例
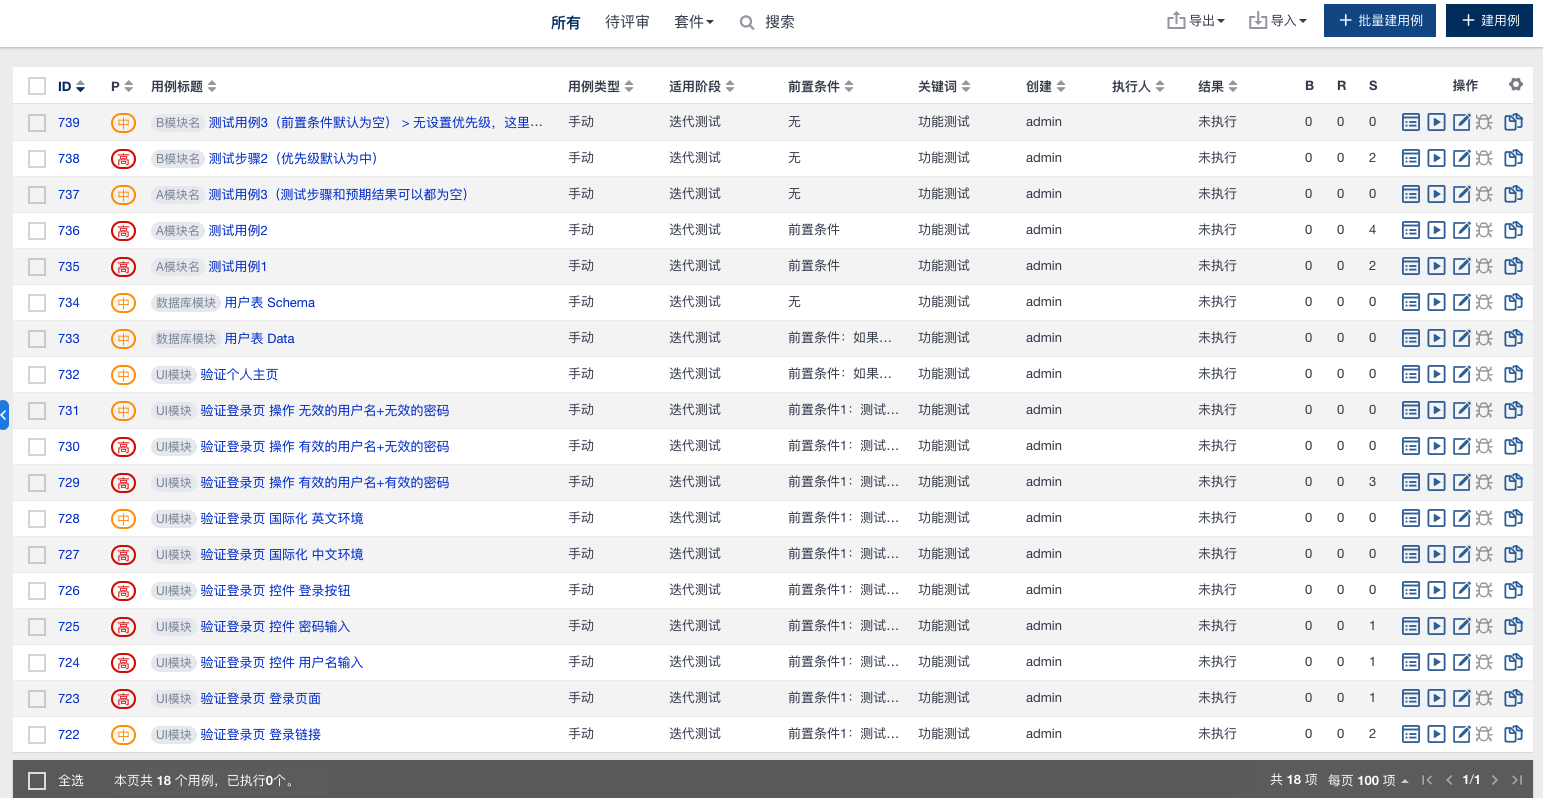
4、禅道(ZenTao)导入结果示例
三、安装方式
pip3 install xmind2testcase
四、版本升级
pip3 install -U xmind2testcase
五、使用方式
1、命令行调用
Usage:
 xmind2testcase [path_to_xmind_file] [-csv] [-xml] [-json]

Example:
 xmind2testcase /path/to/testcase.xmind        => output testcase.csv、testcase.xml、testcase.json
 xmind2testcase /path/to/testcase.xmind -csv   => output testcase.csv
 xmind2testcase /path/to/testcase.xmind -xml   => output testcase.xml
 xmind2testcase /path/to/testcase.xmind -json  => output testcase.json
2、使用Web界面
Usage:
 xmind2testcase [webtool] [port_num]

Example:
 xmind2testcase webtool        => launch the web testcase convertion tool locally -> 127.0.0.1:5001
 xmind2testcase webtool 8000   => launch the web testcase convertion tool locally -> 127.0.0.1:8000
3、API调用
import json
import xmind
from xmind2testcase.zentao import xmind_to_zentao_csv_file
from xmind2testcase.testlink import xmind_to_testlink_xml_file
from xmind2testcase.utils import xmind_testcase_to_json_file
from xmind2testcase.utils import xmind_testsuite_to_json_file
from xmind2testcase.utils import get_xmind_testcase_list
from xmind2testcase.utils import get_xmind_testsuite_list

def main():
    xmind_file = 'docs/xmind_testcase_template.xmind'
    print('Start to convert XMind file: %s' % xmind_file)

    zentao_csv_file = xmind_to_zentao_csv_file(xmind_file)
    print('Convert XMind file to zentao csv file successfully: %s' % zentao_csv_file)

    testlink_xml_file = xmind_to_testlink_xml_file(xmind_file)
    print('Convert XMind file to testlink xml file successfully: %s' % testlink_xml_file)

    testsuite_json_file = xmind_testsuite_to_json_file(xmind_file)
    print('Convert XMind file to testsuite json file successfully: %s' % testsuite_json_file)

    testcase_json_file = xmind_testcase_to_json_file(xmind_file)
    print('Convert XMind file to testcase json file successfully: %s' % testcase_json_file)

    testsuites = get_xmind_testsuite_list(xmind_file)
    print('Convert XMind to testsuits dict data:\n%s' % json.dumps(testsuites, indent=2, separators=(',', ': '), ensure_ascii=False))

    testcases = get_xmind_testcase_list(xmind_file)
    print('Convert Xmind to testcases dict data:\n%s' % json.dumps(testcases, indent=4, separators=(',', ': ')))

    workbook = xmind.load(xmind_file)
    print('Convert XMind to Json data:\n%s' % json.dumps(workbook.getData(), indent=2, separators=(',', ': '), ensure_ascii=False))

    print('Finished conversion, Congratulations!')

if __name__ == '__main__':
    main()
4、XMind用例文件转为JSON数据
(1)转为测试用例JSON数据
from xmind2testcase.utils import get_xmind_testcase_list
xmind_file = 'docs/xmind_testcase_demo.xmind'
testcases = get_xmind_testcase_list(xmind_file)
print(testcases)

Output:

[
    {                                                # 测试用例
        "name": "测试用例1",                           # 用例标题
        "version": 1,                                 # 用例版本
        "summary": "测试用例1",                        # 用例摘要
        "preconditions": "前置条件",                   # 前置条件
        "execution_type": 1,                          # 用例执行类型(1:手动、2:自动)
        "importance": 1,                              # 优先级(1:高、2:中、3:低)
        "estimated_exec_duration": 3,                 # 预计执行时间(分钟)
        "status": 7,                                  # 用例状态(1:草稿、2:待评审、3:评审中、4:重做、5、废弃、6:feature、7:终稿)
        "steps": [                                    # 测试步骤列表
            {
                "step_number": 1,                     # 编号
                "actions": "测试步骤1",                 # 步骤内容
                "expectedresults": "预期结果1",         # 预期结果
                "execution_type": 1                    # 执行类型(1:手动,2:自动)
            },
            {
                "step_number": 2,
                "actions": "测试步骤2",
                "expectedresults": "预期结果2",
                "execution_type": 1
            }
        ],
        "product": "我是产品名",                          # 产品名称
        "suite": "我是模块名(测试集1)"                     # 测试集(模块名)
    },
    {
        "name": "测试用例2",
        "version": 1,
        "summary": "测试用例2",
        "preconditions": "前置条件",
        "execution_type": 1,
        "importance": 1,
        "estimated_exec_duration": 3,
        "status": 7,
        "steps": [
            {
                "step_number": 1,
                "actions": "测试步骤1",
                "expectedresults": "预期结果1",
                "execution_type": 1
            },
            {
                "step_number": 2,
                "actions": "测试步骤2(预期结果2可以为空)",
                "expectedresults": "",
                "execution_type": 1
            },
            {
                "step_number": 3,
                "actions": "测试步骤3",
                "expectedresults": "预期结果3",
                "execution_type": 1
            },
            {
                "step_number": 4,
                "actions": "测试步骤4",
                "expectedresults": "预期结果4",
                "execution_type": 1
            }
        ],
        "product": "我是产品名",
        "suite": "我是模块名(测试集1)"
    },
    {
        "name": "测试用例3(测试步骤和预期结果可以都为空)",
        "version": 1,
        "summary": "测试用例3(测试步骤和预期结果可以都为空)",
        "preconditions": "无",
        "execution_type": 1,
        "importance": 2,
        "estimated_exec_duration": 3,
        "status": 7,
        "steps": [ ],
        "product": "我是产品名",
        "suite": "我是模块名(测试集1)"
    },
    {
        "name": "测试步骤2(优先级默认为中)",
        "version": 1,
        "summary": "测试步骤2(优先级默认为中)",
        "preconditions": "无",
        "execution_type": 1,
        "importance": 3,
        "estimated_exec_duration": 3,
        "status": 7,
        "steps": [
            {
                "step_number": 1,
                "actions": "测试步骤1",
                "expectedresults": "预期结果1",
                "execution_type": 1
            },
            {
                "step_number": 2,
                "actions": "测试步骤3",
                "expectedresults": "",
                "execution_type": 1
            }
        ],
        "product": "我是产品名",
        "suite": "我是模块名(测试集2)"
    },
    {
        "name": "测试用例3(前置条件默认为空) 无设置优先级,这里加入用例标题",
        "version": 1,
        "summary": "测试用例3(前置条件默认为空) 无设置优先级,这里加入用例标题",
        "preconditions": "无",
        "execution_type": 1,
        "importance": 2,
        "estimated_exec_duration": 3,
        "status": 7,
        "steps": [ ],
        "product": "我是产品名",
        "suite": "我是模块名(测试集2)"
    }
]
(2)转为测试集JSON数据
from xmind2testcase.utils import get_xmind_testsuite_list
xmind_file = 'docs/xmind_testcase_demo.xmind'
testsuites = get_xmind_testsuite_list(xmind_file)
print(testsuites)

Output:

[
  {                                                 # XMind画布(Sheet)列表
    "name": "我是产品名",                             # 产品名称
    "details": null,                                 # 产品摘要
    "testcase_list": [],                             # 用例列表
    "sub_suites": [                                  # 用例集列表
      {
        "name": "我是模块名(测试集1)",                  # 用例集1名称(模块名)
        "details": null,                             # 用例集摘要
        "testcase_list": [                           # 用例列表
          {                                          # 具体用例
            "name": "测试用例1",
            "version": 1,
            "summary": "测试用例1",
            "preconditions": "前置条件",
            "execution_type": 1,
            "importance": 1,
            "estimated_exec_duration": 3,
            "status": 7,
            "steps": [
              {
                "step_number": 1,
                "actions": "测试步骤1",
                "expectedresults": "预期结果1",
                "execution_type": 1
              },
              {
                "step_number": 2,
                "actions": "测试步骤2",
                "expectedresults": "预期结果2",
                "execution_type": 1
              }
            ]
          },
          {
            "name": "测试用例2",
            "version": 1,
            "summary": "测试用例2",
            "preconditions": "前置条件",
            "execution_type": 1,
            "importance": 1,
            "estimated_exec_duration": 3,
            "status": 7,
            "steps": [
              {
                "step_number": 1,
                "actions": "测试步骤1",
                "expectedresults": "预期结果1",
                "execution_type": 1
              },
              {
                "step_number": 2,
                "actions": "测试步骤2(预期结果2可以为空)",
                "expectedresults": "",
                "execution_type": 1
              },
              {
                "step_number": 3,
                "actions": "测试步骤3",
                "expectedresults": "预期结果3",
                "execution_type": 1
              },
              {
                "step_number": 4,
                "actions": "测试步骤4",
                "expectedresults": "预期结果4",
                "execution_type": 1
              }
            ]
          },
          {
            "name": "测试用例3(测试步骤和预期结果可以都为空)",
            "version": 1,
            "summary": "测试用例3(测试步骤和预期结果可以都为空)",
            "preconditions": "无",
            "execution_type": 1,
            "importance": 2,
            "estimated_exec_duration": 3,
            "status": 7,
            "steps": []
          }
        ],
        "sub_suites": []                            # 用例集中可以包含子用例集(目前只要产品类别下有用例集)
      },
      {
        "name": "我是模块名(测试集2)",                  # 用例集2名称(模块名)
        "details": "测试集摘要(详情)",
        "testcase_list": [
          {
            "name": "测试步骤2(优先级默认为中)",
            "version": 1,
            "summary": "测试步骤2(优先级默认为中)",
            "preconditions": "无",
            "execution_type": 1,
            "importance": 3,
            "estimated_exec_duration": 3,
            "status": 7,
            "steps": [
              {
                "step_number": 1,
                "actions": "测试步骤1",
                "expectedresults": "预期结果1",
                "execution_type": 1
              },
              {
                "step_number": 2,
                "actions": "测试步骤3",
                "expectedresults": "",
                "execution_type": 1
              }
            ]
          },
          {
            "name": "测试用例3(前置条件默认为空) 无设置优先级,这里加入用例标题",
            "version": 1,
            "summary": "测试用例3(前置条件默认为空) 无设置优先级,这里加入用例标题",
            "preconditions": "无",
            "execution_type": 1,
            "importance": 2,
            "estimated_exec_duration": 3,
            "status": 7,
            "steps": []
          }
        ],
        "sub_suites": []
      }
    ]
  }
]
(3)XMind文件转换为JSON数据
以上(1)TestCase数据、(2)TestSuite数据的获取,其实是基于XMind这个工具,对XMind文件进行解析和数据提取,然后转换而来。
这个工具是在设计XMind2TestCase时,针对XMind单独抽取出来的库,提供了XMind思维导图创建、解析、更新的一系列方法。使用它可以直接将XMind文件转换为JSON数据:
import xmind
xmind_file = 'docs/xmind_testcase_demo.xmind'
workbook = xmind.load(xmind_file)
data = workbook.getData()
print(data)

Output:

[
  {                                                    # XMind画布(sheet)列表
    "id": "7hmnj6ahp0lonp4k2hodfok24f",                # 画布ID
    "title": "画布 1",                                  # 画布名称
    "topic": {                                         # 中心主题
      "id": "7c8av5gt8qfbac641lth4g1p67",              # 主题ID
      "link": null,                                    # 主题上的超链接信息
      "title": "我是产品名",                             # 主题名称
      "note": null,                                    # 主题上的备注信息
      "label": null,                                   # 主题上标签信息
      "comment": null,                                 # 主题上的批注(评论)信息
      "markers": [],                                   # 主题上的图标信息
      "topics": [                                      # 子主题列表
        {
          "id": "2rj4ek3nn4sk0lc4pje3gvgv9k",
          "link": null,
          "title": "我是模块名(测试集1)",                  # 子主题1
          "note": null,
          "label": null,
          "comment": null,
          "markers": [],
          "topics": [                                    # 子主题下的子主题列表
            {
              "id": "3hjj43s7rv66uncr1srl3qsboi",
              "link": null,
              "title": "测试用例1",
              "note": "前置条件\n",
              "label": "手动(执行方式默认为手动)",
              "comment": null,
              "markers": [
                "priority-1"
              ],
              "topics": [
                {
                  "id": "3djn37j1fdc6081de319slf035",
                  "link": null,
                  "title": "测试步骤1",
                  "note": null,
                  "label": null,
                  "comment": null,
                  "markers": [],
                  "topics": [
                    {
                      "id": "7v0f1152popou38ndaaamt49l5",
                      "link": null,
                      "title": "预期结果1",
                      "note": null,
                      "label": null,
                      "comment": null,
                      "markers": []
                    }
                  ]
                },
                {
                  "id": "2srtqqjp818clkk1drm233lank",
                  "link": null,
                  "title": "测试步骤2",
                  "note": null,
                  "label": null,
                  "comment": null,
                  "markers": [],
                  "topics": [
                    {
                      "id": "4jlbo280urmid3qkd01j7h8jnq",
                      "link": null,
                      "title": "预期结果2",
                      "note": null,
                      "label": null,
                      "comment": null,
                      "markers": []
                    }
                  ]
                }
              ]
            },
            ...
          ]
        },
        ...
      ]
    }
  }
]
四、自动化发布:一键打 Tag 并上传至 PYPI
每次在 __ about __.py 更新版本号后,运行以下命令,实现自动化更新打包上传至 PYPI ,同时根据其版本号自动打 Tag 并推送到仓库:
python3 setup.py pypi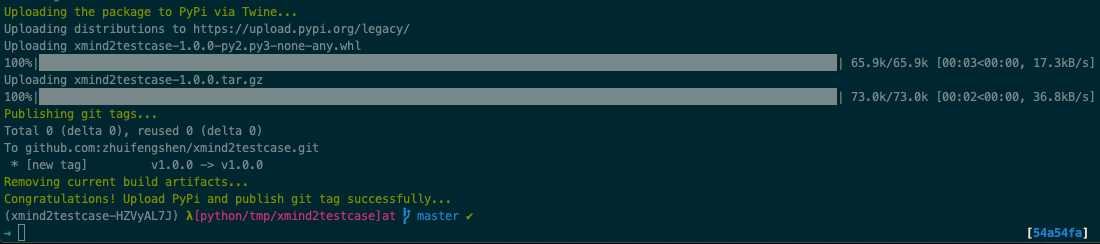
五、致谢
XMind2TestCase 工具的产生,受益于以下四个开源项目,并在此基础上扩展、优化,受益匪浅,感恩!
- 1、XMind:XMind思维导图创建、解析、更新的一站式解决方案(Python实现)!
- 2、xmind2testlink:践行了XMind通用测试用例模板设计思路,同时提供了Web转换工具!
- 3、TestLink:提供了完整的测试用例管理流程和文档;
- 4、禅道开源版(ZenTao):提供了完整的项目管理流程、文档和用户交流释疑群;
XMind2TestCase:一个高效测试用例设计的解决方案!的更多相关文章
- 【测试设计】基于正交法的测试用例设计工具--PICT
前言 我们都知道成对组合覆盖是一种非常有效的测试用例设计方法,但是实际工作过程中当成对组合量太大,我们往往很难做到有效的用例覆盖. PICT是微软公司出品的一款成对组合命令行生成工具,它很好的解决了上 ...
- 测试思想-测试设计 史上最详细测试用例设计实践总结 Part2
史上最详细测试用例设计实践总结 by:授客 QQ:1033553122 -------------------------接 Part1-------------------------- 方法:这里 ...
- Android:一个高效的UI才是一个拉风的UI(二)
趁今晚老大不在偷偷早下班,所以有时间继续跟大伙扯扯UI设计之痛,也算一个是对上篇<Android:一个高效的UI才是一个拉风的UI(一)>的完整补充吧.写得不好的话大家尽管拍砖~(来!砸死 ...
- ETL测试场景和测试用例设计
前段时间做了些数据测试相关的工作,找了些相关方面的资料,也跟一些一线厂的同学聊了下数据测试方面的东西,然后在团队内部形成了一个初级的数据测试的规范流程以及测试需要进行的场景设计和测试用例设计的方案. ...
- 移动App崩溃的测试用例设计
我们的日常生活中对移动设备越来越多的使用意味着移动App测试这个主题已成为需要考虑的一个无法避免的问题.根据最近的调查研究,用户难以容忍有bug的移动App. 移动App Bug的影响是用户体验差.A ...
- 两两组合覆盖测试用例设计工具:PICT
两两组合覆盖测试用例设计工具:PICT 2016-08-31 目录 1 成对测试简介2 PICT使用 2.1 安装 PICT 2.2 使用PICT3 PICT算法 3.1 准备阶段 3.2 产 ...
- 移动App崩溃测试用例设计
我们的日常生活中对移动设备越来越多的使用意味着移动App测试这个主题已成为需要考虑的一个无法避免的问题.根据最近的调查研究,用户难以容忍有bug的移动App. 移动App Bug的影响是用户体验差.A ...
- 黑盒测试用例设计方法&理论联系实际-> 功能图法
一. 概念 功能图由状态迁移图和布尔函数组成.状态迁移图用状态和迁移来描述.一个状态指出数据输入的位置(或时间),而迁移则指明状态的改变.同时要依靠判定表或因果图表示的逻辑功能.例,一个简化的自动出纳 ...
- 黑盒测试用例设计方法&理论结合实际 -> 边界值分析法
一. 概念 边界值分析法就是对输入或输出的边界值进行测试的一种黑盒测试方法.通常边界值分析法是作为对等价类划分法的补充,这种情况下,其测试用例来自等价类的边界. 二. 边界值分析法的应用 根据大量的测 ...
随机推荐
- 2 python介绍
1.Python介绍:龟叔 python的创始人为吉多·范罗苏姆(Guido van Rossum).1989年的圣诞节期间,Guido开始写Python语言的编译器.Python这个名字,来自Gui ...
- spark-client 一直 accepted,无法提交任务,报错Failed to connect to driver at
这个问题的原因有几个: 1.客户端安装的机器一般是虚拟机,虚拟机的名称可能是随便搞的,然而,yarn-client模式提交任务,是默认把本机当成driver的.所以导致其他的机器无法通过host的na ...
- Ubuntu安装Oh My Zsh
1. 安装ZSH sudo apt-get install zsh 安装完后需要注销或重启才能生效.注销或重启后打开终端,会出现ZSH的界面,选择(2) 2. 安装Oh My Zsh sh -c &q ...
- MOD 模除运算符
用于奇数和偶数的校验,星期几的计算,以及其它专门的计算.
- Windows下LimeSDR Mini使用说明
本文内容.开发板及配件仅限用于学校或科研院所开展科研实验! 淘宝店铺名称:开源SDR实验室 LimeSDR链接:https://item.taobao.com/item.htm?spm=a230r.1 ...
- Redis源码阅读(一)事件机制
Redis源码阅读(一)事件机制 Redis作为一款NoSQL非关系内存数据库,具有很高的读写性能,且原生支持的数据类型丰富,被广泛的作为缓存.分布式数据库.消息队列等应用.此外Redis还有许多高可 ...
- Ruby知识点二:类
1.追查对象是否属于某个类时,使用is_a?方法 追查某个对象属于哪个类时,使用class方法 判断某个对象是否属于某个类时,使用instance_of?方法 判断类是否包含某个模块,使用inclu ...
- lscpi命令详解
基础命令学习目录 lspci是一个用来查看系统中所有PCI总线以及连接到该总线上的设备的工具. 命令格式为 lspci -参数 (不加参数显示所有硬件设备) 至于有哪些参数及其详细用法可以看下这篇博客 ...
- wc命令详解
基础命令学习目录首页 原文链接:http://www.cnblogs.com/peida/archive/2012/12/18/2822758.html Linux系统中的wc(Word Count) ...
- which命令详解
基础命令学习目录首页 原文链接:https://www.cnblogs.com/jkin/p/10289085.html Linux which命令用于查找文件. which指令会在环境变量$PATH ...