IntelliJ IDEA 2017版 spring-boot使用Spring Data JPA搭建基础版的三层架构
1、配置环境pom
 <?xml version="1.0" encoding="UTF-8"?>

 <project xmlns="http://maven.apache.org/POM/4.0.0" xmlns:xsi="http://www.w3.org/2001/XMLSchema-instance"

          xsi:schemaLocation="http://maven.apache.org/POM/4.0.0 http://maven.apache.org/xsd/maven-4.0.0.xsd">

     <modelVersion>4.0.0</modelVersion>

     <groupId>com.spring</groupId>

     <artifactId>boot_jpa</artifactId>

     <version>0.0.1-SNAPSHOT</version>

     <packaging>jar</packaging>

     <name>boot_jpa</name>

     <url>http://maven.apache.org</url>

     <description>Demo project for Spring Boot</description>

     <parent>

         <groupId>org.springframework.boot</groupId>

         <artifactId>spring-boot-starter-parent</artifactId>

         <version>1.5.9.RELEASE</version>

         <relativePath/> <!-- lookup parent from repository -->

     </parent>

     <properties>

         <project.build.sourceEncoding>UTF-8</project.build.sourceEncoding>

         <project.reporting.outputEncoding>UTF-8</project.reporting.outputEncoding>

         <java.version>1.8</java.version>

     </properties>

     <dependencies>

         <dependency>

             <groupId>org.springframework.boot</groupId>

             <artifactId>spring-boot-starter-web</artifactId>

         </dependency>

         <dependency>

             <groupId>org.springframework.boot</groupId>

             <artifactId>spring-boot-starter-test</artifactId>

             <scope>test</scope>

         </dependency>

         <!--自定义配置文件-->

         <dependency>

             <groupId>com.alibaba</groupId>

             <artifactId>fastjson</artifactId>

             <version>1.2.15</version>

         </dependency>

         <dependency>

             <groupId>org.springframework.boot</groupId>

             <artifactId>spring-boot-starter-jdbc</artifactId>

         </dependency>

         <!-- 添加fastjson 依赖包. -->

         <dependency>

             <groupId>com.alibaba</groupId>

             <artifactId>fastjson</artifactId>

             <version>1.2.15</version>

         </dependency>

         <!-- spring boot devtools 依赖包. -->

         <dependency>

             <groupId>org.springframework.boot</groupId>

             <artifactId>spring-boot-devtools</artifactId>

             <optional>true</optional>

             <scope>true</scope>

         </dependency>

         <!-- 添加MySQL数据库驱动依赖包. -->

         <dependency>

             <groupId>mysql</groupId>

             <artifactId>mysql-connector-java</artifactId>

         </dependency>

         <!-- 添加Spring-data-jpa依赖. -->

         <dependency>

             <groupId>org.springframework.boot</groupId>

             <artifactId>spring-boot-starter-data-jpa</artifactId>

         </dependency>

     </dependencies>

     <build>

         <plugins>

             <plugin>

                 <groupId>org.springframework.boot</groupId>

                 <artifactId>spring-boot-maven-plugin</artifactId>

                 <configuration>

                     <!--fork :  如果没有该项配置,肯呢个devtools不会起作用,即应用不会restart -->

                     <fork>true</fork>

                 </configuration>

             </plugin>

         </plugins>

     </build>

 </project>
2、建立数据库连接的application.properties
 #######################################################

 ##datasource -- 指定mysql数据库连接信息.

 #######################################################

 spring.datasource.url = jdbc:mysql://localhost:3306/test

 spring.datasource.username = root

 spring.datasource.password = 123456

 spring.datasource.driverClassName = com.mysql.jdbc.Driver

 spring.datasource.max-active=20

 spring.datasource.max-idle=8

 spring.datasource.min-idle=8

 spring.datasource.initial-size=10

 ########################################################

 ### Java Persistence Api --  Spring jpa的配置信息.

 ########################################################

 # Specify the DBMS

 spring.jpa.database = MYSQL

 # Show or not log for each sql query

 spring.jpa.show-sql = true

 # Hibernate ddl auto (create, create-drop, update)

 spring.jpa.hibernate.ddl-auto = update

 # Naming strategy

 #[org.hibernate.cfg.ImprovedNamingStrategy  #org.hibernate.cfg.DefaultNamingStrategy]

 spring.jpa.hibernate.naming-strategy = org.hibernate.cfg.ImprovedNamingStrategy

 # stripped before adding them to the entity manager)

 spring.jpa.properties.hibernate.dialect = org.hibernate.dialect.MySQL5Dialect
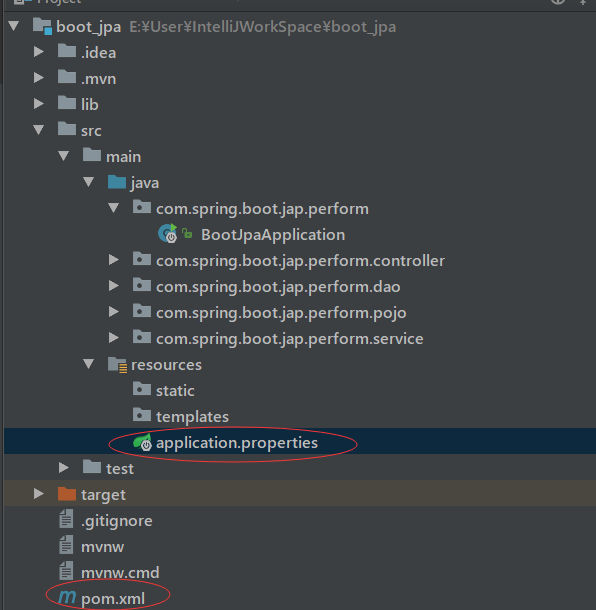
结构如图:
3、建立pojo实体类
 package com.spring.boot.jap.perform.pojo;

 import javax.persistence.Entity;

 import javax.persistence.GeneratedValue;

 import javax.persistence.GenerationType;

 import javax.persistence.Id;

 /**

  * Created by liuya on 2018-01-26.

  */

 @Entity

 public class Cat {

     /**

      * 使用@Id指定主键.

      * <p>

      * 使用代码@GeneratedValue(strategy=GenerationType.AUTO)

      * 指定主键的生成策略,mysql默认的是自增长。

      */

     @Id

     @GeneratedValue(strategy = GenerationType.AUTO)

     private int id;//主键.

     private String catName;//姓名. cat_name

     private int catAge;//年龄. cat_age;

     public int getId() {

         return id;

     }

     public void setId(int id) {

         this.id = id;

     }

     public String getCatName() {

         return catName;

     }

     public void setCatName(String catName) {

         this.catName = catName;

     }

     public int getCatAge() {

         return catAge;

     }

     public void setCatAge(int catAge) {

         this.catAge = catAge;

     }

 }
4、通过实体类自动生成数据库表(前提建立数据库,名称为test)
 package com.spring.boot.jap.perform;

 import com.alibaba.fastjson.serializer.SerializerFeature;

 import com.alibaba.fastjson.support.config.FastJsonConfig;

 import com.alibaba.fastjson.support.spring.FastJsonHttpMessageConverter;

 import org.springframework.boot.SpringApplication;

 import org.springframework.boot.autoconfigure.SpringBootApplication;

 import org.springframework.boot.autoconfigure.web.HttpMessageConverters;

 import org.springframework.context.annotation.Bean;

 import org.springframework.context.annotation.ComponentScan;

 import org.springframework.http.MediaType;

 import org.springframework.http.converter.HttpMessageConverter;

 import java.util.ArrayList;

 import java.util.List;

 @SpringBootApplication

 //@ComponentScan(basePackages = {"com.spring.boot.service.*"})

 public class BootJpaApplication {

     public static void main(String[] args) {

         SpringApplication.run(BootJpaApplication.class,args);

     }

     /**

      * 在这里我们使用 @Bean注入 fastJsonHttpMessageConvert

      *

      * @return

      */

     @Bean

     public HttpMessageConverters fastJsonHttpMessageConverters() {

         // 1、需要先定义一个 convert 转换消息的对象;

         FastJsonHttpMessageConverter fastConverter = new FastJsonHttpMessageConverter();

         //2、添加fastJson 的配置信息,比如:是否要格式化返回的json数据;

         FastJsonConfig fastJsonConfig = new FastJsonConfig();

         fastJsonConfig.setSerializerFeatures(SerializerFeature.PrettyFormat);

         //处理中文乱码

         List<MediaType> fastMediaTypes = new ArrayList<>();

         fastMediaTypes.add(MediaType.APPLICATION_JSON_UTF8);

         fastConverter.setSupportedMediaTypes(fastMediaTypes);

         //3、在convert中添加配置信息.

         fastConverter.setFastJsonConfig(fastJsonConfig);

         HttpMessageConverter<?> converter = fastConverter;

         return new HttpMessageConverters(converter);

     }

 }
建立这个BootJpaApplication类中书写内容,然后run这个类,就会在数据库中产生cat的表
5、建立dao层
 package com.spring.boot.jap.perform.dao;

 import com.spring.boot.jap.perform.pojo.Cat;

 import org.springframework.data.repository.CrudRepository;

 /**

  * Created by liuya on 2018-01-27.

  */

 public interface CatDao  extends CrudRepository<Cat, Integer> {

 }
6、建立service层
 package com.spring.boot.jap.perform.service;

 import com.spring.boot.jap.perform.dao.CatDao;

 import com.spring.boot.jap.perform.pojo.Cat;

 import org.springframework.stereotype.Service;

 import javax.annotation.Resource;

 import javax.transaction.Transactional;

 /**

  * Created by liuya on 2018-01-27.

  */

 @Service

 public class CatService {

     @Resource

     private CatDao catRepository;

     /**

      * save,update ,delete 方法需要绑定事务.

      *

      * 使用@Transactional进行事务的绑定.

      *

      * @param cat

      */

     //保存数据.

     @Transactional

     public void save(Cat cat){

         catRepository.save(cat);

     }

     //删除数据》

     @Transactional

     public void delete(int id){

         catRepository.delete(id);

     }

     //查询数据.

     public Iterable<Cat> getAll(){

         return catRepository.findAll();

     }

 }
7、建立controller层
 package com.spring.boot.jap.perform.controller;

 import com.spring.boot.jap.perform.pojo.Cat;

 import com.spring.boot.jap.perform.service.CatService;

 import org.springframework.web.bind.annotation.RequestMapping;

 import org.springframework.web.bind.annotation.RestController;

 import javax.annotation.Resource;

 /**

  * Created by liuya on 2018-01-27.

  */

 @RestController

 @RequestMapping("/cat")

 public class CatController {

     @Resource

     private CatService catService;

     @RequestMapping("/save")

     public String save(){

         Cat cat = new Cat();

         cat.setCatName("jack");

         cat.setCatAge(3);

         catService.save(cat);

         return "save ok.";

     }

     //每次需要更改delete删除的id值,否则会报错

     @RequestMapping("/delete")

     public String delete(){

         catService.delete(2);

         return "delete ok";

     }

     @RequestMapping("/getAll")

     public Iterable<Cat> getAll(){

         return catService.getAll();

     }

 }
8、测试代码是否成功,启动

9、浏览器访问,url:http://127.0.0.1:8080/cat/save 首先新建数据
http://127.0.0.1:8080/cat/delete 删除id为1的数据
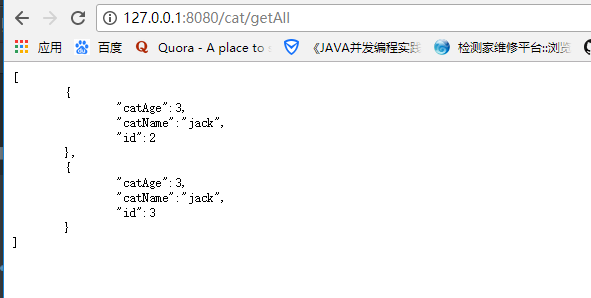
http://127.0.0.1:8080/cat/getAll 显示全部数据,如果按照上两步,就只有2和之后的数据存在
IntelliJ IDEA 2017版 spring-boot使用Spring Data JPA搭建基础版的三层架构的更多相关文章
- 一:Spring Boot、Spring Cloud
上次写了一篇文章叫Spring Cloud在国内中小型公司能用起来吗?介绍了Spring Cloud是否能在中小公司使用起来,这篇文章是它的姊妹篇.其实我们在这条路上已经走了一年多,从16年初到现在. ...
- Spring Boot 结合Spring Data结合小项目(增,删,查,模糊查询,分页,排序)
本次做的小项目是类似于,公司发布招聘信息,因此有俩个表,一个公司表,一个招聘信息表,俩个表是一对多的关系 项目整体结构: Spring Boot和Spring Data结合的资源文件 applicat ...
- Spring Boot -- 认识Spring Boot
在前面我们已经学习过Srping MVC框架,我们需要配置web.xml.spring mvc配置文件,tomcat,是不是感觉配置较为繁琐.那我们今天不妨来试试使用Spring Boot,Sprin ...
- Spring Boot,Spring Cloud,Spring Cloud Alibaba 版本选择说明以及整理归纳
前言 本文的核心目的: 1.方便自己以后的查找,预览,参考 2.帮助那些不知道如何选择版本的朋友进行指引,而不是一味的跟风网上的版本,照抄. Spring Boot 版本 版本查询: https:// ...
- 基于Spring Boot、Spring Cloud、Docker的微服务系统架构实践
由于最近公司业务需要,需要搭建基于Spring Cloud的微服务系统.遍访各大搜索引擎,发现国内资料少之又少,也难怪,国内Dubbo正统治着天下.但是,一个技术总有它的瓶颈,Dubbo也有它捉襟见肘 ...
- Spring Cloud Alibaba与Spring Boot、Spring Cloud之间不得不说的版本关系
这篇博文是临时增加出来的内容,主要是由于最近连载<Spring Cloud Alibaba基础教程>系列的时候,碰到读者咨询的大量问题中存在一个比较普遍的问题:版本的选择.其实这类问题,在 ...
- Spring Boot(Spring的自动整合框架)
Spring Boot 是一套基于Spring框架的微服务框架,由于Spring是一个轻量级的企业开发框架,主要功能就是用于整合和管理其他框架,想法是将平时主流使用到的框架的整合配置预先写好,然后通过 ...
- spring boot 与 spring cloud 关系
公司使用spring cloud,所以稍微了解一下 看了一下spring官网对 spring boot 以及 spring cloud 的解释 Spring Boot Spring Boot make ...
- Spring Boot (一): Spring Boot starter自定义
前些日子在公司接触了spring boot和spring cloud,有感于其大大简化了spring的配置过程,十分方便使用者快速构建项目,而且拥有丰富的starter供开发者使用.但是由于其自动化配 ...
随机推荐
- ubuntu编译安装php7, 安装openssl
sudo apt-get install openssl sudo apt-get install libssl-dev
- UI5-文档-4.10-Descriptor for Applications
所有特定于应用程序的配置设置现在将进一步放在一个名为manifest的单独描述符文件中.json.这清楚地将应用程序编码从配置设置中分离出来,使我们的应用程序更加灵活.例如,所有SAP Fiori应用 ...
- 脚本中 %~dp0
cmd窗口中 for /? 查询参数含义 %~dp0, 将参数转换为磁盘路径+名字 例: 脚本中一行 %~dp0abc.exe (abc.exe位置c:\test\abc.exe) 展开后则为 c:\ ...
- Asp.net MVC重要
1.asp.net mvc百度解释 2.asp.net mvc各版本特点 3.asp.net mvc知多少 4.asp.net mvc4入门到精通系列目录汇总(邹琼俊)[重要] 5.新年奉献MVC+E ...
- iperf点对点网络性能测试工具
什么是Iperf?Iperf 是一个网络性能测试工具.Iperf可以测试TCP和UDP带宽质量.Iperf可以测量最大TCP带宽,具有多种参数和UDP特性.Iperf可以报告带宽,延迟抖动和数据包丢失 ...
- Hibernate 的三种状态详解
hibernate的对象有3种状态,分别为:瞬时态(Transient).持久态(Persistent).脱管态(Detached). 处于持久态的对象也称为PO(Persistence Object ...
- ArcGIS案例学习笔记3_2
ArcGIS案例学习笔记3_2 联系方式:谢老师,135-4855-4328, xiexiaokui#qq.com 时间:第3天下午 内容:CAD数据导入,建库和管理 目的:生成地块多边形,连接属性, ...
- console.log等不能打印全部数据/信息
有时候console.log在chrome调试控制台打印不全,如下: 这个时候,我们可以点击进去:用watch 工具,添加变量,右击copy value 选项:
- linux安装本地blast
1)wget ftp://ftp.ncbi.nlm.nih.gov/blast/executables/blast+/2.8.0alpha/ncbi-blast-2.8.0-alpha+-x64-li ...
- ReentrantLock synchronized
关于互斥锁: 所谓互斥锁, 指的是一次最多只能有一个线程持有的锁. 在jdk1.5之前, 我们通常使用synchronized机制控制多个线程对共享资源的访问. 而现在, Lock提供了比synchr ...