springboot快速入门(二)——项目属性配置(日志详解)
一、概述
application.properties就是springboot的属性配置文件
在使用spring boot过程中,可以发现项目中只需要极少的配置就能完成相应的功能,这归功于spring boot中的模块化配置,在pom.xml中依赖的每个Starter都有默认配置,而这些默认配置足以满足正常的功能开发。
除此之外,还有application.yml形式的配置文件;对比如下;
server.port=8080

server.session-timeout=30

server.context-path=

server.tomcat.max-threads=0

server.tomcat.uri-encoding=UTF-8

spring.datasource.url = jdbc:mysql://localhost:3306/spring

spring.datasource.username = root

spring.datasource.password = root

spring.datasource.driverClassName = com.mysql.jdbc.Driver

# Specify the DBMS

spring.jpa.database = MYSQL

# Show or not log for each sql query

spring.jpa.show-sql = true

# Hibernate ddl auto (create, create-drop, update)

spring.jpa.hibernate.ddl-auto = update

# Naming strategy

spring.jpa.hibernate.naming-strategy = org.hibernate.cfg.ImprovedNamingStrategy

# stripped before adding them to the entity manager)

spring.jpa.properties.hibernate.dialect = org.hibernate.dialect.MySQL5Dialect
application.properties
server:

  port: 8080

  session-timeout: 30

  tomcat.max-threads: 0

  tomcat.uri-encoding: UTF-8

spring:

  datasource:

    url : jdbc:mysql://localhost:3306/springboot

    username : root

    password : root

    driverClassName : com.mysql.jdbc.Driver

  jpa:

    database : MYSQL

    show-sql : true

    hibernate:

      ddl-auto : update

      naming-strategy : org.hibernate.cfg.ImprovedNamingStrategy

    properties:

      hibernate:
application.yml
默认生成的为application.properties
# 补充:springboot日志详解
二、修改默认配置
spring-boot自带了很多默认配置,所有默认配置可以参考官方文档:点击查看所有默认配置
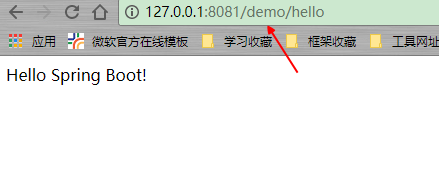
示例:修改端口和context-path:
server.port=8081

server.context-path=/demo
// 新版的IDEA写此配置文件也会给出对应默认配置名称的提示,赞!
当然,通过jar方式运行也可以使用--进行参数设置,这是专门用于对属性文件进行配置的:
java -jar xxx.jar --server.port=8888
当然,properties写起来比较费事,我们推荐的是yml(压ml)形式的配置:
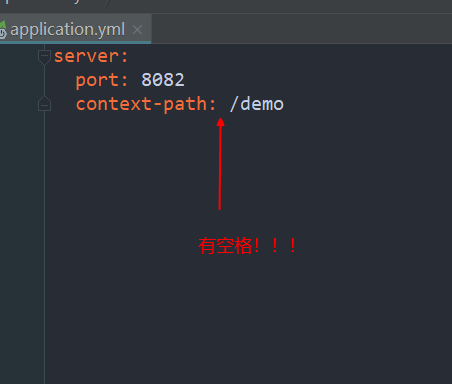
这里必须提醒,yml配置文件分割处必须有空格:当然IDEA也会帮我们检查yml语法,正确的配置是会高亮的,yml文件本身也会有特殊图标显示的
这里我们就把默认的properties删除了,使用更加简洁的yml配置:
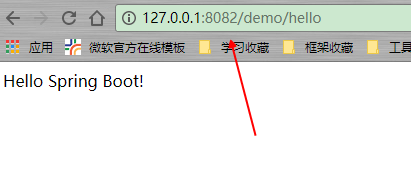
server:

  port: 8082

  context-path: /demo
如果已经是properties,可以通过在线工具转换:http://www.toyaml.com/
效果:
三、自定义属性配置
1.在yml文件中定义:
salary: 10010

name: jiangbei
2.使用@Value注解读取值:
使用@Value的类如果被其他类作为对象引用,必须要使用注入的方式,而不能new
package com.example.demo;

import org.springframework.beans.factory.annotation.Value;

import org.springframework.web.bind.annotation.RequestMapping;

import org.springframework.web.bind.annotation.RequestMethod;

import org.springframework.web.bind.annotation.RestController;

/**

 * 测试demo的controller

 *

 * @author zcc ON 2018/2/8

 **/

@RestController

public class HelloController {

    @Value("${name}")

    private String name;

    @Value("${salary}")

    private Integer salary;

    @RequestMapping(value = "/hello", method = RequestMethod.GET)

    public String hello() {

        return "name:" + name + " salary:" + salary;

    }

}
页面效果:
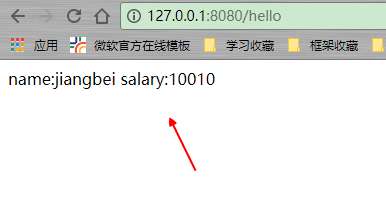
// 可以看到,配置文件到属性的过程,会自动进行类型转换
读取多级属性:
name:

  first_name: jiangbei

  last_name: z
  @Value("${name.first_name}")

    private String fname;

    @Value("${name.last_name}")

    private String lname;
属性中引用其他属性:类似shell变量
name:

  first_name: jiangbei

  last_name: z

  full_name: "full name: ${name.first_name} ${name.last_name}"
使用bean进行属性映射
需要特别注意的是bean上面的两个注解:@Componet和@ConfigurationProperties,通过prefix来匹配前缀(类似分组思想),当然也可以
通过 @ConfigurationProperties(prefix = "master.ds",locations = "classpath:application.properties") 的形式,指定配置文件
person:

  name: jiangbei

  age: 18

  sex: M
package com.example.demo.bean;

import org.springframework.boot.context.properties.ConfigurationProperties;

import org.springframework.stereotype.Component;

/**

 * 映射属性配置的bean

 *

 * @author zcc ON 2018/2/8

 **/

@ConfigurationProperties(prefix = "person")

@Component

public class PersonProp {

    private String name;

    private Integer age;

    private String sex;

    // getter setter未列出

}
@RestController

public class HelloController {

    @Autowired

    private PersonProp person;

    @RequestMapping(value = "/hello", method = RequestMethod.GET)

    public String hello() {

        return person.getName();

    }

}
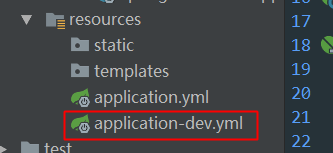
多配置文件切换:
例如生产和开发的配置文件需要切换,那我们只要定义application-xxx.yml,然后在application.yml里面使用spring.profile.active切换即可!
在application.yml中进行配置:
spring:

  profiles:

    active: dev
这个时候再在application.yml文件里面写配置的话,dev里面也是可以直接用到的!
更多属性特征与使用,参考: http://blog.didispace.com/springbootproperties/
springboot快速入门(二)——项目属性配置(日志详解)的更多相关文章
- Spring Boot 2.x 快速入门(下)HelloWorld示例详解
上篇 Spring Boot 2.x 快速入门(上)HelloWorld示例 进行了Sprint Boot的快速入门,以实际的示例代码来练手,总比光看书要强很多嘛,最好的就是边看.边写.边记.边展示. ...
- SpringBoot 入门:项目属性配置
开发一个SpringBoot 项目,首当其冲,必然是配置项目 一.项目属性配置 1. SpringBoot自带了Tomcat服务器,通过使用项目配置文件来修改项目的配置,如图配置了部署在80端口,目录 ...
- spring boot快速入门 2 :属性配置
属性配置:在application.properties中配置 第一步:配置端口号和项目名 并启动 第二步:在浏览器查看请求 第二种配置方式: 在application.yml中配置.(较为常用) 注 ...
- elasticsearch系列二:索引详解(快速入门、索引管理、映射详解、索引别名)
一.快速入门 1. 查看集群的健康状况 http://localhost:9200/_cat http://localhost:9200/_cat/health?v 说明:v是用来要求在结果中返回表头 ...
- [02] SpringBoot的项目属性配置
1.application.properties 简述 配置文件的使用和调整都非常方便,直接在项目默认的classpath下的application.properties文件中做调整即可.例如Spri ...
- SpringData 基于SpringBoot快速入门
SpringData 基于SpringBoot快速入门 本章通过学习SpringData 和SpringBoot 相关知识将面向服务架构(SOA)的单点登录系统(SSO)需要的代码实现.这样可以从实战 ...
- SpringBoot基础篇-SpringBoot快速入门
SpringBoot基础 学习目标: 能够理解Spring的优缺点 能够理解SpringBoot的特点 能够理解SpringBoot的核心功能 能够搭建SpringBoot的环境 能够完成applic ...
- Springboot快速入门篇,图文并茂
Springboot快速入门篇,图文并茂 文章已托管到GitHub,大家可以去GitHub查看阅读,欢迎老板们前来Star!搜索关注微信公众号 [码出Offer] 领取各种学习资料! image-20 ...
- SpringBoot快速入门(实战篇一)
SpringBoot快速入门(一) 一SpringBoot简介 1.spring开发经历的阶段 Spring 诞生时是 Java 企业版(Java Enterprise Edition,JEE,也称 ...
随机推荐
- windows 命令行报错:file(s) not in client view
今天在执行p4 sync命令时报错:File(s) not in client view,查找后发现其实是未连接上p4服务器.需要重新设置P4PORT=服务器地址 即可解决(参考链接:https:/ ...
- hibernate中指定非外键进行关联
/** * 上级资源 */ @ManyToOne(fetch = FetchType.LAZY) @JoinColumn(name = "PARENT_ID", reference ...
- TFS工具(tf.exe)使用与强制解除锁定签出
在工作区 NTP01_SUNTAI 中,NTP01TFSUser 为 签出 锁定了项 $/NTP01/EIPD/EIPD.Client/Views/Courseware/EditorOne.xaml. ...
- maven(19)-生命周期和内置插件
生命周期和依赖一样,是maven中最重要的核心概念.平时在使用maven时并不一定需要知道生命周期,但是只有明白了生命周期,才能真正理解很多重要的命令和插件配置. default生命周期 defaul ...
- Jmeter入门--安装教程
jmeter简介 Apache JMeter是Apache组织开发的基于Java的压力测试工具.用于对软件做压力测试,它最初被设计用于Web应用测试,但后来扩展到其他测试领域. 它可以用于测试静态和动 ...
- 可以触发点击事件并变色的UILabel
可以触发点击事件并变色的UILabel 谁说UILabel不能够当做button处理点击事件呢?今天,笔者就像大家提供一个改造过的,能够触发点击事件并变色的UILabel:) 效果图: 还能当做计时器 ...
- Redis学习---Redis操作之Python连接
PyCharm下的Redis连接 连接方式: 1. 操作模式 redis-py提供两个类Redis和StrictRedis用于实现Redis的命令,StrictRedis用于实现大部分官方的命令,并使 ...
- zabbix的日常监控-自动化监控(十一)
自动化监控: 1.自动注册 1.1.zabbix agent自动添加 2.主动发现 2.1.自动发现Discover 2.2.zabbix api 自动发现与自动注册,哪一个更好? 共同的特点均可以添 ...
- MVC5开发环境的配置
如果你打算在VS2012上开发MVC5,请通过WPI来安装此组件:ASP.NET and Web Tools 2013.1 version
- SQLServer------遍历操作,游标的基础使用
以下代码 begin declare @tempId int--当前被选中的订单id declare order_cursor cursor for (to.id FROM tb_order AS t ...