
unity图片后期处理
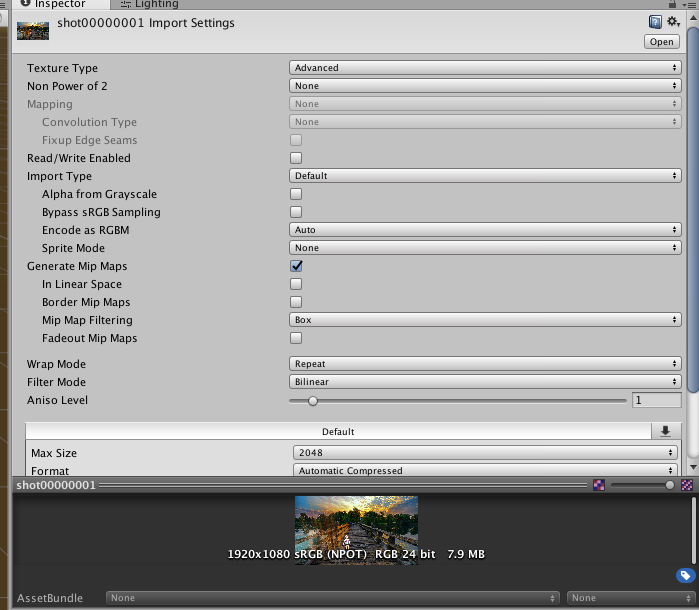
处理算法如下,在Start方法中分别调用想要的效果就行了。其中,将你需要处理的 图片 拖拽到 image参数上。注意,如果想要图片保持原来的尺寸不被压缩,需要更改图片的导入设置如下图,主要的Texture Type 和 Non Power of 2 这两个参数。
using UnityEngine;

using System.Collections;

using System.IO;

public class ImageDeal : MonoBehaviour

{

    public Texture2D image;

    private Texture2D outPut;

    int Width;

    int Height;

    // Use this for initialization

    void Start ()

    {

        Width = image.width;

        Height = image.height;

        outPut = new Texture2D (Width, Height);

        Flur ();

        writeImage ();

    }

    /// <summary>

    /// 底片效果.

    /// </summary>

    private void Dipian ()

    {

        Color pixel;

        for (int x = ; x < Width; x++) {

            for (int y = ; y < Height; y++) {

                float r, g, b;

                pixel = image.GetPixel (x, y);

                r = 1f - pixel.r;

                g = 1f - pixel.g;

                b = 1f - pixel.b;

                outPut.SetPixel (x, y, new Color (r, g, b));

            }

        }

    }

    /// <summary>

    /// 浮雕效果

    /// </summary>

    private void Fudiao ()

    {

        //以浮雕效果显示图像

        Color pixel1, pixel2;

        for (int x = ; x < Width - ; x++) {

            for (int y = ; y < Height - ; y++) {

                float r = , g = , b = ;

                pixel1 = image.GetPixel (x, y);

                pixel2 = image.GetPixel (x + , y + );

                r = Mathf.Abs (pixel1.r - pixel2.r +  / );

                g = Mathf.Abs (pixel1.g - pixel2.g +  / );

                b = Mathf.Abs (pixel1.b - pixel2.b +  / );

                outPut.SetPixel (x, y, new Color (r, g, b));

            }

        }

    }

    /// <summary>

    /// 黑白效果

    /// </summary>

    private void Heibai(){

        Color pixel;

        for (int x = ; x < Width; x++)

            for (int y = ; y < Height; y++) {

                pixel = image.GetPixel (x, y);

                float r, g, b, Result = ;

                r = pixel.r;

                g = pixel.g;

                b = pixel.b;

                //实例程序以加权平均值法产生黑白图像

                int iType = ;

                switch (iType) {

                case ://平均值法

                    Result = ((r + g + b) / );

                    break;

                case ://最大值法

                    Result = r > g ? r : g;

                    Result = Result > b ? Result : b;

                    break;

                case ://加权平均值法

                    Result = ((0.7f * r) + (0.2f * g) + (0.1f * b));

                    break;

                }

                outPut.SetPixel (x, y, new Color (Result, Result, Result));

            }

    }

    /// <summary>

    /// 柔化3x3高斯模型

    /// </summary>

    private void Rouhua3(){

        Color pixel;

        int[] Gauss ={ , , , , , , , ,  };

        for (int x = ; x < Width - ; x++)

            for (int y = ; y < Height - ; y++)

            {

                float r = , g = , b = ;

                int Index = ;

                for (int col = -; col <= ; col++)

                    for (int row = -; row <= ; row++)

                    {

                        pixel = image.GetPixel(x + row, y + col);

                        r += pixel.r * Gauss[Index];

                        g += pixel.g * Gauss[Index];

                        b += pixel.b * Gauss[Index];

                        Index++;

                    }

                r /= ;

                g /= ;

                b /= ;

                outPut.SetPixel(x - , y - , new Color(r, g, b));

            }

    }

    /// <summary>

    /// 柔化5x5高斯模型

    /// </summary>

    private void Rouhua5(){

        Color pixel;

        int[] Gauss = { , , , , , , , , , , , , , , , , , , , , , , , ,  };

        for (int x = ; x < Width - ; x++)

            for (int y = ; y < Height - ; y++)

            {

                float r = , g = , b = ;

                int Index = ;

                for (int col = -; col <= ; col++)

                    for (int row = -; row <= ; row++)

                    {

                        pixel = image.GetPixel(x + row, y + col);

                        r += pixel.r * Gauss[Index];

                        g += pixel.g * Gauss[Index];

                        b += pixel.b * Gauss[Index];

                        Index++;

                    }

                r /= ;

                g /= ;

                b /= ;

                outPut.SetPixel(x - , y - , new Color(r, g, b));

            }

    }

    /// <summary>

    /// 柔化,高斯模糊通用方法

    /// </summary>

    private void Flur(){

        Color pixel;

        float[] Gauss = GaussianSmooth (10.0f);

        for (int x = ; x < Width - ; x++)

            for (int y = ; y < Height - ; y++)

            {

                float r = , g = , b = ;

                int Index = ;

                int length = (int)Mathf.Sqrt (Gauss.Length) / ;

                for (int col = -length; col <= length; col++)

                    for (int row = -length; row <= length; row++)

                    {

                        pixel = image.GetPixel(x + row, y + col);

                        r += pixel.r * Gauss[Index];

                        g += pixel.g * Gauss[Index];

                        b += pixel.b * Gauss[Index];

                        Index++;

                    }

                outPut.SetPixel(x - , y - , new Color(r, g, b));

            }

    }

    /// <summary>

    /// 锐化效果

    /// </summary>

    private void Ruihua(){

        Color pixel;

        //拉普拉斯模板

        int[] Laplacian ={ -, -, -, -, , -, -, -, - };

        for (int x = ; x < Width - ; x++)

            for (int y = ; y < Height - ; y++)

            {

                float r = , g = , b = ;

                int Index = ;

                for (int col = -; col <= ; col++)

                    for (int row = -; row <= ; row++)

                    {

                        pixel = image.GetPixel(x + row, y + col);

                        r += pixel.r * Laplacian[Index];

                        g += pixel.g * Laplacian[Index];

                        b += pixel.b * Laplacian[Index];

                        Index++;

                    }

                outPut.SetPixel(x - , y - , new Color(r, g, b));

            }

    }

    /// <summary>

    /// 写文件

    /// </summary>

    private void writeImage ()

    {

        byte[] bytes = outPut.EncodeToJPG ();

        File.WriteAllBytes (Application.dataPath + "/test.jpg", bytes);

    }

    /// <summary>

    /// 动态生成高斯模型

    /// </summary>

    /// <returns>The smooth.</returns>

    /// <param name="sigma">Sigma.</param>

    private float[] GaussianSmooth( float sigma)

    {

        sigma = sigma >  ? sigma : -sigma;

        //高斯核矩阵的大小为(6*sigma+1)*(6*sigma+1)

        //ksize为奇数

        int ksize = (int)Mathf.Ceil(sigma * ) *  + ;

        //计算一维高斯核

        float[] kernel = new float[ksize];

        float scale = -0.5f / (sigma * sigma);

        const float PI = 3.141592653f;

        float cons = / Mathf.Sqrt(-scale / PI);

        float sum = ;

        int kcenter = ksize/;

        int i = , j = ;

        for(i = ; i < ksize; i++)

        {

            int x = i - kcenter;

            kernel[i] = cons * Mathf.Exp(x * x * scale);//一维高斯函数

            sum +=kernel[i];

        }

        //归一化,确保高斯权值在[0,1]之间

        for(i = ; i < ksize; i++)

        {

            kernel[i] =  kernel[i] / sum;

        }

        return kernel;

    }

}
unity图片后期处理的更多相关文章
- Unity 图片的灰度处理
我们平时在做项目时,经常遇到按钮的点击而且还要区分悬浮,点击,禁用的状态,美术要针对一张图片做多个状态图片,资源图片的数量也就增大了,那么打出的包的大小也就跟着上去了,所以我们可以针对原始图片进行Sh ...
- Unity 图片分割将spirte保存在本地
如果你拿到的是一张整图,你想分割之后使用NGUI sprite来使用! 下面就能解决的需求. 步骤: 1. 使用Unity自带的spirte进行分割图片 2. 使用代码把分割出来的2DSpirte转 ...
- Unity图片处理类,包括压缩、截屏和滤镜
先上代码: 1 using System.Threading; using UnityEngine; using System.IO; using System.Collections; public ...
- unity 图片 粉碎效果 破碎效果
效果: 点击按钮后: 这些碎片具有物理碰撞效果,下面会有隐形的支柱垫着碎片,n秒后支柱消失,碎片落下 当然你也可以控制生成的碎片,让他们从下而上一块一块地落下 插件源码: https://github ...
- unity 图片变纯色填充
unity自带shader 即可
- unity图片保留周边,中间延伸
1.先把图片切割,类似下面这样的 2.然后在使用的时候(选择图片类型的时候选择sliced)
- Unity图片变灰的方式
http://www.tuicool.com/articles/Vruuqme NGUI中的Button差点儿是最经常使用到的控件之中的一个,而且能够组合各种组件(比方UIButtonColor,UI ...
- Unity Texture 2D Compress
测试了一下 unity 图片 对 apk 的影响. 上两种测试环境 1024 * 1024 带 alpha的话 默认压缩就是RBA 16bit就是2M 不带的话就是 etc 的话 ...
- 【优秀的图片后期编辑工具】Luminar 3.1 for Mac
[简介] 今天和大家分享最新的 Luminar for Mac 3.1 版本,支持中文界面,Luminar是一款Mac上优秀的图片后期处理工具,功能类似 Photoshop Lightroom 等软 ...
随机推荐
- log4net使用注意事项
1配置Log4net Log4net的配置文件有几种使用方式,这里将配置log4net的部分独立出来,即关于log4net的配置独立成文件log4net.config. 1)写入Mysql log4n ...
- 分布式监控系统Zabbix3.2监控数据库的连接数
在 分布式监控系统Zabbix3.2跳坑指南 和 分布式监控系统Zabbix3.2给异常添加邮件报警 已经介绍了如何安装以及报警.此篇通过介绍监控数据库的3306端口连接数来了解如何监控其它端口和配置 ...
- Git快速入门和常用命令
一.快速入门 本地初始化一个项目 首先,你需要执行下面两条命令,作为 git 的基础配置,作用是告诉 git 你是谁,你输入的信息将出现在你创建的提交中. git config --global us ...
- 分享一些JAVA相关资源
前言 以前在学习JAVA时,因为搜索相关资源过于不便,所以在搜集了一些好用的资源之后,将此分享. 文档主要包括面试文档, JAVA的技术文档(如JAVA并发实战.设计模式之类),LINUX的相关文档以 ...
- Selenium中如何使用xpath更快定位
在学习Selenium路上,踩了也不少坑,这是我最近才发现的一个新写法,好吧,"才发现"又说明我做其他事了.对的,我现在还在加班! 开车~~~ 例子:知乎网 标签:Python3. ...
- NOIP2016提高组初赛(2)四、读程序写结果3、求最长回文子序列
#include <iostream> using namespace std; int lps(string seq, int i, int j) { int len1, len2; i ...
- Emoji表情符号录入MySQL数据库报错的解决方式
前言:手机app应用评论的时候,恢复表情符号.提示失败.1,查看tomcat后台日志,核心报错信息例如以下: Caused by: java.sql.SQLException: Incorrect ...
- 一起talk C栗子吧(第一百二十六回:C语言实例--statickeyword)
各位看官们,大家好,上一回中咱们说的内置宏的样例.这一回咱们说的样例是:static关键字. 闲话休提.言归正转. 让我们一起talk C栗子吧! 看官们,C语言提供了static关键字.它常常出如今 ...
- ML02: 机器学习KNN 算法
摘要: 一张图说清楚KNN算法 看下图,清楚了吗? 没清楚的话,也没关系,看完下面几句话,就清楚了. KNN算法是用来分类的. 这个算法是如何来分类的呢? 看下图,你可以想想下图中的 『绿色圆点』 ...
- Elasticsearch和MongoDB分片及高可用对比
本文旨在对比Elasticsearch和MongoDB高可用和分片的实现机制. Elasticsearch ES天生就是分布式的,那她又是如何做到天生分布式的? 通过ES官方指南我们可以知道: 一个运 ...