Elasticsearch6.5.1破解x-pack,设置密码并使用head插件登陆。
#没有许可证的es无法持久的设置密码,而且使用一段时间后会过期,过期后,一些功能无法被使用,例如head插件无法看到es状态。
下图是过期的es的状态,可通过此url查看:http://ip:port_xpack/license
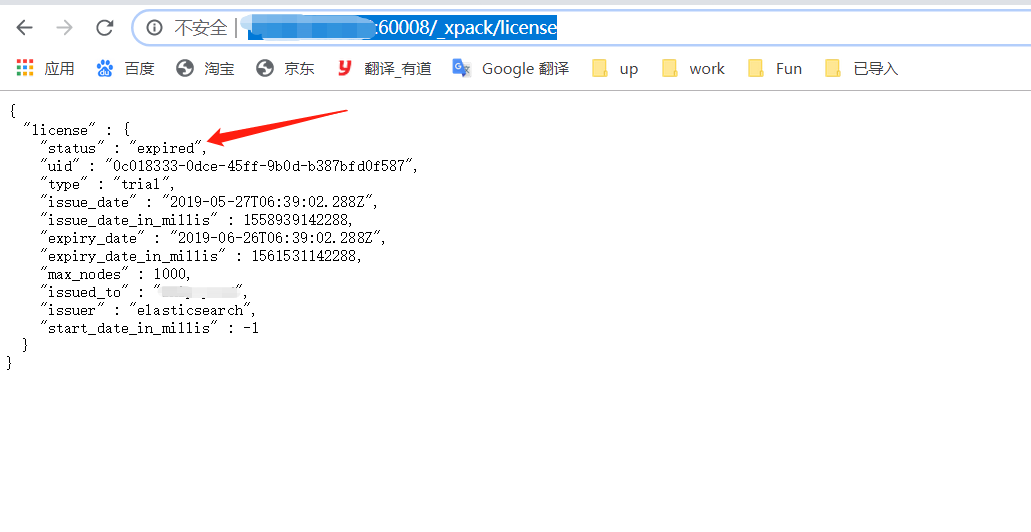
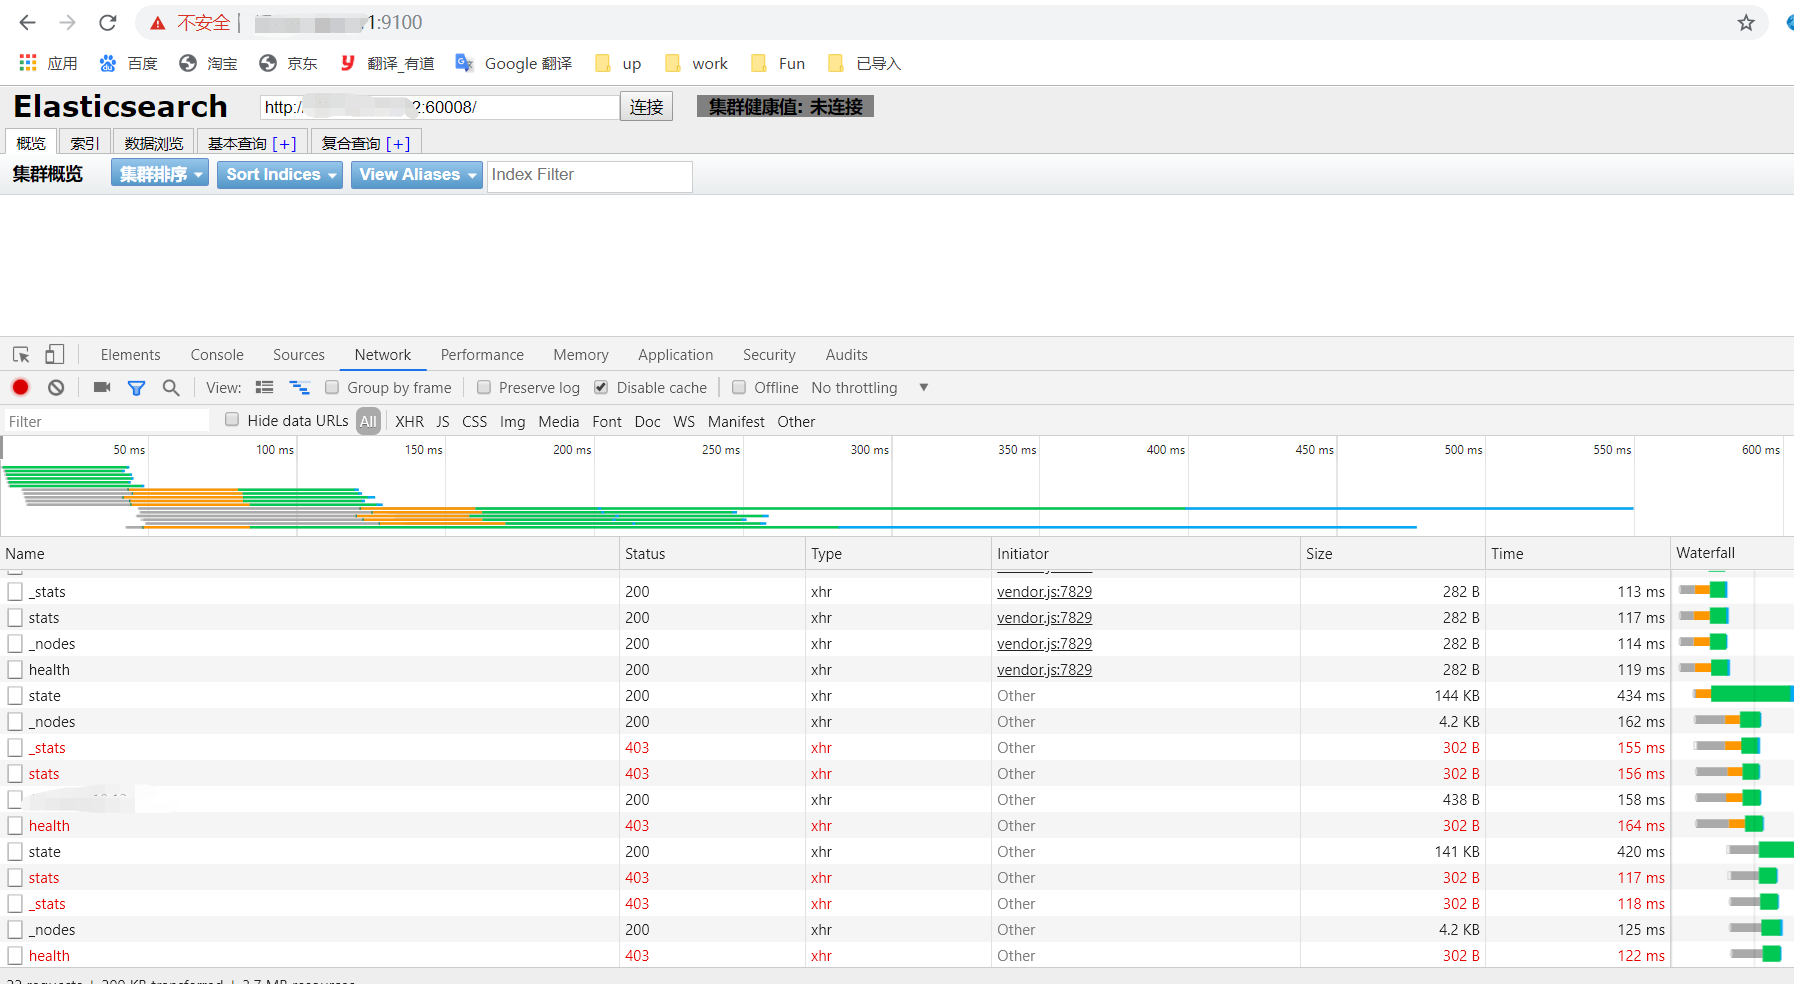
使用es-head插件连接提示403,无法直接连接已过期的es
#elasticsearch通过x-pack模块来提供密码认证等功能,不过我们无需额外安装x-pack插件,x-pack包在6.3版本后已经集成在es安装包内
#此文章应该不仅限于6.5.1版本,没有验证过,不过直觉告诉我只要是6.3+的版本参照这个也能成功破解,毕竟步骤差不多,什么,为什么这么自信?因为早上用了飘柔(因为我也是参照了其他高手的文章的,人家6.3.2可行:https://blog.csdn.net/qq_25475209/article/details/81906701)
下面开始破解es,步骤大致如下,准备开干。
取出es中的x-pack包jar文件,解压后用破解后的代码替换掉原有的类文件,后将更改后的文件

    ||

重新打成jar包

    ||

上传许可证

    ||

创建证书文件

    ||

调整es配置文件后启动即可
环境信息
es版本:6.5.

安装路径:/home/admin/elasticsearch-6.5.

使用端口:

#配置文件

cluster.name: test

node.name: es-node-

path.data: /home/admin/elasticsearch-6.5./data

path.logs: /home/admin/elasticsearch-6.5./logs

bootstrap.memory_lock: false

bootstrap.system_call_filter: false

network.host: 0.0.0.0

http.port:
1.先把之前代码取出来,然后把破解后的代码替换进去
#破解后的类文件(百度网盘)
链接:https://pan.baidu.com/s/1GTCwQfcLBpDc8QStoMPlKA

提取码:1swg
#创建个零时目录,我们在这里动手术,不能误伤友军。
#如果是其他版本的es,cp的时候将下图表红的版本号,记得换成你那个版本的,不然完全按照我这儿步骤可是行不通的。
[admin@es-node- ~]$ pwd

/home/admin

[admin@es-node- ~]$ mkdir  jartmp

[admin@es-node- ~]$ cd jartmp/

[admin@es-node- jartmp]$ cp /home/admin/elasticsearch-6.5./modules/x-pack-core/x-pack-core-6.5.1.jar  ./

[admin@es-node- jartmp]$ jar -xf x-pack-core-6.5..jar               #解压jar包

[admin@es-node- jartmp]$ cp /tmp/XPackBuild.class org/elasticsearch/xpack/core/             #将百度盘上面的文件替换掉现有文件

[admin@es-node- jartmp]$ cp /tmp/LicenseVerifier.class org/elasticsearch/license/
[admin@es-node-1 jartmp]$ rm -rf x-pack-core-6.5.1.jar                            #删除原有jar包
[admin@es-node-1 jartmp]$ jar -cfv x-pack-core-6.5.1.jar *                        #用咋们刚改过的代码生成新的jar包(名称不要变)
[admin@es-node-1 jartmp]$ cp x-pack-core-6.5.1.jar  /home/admin/elasticsearch-6.5.1/modules/x-pack-core/  #将手术完成的模块放回去
2.手术完了,改改配置,试试改完后的es好不好使,还好使的话,继续望下执行,要是不好使,都启动不起来,那么这个教程可能不适合你,可能因为版本原因把。
#调整下配置文件后重新启动es,启动一下xpack模块
cluster.name:  test

node.name: es-node-

path.data: /home/admin/elasticsearch-6.5./data

path.logs: /home/admin/elasticsearch-6.5./logs

bootstrap.memory_lock: false

bootstrap.system_call_filter: false

network.host:  0.0.0.0

http.port:

http.cors.enabled: true

http.cors.allow-origin: "*"

xpack.security.enabled: true
#开启密码功能(返回如下格式json代表成功)(如果没有继续按照步骤执行,上传许可证,这个密码也就能用30天)
[admin@es-node-1 elasticsearch-6.5.1]$ curl -H "Content-Type:application/json" -XPOST http://10.0.1.103:9200/_xpack/license/start_trial?acknowledge=true
[2019-12-10T19:58:37,751][INFO ][o.e.l.LicenseService ] [es-node-1] license [bd5aaeb7-a213-4696-8e53-865884e51ebc] mode [trial] - valid
{"acknowledged":true,"trial_was_started":true,"type":"trial"}
#试一下,发现es要密码了,TNN的还没设置,咋知道密码是啥。

#再设置也不迟。
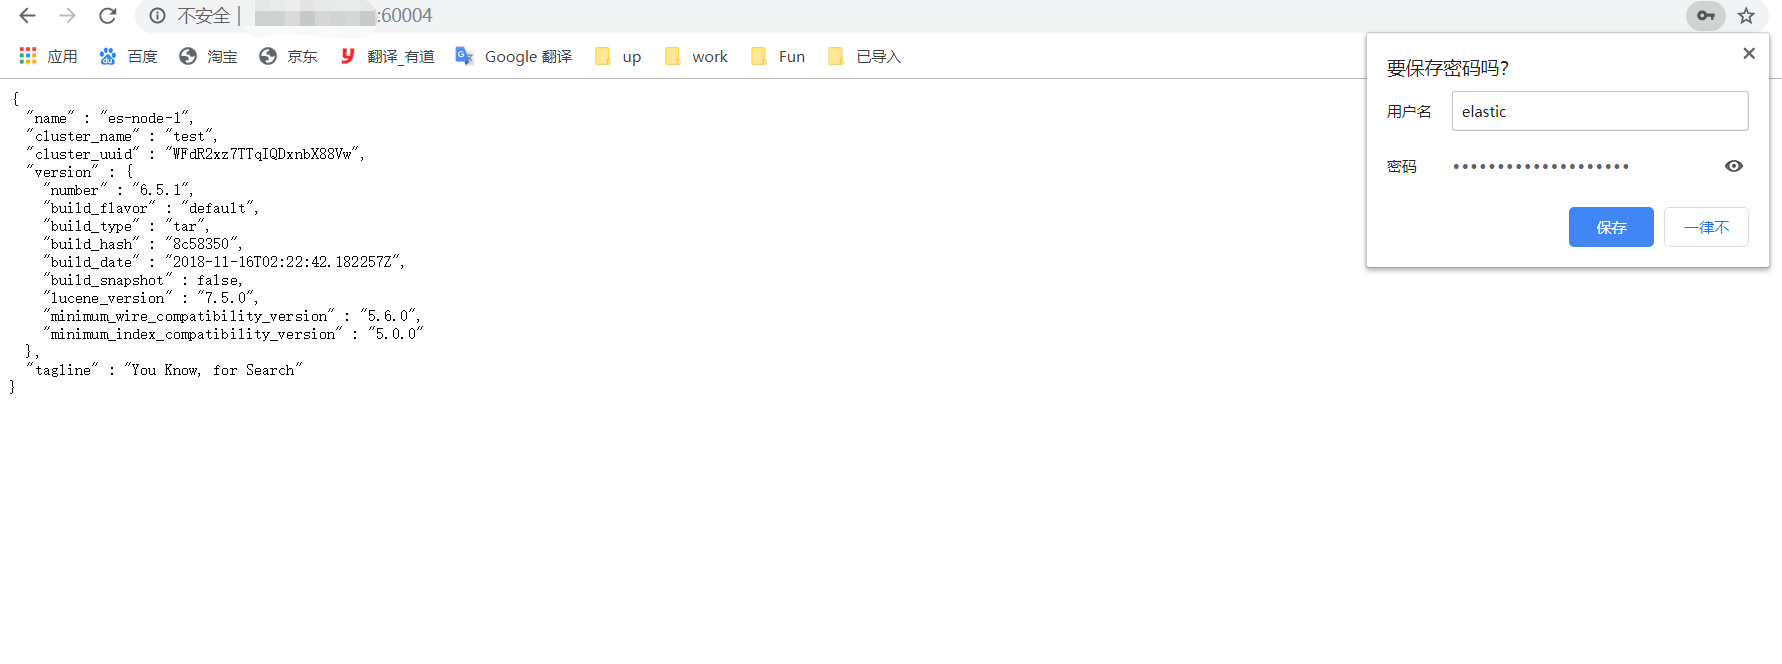
[admin@es-node- elasticsearch-6.5.]$ /home/admin/elasticsearch-6.5./bin/elasticsearch-setup-passwords   auto       # auto|interactive 模式二选一,正如字面意思,可以自动生成密码也可以手动输入要设置的密码

Initiating the setup of passwords for reserved users elastic,apm_system,kibana,logstash_system,beats_system,remote_monitoring_user.

The passwords will be randomly generated and printed to the console.

Please confirm that you would like to continue [y/N]y

[--10T20::,][INFO ][o.e.c.m.MetaDataCreateIndexService] [es-node-] [.security-] creating index, cause [api], templates [security-index-template], shards []/[], mappings [doc]

[--10T20::,][INFO ][o.e.c.r.a.AllocationService] [es-node-] Cluster health status changed from [YELLOW] to [GREEN] (reason: [shards started [[.security-][]] ...]).

Changed password for user apm_system

PASSWORD apm_system = ZMLYeAwXynEECiPY8KuV

Changed password for user kibana

PASSWORD kibana = SR0BAPhVXLYUCqERsm2W

Changed password for user logstash_system

PASSWORD logstash_system = RxUBjW4Wq1coYqvXRZKa

Changed password for user beats_system

PASSWORD beats_system = pA9SMgXzFTU4hslSQSnf

Changed password for user remote_monitoring_user

PASSWORD remote_monitoring_user = 7G5mm9QZBCJECA8yXAwm

Changed password for user elastic

PASSWORD elastic = HPlwGuzgQsG712KymGyY
#这时候,输入刚才生成的密码就可以进来啦
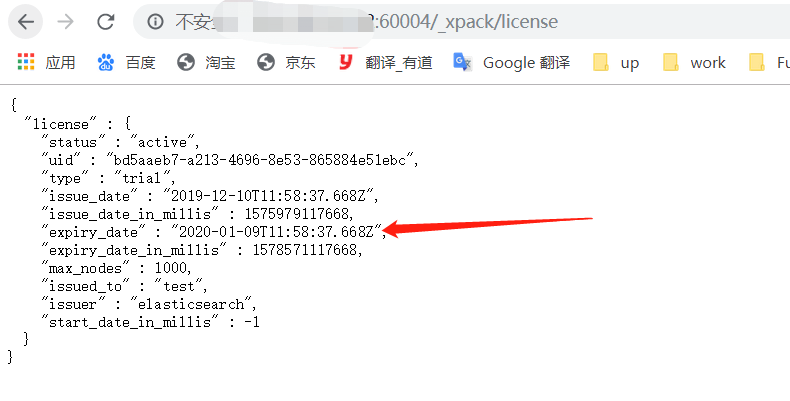
#看下许可证情况,一个月就又到期了很尴尬,接下来让他。。。永不过期有点太狂了,让他晚点过期把。。
3.上传许可证,因为我们已经破解了x-pack,许可证上传的时候可以狂一点,比如搞个高端版本的es,实际上,第二个步骤的操作不用破解都能干,破解的作用主要就是为了这步开始,为了永恒的使用~。
#创建许可证文件(许可证文件为官方申请https://register.elastic.co/marvel_register,申请下来后自己改点东西,也可以自行申请,信息填写准确)
#红标处为改动过的内容,分别为白金版和过期时间(时间戳)
[admin@es-node- elasticsearch-6.5.]$ cat license.json

{"license":{"uid":"640fd711-1234-4ccf-8cd3-737396ed3597","type":"platinum","issue_date_in_millis":,"expiry_date_in_millis":,"max_nodes":,"issued_to":"? ?? (?)","issuer":"Web Form","signature":"AAAAAwAAAA2CzEVG2T4xrY3F7fi0AAABmC9ZN0hjZDBGYnVyRXpCOW5Bb3FjZDAxOWpSbTVoMVZwUzRxVk1PSmkxaktJRVl5MUYvUWh3bHZVUTllbXNPbzBUemtnbWpBbmlWRmRZb25KNFlBR2x0TXc2K2p1Y1VtMG1UQU9TRGZVSGRwaEJGUjE3bXd3LzRqZ05iLzRteWFNekdxRGpIYlFwYkJiNUs0U1hTVlJKNVlXekMrSlVUdFIvV0FNeWdOYnlESDc3MWhlY3hSQmdKSjJ2ZTcvYlBFOHhPQlV3ZHdDQ0tHcG5uOElCaDJ4K1hob29xSG85N0kvTWV3THhlQk9NL01VMFRjNDZpZEVXeUtUMXIyMlIveFpJUkk2WUdveEZaME9XWitGUi9WNTZVQW1FMG1DenhZU0ZmeXlZakVEMjZFT2NvOWxpZGlqVmlHNC8rWVVUYzMwRGVySHpIdURzKzFiRDl4TmM1TUp2VTBOUlJZUlAyV0ZVL2kvVk10L0NsbXNFYVZwT3NSU082dFNNa2prQ0ZsclZ4NTltbU1CVE5lR09Bck93V2J1Y3c9PQAAAQAURfLHTfnsxhRKDusn05L7HpgN2Fbc8XHRJNNWQ6WgeMoSUcF9uyA39/TYti6wAdXLbq6z18Jgd0uj6JgDv9W5r/Lm1P0ca7xeIeoHnjCkT/EW95nM6HrQVbkRT5ofLWu0ZqD9s/leiPAMorjBkVHe2AwefE+LYbK1JhGhkRINESGx0Lva0Cxx/QvZNY86/dCWQ3e1PfgSlBpDYN2d6bzsdXivumfGdMv15McoYMNFGy9WsivhD/S3AfuN/6e8LfNZCTjAXrYawKcFlXoPIX9oZe/doAxpACOVmDoC5cdSGDfLMZ/Y6e0sXYZuSgiL68udLilJHRR6iqXeMgxkC3qZ","start_date_in_millis":}}

[admin@es-node- elasticsearch-6.5.]$ curl -XPUT -u elastic 'http://10.0.1.103:9200/_xpack/license' -H "Content-Type: application/json" -d @license.json

Enter host password for user 'elastic':

[--10T20::,][WARN ][r.suppressed             ] [es-node-] path: /_xpack/license, params: {}

java.lang.IllegalStateException: Cannot install a [PLATINUM] license unless TLS is configured or security is disabled

        at org.elasticsearch.license.LicenseService.registerLicense(LicenseService.java:) ~[?:?]

        at org.elasticsearch.license.TransportPutLicenseAction.masterOperation(TransportPutLicenseAction.java:) ~[?:?]

        at org.elasticsearch.license.TransportPutLicenseAction.masterOperation(TransportPutLicenseAction.java:) ~[?:?]

        at org.elasticsearch.action.support.master.TransportMasterNodeAction.masterOperation(TransportMasterNodeAction.java:) ~[elasticsearch-6.5..jar:6.5.]

        at org.elasticsearch.action.support.master.TransportMasterNodeAction$AsyncSingleAction$.doRun(TransportMasterNodeAction.java:)~[elasticsearch-6.5..jar:6.5.]

        at org.elasticsearch.common.util.concurrent.ThreadContext$ContextPreservingAbstractRunnable.doRun(ThreadContext.java:) [elasticsearch-6.5..jar:6.5.]

        at org.elasticsearch.common.util.concurrent.AbstractRunnable.run(AbstractRunnable.java:) [elasticsearch-6.5..jar:6.5.]

        at java.util.concurrent.ThreadPoolExecutor.runWorker(ThreadPoolExecutor.java:) [?:1.8.0_201]

        at java.util.concurrent.ThreadPoolExecutor$Worker.run(ThreadPoolExecutor.java:) [?:1.8.0_201]

        at java.lang.Thread.run(Thread.java:) [?:1.8.0_201]

{"error":{"root_cause":[{"type":"illegal_state_exception","reason":"Cannot install a [PLATINUM] license unless TLS is configured or security is disabled"}],"type":"illegal_state_exception","reason":"Cannot install a [PLATINUM] license unless TLS is configured or security is disabled"},"status":}[admin@es-node- elasticsearch-6.5.]$
#不允许安全模式下上传许可证,先改配置文件把x-pack关了,注意不是注释,是将配置定为false,重启后再试
cluster.name:  test

node.name: es-node-

path.data: /home/admin/elasticsearch-6.5./data

path.logs: /home/admin/elasticsearch-6.5./logs

bootstrap.memory_lock: false

bootstrap.system_call_filter: false

network.host:  0.0.0.0

http.port:

http.cors.enabled: true

http.cors.allow-origin: "*"

xpack.security.enabled: false
#这次就成功了
[admin@es-node- elasticsearch-6.5.]$ curl -XPUT -u elastic 'http://10.0.1.103:9200/_xpack/license' -H "Content-Type: application/json" -d @license.json

Enter host password for user 'elastic':

[--10T20::,][INFO ][o.e.l.LicenseService     ] [es-node-] license [640fd711--4ccf-8cd3-737396ed3597] mode [platinum] - valid

{"acknowledged":true,"license_status":"valid"}
#再次将x-pack开启,这次是true,再重启
cluster.name:  test

node.name: es-node-

path.data: /home/admin/elasticsearch-6.5./data

path.logs: /home/admin/elasticsearch-6.5./logs

bootstrap.memory_lock: false

bootstrap.system_call_filter: false

network.host:  0.0.0.0

http.port:

http.cors.enabled: true

http.cors.allow-origin: "*"

xpack.security.enabled: true
#启动会报错,因为没有搞证书,进入下一个阶段。
ERROR: [1] bootstrap checks failed
[1]: Transport SSL must be enabled for setups with production licenses. Please set [xpack.security.transport.ssl.enabled] to [true] or disable security by setting [xpack.security.enabled] to [false]
4.私有证书申请,配置使用。
#按照下方步骤申请证书,第一个需要填写的是文件名,这个直接默认,回车,接下来标红处分别是,es集群名称:test,证书文件存放的目录:es_ca,节点ip:10.0.1.103(我这只有一台所以就写一台,如果是集群环境,又多台那么按照格式填写节点ip:1.1.1.1,2.2.2.2,3.3.3.3逗号分隔),节点名称:es-node-1(es配置文件中的node.name,同主机名,跟ip同理,如果是集群的话,那就用逗号隔开)
[admin@es-node- elasticsearch-6.5.]$ /home/admin/elasticsearch-6.5./bin/elasticsearch-certgen

******************************************************************************

Note: The 'elasticsearch-certgen' tool has been deprecated in favour of the

      'elasticsearch-certutil' tool. This command will be removed in a future

      release.

******************************************************************************

This tool assists you in the generation of X. certificates and certificate

signing requests for use with SSL in the Elastic stack. Depending on the command

line option specified, you may be prompted for the following:

* The path to the output file

    * The output file is a zip file containing the signed certificates and

      private keys for each instance. If a Certificate Authority was generated,

      the certificate and private key will also be included in the output file.

* Information about each instance

    * An instance is any piece of the Elastic Stack that requires a SSL certificate.

      Depending on your configuration, Elasticsearch, Logstash, Kibana, and Beats

      may all require a certificate and private key.

    * The minimum required value for each instance is a name. This can simply be the

      hostname, which will be used as the Common Name of the certificate. A full

      distinguished name may also be used.

    * A filename value may be required for each instance. This is necessary when the

      name would result in an invalid file or directory name. The name provided here

      is used as the directory name (within the zip) and the prefix for the key and

      certificate files. The filename is required if you are prompted and the name

      is not displayed in the prompt.

    * IP addresses and DNS names are optional. Multiple values can be specified as a

      comma separated string. If no IP addresses or DNS names are provided, you may

      disable hostname verification in your SSL configuration.

* Certificate Authority private key password

    * The password may be left empty if desired.

Let's get started...

Please enter the desired output file [certificate-bundle.zip]:

Enter instance name: test

Enter name for directories and files [test]: es_ca

Enter IP Addresses for instance (comma-separated if more than one) []: 10.0.1.103

Enter DNS names for instance (comma-separated if more than one) []: es-node-1

Would you like to specify another instance? Press 'y' to continue entering instance information:   #此处直接回车

Certificates written to /home/admin/elasticsearch-6.5./certificate-bundle.zip

This file should be properly secured as it contains the private keys for all

instances and the certificate authority.

After unzipping the file, there will be a directory for each instance containing

the certificate and private key. Copy the certificate, key, and CA certificate

to the configuration directory of the Elastic product that they will be used for

and follow the SSL configuration instructions in the product guide.

For client applications, you may only need to copy the CA certificate and

configure the client to trust this certificate.
#解压ca压缩包并取出证书文件后放置到config目录下
[admin@es-node- elasticsearch-6.5.]$ unzip certificate-bundle.zip

Archive:  certificate-bundle.zip

   creating: ca/

  inflating: ca/ca.crt

  inflating: ca/ca.key

   creating: es_ca/

  inflating: es_ca/es_ca.crt

  inflating: es_ca/es_ca.key

[admin@es-node- elasticsearch-6.5.]$ cp ca/*  es_ca/*  config/
#调整配置文件引入ca配置后重启
cluster.name:  test

node.name: es-node-

path.data: /home/admin/elasticsearch-6.5./data

path.logs: /home/admin/elasticsearch-6.5./logs

bootstrap.memory_lock: false

bootstrap.system_call_filter: false

network.host:  0.0.0.0

http.port:

http.cors.enabled: true

http.cors.allow-origin: "*"

xpack.security.enabled: true

xpack.security.transport.ssl.enabled: true

xpack.ssl.key: es_ca.key

xpack.ssl.certificate: es_ca.crt

xpack.ssl.certificate_authorities: ca.crt
#启动会报一些ca的问题,因为这个ca是私有的肯定是不受信任的不管,总之启动了,接下来访问es看到期时间。

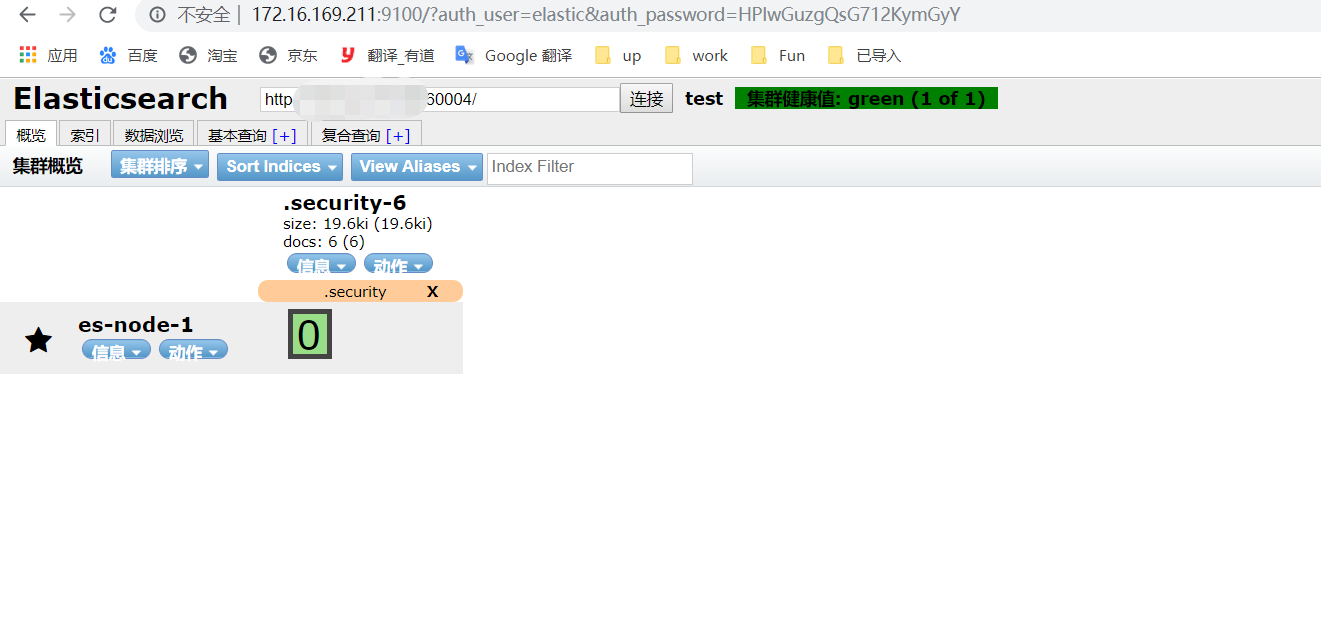
大功告成!!不过用head插件连接时,传入账号密码参数,总是连不上呢
5.head插件连接es
#head传入账号密码参数:http://172.16.169.211:9100/?auth_user=elastic&auth_password=HPlwGuzgQsG712KymGyY
#head访问es时会报跨域问题,但是我们的es已经配置了允许跨域访问了:http.cors.allow-origin: "*"
Access to XMLHttpRequest at 'http://*.*.*.*:60004/_all' from origin 'http://172.16.169.211:9100' has been blocked by CORS policy: Request header field authorization is not allowed by Access-Control-Allow-Headers in preflight response.

app.js: {XHR Error: "error", message: ""}
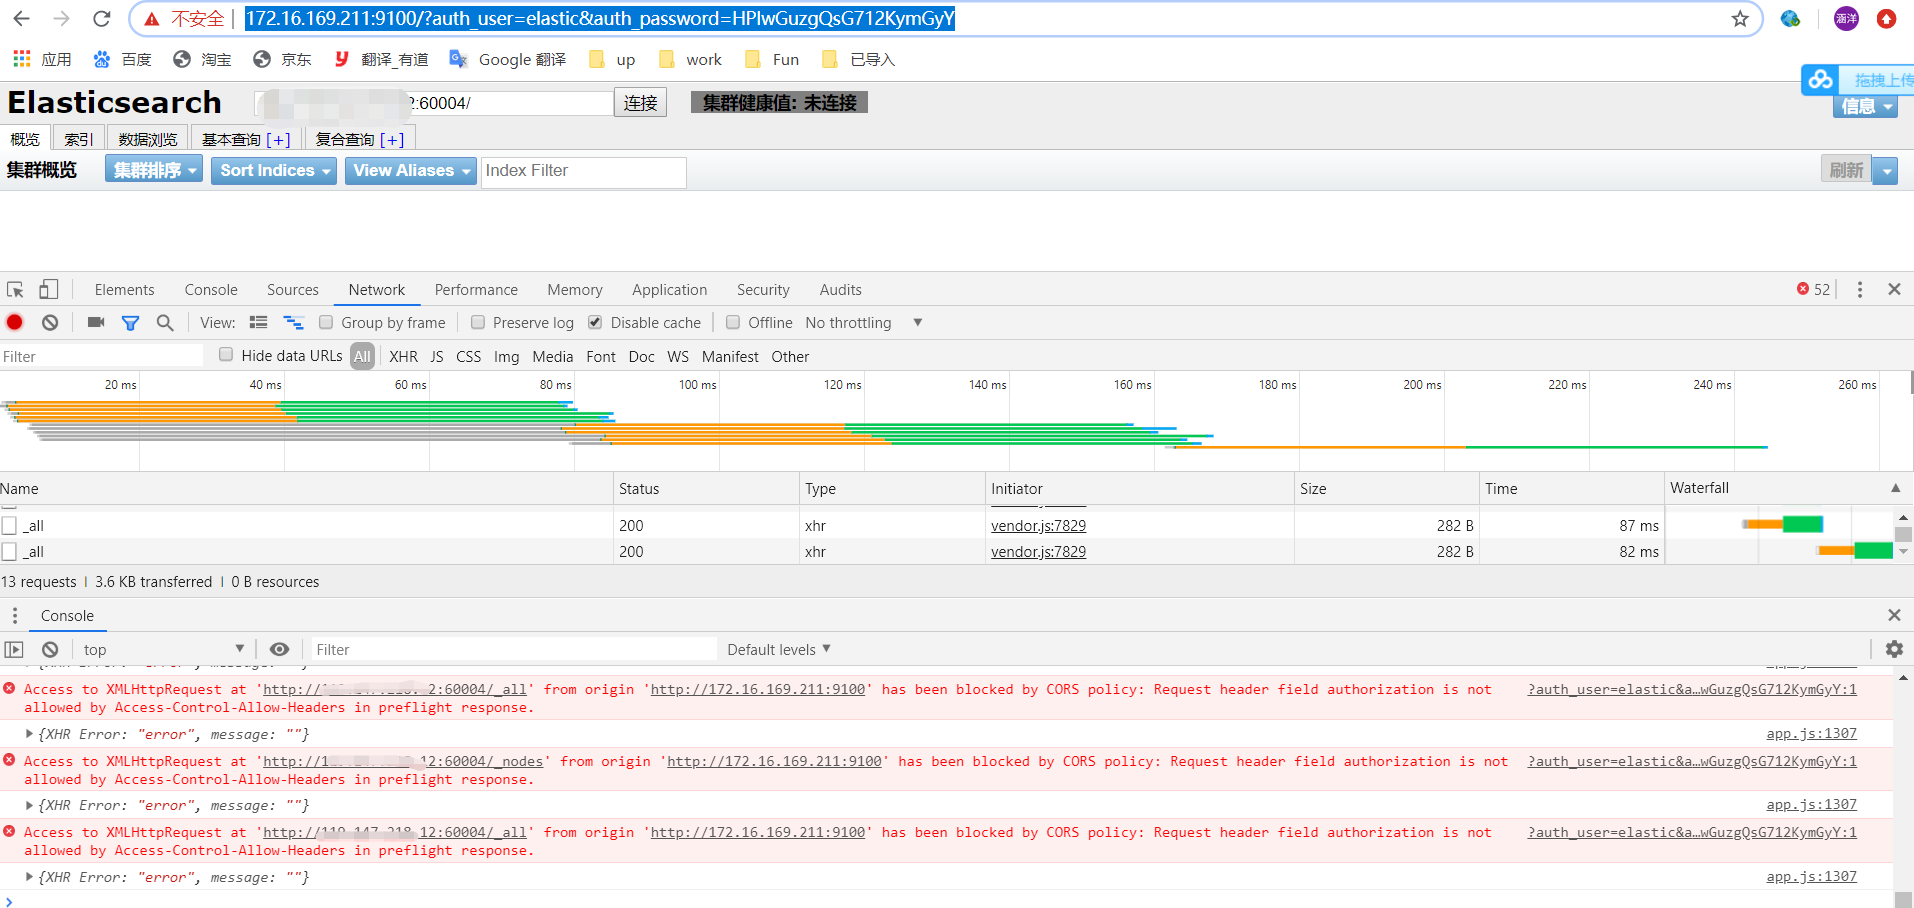
#解决方案-还是得动配置文件,允许一些头部的请求
cluster.name:  test

node.name: es-node-

path.data: /home/admin/elasticsearch-6.5./data

path.logs: /home/admin/elasticsearch-6.5./logs

bootstrap.memory_lock: false

bootstrap.system_call_filter: false

network.host:  0.0.0.0

http.port:

http.cors.enabled: true

http.cors.allow-origin: "*"

xpack.security.enabled: true

xpack.security.transport.ssl.enabled: true

xpack.ssl.key: es_ca.key

xpack.ssl.certificate: es_ca.crt

xpack.ssl.certificate_authorities: ca.crt

http.cors.allow-headers: Authorization,X-Requested-With,Content-Type,Content-Length
#改完后重启es,搞定。
Elasticsearch6.5.1破解x-pack,设置密码并使用head插件登陆。的更多相关文章
- idea2020.2.x/2020.3.x最新破解版方法教程无限永久重置插件激活码
idea是一个java开发工件,相信我所有的朋友都用过.本教程教你做到完美,安全,永久.破解 idea2020.2.x和idea2020.3.x的所有版本绝对是100% 激活,支持Windows Ma ...
- 破解版sublimeText3重新安装Package Control方法
我们都知道破解版的sublime是不能安装插件的,甚至连他的控制台都调用不出来,我也不知道这是为什么,但是,后来上网搜了很久,才发现,原来重新安装Package Control之后就可以的了.注意:因 ...
- JIRA 6.0.1 (ZIP Archive)最新破解方法,绝对可用
国内私募机构九鼎控股打造APP,来就送 20元现金领取地址:http://jdb.jiudingcapital.com/phone.html内部邀请码:C8E245J (不写邀请码,没有现金送)国内私 ...
- WordPress防暴力破解:安全插件和用.htpasswd保护WordPress控制面板
正在用Wordpress的博主们一定知道最近全球兴起的一波黑客锁定Wordpress暴力破解控制面板密码的风波了,据CloudFlare执行长Matthew Prince所说,所谓的暴力密码攻击是输入 ...
- JRebel 6 破解版及使用方法
最近更新到jrebel6.2.1了,我自己做了个技术分享的微信公众号(茶爸爸),有心的朋友可以来这里一起学习 云盘下载链接: http://pan.baidu.com/s/1bnGzMUF 配置: - ...
- (新)elasticsearch6.0版本安装head插件
ES6.0版本安装head插件 1.1 前言 不知道是我电脑问题还是最近的开源软件都比较**,mysql和elasticsearch新版本变动都比较大. elasticsearch6.0貌似已经不支持 ...
- IDEA 201809 Jrebel安装破解
jrebel介绍: JRebel是一款JAVA虚拟机插件,它使得JAVA程序员能在不进行重部署的情况下,即时看到代码的改变对一个应用程序带来的影响.JRebel使你能即时分别看到代码.类和资源的变化, ...
- XAMPP、PHPstorm和PHPcharm和Windows环境下Python搭建+暴力破解
XAMPP的安装和使用 一.什么是XAMPP? XAMPP是最流行的PHP开发环境. XAMPP是完全免费且易于安装的Apache发行版,其中包含Apache.MariaDB.PHP和Perl. 类似 ...
- elasticsearch6.0版本安装head插件
ES6.0版本安装head插件 1.1 前言 不知道是我电脑问题还是最近的开源软件都比较**,mysql和elasticsearch新版本变动都比较大. elasticsearch6.0貌似已经不支持 ...
随机推荐
- Vue中断axios请求-切换页面+重复请求
切换页面时中断 一.概述 在Vue单页面开发过程中,遇到这样的情况,当我切换页面时,由于上一页面请求执行时间长,切换到该页面时,还未执行完,这时那个请求仍会继续执行直到请求结束,此时将会影响页面性能, ...
- 复选框已经有checked,但是页面没有选中效果(解决)
原代码: $("#checked").click(function(){ $(".input[name="checked"]").attr( ...
- vue关于路由容易忽略的点
1.去掉导航里的# 在router.js中 export default new Router{ mode:'history' } 2.指定激活项的class 在router.js中 export d ...
- SAP CRM和C4C的内容管理(Content Management)
SAP CRM内容管理 SAP CRM使用Attachments这个UI给用户提供内容管理的功能.通过新建按钮可以上传本地文档到CRM系统: 该内容管理支持简单的版本管理功能,用户可点击Check O ...
- 【Day2】4.第三方模块的安装与使用
课程目标 1. 使用模块 2. 安装第三方模块 使用模块 • 一个.Py文件称之为一个模块(Module) • 好处: 1. 便于代码维护,把很多函数放到不同文件,一个.py文件 的 代码数量少 2. ...
- PendSV异常介绍、用于上下文切换
在这里,非常感谢<cortex-cm3权威指南>的翻译者. PendSV 的典型使用场合是在上下文切换时(在不同任务之间切换). 例如, 一个系统中有两个就绪的任务,上下文切换被触发的场合 ...
- 在idea中相同的字符串使用equals()进行比较时,返回值是flase问题
最近在idea中遇到了一个编码的问题,我的程序是从前台传过来一个字符串,判断用户的角色(学生,教师,管理员), 在进行equals()判断时,返回的确是false,然后就在网上查了查,发现是编码的问题 ...
- 作业八——非确定的自动机NFA确定化为DFA
NFA 确定化为 DFA 子集法: f(q,a)={q1,q2,…,qn},状态集的子集 将{q1,q2,…,qn}看做一个状态A,去记录NFA读入输入符号之后可能达到的所有状态的集合. 步骤: 1. ...
- 牛客练习赛52 | C | [烹饪] (DP,裴蜀定理,gcd)
牛客练习赛52 C 烹饪 链接:https://ac.nowcoder.com/acm/contest/1084/C来源:牛客网 时间限制:C/C++ 1秒,其他语言2秒 空间限制:C/C++ 327 ...
- HDU - 3506 Monkey Party
HDU - 3506 思路: 平行四边形不等式优化dp 这不就是石子归并(雾 代码: #pragma GCC optimize(2) #pragma GCC optimize(3) #pragma G ...