
webpack中bundler源码编写2
const fs = require('fs'); // 帮助我们获取一些文件的信息

const path = require('path'); // 打包的时候需要绝对路径,借助path这个模块

const parser = require('@babel/parser'); // 帮助我们分析代码,引入的文件

const traverse = require('@babel/traverse').default;// 因为是export出来的内容,必须加一个default属性才可以

const babel = require('@babel/core'); // babel的核心模块,转化代码,转化成浏览器认识的代码

// 分析模块

const moduleAnalyser = (filename) => {

  // 读取文件内容

  const content = fs.readFileSync(filename, 'utf-8');

  // 利用parser.parse获取到ast,抽象语法树

  const ast = parser.parse(content, {

    sourceType: 'module' // 说明是es module的引入方式

  });

  // 利用traverse对代码进行一个分析

  const dependencies = {};

  traverse(ast, {

    // 只要抽象语法树有ImportDeclaration就会进入这个方法,node是节点

    ImportDeclaration({ node }){

      // 拿到filename对应的文件夹路径

      const dirname = path.dirname(filename);

      // 对这个文件夹的路径进行一个转化,将引入的模块转化成相对于bundler的相对路径

      const newFile = './' + path.join(dirname, node.source.value);

      // 为了方便,把相对路径,绝对路径都存上,key是相对路径,value是绝对路径

      dependencies[node.source.value] = newFile;

    }

  });

  // 这个方法可以将抽象语法树转化成浏览器可以运行代码。

  const { code } = babel.transformFromAst(ast, null, {

    presets: ['@babel/preset-env'] // 把es6语法翻译成es5语法

  });

  // 返回入口文件和相对应的依赖,都可以分析出来了。

  return {

    filename,

    dependencies,

    code

  }

}

// 依赖图谱函数,将所有分析好的模块放在这里

const makeDependenciesGraph = (entry) => {

  const entryModule = moduleAnalyser(entry);

  const graphArray = [entryModule];

  // 循环入口文件

  for(let i = 0; i < graphArray.length; i++) {

    const item = graphArray[i];

    const { dependencies } = item;

    // 如果该模块有依赖文件,那么就对相应的依赖文件继续进行分析

    if(dependencies) {

      for(let j in dependencies) {

        graphArray.push(moduleAnalyser(dependencies[j]));

      }

    }

  }

  // 打印出来,发现所有模块都分析好了。

  console.log(graphArray);

}

const graphInfo = makeDependenciesGraph('./src/index.js');
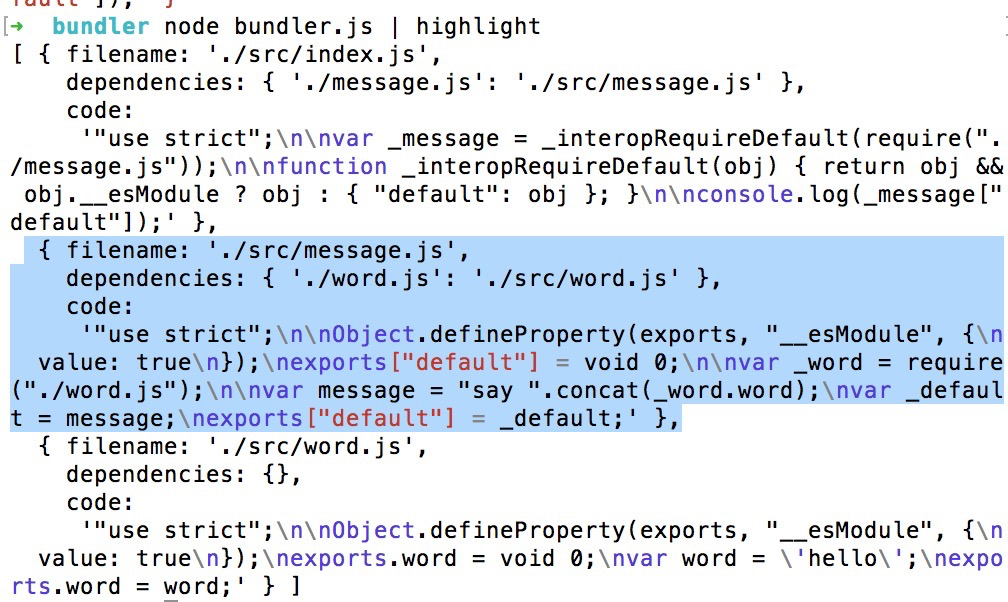
运行node bundler.js | highlight。发现所有模块的文件,依赖和翻译的代码都分析好了打印出来。这个就是我们的依赖图谱。
// 依赖图谱函数,将所有分析好的模块放在这里

const makeDependenciesGraph = (entry) => {

  const entryModule = moduleAnalyser(entry);

  const graphArray = [entryModule];

  // 循环入口文件

  for(let i = 0; i < graphArray.length; i++) {

    const item = graphArray[i];

    const { dependencies } = item;

    // 如果该模块有依赖文件,那么就对相应的依赖文件继续进行分析

    if(dependencies) {

      for(let j in dependencies) {

        graphArray.push(moduleAnalyser(dependencies[j]));

    }

  }

}

const graph = {};

graphArray.forEach(item => {

  graph[item.filename] = {

    dependencies: item.dependencies,

    code: item.code

  }

})

console.log(graph);

}
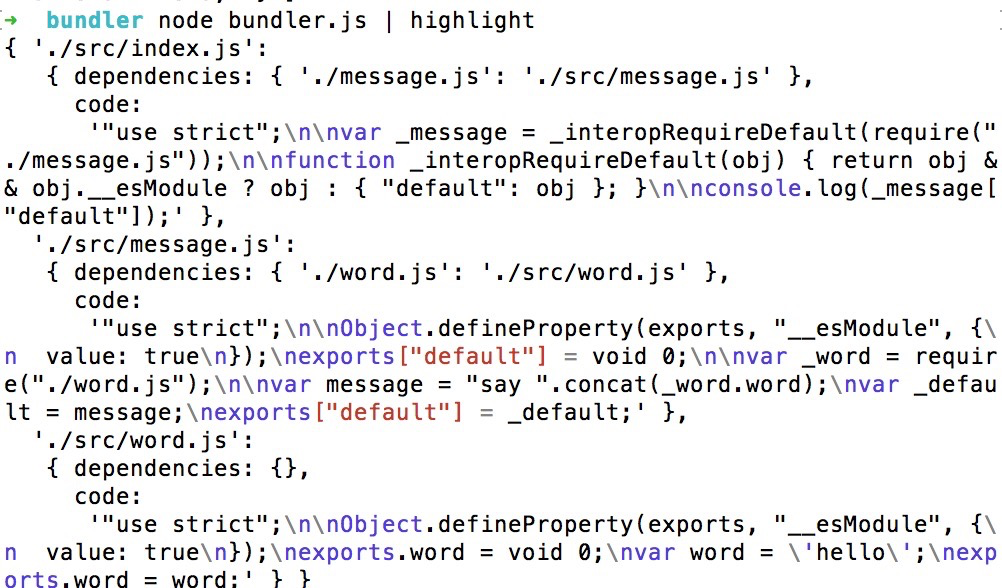
这个时候数组就编程了一个对象。
const fs = require('fs'); // 帮助我们获取一些文件的信息

const path = require('path'); // 打包的时候需要绝对路径,借助path这个模块

const parser = require('@babel/parser'); // 帮助我们分析代码,引入的文件

const traverse = require('@babel/traverse').default;// 因为是export出来的内容,必须加一个default属性才可以

const babel = require('@babel/core'); // babel的核心模块,转化代码,转化成浏览器认识的代码

// 分析模块

const moduleAnalyser = (filename) => {

  // 读取文件内容

  const content = fs.readFileSync(filename, 'utf-8');

  // 利用parser.parse获取到ast,抽象语法树

  const ast = parser.parse(content, {

    sourceType: 'module' // 说明是es module的引入方式

  });

  // 利用traverse对代码进行一个分析

  const dependencies = {};

  traverse(ast, {

    // 只要抽象语法树有ImportDeclaration就会进入这个方法,node是节点

    ImportDeclaration({ node }){

      // 拿到filename对应的文件夹路径

      const dirname = path.dirname(filename);

      // 对这个文件夹的路径进行一个转化,将引入的模块转化成相对于bundler的相对路径

      const newFile = './' + path.join(dirname, node.source.value);

      // 为了方便,把相对路径,绝对路径都存上,key是相对路径,value是绝对路径

      dependencies[node.source.value] = newFile;

    }

  });

  // 这个方法可以将抽象语法树转化成浏览器可以运行代码。

  const { code } = babel.transformFromAst(ast, null, {

    presets: ['@babel/preset-env'] // 把es6语法翻译成es5语法

  });

  // 返回入口文件和相对应的依赖,都可以分析出来了。

  return {

    filename,

    dependencies,

    code

  }

}

// 依赖图谱函数,将所有分析好的模块放在这里

const makeDependenciesGraph = (entry) => {

  const entryModule = moduleAnalyser(entry);

  const graphArray = [entryModule];

  // 循环入口文件

  for(let i = 0; i < graphArray.length; i++) {

    const item = graphArray[i];

    const { dependencies } = item;

    // 如果该模块有依赖文件,那么就对相应的依赖文件继续进行分析

    if(Object.getOwnPropertyNames(dependencies).length) {

      for(let j in dependencies) {

        graphArray.push(moduleAnalyser(dependencies[j]));

      }

    }

  }

  const graph = {};

  graphArray.forEach(item => {

    graph[item.filename] = {

      dependencies: item.dependencies,

      code: item.code

    }

  })

  return graph;

}

const graphInfo = makeDependenciesGraph('./src/index.js');

console.log(graphInfo);
接下来我们就只要借助dependenciesGraph来生成真正可以在浏览器运行的代码。
const fs = require('fs'); // 帮助我们获取一些文件的信息

const path = require('path'); // 打包的时候需要绝对路径,借助path这个模块

const parser = require('@babel/parser'); // 帮助我们分析代码,引入的文件

const traverse = require('@babel/traverse').default;// 因为是export出来的内容,必须加一个default属性才可以

const babel = require('@babel/core'); // babel的核心模块,转化代码,转化成浏览器认识的代码

// 分析模块

const moduleAnalyser = (filename) => {

  // 读取文件内容

  const content = fs.readFileSync(filename, 'utf-8');

  // 利用parser.parse获取到ast,抽象语法树

  const ast = parser.parse(content, {

    sourceType: 'module' // 说明是es module的引入方式

  });

  // 利用traverse对代码进行一个分析

  const dependencies = {};

  traverse(ast, {

    // 只要抽象语法树有ImportDeclaration就会进入这个方法,node是节点

    ImportDeclaration({ node }){

      // 拿到filename对应的文件夹路径

      const dirname = path.dirname(filename);

      // 对这个文件夹的路径进行一个转化,将引入的模块转化成相对于bundler的相对路径

      const newFile = './' + path.join(dirname, node.source.value);

      // 为了方便,把相对路径,绝对路径都存上,key是相对路径,value是绝对路径

      dependencies[node.source.value] = newFile;

    }

  });

  // 这个方法可以将抽象语法树转化成浏览器可以运行代码。

  const { code } = babel.transformFromAst(ast, null, {

    presets: ['@babel/preset-env'] // 把es6语法翻译成es5语法

  });

  // 返回入口文件和相对应的依赖,都可以分析出来了。

  return {

    filename,

    dependencies,

    code

  }

}

// 依赖图谱函数,将所有分析好的模块放在这里

const makeDependenciesGraph = (entry) => {

  const entryModule = moduleAnalyser(entry);

  const graphArray = [entryModule];

  // 循环入口文件

  for(let i = 0; i < graphArray.length; i++) {

    const item = graphArray[i];

    const { dependencies } = item;

    // 如果该模块有依赖文件,那么就对相应的依赖文件继续进行分析

    if(Object.getOwnPropertyNames(dependencies).length) {

      for(let j in dependencies) {

        graphArray.push(moduleAnalyser(dependencies[j]));

      }

    }

  }

  const graph = {};

  graphArray.forEach(item => {

    graph[item.filename] = {

      dependencies: item.dependencies,

      code: item.code

    }

  })

  return graph;

}

// 这个函数结合dependenciesGraph来生成最后的代码

const generateCode = (entry) => {

  // 拿到生成的 graph对象

  const graph = JSON.stringify(makeDependenciesGraph(entry));

  /**

  * 1、避免污染全局,放在大的闭包里面

  * 2、我们看到graph里面的源码有require,export这样的关键字,这个浏览器也是看不懂的,

  * 所以如果想去直接去执行每个模块的代码,会报错的。所以首先需要在里面构建require

  * 3、localRequire是相对路径转化的函数

  */

  return `

    (function(graph){

      function require(module){

        function localRequire(relativePath){

          return require(graph[module].dependencies[relativePath])

        }

        var exports = {};

        (function(require, exports, code){

          eval(code);

        })(localRequire, exports, graph[module].code);

        return exports;

      };

      require('${entry}')

    })(${graph});

  `;

}

const code = generateCode('./src/index.js');

console.log(code);
webpack中bundler源码编写2的更多相关文章
- webpack中bundler源码编写
新建一个项目,再新建一个src文件夹,里面有三个文件,word.js,message.js,index.js word.js export const word = 'hello'; message. ...
- php中foreach源码分析(编译原理)
php中foreach源码分析(编译原理) 一.总结 编译原理(lex and yacc)的知识 二.php中foreach源码分析 foreach是PHP中很常用的一个用作数组循环的控制语句.因为它 ...
- vue打包时,assets目录 和static目录下文件的处理区别(nodeModule中插件源码修改后,打包后的文件应放在static目录)
为了回答这个问题,我们首先需要了解Webpack如何处理静态资产.在 *.vue 组件中,所有模板和CSS都会被 vue-html-loader 及 css-loader 解析,并查找资源URL.例如 ...
- 【原】Spark中Client源码分析(二)
继续前一篇的内容.前一篇内容为: Spark中Client源码分析(一)http://www.cnblogs.com/yourarebest/p/5313006.html DriverClient中的 ...
- 【原】Spark中Master源码分析(二)
继续上一篇的内容.上一篇的内容为: Spark中Master源码分析(一) http://www.cnblogs.com/yourarebest/p/5312965.html 4.receive方法, ...
- 【原】 Spark中Worker源码分析(二)
继续前一篇的内容.前一篇内容为: Spark中Worker源码分析(一)http://www.cnblogs.com/yourarebest/p/5300202.html 4.receive方法, r ...
- Django缓存机制--rest_framework中节流源码使用的就是django提供的缓存api
一.配置缓存 https://www.jb51.net/article/124434.htm 二.缓存全站.页面.局部 三.自我控制的简单缓存API API 接口为:django.core.c ...
- 深入理解 Node.js 中 EventEmitter源码分析(3.0.0版本)
events模块对外提供了一个 EventEmitter 对象,即:events.EventEmitter. EventEmitter 是NodeJS的核心模块events中的类,用于对NodeJS中 ...
- 从 sourcemap 中获取源码
使用 paazmaya/shuji: Reverse engineering JavaScript and CSS sources from sourcemaps 可以从 sourcemap 中获取源 ...
随机推荐
- linux如何查看mysql是否启动
linux下有很多服务,今天就写一下如何查看服务是否启动,以mysql为例子 使用命令 # service mysqld status 或者 # service mysql status 命令来查看m ...
- 【ARTS】01_45_左耳听风-201900916~201900922
ARTS: Algrothm: leetcode算法题目 Review: 阅读并且点评一篇英文技术文章 Tip/Techni: 学习一个技术技巧 Share: 分享一篇有观点和思考的技术文章 Algo ...
- js 次方 开方 对数
次方 ,用Math.pow(值,次方数) 如: Math.pow(3,2); 3的平方 Math.Pow(2,3); 2的立方 开方Math.sqrt(值) 如: Math.sqrt(9); ...
- django2.x报错No module named 'django.core.urlresolvers'
解决方法如下 from django.urls import reverse 最近从django1.9迁移到django2.0中出现一个意外的报错: No module named 'django.c ...
- Eclipse导war包忽略node_modules等文件
window7环境下,选择project->Properties->如下图
- mybatis xml动态语句写法
mapper.java: /** * @Description: 根据摄像机Id查询出入记录 * @Param: * name 姓名 * monitorId 布控ID * starttime 开始时间 ...
- MySQL的索引有哪些
一.索引是什么 索引,在MySQL中也叫“键(key)”,是存储引擎用于快速找到记录的一种数据结构.如果把数据库的一张表比作一本书,那索引则是这本书的目录,通过目录,我们能快速找到我们想要的主题所对应 ...
- Mowing the Lawn【线性dp + 单调队列优化】
题目链接:https://ac.nowcoder.com/acm/contest/2652/G 题目大意:与上一篇博客 烽火传递 差不多. 1.一共n头羊,若超过m头连续的羊在一起,就会集体罢工,每头 ...
- 解决Ubuntu14.04不能打正确拼音--无法选择第二个拼音
这时候 我们回到桌面 按"ctrl"+"Alt"+"T",打开系统终端,在终端里面输入ibus-daemon -drx并回车 Ref: ht ...
- [SVN] - 使用 TortoiseSVN 进行文件比对非常慢 之 解决
背景 Windows 10 + TortoiseSVN-v1.9.7使用默认的 TortoiseMerge 进行文件比对,打开速度非常非常慢. 解决 禁用 TortoiseMerge / Settin ...