LNMP环境搭建wordpress博客及伪静态
WordPress是使用PHP语言开发的博客平台,是一款开源的软件,用户可以在支持PHP和MySQL数据库的服务器上架设属于自己的网站。也可以把 WordPress当作一个内容管理系统(CMS)来使用。因为使用者众多,所以WordPress社区非常活跃,有丰富的插件模板资源。使用WordPress可以快速搭建独立的博客网站。
官网:https://cn.wordpress.org/中文文档:https://codex.wordpress.org/zh-cn:Main_Page
一、LNMP环境的搭建详情:https://www.cnblogs.com/su-root/p/11073215.html
二、搭建wordpress bolog博客程序准备:
mysql数据库配置准备:
登陆mysql数据库:
mysql –uroot –p123456
创建并授权一个专用的数据库wordpress用于存放blog数据:
create database wordpress;
show database like ‘wordpress’;
grant all on worpress.* to worpress@'localhost' identified by '123456';
注:当数据库和php服务不在同一台机器上,可执行如下命令授权
grant all on wordpress.* to wordpress@’192.168.0.%’ identified by ‘123456’;
刷新权限,使得创建的用户生效:
flush privileges;
查看用户对应的权限:
select user,host from mysql.user where user='wordpress';
博客程序下载:
[root@bqh- blog]# wget https://cn.wordpress.org/wordpress-4.2.2-zh_CN.tar.gz

[root@bqh- blog]# ls

wordpress-4.2.-zh_CN.tar.gz

[root@bqh- blog]# tar xf wordpress-4.2.-zh_CN.tar.gz

[root@bqh- blog]# ll

总用量

drwxr-xr-x  nobody nfsnobody     5月    wordpress

-rw-r--r--  root   root       6月   : wordpress-4.2.-zh_CN.tar.gz

[root@bqh- blog]# mv wordpress/* .

[root@bqh-118 blog]# ls

index.php    wordpress-4.2.2-zh_CN.tar.gz  wp-comments-post.php  wp-includes        wp-mail.php       xmlrpc.php

license.txt  wp-activate.php               wp-config-sample.php  wp-links-opml.php  wp-settings.php

readme.html  wp-admin                      wp-content            wp-load.php        wp-signup.php

wordpress    wp-blog-header.php            wp-cron.php           wp-login.php       wp-trackback.php

[root@bqh-118 blog]#rm –rf wordpress/    #删掉,避免带路径
nginx环境配置准备:
[root@bqh- conf]# vim nginx.conf

worker_processes  ;

events {

    worker_connections  ;

}

http {

    include       mime.types;

    default_type  application/octet-stream;

    sendfile        on;

    keepalive_timeout  ;

 server {

        listen       ;

        server_name  www.test.com;

        root  html/blog;

    location / {

            index  index.php index.html index.htm;

           }

        location ~ .*\.(php|php5)?$ {

           fastcgi_pass 127.0.0.1:;

       fastcgi_index index.php;

       include fastcgi.conf;

         }

        error_page        /50x.html;

     }

}
php环境配置准备:
[root@bqh- html]# chown -R root.root blog/

[root@bqh- html]# find ./blog/ -type f|xargs chmod

[root@bqh- html]# find ./blog/ -type d|xargs chmod

[root@bqh- html]# mkdir -p ./blog/wp-content/uploads
但是这样设置用户无法更改头像,上传图片,我们可以单独给他们设置权限。
[root@bqh- html]# chown -R nginx.nginx ./blog/wp-content/uploads #网站上传目录权限,没有则创建一个即可
修改所有php文件属主为root,避免网站php程序遭到篡改
[root@bqh- html]# find ./blog/ -type f -name "*.php"|xargs chown -R root.root
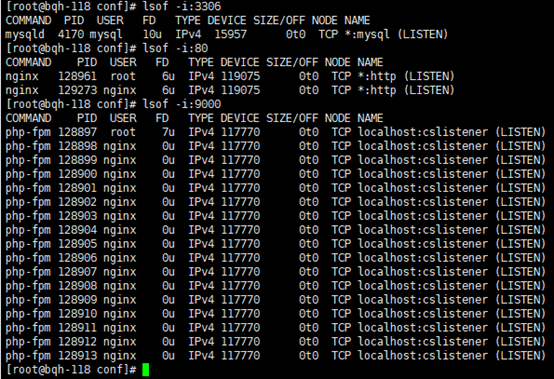
现在我们启动nginx服务、php服务、mysql服务:
[root@bqh- html]# /application/nginx/sbin/nginx

[root@bqh- html]# /application/php/sbin/php-fpm

[root@bqh- html]# /etc/init.d/mysqld start
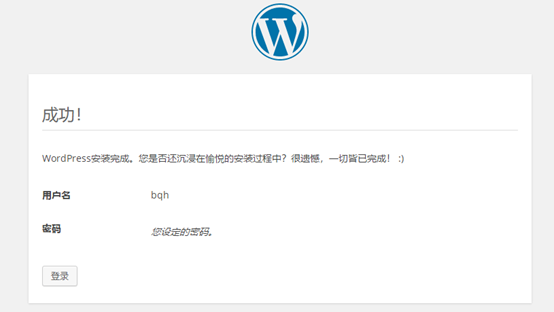
打开浏览器:www.test.com
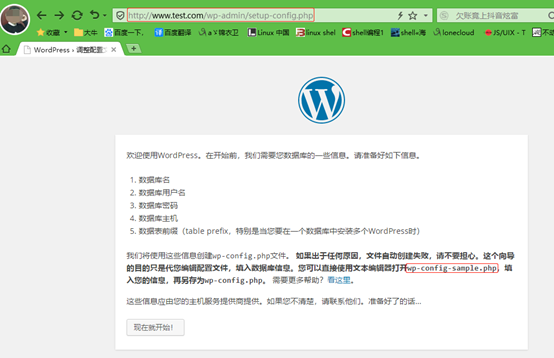
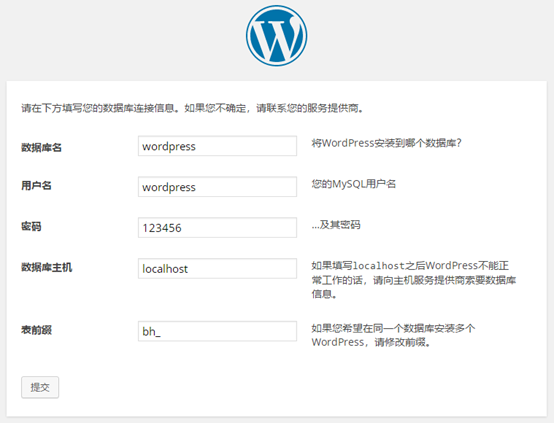
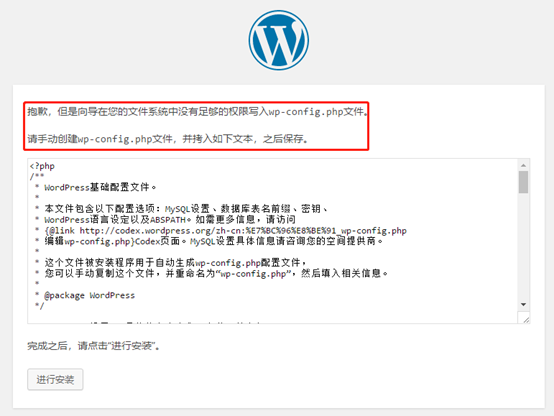
由于前期我们把权限搞了,现在需要复制出来,手动创建wp-config.php文件传上去即可。当然也可以在前面把安全降低777也行,后期再加固权限。

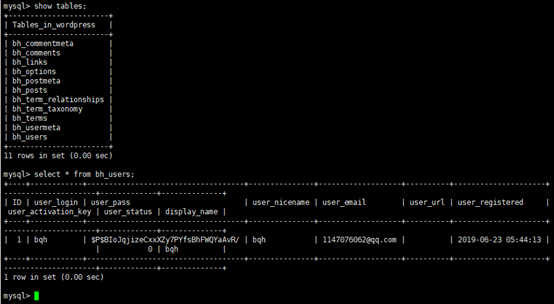
此时我们查询下数据库里面的信息:

ok,我们现在发一个博客试试:

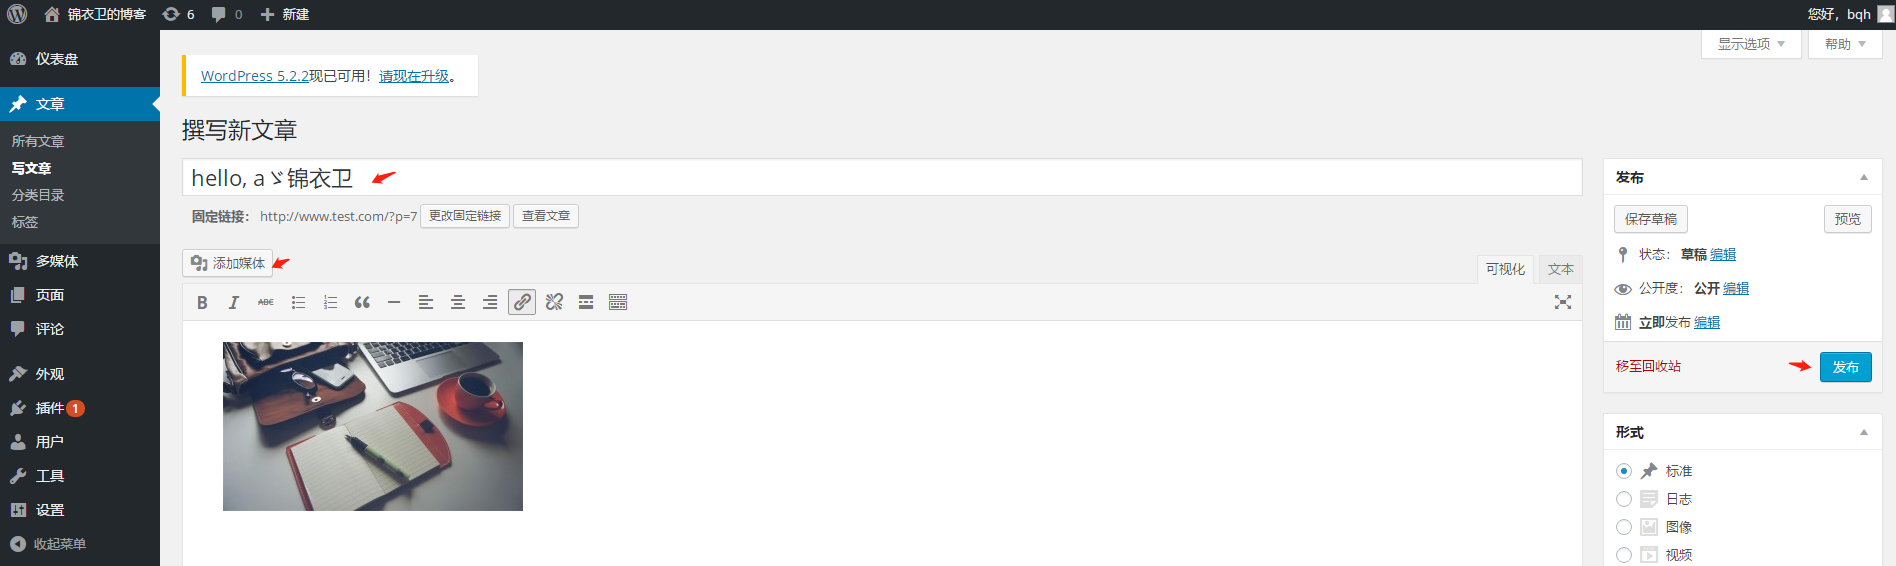
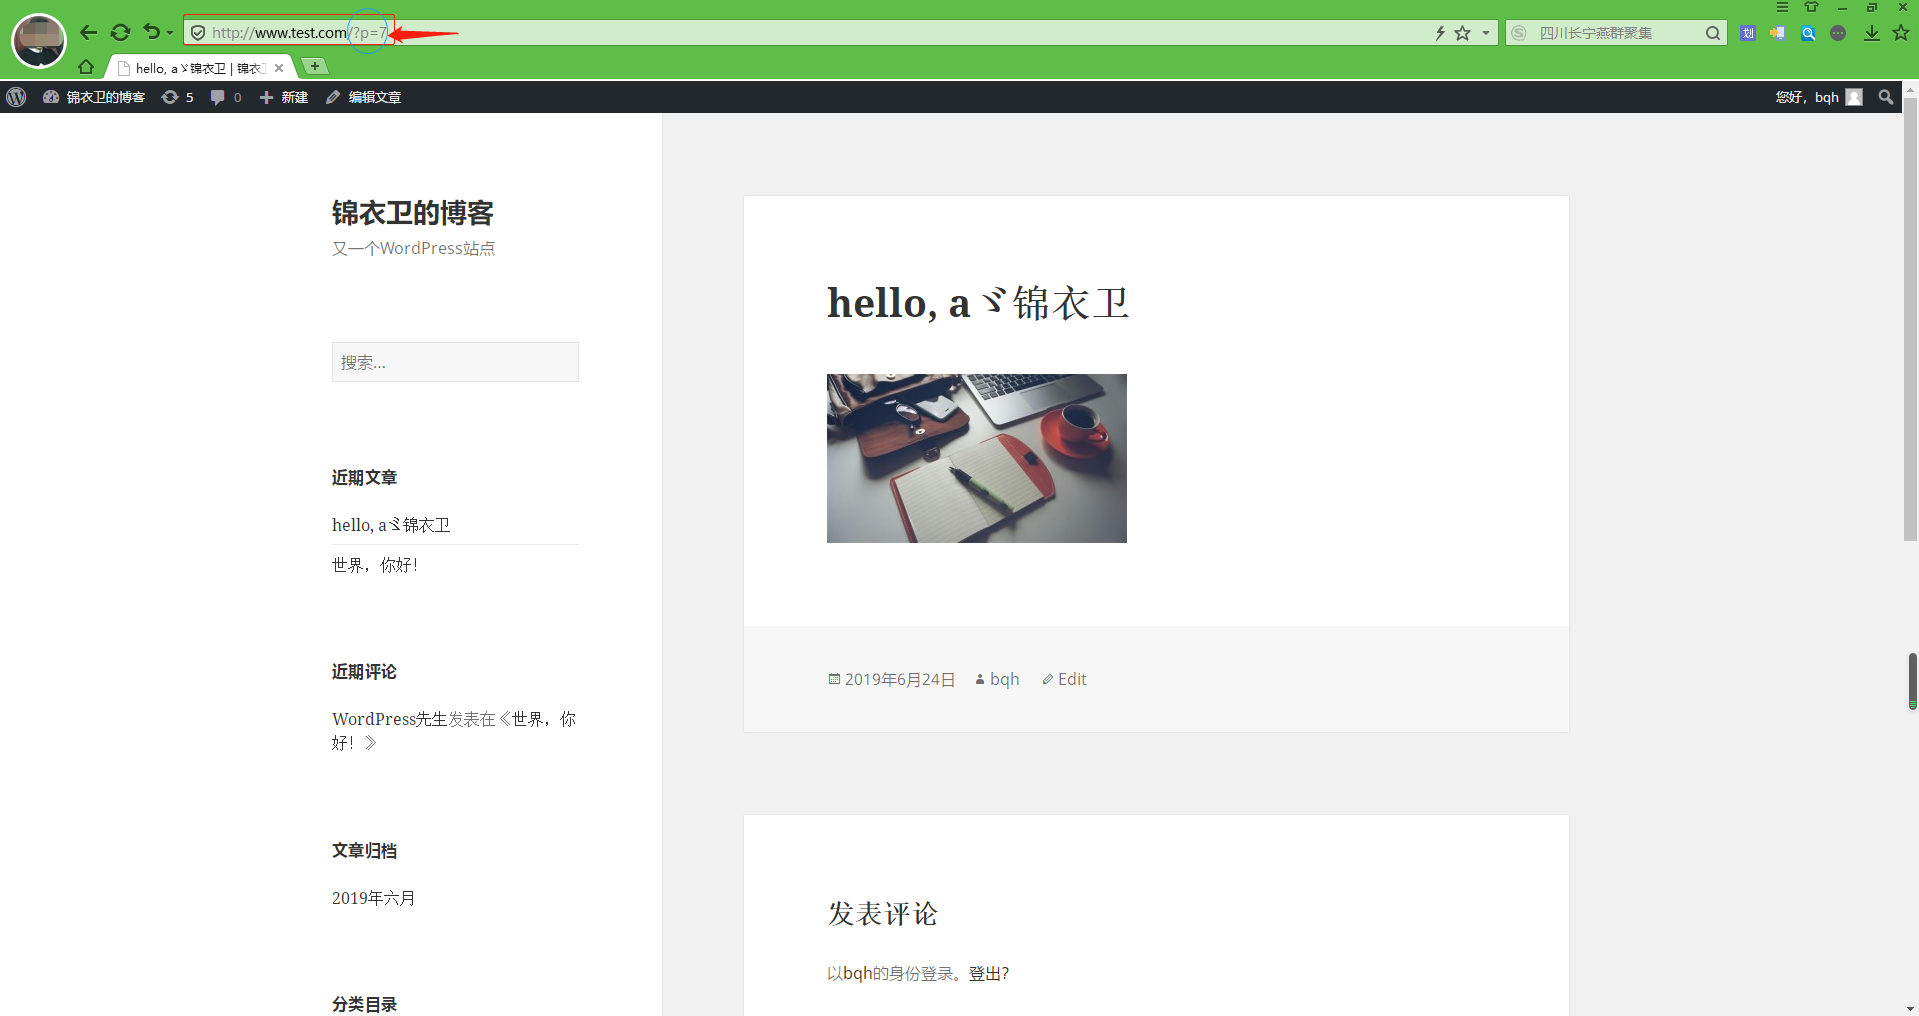
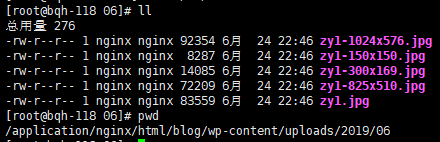
我们查看一下上传图片路径,发现有多张图片,原因是博客优化图片来着(主页展示图片跟文章展示图片大小)
同时我们还发现网址后面带参数,说明是动态博客。
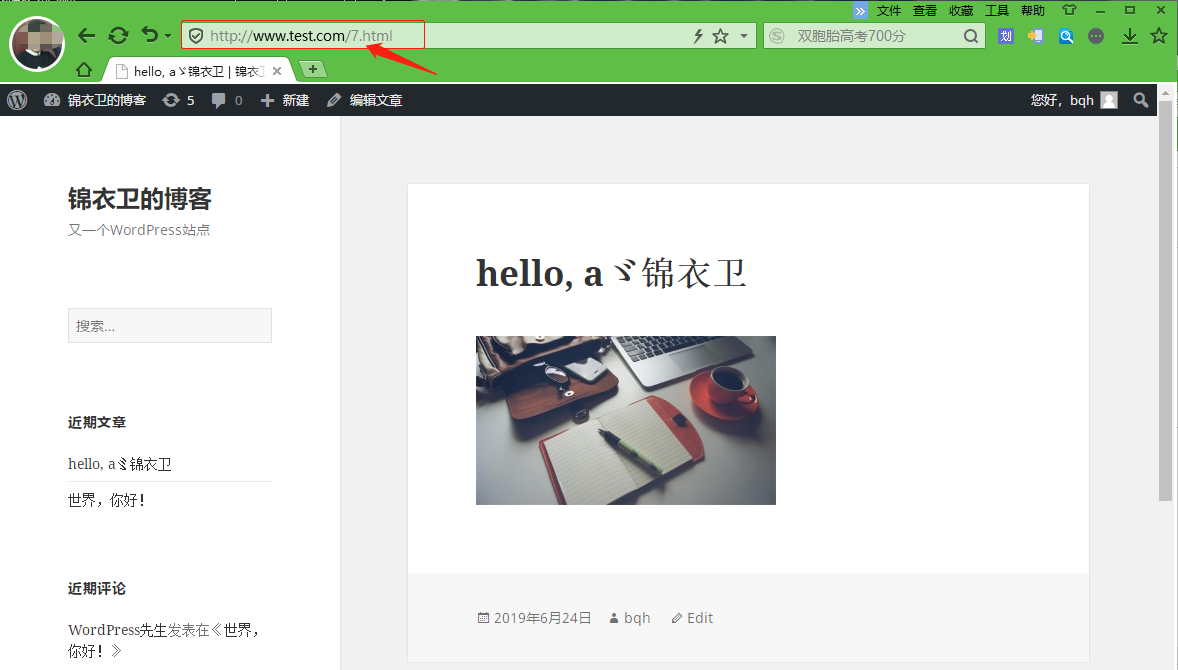
下面我们为wordpress博客设置伪静态规则:
1.打开博客后台登录进去----设置----固定连接----自定义结构,输入下面的代码保存即可:
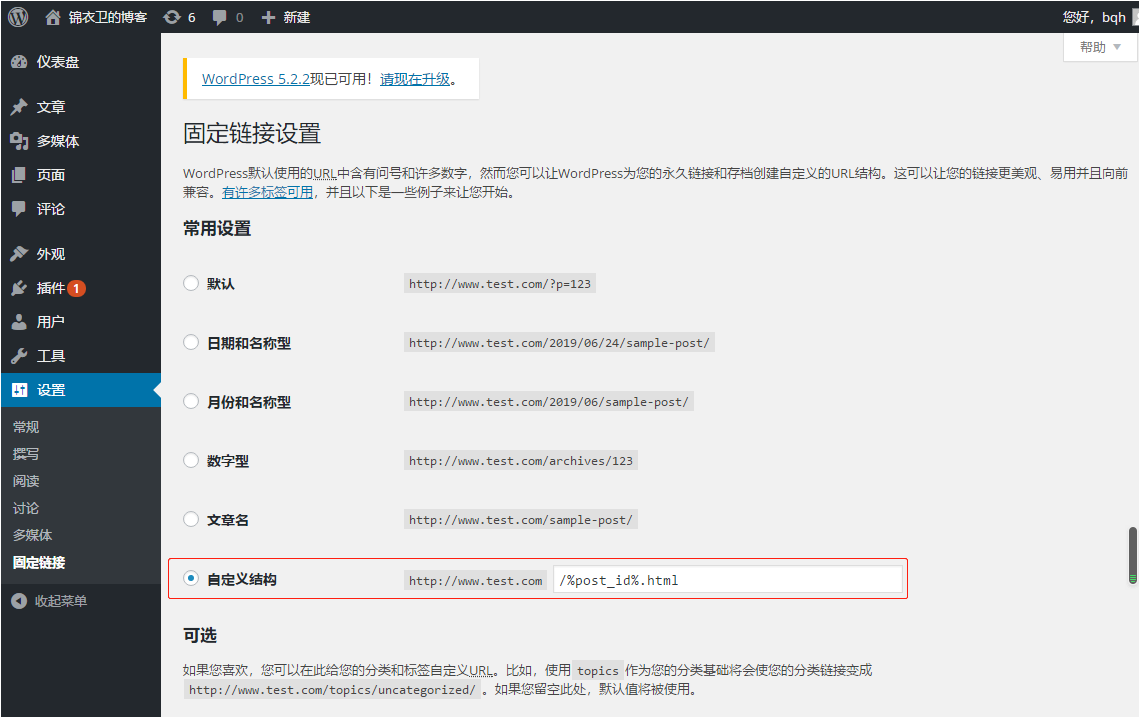
自定义结构帮助:https://codex.wordpress.org/Using_Permalinks
2. nginx配置文件的server容器中添加下面的代码:(红色部分)
[root@bqh- conf]# vim nginx.conf

worker_processes  ;

events {

    worker_connections  ;

}

http {

    include       mime.types;

    default_type  application/octet-stream;

    sendfile        on;

    keepalive_timeout  ;

 server {

        listen       ;

        server_name  www.test.com;

        root  html/blog;

    location / {

            index  index.php index.html index.htm;

    if (-f $request_filename/index.html){

    rewrite (.*) $1/index.html break;

     }

    if (-f $request_filename/index.php){

    rewrite (.*) $1/index.php;

     }

    if (!-f $request_filename){

    rewrite (.*) /index.php;

     }

    }

        location ~ .*\.(php|php5)?$ {

           fastcgi_pass 127.0.0.1:;

       fastcgi_index index.php;

       include fastcgi.conf;

         }

        error_page        /50x.html;

     }

}

[root@bqh- conf]# /application/nginx/sbin/nginx -t

nginx: the configuration file /application/nginx-1.6./conf/nginx.conf syntax is ok

nginx: configuration file /application/nginx-1.6./conf/nginx.conf test is successful

[root@bqh- conf]# /application/nginx/sbin/nginx -s reload
我们进入mysql 可以查看到原始的地址加以对比:
[root@bqh- conf]# mysql -uroot -p123456
Welcome to the MySQL monitor. Commands end with ; or \g.
Your MySQL connection id is
Server version: 5.5. MySQL Community Server (GPL) Copyright (c) , , Oracle and/or its affiliates. All rights reserved. Oracle is a registered trademark of Oracle Corporation and/or its
affiliates. Other names may be trademarks of their respective
owners. Type 'help;' or '\h' for help. Type '\c' to clear the current input statement. mysql> use wordpress;
Database changed
mysql> show tables;
+-----------------------+
| Tables_in_wordpress |
+-----------------------+
| bh_commentmeta |
| bh_comments |
| bh_links |
| bh_options |
| bh_postmeta |
| bh_posts |
| bh_term_relationships |
| bh_term_taxonomy |
| bh_terms |
| bh_usermeta |
| bh_users |
+-----------------------+
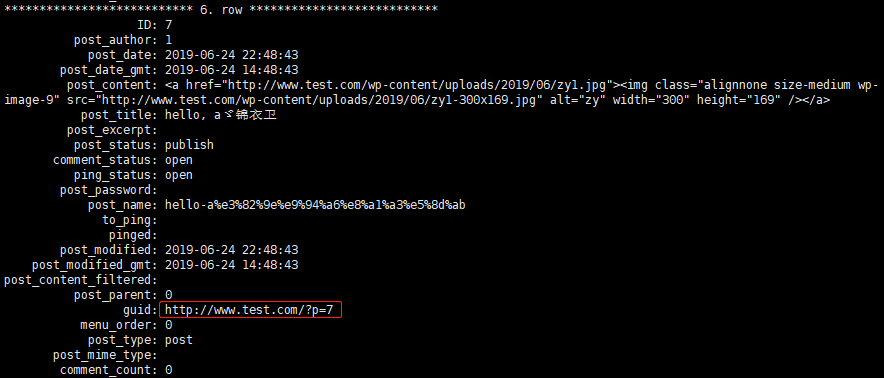
11 rows in set (0.00 sec) mysql> select * from bh_posts\G;
php.ini 配置文件的深入解析详情见:https://www.jb51.net/article/38632.htm
LNMP环境搭建wordpress博客及伪静态的更多相关文章
- LNMP环境搭建Wordpress博客
目录 LNMP架构工作原理 yum源安装 网站源包安装 LNMP是Linux Nginx MySQL/MariaDB Php/perl/python 的简称,是近些年才逐渐发展起来的构架,发展非常迅 ...
- 基于LNMP架构搭建wordpress博客之安装架构说明
架构情况 架构情况:基于LNMP架构搭建wordpress系统 软件包版本说明: 系统要求 : CentOS-6.9-x86_64-bin-DVD1.iso PHP版本 : php-7.2.29 ...
- 搭建LNMP环境部署Wordpress博客
!!!首先要做的就是关闭系统的防火墙以及selinux: #systemctl stop firewalld #systemctl disable firewalld #sed -ri 's/^(SE ...
- Docker搭建wordpress博客环境(Centos7)
Docker搭建wordpress博客环境(Centos7) 升级系统 yum -y update 设置docker库 sudo yum install -y yum-utils sudo yum-c ...
- 搭建WordPress博客程序库
搭建WordPress博客程序库 wordpress简介 wordpress是一套利用PHP语言和Mysql数据库开发的开源免费的Blog(博客,网站)程序,用户可以在支持PHP环境和Mysql数据库 ...
- 烂泥:使用nginx利用虚拟主机搭建WordPress博客
本文由秀依林枫提供友情赞助,首发于烂泥行天下. 最近开始打算学习nginx web服务器,既然是学习还是以实用为目的的.我们在此以搭建WordPress博客为例. 搭建WordPress博客,我们需要 ...
- Centos 7使用docker部署LAMP搭建wordpress博客系统
0.简要概述 LAMP是目前比较流行的web框架,即Linux+Apache+Mysql+PHP的网站架构方案.docker是目前非常流行的虚拟化应用容器,可以为任何应用创建一个轻量级.可移植的容器. ...
- 搭建 WordPress 博客教程
搭建 WordPress 博客教程(超详细) 在 2018年7月29日 上张贴 由 suncent一条评论 本文转自:静候那一米阳光 链接:https://www.jianshu.com/p/5675 ...
- 免费搭建wordpress博客有感
之前一直有搭建个wordpress博客的想法,但一直没有实施.最近离职之后,空闲时间多了起来,就开始折腾wordpress博客起来. wordpress博客可玩性很高,但刚开始只想练练手,就没有想买域 ...
随机推荐
- iptables 的安装与配置
iptables 的安装与配置 由于centos7默认是使用firewall作为防火墙,下面介绍如何将系统的防火墙设置为iptables. #停止firewall systemctl stop fi ...
- jvm 虚拟机字节码指令表(转)
- idea能用下划线替换红色报错吗?我色弱,用idea简直太痛苦了
看看下图的idea,如果某个类的包路径没有引进来,使用颜色来提示,这对于色弱的程序员简直是一种折磨,有没有可以改成eclipse的那种报错提示方式? 个人感觉idea真的没有eclipse友好,也许是 ...
- css样式圆角和一定的透明度
css样式里可以用border-radius把div或图片变成带有一定圆角的,如果是div本身是正方形,设置圆角度是百分之五十,就是圆形. border-radius:值可以是具体的px数值,也可以是 ...
- js 防抖 节流
函数防抖:将几次操作合并为一此操作进行.原理是维护一个计时器,规定在delay时间后触发函数,但是在delay时间内再次触发的话,就会取消之前的计时器而重新设置.这样一来,只有最后一次操作能被触发.( ...
- vue路由跳转取消上个页面的请求和去掉重复请求
vue路由跳转取消上个页面的请求和去掉重复请求 axios 的二次封装(拦截重复请求.异常统一处理) axios里面拦截重复请求
- extract()函数:用于从一个date或者interval类型中截取到特定的部分
extract()函数:用于从一个date或者interval类型中截取到特定的部分 ### extract 语法extract ( { year | month | day | hour | min ...
- 微信开发核心AccessToken实现
Common <?php namespace Proxy\Action; use Think\Action; use Vendor\Func\Red; class CommonAction ex ...
- [转帖]ARM发布Ethos-N57/N73 NPU、Mali-G57 Valhall GPU和Mali-D37 DPU
ARM发布Ethos-N57/N73 NPU.Mali-G57 Valhall GPU和Mali-D37 DPU https://www.cnbeta.com/articles/tech/902417 ...
- STM32之复用功能
复用功能分复用输入,复用输出,STM32芯片内部集成多种模块,如GPIO.串口.i2c等,为使IO端口支持这些模块,厂家对IO端口进行扩展,同一个端口通过设置寄存器会有不同的功能.如下图IO结构图: ...