VirtualBox——在Win7的HOST上安装配置虚拟机CentOS7
在Win7为HOST的环境下,安装VirtualBox,在其中安装CentOS7,以Bridge的方式搭建网络环境。
主要配置包括VirtualBox中的网络设置,以及CentOS中的网络配置。另外还有个重要的注意点就是如果HOST使用的是无线网,那么即使bridge配置成功了,虚拟机能够与主机互相ping通,虚拟机也无法访问外网。
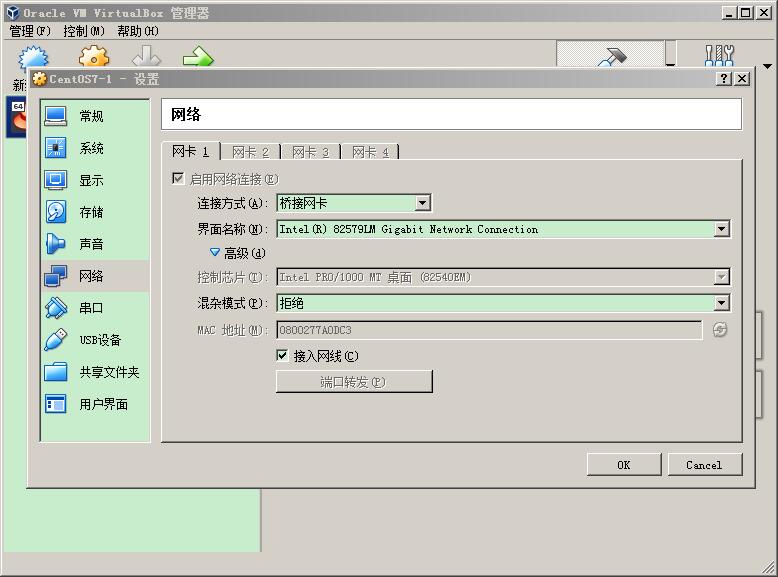
VirtualBox网络配置
CentOS网络配置
修改网络配置文件:
vi /etc/sysconfig/network-scripts/ifcfg-enp0s3
修改后内容:
TYPE=Ethernet

PROXY_METHOD=none

BROWSER_ONLY=no

BOOTPROTO=static

DEFROUTE=yes

IPV4_FAILURE_FATAL=no

IPV6INIT=yes

IPV6_AUTOCONF=yes

IPV6_DEFROUTE=yes

IPV6_FAILURE_FATAL=no

IPV6_ADDR_GEN_MODE=stable-privacy

NAME=enp0s3

UUID=6ce977fe-843a-4fb3-8bda-40b7ae4fc4f5

DEVICE=enp0s3

ONBOOT=yes

HWADDR=:::7a:0d:c3

IPADDR=192.168.0.150

NETMASK=255.255.255.0

GATEWAY=192.168.0.1

DNS1=192.168.0.1
安装VirtualBox Guest Additational
安装依赖:
yum install kernel-headers

yum install kernel-devel

yum install gcc*

yum install make
安装完成之后重启一下,然后点击虚拟机窗口上的安装增强(如果guest中已经加在过了镜像,就将其退出),然后稍等一会就安装完成了。
如果报以下错误:
this system is currently not set up to build kernel modules
则有可能是kernel的几个包的版本不一致,使用命令:
rpm -qa kernel* |sort -V |tail -n 5
查看几个包的版本是否一致:
kernel-3.10.-.el7.x86_64

kernel-devel-3.10.-693.5..el7.x86_64

kernel-headers-3.10.-693.5..el7.x86_64

kernel-tools-3.10.-.el7.x86_64

kernel-tools-libs-3.10.-.el7.x86_64
如果不一致,可以使用以下命令进行更新:
yum -y upgrade kernel kernel-devel kernel-devel
更新完重启后,再次安装增强控件。
CentOS分辨率问题(存在问题)
以下过程是参照网络上的资料执行的,不过在执行过程中报了一个错,可能是缺少驱动的问题,此处我没有再进一步解决,就此打住了,因为是打算设置一个Linux的Java开发环境,因此打算换一个比较容易操作的版本,换成Ubuntu了。
下面的操作直接导致系统卡在启动界面了,解决方法可以参考日志:
执行命令:
Xorg : -configure
执行结果:
X.Org X Server 1.19.

Release Date: --

X Protocol Version , Revision

Build Operating System:  3.10.-514.16..el7.x86_64

Current Operating System: Linux localhost.localdomain 3.10.-693.5..el7.x86_64 # SMP Fri Oct  :: UTC  x86_64

Kernel command line: BOOT_IMAGE=/vmlinuz-3.10.-693.5..el7.x86_64 root=/dev/mapper/centos-root ro crashkernel=auto rd.lvm.lv=centos/root rd.lvm.lv=centos/swap rhgb quiet LANG=zh_CN.UTF-

Build Date:  August   ::43AM

Build ID: xorg-x11-server 1.19.-.el7

Current version of pixman: 0.34.

    Before reporting problems, check http://wiki.x.org

    to make sure that you have the latest version.

Markers: (--) probed, (**) from config file, (==) default setting,

    (++) from command line, (!!) notice, (II) informational,

    (WW) warning, (EE) error, (NI) not implemented, (??) unknown.

(==) Log file: "/var/log/Xorg.1.log", Time: Tue Nov   ::

List of video drivers:

    ati

    dummy

    intel

    nouveau

    qxl

    radeon

    v4l

    vmware

    modesetting

    vesa

    fbdev

(++) Using config file: "/root/xorg.conf.new"

(==) Using config directory: "/etc/X11/xorg.conf.d"

(==) Using system config directory "/usr/share/X11/xorg.conf.d"

(EE)

(EE) Backtrace:

(EE) : Xorg (xorg_backtrace+0x55) [0x55b8bcdb6655]

(EE) : Xorg (0x55b8bcc0a000+0x1b0369) [0x55b8bcdba369]

(EE) : /lib64/libpthread.so. (0x7fcf0c3ca000+0xf5e0) [0x7fcf0c3d95e0]

(EE)

(EE) Segmentation fault at address 0x0

(EE)

Fatal server error:

(EE) Caught signal  (Segmentation fault). Server aborting

(EE)

(EE)

Please consult the The X.Org Foundation support

     at http://wiki.x.org

 for help.

(EE) Please also check the log file at "/var/log/Xorg.1.log" for additional information.

(EE)

(EE) Server terminated with error (). Closing log file.

已放弃(吐核)
然后将生成的配置文件拷贝到目标路径下:
cp /root/xorg.conf.new /etc/X11/xorg.conf
该文件中的原始内容为:
Section "ServerLayout"

    Identifier     "X.org Configured"

    Screen        "Screen0"

    InputDevice    "Mouse0" "CorePointer"

    InputDevice    "Keyboard0" "CoreKeyboard"

EndSection

Section "Files"

    ModulePath   "/usr/lib64/xorg/modules"

    FontPath     "catalogue:/etc/X11/fontpath.d"

    FontPath     "built-ins"

EndSection

Section "Module"

    Load  "glx"

EndSection

Section "InputDevice"

    Identifier  "Keyboard0"

    Driver      "kbd"

EndSection

Section "InputDevice"

    Identifier  "Mouse0"

    Driver      "mouse"

    Option        "Protocol" "auto"

    Option        "Device" "/dev/input/mice"

    Option        "ZAxisMapping" "4 5 6 7"

EndSection

Section "Monitor"

    Identifier   "Monitor0"

    VendorName   "Monitor Vendor"

    ModelName    "Monitor Model"

EndSection

Section "Device"

        ### Available Driver options are:-

        ### Values: <i>: integer, <f>: float, <bool>: "True"/"False",

        ### <string>: "String", <freq>: "<f> Hz/kHz/MHz",

        ### <percent>: "<f>%"

        ### [arg]: arg optional

        #Option     "SWcursor"               # [<bool>]

        #Option     "kmsdev"                 # <str>

        #Option     "ShadowFB"               # [<bool>]

        #Option     "AccelMethod"            # <str>

        #Option     "PageFlip"               # [<bool>]

        #Option     "ZaphodHeads"            # <str>

        #Option     "DoubleShadow"           # [<bool>]

    Identifier  "Card0"

    Driver      "modesetting"

    BusID       "PCI:0:2:0"

EndSection

Section "Screen"

    Identifier "Screen0"

    Device     "Card0"

    Monitor    "Monitor0"

    SubSection "Display"

        Viewport

        Depth

    EndSubSection

    SubSection "Display"

        Viewport

        Depth

    EndSubSection

    SubSection "Display"

        Viewport

        Depth

    EndSubSection

    SubSection "Display"

        Viewport

        Depth

    EndSubSection

    SubSection "Display"

        Viewport

        Depth

    EndSubSection

    SubSection "Display"

        Viewport

        Depth

    EndSubSection

EndSection
在其中的:
SubSection "Display"

    Viewport

    Depth

EndSubSection
插入内容后形成:
SubSection "Display"

    Viewport

    Depth

    Models    "800x600" "1366x768" "1440x900"

EndSubSection
其中分辨率根据子集的屏幕来设置。
VirtualBox——在Win7的HOST上安装配置虚拟机CentOS7的更多相关文章
- Windows 7上安装配置TensorFlow-GPU运算环境
Windows 7上安装配置TensorFlow-GPU运算环境 1. 概述 在深度学习实践中,对于简单的模型和相对较小的数据集,我们可以使用CPU完成建模过程.例如在MNIST数据集上进行手写数字识 ...
- 在Centos 7上安装配置 Apche Kafka 分布式消息系统集群
Apache Kafka是一种颇受欢迎的分布式消息代理系统,旨在有效地处理大量的实时数据.Kafka集群不仅具有高度可扩展性和容错性,而且与其他消息代理(如ActiveMQ和RabbitMQ)相比,还 ...
- 在win2003上安装配置win 服务 遇到的问题
在win2003上安装配置win 服务 win服务安装后启动不起来 .. 没有装.net framework4.0 要装这个版本 mysql-connector-net-6.3.4.zip ...
- linux上安装配置samba服务器
linux上安装配置samba服务器 在linux上安装配置samba服务器 在这给大家介绍一个不错的家伙,samba服务.如果您正在犯愁,如何在Windows和Linux之间实现资源共享,就请看看这 ...
- Windows上安装配置SSH教程(4)——WinSCP+OpenSSH 使用公钥自动登陆
-------------------- 知识点汇总:http://www.cnblogs.com/feipeng8848/p/8559803.html -------------------- 重要 ...
- 如何在Ubuntu 16.04上安装配置Redis
如何在Ubuntu 16.04上安装配置Redis Redis是一个内存中的键值存储,以其灵活性,性能和广泛的语言支持而闻名.在本指南中,我们将演示如何在Ubuntu 16.04服务器上安装和配置Re ...
- ubuntu16.04上安装配置DHCP服务的详细过程
DHCP服务器是为客户端机器分配IP地址的,所有分配的IP地址都保存在DHCP服务器的数据库中.为了在子网中实现DHCP分配IP地址,需要在目标主机上安装配置DHCP服务 1. 安装DHCP服务 安装 ...
- Jenkins-在CentOS7 上安装配置
Jenkins-在CentOS7 上安装配置 1.安装JDK yum install -y java 2.安装jenkins 方法1:添加Jenkins库到yum库,Jenkins将从这里下载安装. ...
- Linux上安装配置Keepalived
Linux上安装配置Keepalived 1.下载 自行去Keepalived官网进行下载,也可以通过如下链接进行下载2.0.18版本(目前的稳定版) 链接:https://pan.baidu.com ...
随机推荐
- ES6新增内容总结
ES6新增内容有:1,模块化思想.2,关于变量let和const.3,解构赋值.4,字符串的扩展.5,函数的扩展.6,箭头函数.7,继承apply的用法 以下就是详解: 1:模块化思想 非模块化有命名 ...
- Cookie工具类(获取cookie,设置cookie)
import java.io.UnsupportedEncodingException; import java.net.URLDecoder;import java.net.URLEncoder; ...
- Linux服务器性能检查教程
一.uptime命令 这个命令可以快速查看机器的负载情况.在Linux系统中,这些数据表示等待CPU资源的进程和阻塞在不可中断IO进程(进程状态为D)的数量.这些数据可以让我们对系统资源使用有一个宏观 ...
- layDate面板出现红色花纹图案
要使用layDate,有两种方法: 1. 要么在引用layui.js和layui.css,然后通过layui.use('laydate', callback) 加载模块后,调用方法使用. 2. 去la ...
- Odoo的菜单项
用户界面的入口是菜单项,菜单项形成一个层级结构,最顶级项为应用,其下一级为每个应用的主菜单.还可以添加更深的子菜单.可操作菜单与窗口操作关联,它告诉客户端在点击了菜单项后应执行什么操作. 菜单项存储在 ...
- 十一,k8s集群访问控制之ServicAccount
目录 认证安全 连接Api-Server的两类账号 ServiceAccount 创建 使用admin 的SA 测试 URL访问kubernetes资源 APIserver客户端定义的配置文件 kub ...
- three.js之元素周期表
<html><head> <title>three.js css3d - periodic table</title> <meta charset ...
- Linux用户组管理及用户权限2
用户.组和权限管理 Multi-tasks,Multi-Users,多任务,多用户的计算机 每个使用者: 用户标识.密码: Authentication ...
- 认识并初步应用GitHub
好好学习,天天向上 一.这是一个简单的开头 GIT的地址 https://github.com/Notexcellent GIT的用户名 Notexcxllent 学号后五位 82405 博客地址 h ...
- 陌上花开 HYSBZ - 3262 (CDQ分治)
陌上花开 HYSBZ - 3262 有n朵花,每朵花有三个属性:花形(s).颜色(c).气味(m),用三个整数表示. 现在要对每朵花评级,一朵花的级别是它拥有的美丽能超过的花的数量. 定义一朵花A比另 ...