【Android-网络通讯】 客户端与.Net服务端Http通讯
以登陆系统为例:
一、创建服务端程序
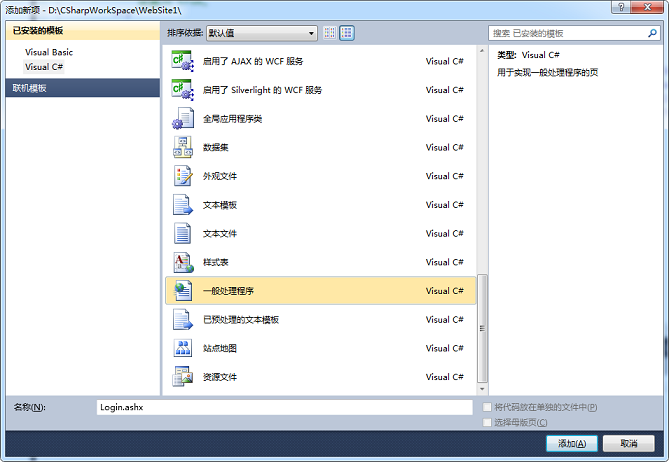
1、打开VS2012,新建项目,创建ASP.NET WEB应用程序 ,命名为MyApp
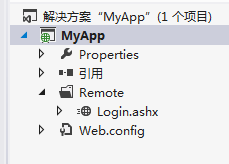
2、添加新建项,选择一般处理程序,创建Login.ashx
C# Code: Login.ashx
using System;

using System.Collections.Generic;

using System.Linq;

using System.Web;

namespace MyApp.Remote

{

    /// <summary>

    /// Login 的摘要说明

    /// </summary>

    public class Login : IHttpHandler

    {

        public void ProcessRequest(HttpContext context)

        {

            context.Response.ContentType = "text/plain";

            switch (context.Request["type"])

            {

                case "login":

                    loginValidate(context);

                    break;

                default:

                    break;

            }

        }

        /// <summary>

        /// 验证登陆

        /// </summary>

        /// <param name="context"></param>

        private void loginValidate(HttpContext context)

        {

            string account = context.Request["Account"].ToString();

            string password = context.Request["Password"].ToString();

            if (account == "" && password == "")

            {

                string realName="HelloWord";

                context.Response.Write("{\"Result\":\"1\",\"RealName\":\""+realName+"\"}");

                //实际输出:{"Result":"1","RealName":"HelloWord"}

                //注意:双引号需要用转义符\

            }

            else

            {

                context.Response.Write("{\"Result\":\"0\"}");

            }

        }

        public bool IsReusable

        {

            get

            {

                return false;

            }

        }

    }

}
3、到这里就完成服务端的验证代码登陆了。
浏览器输入地址访问:http://localhost:11946/Remote/Login.ashx?type=login&Account=123&Password=123
4、这时候程序还没有部署到IIS,那么如何在VS调试的时候,客户端可以通过IP访问该程序?
二、创建客户端程序
1、界面布局 layout \ activity_main.xml

<LinearLayout xmlns:android="http://schemas.android.com/apk/res/android"

    android:layout_width="fill_parent"

    android:layout_height="fill_parent"

    android:layout_margin="10dp"

    android:orientation="vertical" >

    <LinearLayout

        android:layout_width="match_parent"

        android:layout_height="wrap_content" >

        <TextView

            android:layout_width="100dp"

            android:layout_height="wrap_content"

            android:text="账号" />

        <EditText

            android:id="@+id/edittext_loginAccount"

            android:layout_width="0dp"

            android:layout_height="wrap_content"

            android:layout_weight="1"

            android:ems="10"

            android:inputType="number" >

            <requestFocus />

        </EditText>

    </LinearLayout>

    <LinearLayout

        android:layout_width="match_parent"

        android:layout_height="wrap_content" >

        <TextView

            android:layout_width="100dp"

            android:layout_height="wrap_content"

            android:text="密码" />

        <EditText

            android:id="@+id/editetext_loginPassword"

            android:layout_width="0dp"

            android:layout_height="wrap_content"

            android:layout_weight="1"

            android:ems="10"

            android:inputType="textPassword" />

    </LinearLayout>

    <LinearLayout

        android:layout_width="match_parent"

        android:layout_height="wrap_content"

        android:gravity="center" >

        <CheckBox

            android:id="@+id/checkbox_remindPassword"

            android:layout_width="wrap_content"

            android:layout_height="wrap_content"

            android:text="记住密码" />

    </LinearLayout>

    <LinearLayout

        android:layout_width="match_parent"

        android:layout_height="wrap_content"

        android:gravity="center" >

        <Button

            android:id="@+id/button_login"

            android:layout_width="match_parent"

            android:layout_height="wrap_content"

            android:text="登录" />

    </LinearLayout>

</LinearLayout>
2、Java Code : MainActivity.java
package com.example.net;

import java.io.BufferedReader;

import java.io.InputStreamReader;

import org.apache.http.HttpResponse;

import org.apache.http.client.HttpClient;

import org.apache.http.client.methods.HttpGet;

import org.apache.http.impl.client.DefaultHttpClient;

import org.json.JSONObject;

import android.app.Activity;

import android.app.ProgressDialog;

import android.os.Bundle;

import android.os.Handler;

import android.os.Message;

import android.os.StrictMode;

import android.view.View;

import android.view.View.OnClickListener;

import android.widget.Button;

import android.widget.CheckBox;

import android.widget.EditText;

import android.widget.Toast;

public class MainActivity extends Activity {

    private String ServerUrl = "http://192.168.137.210:11946/Remote/";

    private EditText et_loginAccount;

    private EditText et_loginPassword;

    private CheckBox cb_remindPassword;

    private Button btn_login;

    private ProgressDialog progressDialog;

    @Override

    protected void onCreate(Bundle savedInstanceState) {

        super.onCreate(savedInstanceState);

        setContentView(R.layout.activity_main);

        StrictMode.setThreadPolicy(new StrictMode.ThreadPolicy.Builder().detectDiskReads().detectDiskWrites().detectNetwork().penaltyLog().build());

        StrictMode.setVmPolicy(new StrictMode.VmPolicy.Builder().detectLeakedSqlLiteObjects().detectLeakedClosableObjects().penaltyLog().penaltyDeath().build());

        et_loginAccount = (EditText) findViewById(R.id.edittext_loginAccount);

        et_loginPassword = (EditText) findViewById(R.id.editetext_loginPassword);

        cb_remindPassword = (CheckBox) findViewById(R.id.checkbox_remindPassword);

        btn_login = (Button) findViewById(R.id.button_login);

        btn_login.setOnClickListener(new OnClickListener() {

            @Override

            public void onClick(View v) {

                // loading 对话框

                progressDialog = ProgressDialog.show(MainActivity.this, "", "服务器连接中...", true, false);

                // 开启线程去验证登录

                new Thread() {

                    @Override

                    public void run() {

                        // 向handler发消息

                        mHandler.sendEmptyMessage(0);

                    }

                }.start();

            }

        });

    }

    private Handler mHandler = new Handler() {

        @Override

        public void handleMessage(Message msg) {

            // 登录验证

            loginValidate();

        }

    };

    private void loginValidate() {

        // 打开网络连接

        HttpClient client = new DefaultHttpClient();

        StringBuilder builder = new StringBuilder();

        // 服务器提交地址

        String url = ServerUrl + "Login.ashx?type=login&Account=" + et_loginAccount.getText().toString() + "&Password=" + et_loginPassword.getText().toString();

        HttpGet httpGet = new HttpGet(url);

        try {

            HttpResponse response = client.execute(httpGet);

            BufferedReader reader = new BufferedReader(new InputStreamReader(response.getEntity().getContent()));

            // 填充数据流

            for (String s = reader.readLine(); s != null; s = reader.readLine()) {

                builder.append(s);

            }

            // 读取Json返回数组

            JSONObject jsonObject = new JSONObject(builder.toString());

            String re_result = jsonObject.getString("Result");

            String re_realName = jsonObject.getString("RealName");

            if (re_result.equals("1")) {

                Toast.makeText(MainActivity.this, "验证成功!" + re_realName, Toast.LENGTH_SHORT).show();

                // TODO:跳转页面

            } else {

                Toast.makeText(MainActivity.this, "登录失败", Toast.LENGTH_SHORT).show();

            }

            progressDialog.dismiss();

        } catch (Exception e) {

            e.printStackTrace();

            Toast.makeText(MainActivity.this, "服务器数据读取失败", Toast.LENGTH_SHORT).show();

            progressDialog.dismiss();

        }

    }

}
StrictMode.setThreadPolicy(new StrictMode.ThreadPolicy.Builder().detectDiskReads().detectDiskWrites().detectNetwork().penaltyLog().build());
StrictMode.setVmPolicy(new StrictMode.VmPolicy.Builder().detectLeakedSqlLiteObjects().detectLeakedClosableObjects().penaltyLog().penaltyDeath().build());
少了上面两句代码会报错android.os.NetworkOnMainThreadException即,在主线程访问网络时出的异常
Android在4.0之前的版本支持在主线程中访问网络,但是在4.0以后对这部分程序进行了优化,也就是说访问网络的代码不能写在主线程中了。
稍后研究多线程
3、别放了加上权限 AndroidManifest.xml
  <!-- sd卡读取权限 -->

    <uses-permission android:name="android.permission.WRITE_EXTERNAL_STORAGE" />

    <uses-permission android:name="android.permission.MOUNT_UNMOUNT_FILESYSTEMS" />

    <!-- 访问网络权限 -->

    <uses-permission android:name="android.permission.INTERNET" />

    <uses-permission android:name="android.permission.WAKE_LOCK" />

    <!-- 完全退出程序权限 -->

    <uses-permission android:name="android.permission.KILL_BACKGROUND_PROCESSES" />
【Android-网络通讯】 客户端与.Net服务端Http通讯的更多相关文章
- android客户端app和服务端交互token的作用
Android客户端和服务端如何使用Token和Session niceheart关注1人评论34644人阅读2014-09-16 16:38:44 对于初学者来说,对Token和Session的 ...
- 网络版shell之网络编程练习篇--telnet服务端
网络版shell之网络编程练习篇--telnet服务端 以前写过一个shell命令解释器,对与shell命令解释器的执行流程有了清晰的认识,这段时间学习网络编程,至于网络编程的细节以及知识点,已经 ...
- C#使用Thrift简介,C#客户端和Java服务端相互交互
C#使用Thrift简介,C#客户端和Java服务端相互交互 本文主要介绍两部分内容: C#中使用Thrift简介 用Java创建一个服务端,用C#创建一个客户端通过thrift与其交互. 用纯C#实 ...
- 利用python多线程实现多个客户端与单个服务端的远程ssh
本次实验设计两个方面的代码,第一个是客户端,代码如下: import os from socket import * c = socket(AF_INET,SOCK_STREAM) c.connect ...
- 6-1 建立客户端与zk服务端的连接
6-1 建立客户端与zk服务端的连接 zookeeper原生java api使用 会话连接与恢复; 节点的增删改查; watch与acl的相关操作; 导入jar包;
- Linux下更改oracle客户端字符集和服务端字符集
from:http://blog.csdn.net/chid/article/details/6166506 Linux 下更改 oracle 客户端字符集和服务端字符集 1.Linux 下更改 or ...
- XFire客户端调用CXF服务端(四)
前面章节:http://www.cnblogs.com/xiehongwei/p/8082337.html 已经开发出了CXF服务端,现在用XFire开发客户端调用CXF服务端,代码如下: impor ...
- java版gRPC实战之六:客户端动态获取服务端地址
欢迎访问我的GitHub https://github.com/zq2599/blog_demos 内容:所有原创文章分类汇总及配套源码,涉及Java.Docker.Kubernetes.DevOPS ...
- 关于kafka客户端版本与服务端版本不一致导致的一次坑
上周开发了一个功能,需要使用kafka接上游数据并入库,本地开发时,自己安装了一个kafka服务,开发测试时使用本地的kafka服务给主题发消息,然后在自己本地的代码中进行调试.使用的kafka版本如 ...
随机推荐
- Two progressions(CodeForces-125D)【鸽巢原理】
题意:将一列数划分为两个等差数列. 思路:首先,我要吹爆鸽巢原理!!!真的很强大的东西!!! 加入能完成题设操作,则前三个数中,必有至少两个数在同一序列,枚举三种情况(a1 a2,a2 a3,a1 a ...
- python学习-6 猜拳小游戏
import random # 调用随机数模块 pc = random.randint(1,3) # 产生1-3的随机数 print("来玩个猜拳游戏吧!") a = '石头' b ...
- 通过ImageReader进行图像裁剪时出现NoSuchElementException异常
首先放上最初的Image工具类 package util; import java.awt.Rectangle; import java.awt.image.BufferedImage; import ...
- Oracle 以及 PLSQL安装
今天重装系统遇到oracle 安装的问题咯 ,oracle安装过程中很多疑难杂症咯 1如果之前装过,记得去删除注册表的Oracle 相关的文件 ,请百度有很多教程咯 2这个必须要勾选的!因为的是11g ...
- spark2.0新特性之DataSet
1.Spark SQL,DataFrame,DataSet的错误类型检测时机 spark SQL:其类型检测与语法检测是在运行时检测的 DataFrame:在spark2.0以前的版本中,DataFr ...
- vue-cli3 本地数据模拟后台接口
vue-cli3 本地数据模拟后台接口 原理: 将本地的json数据在前端模拟为后台接口,然后调用接口,完成前端操作.在后台接通后可以直接在api配置文件中修改路径,完成前后台对接. 配置: 1.文件 ...
- C++ STL 之 deque容器 打分案例(内含sort排序用法)
#include <iostream> #include <vector> #include <time.h> #include <deque> #in ...
- 页面加载完毕后调用js方法进行布局操控 已实验
页面加载完毕后调用js方法进行布局操控 已实验 $(function(){ var check1 = $("[id$=SMS]").is(':checked'); var bl=$ ...
- 10.自定义EL函数和自定义标签
需要在JSP页面中进行一些常见逻辑操作(如对字符串进行操作),首先考虑是否可以用到sun公司提供的EL函数库(fn.tld)和JSTL 核心标签库 如果sun公司的EL函数库没有或者无法满足,就需要自 ...
- 获取impala下所有的数据库建表语句
方法一: 现在的导出还是有缺陷的,导出的文件中还是存在其他不必要的信息 #!/bin/bash ##获取数据库 databases=$(hive -e "show databases; ex ...