android中的Section ListView
后来搜了一下,android做起来也很easy。下面记录一下方便以后参考(大家改一下包名)
首先复写一下BaseAdapter:
- package com.test.activity;
- import java.util.LinkedHashMap;
- import java.util.Map;
- import android.content.Context;
- import android.view.View;
- import android.view.ViewGroup;
- import android.widget.Adapter;
- import android.widget.ArrayAdapter;
- import android.widget.BaseAdapter;
- public class SeparatedListAdapter extends BaseAdapter {
- public final Map<String, Adapter> sections = new LinkedHashMap<String, Adapter>();
- public final ArrayAdapter<String> headers;
- public final static int TYPE_SECTION_HEADER = 0;
- public SeparatedListAdapter(Context context) {
- headers = new ArrayAdapter<String>(context, R.layout.list_header);
- }
- public void addSection(String section, Adapter adapter) {
- this.headers.add(section);
- this.sections.put(section, adapter);
- }
- public Object getItem(int position) {
- for (Object section : this.sections.keySet()) {
- Adapter adapter = sections.get(section);
- int size = adapter.getCount() + 1;
- // check if position inside this section
- if (position == 0)
- return section;
- if (position < size)
- return adapter.getItem(position - 1);
- // otherwise jump into next section
- position -= size;
- }
- return null;
- }
- public int getCount() {
- // total together all sections, plus one for each section header
- int total = 0;
- for (Adapter adapter : this.sections.values())
- total += adapter.getCount() + 1;
- return total;
- }
- public int getViewTypeCount() {
- // assume that headers count as one, then total all sections
- int total = 1;
- for (Adapter adapter : this.sections.values())
- total += adapter.getViewTypeCount();
- return total;
- }
- public int getItemViewType(int position) {
- int type = 1;
- for (Object section : this.sections.keySet()) {
- Adapter adapter = sections.get(section);
- int size = adapter.getCount() + 1;
- // check if position inside this section
- if (position == 0)
- return TYPE_SECTION_HEADER;
- if (position < size)
- return type + adapter.getItemViewType(position - 1);
- // otherwise jump into next section
- position -= size;
- type += adapter.getViewTypeCount();
- }
- return -1;
- }
- public boolean areAllItemsSelectable() {
- return false;
- }
- public boolean isEnabled(int position) {
- return (getItemViewType(position) != TYPE_SECTION_HEADER);
- }
- @Override
- public View getView(int position, View convertView, ViewGroup parent) {
- int sectionnum = 0;
- for (Object section : this.sections.keySet()) {
- Adapter adapter = sections.get(section);
- int size = adapter.getCount() + 1;
- // check if position inside this section
- if (position == 0)
- return headers.getView(sectionnum, convertView, parent);
- if (position < size)
- return adapter.getView(position - 1, convertView, parent);
- // otherwise jump into next section
- position -= size;
- sectionnum++;
- }
- return null;
- }
- @Override
- public long getItemId(int position) {
- return position;
- }
- }
然后开始写主Act,用listview适配一下上面的adapter
- package com.test.activity;
- import java.util.HashMap;
- import java.util.LinkedList;
- import java.util.List;
- import java.util.Map;
- import android.app.Activity;
- import android.os.Bundle;
- import android.widget.ArrayAdapter;
- import android.widget.ListView;
- import android.widget.SimpleAdapter;
- public class ListSample extends Activity {
- public final static String ITEM_TITLE = "title";
- public final static String ITEM_CAPTION = "caption";
- public Map<String, ?> createItem(String title, String caption) {
- Map<String, String> item = new HashMap<String, String>();
- item.put(ITEM_TITLE, title);
- item.put(ITEM_CAPTION, caption);
- return item;
- }
- @Override
- public void onCreate(Bundle icicle) {
- super.onCreate(icicle);
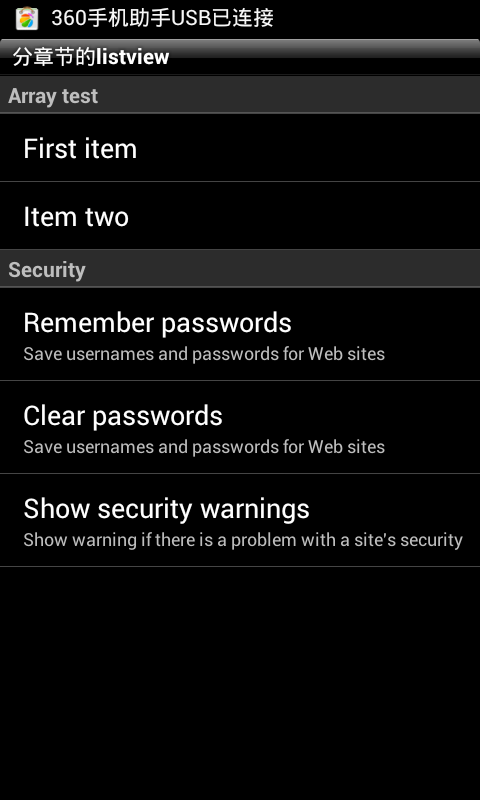
- List<Map<String, ?>> security = new LinkedList<Map<String, ?>>();
- security.add(createItem("Remember passwords",
- "Save usernames and passwords for Web sites"));
- security.add(createItem("Clear passwords",
- "Save usernames and passwords for Web sites"));
- security.add(createItem("Show security warnings",
- "Show warning if there is a problem with a site's security"));
- // create our list and custom adapter
- SeparatedListAdapter adapter = new SeparatedListAdapter(this);
- adapter.addSection("Array test", new ArrayAdapter<String>(this,
- R.layout.list_item, new String[] { "First item", "Item two" }));
- adapter.addSection("Security", new SimpleAdapter(this, security,
- R.layout.list_complex,
- new String[] { ITEM_TITLE, ITEM_CAPTION }, new int[] {
- R.id.list_complex_title, R.id.list_complex_caption }));
- ListView list = new ListView(this);
- list.setAdapter(adapter);
- this.setContentView(list);
- }
- }
这样java代码就写完了。。
最后把xml布局文件粘贴一下就可以跑起来了
- <!-- list_complex.xml -->
- <LinearLayout
- xmlns:android="http://schemas.android.com/apk/res/android"
- android:layout_width="fill_parent"
- android:layout_height="wrap_content"
- android:orientation="vertical"
- android:paddingTop="10dip"
- android:paddingBottom="10dip"
- android:paddingLeft="15dip"
- >
- <TextView
- android:id="@+id/list_complex_title"
- android:layout_width="fill_parent"
- android:layout_height="wrap_content"
- android:textAppearance="?android:attr/textAppearanceLarge"
- />
- <TextView
- android:id="@+id/list_complex_caption"
- android:layout_width="fill_parent"
- android:layout_height="wrap_content"
- android:textAppearance="?android:attr/textAppearanceSmall"
- />
- </LinearLayout>
- <!-- list_header.xml -->
- <TextView
- xmlns:android="http://schemas.android.com/apk/res/android"
- android:id="@+id/list_header_title"
- android:layout_width="fill_parent"
- android:layout_height="wrap_content"
- android:paddingTop="2dip"
- android:paddingBottom="2dip"
- android:paddingLeft="5dip"
- style="?android:attr/listSeparatorTextViewStyle" />
- <!-- list_item.xml -->
- <TextView
- xmlns:android="http://schemas.android.com/apk/res/android"
- android:id="@+id/list_item_title"
- android:layout_width="fill_parent"
- android:layout_height="fill_parent"
- android:paddingTop="10dip"
- android:paddingBottom="10dip"
- android:paddingLeft="15dip"
- android:textAppearance="?android:attr/textAppearanceLarge"
- />
android中的Section ListView的更多相关文章
- Android中动态更新ListView(转)
在使用ListView时,会遇到当ListView列表滑动到最底端时,添加新的列表项的问题,本文通过代码演示如何动态的添加新的列表项到ListView中.实现步骤:调用ListView的setOnSc ...
- android中ScrollView嵌套ListView或GridView显示位置问题
Android中ScrollView中嵌套ListView或GridView时在开始进入界面时总是显示中间位置,开头的位置显示不出来.这种情况下只需要在ScrollView的父控件中添加以下两行代码即 ...
- Android中一个关于ListView的奇怪问题
今天在做项目的时候发现了一个比较奇怪的问题,是关于ListView的,即ListView的android:height属性会影响程序中ListView的getView()方法的调用次数,如果设置Lis ...
- Android中监听ListView滑动到底部
Android中的应用就是ListView中向下滑动加载更多的功能,不要再onScroll方法中进行判断,那样当滑动到底部的时候,触摸屏幕就会又去加载更多,效果很差,可以自行测试一下: listvie ...
- android中ProgressBar和ListView
ProgressBar进度条的使用情况: 进度条的.xml声明:如果不声明格式,则默认格式为转圆圈的形式,声明进度条的visibility为不可见. <ProgressBar android:i ...
- Android中取消GridView & ListView默认的点击背景色
方法一: gridView.setSelector(new ColorDrawable(Color.TRANSPARENT)); listView.setSelector(new ColorDrawa ...
- Android中GridView、ListView 的 getChildAt() 方法返回null 问题
开发的Android app用到了GridView或者ListView,通常使用getChildAt(int position)方法获取当前点击或者选中的View(即position对应的View). ...
- Android中如何使用Listview
第一步 首先在xml文件中声明一个List View控件,并且标明id (这一步其实不用说,怕自学Android的小白不懂,就好比当初的我,哈哈) <?xml version="1.0 ...
- Android中动态改变Listview中字体的颜色
效果如下: 账目显示用的是Listview,要实现的功能为使其根据所在Item是“收入”还是“支出”来把数字设置成绿色或红色 方法是自定义适配器,并重写其中getView()函数,实现如下: //自定 ...
随机推荐
- ConfigParser读取配置文件时报错:ConfigParser.MissingSectionHeaderError
使用ConfigParser来读取配置文件,经常会发现经过记事本.notepad++修改后的配置文件读取时出现下面的问题: ConfigParser.MissingSectionHeaderError ...
- HttpResponse与JasonResponse
两者的含义 我们都知道后台给前台返回的数据都是字符串类型,那么怎么返回成为一个问题 HttpResponse与JasonResponse都是django中后台给前台返回数据的方法, 并且他们最后走的都 ...
- jq 停止/结束多个ajax请求
页面按钮: <button id="song">abort</button> 请求: var str = {} str.xhr = $.ajax({ typ ...
- [daily]使用iptables配置NAT的命令速查
时常,快速的配置一个临时的NAT环境是很常用需求. 但是,每次我都要读iptables的手册,才能配出来.所以,备忘一个速查. DNAT: iptables -t nat -A PREROUTING ...
- Nginx 的关键组件的介绍
本文章主要介绍Nginx本身功能,不依赖第三方的任何模块.介绍常用的组件功能:反向代理.负载均衡.Http服务器.正向代理 反向代理(Reverse Proxy): 什么是反向代理呢?本人最直接的理解 ...
- 从win到多系统
相信有不少电脑爱好者喜欢折腾系统,尤其还是一个小白(感觉多系统强的不要不要的,各种崇拜),然后就走上了深渊. 首先,我一开始也是个win系统的忠实用户,没用过其他系统的我几乎不知道其他系统的存在,反正 ...
- ArcGIS10.6 通过ArcMap发布二维数据服务。
ArcGIS版本基本每年都会更新,原来一直用10.2,在ArcMap中发布服务: 最近安装10.6整套系统,发现在ArcMap中输入http:id:6080/arcgis 输入用户名,密码 无法登录 ...
- slice(), splice(),split(),indexOf(),join(),replace()
1.slice() slice() 方法可以接受一或两个参数,即要返回项的起始和结束位置. 在只有一个参数的情况下, slice() 方法返回从该参数指定位置开始到当前数组末尾的所有项. 如果有两个参 ...
- python_网络编程socket(UDP)
服务端: import socket sk = socket.socket(type=socket.SOCK_DGRAM) #创建基于UDP协议的socket对象 sk.bind(('127.0.0. ...
- hbase实践之数据读取详解
hbase基本存储组织结构与数据读取组织结构对比 Segment是Hbase2.0的概念,MemStore由一个可写的Segment,以及一个或多个不可写的Segments构成.故hbase 1.*版 ...