android recycleView 简单使用二---分割线
转自:https://www.jianshu.com/p/b46a4ff7c10a
RecyclerView没有像之前ListView提供divider属性,而是提供了方法
recyclerView.addItemDecoration()
其中ItemDecoration需要我们自己去定制重写,一开始可能有人会觉得麻烦不好用,最后你会发现这种可插拔设计不仅好用,而且功能强大。
ItemDecoration类主要是三个方法:
public void onDraw(Canvas c, RecyclerView parent, State state)

public void onDrawOver(Canvas c, RecyclerView parent, State state)

public void getItemOffsets(Rect outRect, View view, RecyclerView parent, State state)
官方源码虽然都写的很清楚,但还不少小伙伴不知道怎么理解,怎么用或用哪个方法,下面我画个简单的图来帮你们理解一下。
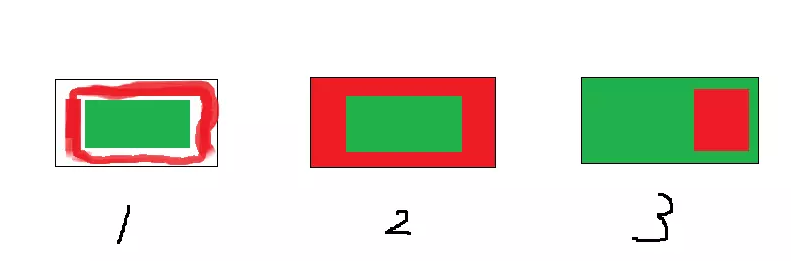
首先我们假设绿色区域代表的是我们的内容,红色区域代表我们自己绘制的装饰,可以看到:
图1:代表了getItemOffsets(),可以实现类似padding的效果
图2:代表了onDraw(),可以实现类似绘制背景的效果,内容在上面
图3:代表了onDrawOver(),可以绘制在内容的上面,覆盖内容
注意上面是我个人从应用角度的看法,事实上实现上面的效果可能三个方法每个方法都可以实现。只不过这种方法更好理解。
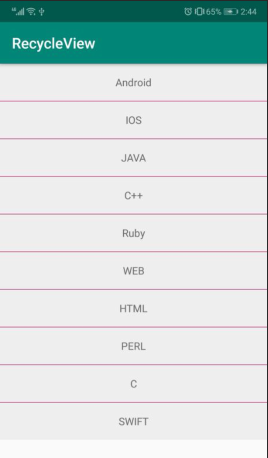
下面是我们没有添加任何ItemDecoration的界面

padding
从前面的图可以看到实现这个效果,需要重写getItemOffsets方法。
//分割线

public class DividerItemDecoration extends RecyclerView.ItemDecoration {

    @Override

    public void getItemOffsets(Rect outRect, View view, RecyclerView parent, RecyclerView.State state) {

        super.getItemOffsets(outRect, view, parent, state);

        //outRect.bottom、left,right,top设置为int值

        outRect.bottom = ;

        outRect.left = ;

    }

}
分割线
分割线在app中是经常用到的,用ItemDecoration怎么实现呢,其实上面padding改成1dp就实现了分割线的效果,但是分割线的颜色只能是背景灰色,所以不能用这种方法。
要实现分割线效果需要 getItemOffsets()和 onDraw()2个方法,首先用 getItemOffsets给item下方空出一定高度的空间(例子中是1dp),然后用onDraw绘制这个空间
//分割线

public class DividerItemDecoration extends RecyclerView.ItemDecoration {

    private Context mContext;   //上下文

    private int dividerHeight;  //分割线的高度

    private Paint mPaint;   //画笔

    //自定义构造方法,在构造方法中初始化一些变量

    public DividerItemDecoration(Context context){

        mContext = context;

        dividerHeight = ;   //context.getResources().getDimensionPixelSize(R.dimen.divider_height);

        mPaint = new Paint();

        mPaint.setColor(context.getResources().getColor(R.color.colorAccent));  //设置颜色

    }

    //设置padding

    @Override

    public void getItemOffsets(Rect outRect, View view, RecyclerView parent, RecyclerView.State state) {

        super.getItemOffsets(outRect, view, parent, state);

        //outRect.bottom、left,right,top设置为int值,设置每一项的padding

        outRect.bottom =dividerHeight ;

    }

    //画图

    @Override

    public void onDraw(Canvas c, RecyclerView parent, RecyclerView.State state) {

        super.onDraw(c, parent, state);

        //获取item个数

        int childCount = parent.getChildCount();

        //左右是固定的

        int left = parent.getPaddingLeft();

        int right = parent.getWidth() - parent.getPaddingRight() ;

        //高度

        for (int i = ; i < childCount - ; i++) {

            View view = parent.getChildAt(i);

            float top = view.getBottom();

            float bottom = view.getBottom() + dividerHeight;

            //画图

            c.drawRect(left, top, right, bottom, mPaint);

        }

    }

}
效果如下:
标签
现在很多电商app会给商品加上一个标签,比如“推荐”,“热卖”,“秒杀”等等,可以看到这些标签都是覆盖在内容之上的,这就可以用onDrawOver()来实现,我们这里简单实现一个有趣的标签
public class LeftAndRightTagDecoration extends RecyclerView.ItemDecoration {

    private int tagWidth;  //标签的宽度

    private Paint leftPaint;  //左边的画笔

    private Paint rightPaint;  //右边的画笔

    public LeftAndRightTagDecoration(Context context){

        leftPaint =new Paint();

        leftPaint.setColor(context.getResources().getColor(R.color.colorPrimary));

        rightPaint = new Paint();

        rightPaint.setColor(context.getResources().getColor(R.color.colorOrange));
     //上面是画笔的初始化,和设置颜色,下面是标签宽度的获取

        tagWidth = context.getResources().getDimensionPixelSize(R.dimen.tag_width);

    }

    //绘制标签

    @Override

    public void onDrawOver(Canvas c, RecyclerView parent, RecyclerView.State state) {

        super.onDrawOver(c, parent, state);


        int childCount = parent.getChildCount();

        for(int i=;i<childCount;i++){

            View child = parent.getChildAt(i);

            int pos = parent.getChildAdapterPosition(child);

            boolean isLeft = pos%==;

            if(isLeft){

                float left = child.getLeft();

                float right = left+tagWidth;

                float top = child.getTop();

                float bottom =child.getBottom();

                c.drawRect(left,top,right,bottom,leftPaint);

            }else{

                float right = child.getRight();

                float left = right-tagWidth;

                float top = child.getTop();

                float bottom =child.getBottom();

                c.drawRect(left,top,right,bottom,rightPaint);

            }

        }

    }

}
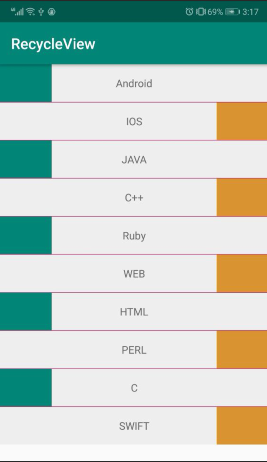
效果如下
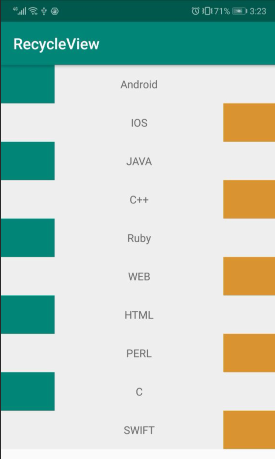
组合
不要忘记的是ItemDecoration是可以叠加的
//ItemDecoration分割线

 mRecycleView.addItemDecoration(new DividerItemDecoration(this));

//标签

 mRecycleView.addItemDecoration(new LeftAndRightTagDecoration(this));
效果如下:
section
这个是什么呢,先看下我们实现的效果

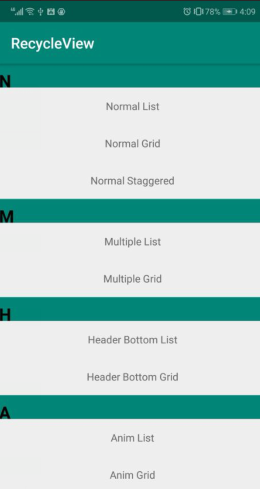
一看这个就很熟悉吧,手机上面的通讯录联系人,知乎日报都是这样效果,可以叫分组,也可以叫section分块 先不管它叫什么。
这个怎么实现呢? 其实和实现分割线是一样的道理 ,只是不是所有的item都需要分割线,只有同组的第一个需要。
我们首先定义一个接口给activity进行回调用来进行数据分组和获取首字母
public interface DecorationCallback {

        long getGroupId(int position);

        String getGroupFirstLine(int position);

    }
然后再来看我们的ItemDecoration
public class SectionDecoration extends RecyclerView.ItemDecoration {
private DecorationCallback callback;
private TextPaint textPaint; //文字画笔
private Paint paint; //普通画笔
private int topGap; //padding_top
private Paint.FontMetrics fontMetrics;
//自定义构造函数
public SectionDecoration(Context context, DecorationCallback decorationCallback) {
Resources res = context.getResources();
this.callback = decorationCallback;
//画笔
paint = new Paint();
paint.setColor(res.getColor(R.color.colorPrimary));
//文字画笔,样式设置
textPaint = new TextPaint();
textPaint.setTypeface(Typeface.DEFAULT_BOLD); //加粗
textPaint.setAntiAlias(true);
textPaint.setTextSize(); //字体大小
textPaint.setColor(Color.BLACK); //字体颜色
textPaint.getFontMetrics(fontMetrics); //字体的材质
textPaint.setTextAlign(Paint.Align.LEFT); //字体的向左对齐
fontMetrics = new Paint.FontMetrics();
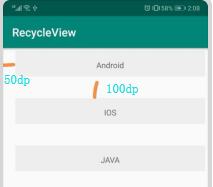
topGap = res.getDimensionPixelSize(R.dimen.sectioned_top);//32dp Padding——top的值
}
@Override
public void getItemOffsets(Rect outRect, View view, RecyclerView parent, RecyclerView.State state) {
super.getItemOffsets(outRect, view, parent, state);
//视图的位置
int pos = parent.getChildAdapterPosition(view);
long groupId = callback.getGroupId(pos);
if (groupId < ) return;
if (pos == || isFirstInGroup(pos)) {//同组的第一个才添加padding
outRect.top = topGap;
} else {
outRect.top = ;
}
}
@Override
public void onDraw(Canvas c, RecyclerView parent, RecyclerView.State state) {
super.onDraw(c, parent, state);
int left = parent.getPaddingLeft();
int right = parent.getWidth() - parent.getPaddingRight();
int childCount = parent.getChildCount();
for (int i = ; i < childCount; i++) {
View view = parent.getChildAt(i);
int position = parent.getChildAdapterPosition(view);
long groupId = callback.getGroupId(position);
if (groupId < ) return;
//分组的文本
String textLine = callback.getGroupFirstLine(position).toUpperCase();
if (position == || isFirstInGroup(position)) {
float top = view.getTop() - topGap;
float bottom = view.getTop();
c.drawRect(left, top, right, bottom, paint);//绘制矩形
c.drawText(textLine, left, bottom, textPaint);//绘制文本
}
}
}
//是否是一个组
private boolean isFirstInGroup(int pos) {
if (pos == ) {
return true;
} else {
long prevGroupId = callback.getGroupId(pos - );
long groupId = callback.getGroupId(pos);
return prevGroupId != groupId;
}
}
//接口实现分组的依据
public interface DecorationCallback {
long getGroupId(int position);
String getGroupFirstLine(int position);
}
}
可以看到和divider实现一样,都是重写getItemOffsets()和onDraw()2个方法,不同的是根据数据做了处理。
在Activity中使用
mRecycleView.addItemDecoration(new SectionDecoration(this, new SectionDecoration.DecorationCallback() {
    @Override
    public long getGroupId(int position) {
        return Character.toUpperCase(homeAdapter.mTitles[position].charAt(0));
    }

    @Override
    public String getGroupFirstLine(int position) {
        return homeAdapter.mTitles[position].substring(0, 1).toUpperCase();
    }
}));
干净舒服,不少github类似的库都是去adapter进行处理 侵入性太强 或许ItemDecoration是个更好的选择,可插拔,可替换。
到这里细心的人就会发现了,header不会动啊,我手机上的通讯录可是会随的滑动而变动呢,这个可以实现么?
StickyHeader
这个东西怎么叫我也不知道啊 粘性头部?英文也有叫 pinned section 取名字真是个麻烦事。
先看下我们简单实现的效果

首先一看到图,我们就应该想到header不动肯定是要绘制item内容之上的,需要重写onDrawOver()方法,其他地方和section实现一样。
public class PinnedSectionDecoration extends RecyclerView.ItemDecoration {

    private static final String TAG = "PinnedSectionDecoration";

    private DecorationCallback callback;

    private TextPaint textPaint;

    private Paint paint;

    private int topGap;

    private Paint.FontMetrics fontMetrics;

    public PinnedSectionDecoration(Context context, DecorationCallback decorationCallback) {

        Resources res = context.getResources();

        this.callback = decorationCallback;

        paint = new Paint();

        paint.setColor(res.getColor(R.color.colorAccent));

        textPaint = new TextPaint();

        textPaint.setTypeface(Typeface.DEFAULT_BOLD);

        textPaint.setAntiAlias(true);

        textPaint.setTextSize();

        textPaint.setColor(Color.BLACK);

        textPaint.getFontMetrics(fontMetrics);

        textPaint.setTextAlign(Paint.Align.LEFT);

        fontMetrics = new Paint.FontMetrics();

        topGap = res.getDimensionPixelSize(R.dimen.sectioned_top);

    }

    @Override

    public void getItemOffsets(Rect outRect, View view, RecyclerView parent, RecyclerView.State state) {

        super.getItemOffsets(outRect, view, parent, state);

        int pos = parent.getChildAdapterPosition(view);

        long groupId = callback.getGroupId(pos);

        if (groupId < ) return;

        if (pos ==  || isFirstInGroup(pos)) {

            outRect.top = topGap;

        } else {

            outRect.top = ;

        }

    }

    @Override

    public void onDrawOver(Canvas c, RecyclerView parent, RecyclerView.State state) {

        super.onDrawOver(c, parent, state);

        int itemCount = state.getItemCount();

        int childCount = parent.getChildCount();

        int left = parent.getPaddingLeft();

        int right = parent.getWidth() - parent.getPaddingRight();

        float lineHeight = textPaint.getTextSize() + fontMetrics.descent;

        long preGroupId, groupId = -;

        for (int i = ; i < childCount; i++) {

            View view = parent.getChildAt(i);

            int position = parent.getChildAdapterPosition(view);

            preGroupId = groupId;

            groupId = callback.getGroupId(position);

            if (groupId <  || groupId == preGroupId) continue;

            String textLine = callback.getGroupFirstLine(position).toUpperCase();

            if (TextUtils.isEmpty(textLine)) continue;

            int viewBottom = view.getBottom();

            float textY = Math.max(topGap, view.getTop());

            if (position +  < itemCount) { //下一个和当前不一样移动当前

                long nextGroupId = callback.getGroupId(position + );

                if (nextGroupId != groupId && viewBottom < textY ) {//组内最后一个view进入了header

                    textY = viewBottom;

                }

            }

            c.drawRect(left, textY - topGap, right, textY, paint);

            c.drawText(textLine, left, textY, textPaint);

        }

    }

}
好了,现在发现ItemDecoration有多强大了吧! 当然还有更多就需要你自己去发现了。
android recycleView 简单使用二---分割线的更多相关文章
- Android 实现简单音乐播放器(二)
在Android 实现简单音乐播放器(一)中,我介绍了MusicPlayer的页面设计. 现在,我简单总结一些功能实现过程中的要点和有趣的细节,结合MainActivity.java代码进行说明(写出 ...
- Android 实现简单音乐播放器(一)
今天掐指一算,学习Android长达近两个月了,今天开始,对过去一段时间的学习收获以及遇到的疑难杂症做一些总结. 简单音乐播放器是我自己完成的第一个功能较为完整的APP,可以说是我的Android学习 ...
- Android APP压力测试(二)之Monkey信息自动收集脚本
Android APP压力测试(二) 之Monkey信息自动收集脚本 前言: 上一篇Monkey介绍基本搬抄官方介绍,主要是为了自己查阅方便.本文重点介绍我在进行Monkey时如何自动收集相关信息 ...
- Android项目实战(二十八):Zxing二维码实现及优化
前言: 多年之前接触过zxing实现二维码,没想到今日项目中再此使用竟然使用的还是zxing,百度之,竟是如此牛的玩意. 当然,项目中我们也许只会用到二维码的扫描和生成两个功能,所以不必下载完整的ja ...
- Android多线程分析之二:Thread的实现
Android多线程分析之二:Thread的实现 罗朝辉 (http://www.cnblogs.com/kesalin/) CC 许可,转载请注明出处 在前文<Android多线程分析之一 ...
- Android抓包方法(二)之Tcpdump命令+Wireshark
Android抓包方法(二) 之Tcpdump命令+Wireshark 前言 做前端测试,基本要求会抓包,会分析请求数据包,查看接口是否调用正确,数据返回是否正确,问题产生是定位根本原因等.学会抓包分 ...
- Android线程管理(二)——ActivityThread
线程通信.ActivityThread及Thread类是理解Android线程管理的关键. 线程,作为CPU调度资源的基本单位,在Android等针对嵌入式设备的操作系统中,有着非常重要和基础的作用. ...
- Android实现简单音乐播放器(MediaPlayer)
Android实现简单音乐播放器(MediaPlayer) 开发工具:Andorid Studio 1.3 运行环境:Android 4.4 KitKat 工程内容 实现一个简单的音乐播放器,要求功能 ...
- Android高手进阶教程(二十八)之---Android ViewPager控件的使用(基于ViewPager的横向相册)!!!
分类: Android高手进阶 Android基础教程 2012-09-14 18:10 29759人阅读 评论(35) 收藏 举报 android相册layoutobjectclassloade ...
随机推荐
- Java Web 学习与总结(二)Servlet核心接口+Servlet3.0配置
Servlet3.0版本对Servlet配置进行了重大变革,Servlet类不需要再麻烦的去编辑web.xml文件了,只需要在类上面进行注释就可以了,获得了 Java 社区的一片赞誉之声,以下是新增的 ...
- 代码审计之Catfish CMS v4.5.7后台作者权限越权两枚+存储型XSS一枚
首先本地搭建环境,我所使用的是Windows PHPstudy集成环境.使用起来非常方便.特别是审计的时候.可以任意切换PHP版本. 本文作者:226safe Team – Poacher 0×01 ...
- 老调重弹-access注入过主机卫
本文作者:i春秋签约作家——非主流 大家好,我是来自农村的非主流,今天就给在座的各位表演个绝活. 首先打开服务器上安装了主机卫士的网站. 尝试在变量id的值后面插入万恶的单引号,根据报错,我们可以分析 ...
- [CSS3] :nth-child的用法
:nth-child(2)选取第几个标签,“2可以是你想要的数字” .demo01 li:nth-child(2){background:#090} :nth-child(n+4)选取大于等于4标签, ...
- java----session
什么是session? 在WEB开发中,服务器可以为每个用户浏览器创建一个会话对象(session对象),也就是说他是保存在服务端的.注意:一个浏览器独占一个session对象(默认情况下).因此,在 ...
- drools入门示例
Drools是一个基于java的规则引擎,开源的,可以将复杂多变的规则从硬编码中解放出来,以规则脚本的形式存放在文件中,使得规则的变更不需要修正代码重启机器就可以立即在线上环境生效.随着互联网金融的兴 ...
- ASP.NET:Application,Session,Cookie,ViewState和Cache之间的区别(转)
在ASP.NET中,有很多种保存信息的对象.例如:Application,Session,Cookie,ViewState和Cache等,那么它们有什么区别呢?每一种对象应用的环境是什么? 为了更清楚 ...
- 阿里云服务器18个数据中心测试IP地址以及测试方法
我们用户在选择阿里云服务器的时候是不是感觉阿里云的数据中心太多太多,确实阿里云服务器机房是有很多,国外国外机房大约有18个,甚至更多,因为还在不断的增加机房.对于商家而言增加不同的机房可以满足不同的项 ...
- python中TAB补全
tab补全的代码文件tab.py #!/usr/bin/env python # python startup file import sys import readline import rlcom ...
- Visual Studio 2019 Key
Visual Studio 2019 Enterprise:BF8Y8-GN2QH-T84XB-QVY3B-RC4DF Visual Studio 2019 Professional:NYWVH-HT ...