
MQ的demo
public class WorkTest {

 @Test

 public void send() throws Exception{

   //获取连接

   Connection conn = ConnectionUtil.getConn();

   Channel chan = conn.createChannel();

   //声明队列

   chan.queueDeclare("work", false, false, false, null);

   for(int i=0;i<100;i++){

     String msg="1712,hello:"+i+"message";

     chan.basicPublish("", "work", null, msg.getBytes());

     System.out.println("第"+i+"条信息已经发送");

   }

   chan.close();

   conn.close();

 }

 @Test

 public void receive1() throws Exception{

   //获取连接,获取信道

   Connection conn = ConnectionUtil.getConn();

   Channel chan = conn.createChannel();

   chan.queueDeclare("work", false, false, false, null);

   //同一时刻服务器只发送一条消息给同一消费者,消费者空闲,才发送一条

   chan.basicQos(1);

   //定义消费者

   QueueingConsumer consumer=new QueueingConsumer(chan);

   //绑定队列和消费者的关系

   //queue

   //autoAck:消息被消费后,是否自动确认回执,如果false,不自动需要手动在

   //完成消息消费后进行回执确认,channel.ack,channel.nack

   //callback

   //chan.basicConsume(queue, autoAck, callback)

   chan.basicConsume("work", false, consumer);

   //监听

   while(true){

     Delivery delivery=consumer.nextDelivery();

     byte[] result = delivery.getBody();

     String msg=new String(result);

     System.out.println("接受到:"+msg);

     Thread.sleep(50);

     //返回服务器,回执

     chan.basicAck(delivery.getEnvelope().getDeliveryTag(), false);

   }

 }

 @Test

 public void receive2() throws Exception{

   //获取连接,获取信道

   Connection conn = ConnectionUtil.getConn();

   Channel chan = conn.createChannel();

   chan.queueDeclare("work", false, false, false, null);

   //同一时刻服务器只发送一条消息给同一消费者,消费者空闲,才发送一条

   chan.basicQos(1);

   //定义消费者

   QueueingConsumer consumer=new QueueingConsumer(chan);

   //绑定队列和消费者的关系

   //queue

   //autoAck:消息被消费后,是否自动确认回执,如果false,不自动需要手动在

   //完成消息消费后进行回执确认,channel.ack,channel.nack

   //callback

   //chan.basicConsume(queue, autoAck, callback)

   chan.basicConsume("work", false, consumer);

   //监听

   while(true){

     Delivery delivery=consumer.nextDelivery();

     byte[] result = delivery.getBody();

     String msg=new String(result);

     System.out.println("接受到:"+msg);

     Thread.sleep(150);

     //返回服务器,回执

     chan.basicAck(delivery.getEnvelope().getDeliveryTag(), false);

   }

 }


}
publish/fanout发布订阅
public class FanoutTest {

 //交换机,有类型,发布订阅:fanout

 //路由模式:direct

 //主题模式:topic

 @Test

 public void send() throws Exception {

   //获取连接

   Connection conn = ConnectionUtil.getConn();

   Channel chan = conn.createChannel();

   //声明交换机

   //参数意义,1 交换机名称,2 类型:fanout,direct,topic

   chan.exchangeDeclare("fanoutEx", "fanout");

   //发送消息

   for(int i=0;i<100;i++){

     String msg="1712 hello:"+i+"msg";

     chan.basicPublish("fanoutEx", "", null, msg.getBytes());

     System.out.println("第"+i+"条信息已经发送");

   }

 }


 @Test

 public void receiv01() throws Exception{

   //获取连接

   Connection conn = ConnectionUtil.getConn();

   Channel chan = conn.createChannel();

   //生命队列

   chan.queueDeclare("fanout01", false, false, false, null);

   //声明交换机

   chan.exchangeDeclare("fanoutEx", "fanout");

   //绑定队列到交换机

   //参数 1 队列名称,2 交换机名称 3 路由key

   chan.queueBind("fanout01", "fanoutEx", "");

   chan.basicQos(1);

   //定义消费者

   QueueingConsumer consumer=new QueueingConsumer(chan);

   //消费者与队列绑定

   chan.basicConsume("fanout01",false, consumer);

   while(true){

     Delivery delivery= consumer.nextDelivery();

     System.out.println("一号消费者接收到"+

     new String(delivery.getBody()));

     chan.basicAck(delivery.getEnvelope().

         getDeliveryTag(), false);

   }

 }

 @Test

 public void receiv02() throws Exception{

   //获取连接

   Connection conn = ConnectionUtil.getConn();

   Channel chan = conn.createChannel();

   //生命队列

   chan.queueDeclare("fanout02", false, false, false, null);

   //声明交换机

   chan.exchangeDeclare("fanoutEx", "fanout");

   //绑定队列到交换机

   //参数 1 队列名称,2 交换机名称 3 路由key

   chan.queueBind("fanout02", "fanoutEx", "");

   chan.basicQos(1);

   //定义消费者

   QueueingConsumer consumer=new QueueingConsumer(chan);

   //消费者与队列绑定

   chan.basicConsume("fanout02",false, consumer);

   while(true){

     Delivery delivery= consumer.nextDelivery();

     System.out.println("二号消费者接收到"+new String(delivery.getBody()));

     chan.basicAck(delivery.getEnvelope().getDeliveryTag(), false);

   }

 }

}
routing路由模式
public class RoutingTopicTest {


 @Test

 public void routingSend() throws Exception{

   //获取连接

   Connection conn = ConnectionUtil.getConn();

   Channel chan = conn.createChannel();

   //声明交换机

   //参数意义,1 交换机名称,2 类型:fanout,direct,topic

   chan.exchangeDeclare("directEx", "direct");

   //发送消息

   String msg="路由模式的消息";

   chan.basicPublish("directEx", "jt1713",

       null, msg.getBytes());

 }

 @Test

 public void routingRec01() throws Exception{

   System.out.println("一号消费者等待接收消息");

   //获取连接

   Connection conn = ConnectionUtil.getConn();

   Channel chan = conn.createChannel();

   //声明队列

   chan.queueDeclare("direct01", false, false, false, null);

   //声明交换机

   chan.exchangeDeclare("directEx", "direct");

   //绑定队列到交换机

   //参数 1 队列名称,2 交换机名称 3 路由key

   chan.queueBind("direct01", "directEx", "jt1712");

   chan.basicQos(1);

   //定义消费者

   QueueingConsumer consumer=new QueueingConsumer(chan);

   //消费者与队列绑定

   chan.basicConsume("direct01",false, consumer);

   while(true){

     Delivery delivery= consumer.nextDelivery();

     System.out.println("一号消费者接收到"+

     new String(delivery.getBody()));

     chan.basicAck(delivery.getEnvelope().

         getDeliveryTag(), false);

   }

 }

 @Test

 public void routingRec02() throws Exception{

   System.out.println("二号消费者等待接收消息");

   //获取连接

   Connection conn = ConnectionUtil.getConn();

   Channel chan = conn.createChannel();

   //声明队列

   chan.queueDeclare("direct02", false, false, false, null);

   //声明交换机

   chan.exchangeDeclare("directEx", "direct");

   //绑定队列到交换机

   //参数 1 队列名称,2 交换机名称 3 路由key

   chan.queueBind("direct02", "directEx", "jt1711");

   chan.basicQos(1);

   //定义消费者

   QueueingConsumer consumer=new QueueingConsumer(chan);

   //消费者与队列绑定

   chan.basicConsume("direct02",false, consumer);

   while(true){

     Delivery delivery= consumer.nextDelivery();

     System.out.println("二号消费者接收到"+

     new String(delivery.getBody()));

     chan.basicAck(delivery.getEnvelope().

         getDeliveryTag(), false);

   }

 }

}
topic主题模式
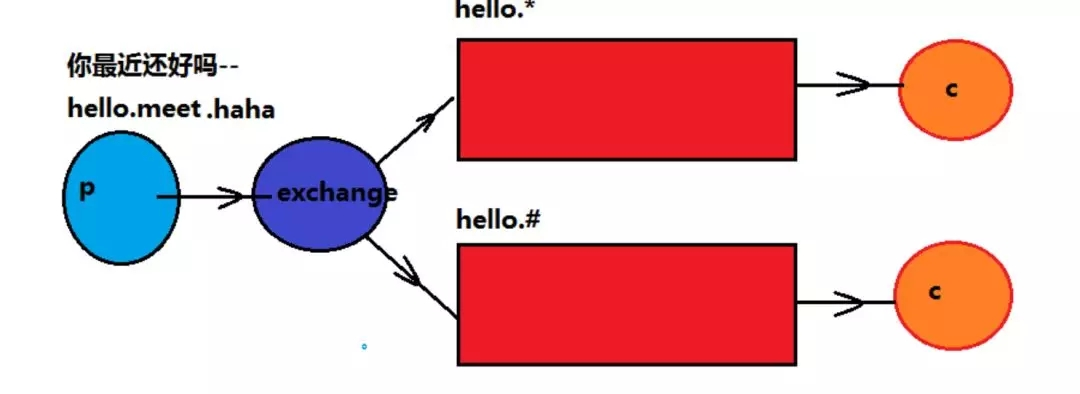
*号代表单个词语
#代表多个词语
其他的内容与routing路由模式一致
public class RoutingTopicTest {


 @Test

 public void routingRec02() throws Exception{

   System.out.println("二号消费者等待接收消息");

   //获取连接

   Connection conn = ConnectionUtil.getConn();

   Channel chan = conn.createChannel();

   //声明队列

   chan.queueDeclare("direct02", false, false, false, null);

   //声明交换机

   chan.exchangeDeclare("directEx", "direct");

   //绑定队列到交换机

   //参数 1 队列名称,2 交换机名称 3 路由key

   chan.queueBind("direct02", "directEx", "jt1711");

   chan.basicQos(1);

   //定义消费者

   QueueingConsumer consumer=new QueueingConsumer(chan);

   //消费者与队列绑定

   chan.basicConsume("direct02",false, consumer);

   while(true){

     Delivery delivery= consumer.nextDelivery();

     System.out.println("二号消费者接收到"+

     new String(delivery.getBody()));

     chan.basicAck(delivery.getEnvelope().

         getDeliveryTag(), false);

   }

 }


 @Test

 public void topicSend() throws Exception{

   //获取连接

   Connection conn = ConnectionUtil.getConn();

   Channel chan = conn.createChannel();

   //声明交换机

   //参数意义,1 交换机名称,2 类型:fanout,direct,topic

   chan.exchangeDeclare("topicEx", "topic");

   //发送消息

   String msg="主题模式的消息";

   chan.basicPublish("topicEx", "jt1712.add.update",

       null, msg.getBytes());

 }

 @Test

 public void topicRec01() throws Exception{

   System.out.println("一号消费者等待接收消息");

   //获取连接

   Connection conn = ConnectionUtil.getConn();

   Channel chan = conn.createChannel();

   //声明队列

   chan.queueDeclare("topic01", false, false, false, null);

   //声明交换机

   chan.exchangeDeclare("topicEx", "topic");

   //绑定队列到交换机

   //参数 1 队列名称,2 交换机名称 3 路由key

   chan.queueBind("topic01", "topicEx", "jt1712");

   chan.basicQos(1);

   //定义消费者

   QueueingConsumer consumer=new QueueingConsumer(chan);

   //消费者与队列绑定

   chan.basicConsume("topic01",false, consumer);

   while(true){

     Delivery delivery= consumer.nextDelivery();

     System.out.println("一号消费者接收到"+

     new String(delivery.getBody()));

     chan.basicAck(delivery.getEnvelope().

         getDeliveryTag(), false);

   }

 }

 @Test

 public void topicRec02() throws Exception{

   System.out.println("二号消费者等待接收消息");

   //获取连接

   Connection conn = ConnectionUtil.getConn();

   Channel chan = conn.createChannel();

   //声明队列

   chan.queueDeclare("topic02", false, false, false, null);

   //声明交换机

   chan.exchangeDeclare("topicEx", "topic");

   //绑定队列到交换机

   //参数 1 队列名称,2 交换机名称 3 路由key

   chan.queueBind("topic02", "topicEx", "jt1712.#");

   chan.basicQos(1);

   //定义消费者

   QueueingConsumer consumer=new QueueingConsumer(chan);

   //消费者与队列绑定

   chan.basicConsume("topic02",false, consumer);

   while(true){

     Delivery delivery= consumer.nextDelivery();

     System.out.println("二号消费者接收到"+

     new String(delivery.getBody()));

     chan.basicAck(delivery.getEnvelope().

         getDeliveryTag(), false);

   }

 }

}
MQ的demo的更多相关文章
- SpringCloud SpringBoot 前后端分离企业级微服务架构源码赠送
基于SpringBoot2.x.SpringCloud和SpringCloudAlibaba并采用前后端分离的企业级微服务敏捷开发系统架构.并引入组件化的思想实现高内聚低耦合,项目代码简洁注释丰富上手 ...
- RabbitMQ:从零开始
目录 一.介绍 二.安装 三.基本配置 四.Java Demo 五.基础API使用 六.ACK机制 七.消息的持久化 八.消息的公平分发 九.消息的优先级 十.消息的路由分发 十一.Spring集成 ...
- MVC+MQ+WinServices+Lucene.Net Demo
前言: 我之前没有接触过Lucene.Net相关的知识,最近在园子里看到很多大神在分享这块的内容,深受启发.秉着“实践出真知”的精神,再结合公司项目的实际情况,有了写一个Demo的想法,算是对自己能力 ...
- ActiveMQ入门实例Demo
前面我们已经搭建和配置好了ActiveMQ,下面来看一个Demo,体验一下MQ. JMS 消息模型 JMS消息服务应用程序结构支持两种模型:点对点模型,发布者/订阅者模型. (1)点对点模型(Queu ...
- JMS与MQ详解(有项目)
<一>m2mGW项目 1.ActiveMQ概述 企业消息软件从80年代起就存在,它不只是一种应用间消息传递风格,也是一种集成风格.因此,消息传递可以满足应用间的通知和互相操作.但是 ...
- socket.io简单说明及在线抽奖demo
socket.io简单说明及在线抽奖demo socket.io 简介 Socket.IO可以实现实时双向的基于事件的通信. 它适用于各种平台,浏览器或设备,也同样注重可靠性和速度. socket.i ...
- kafka2.9.2的伪分布式集群安装和demo(java api)测试
目录: 一.什么是kafka? 二.kafka的官方网站在哪里? 三.在哪里下载?需要哪些组件的支持? 四.如何安装? 五.FAQ 六.扩展阅读 一.什么是kafka? kafka是LinkedI ...
- ubuntu12.04+kafka2.9.2+zookeeper3.4.5的伪分布式集群安装和demo(java api)测试
博文作者:迦壹 博客地址:http://idoall.org/home.php?mod=space&uid=1&do=blog&id=547 转载声明:可以转载, 但必须以超链 ...
- HBase(二): c#访问HBase之股票行情Demo
上一章完成了c#访问hbase的sdk封装,接下来以一个具体Demo对sdk进行测试验证.场景:每5秒抓取指定股票列表的实时价格波动行情,数据下载后,一方面实时刷新UI界面,另一方面将数据放入到在内存 ...
随机推荐
- PHP filter 函数FILTER_CALLBACK 过滤数据
<?php function convertSpace($string) { return str_replace(" ", "_", $string); ...
- CentOS下利用mysqlbinlog恢复MySQL数据库
如果不小心对数据库进行误操作,而又没有及时备份怎么办?这恐怕是广大的coder经常遇到的一类问题.我今天就因为不小心删除了某个数据库,但最后的备份是1个礼拜前的,唯一能解决的办法就是通过mysqlbi ...
- 再读c++primer plus 001
1. OOP强调的是在运行阶段(而不是编译阶段)进行决策,运行阶段指的是程序正在运行时,编译阶段指的是编译器将程序组合起来时. 2.变量的值都存储在栈中,而new从被称为堆或自由存储区的内存区域分配内 ...
- MyBatis中实现多表查询
如果查询的数据量大,推荐使用N+1次查询.数据量少使用联合查询... 一. 1.Mybatis是实现多表查询方式 1.1 业务装配:对两个表编写单表查询语句,在业务(Service)把查询的两表结果 ...
- 前端html的简单认识
一.html 超文本标记语言 hypertext markup language 二.html的结构 三.html标签格式 1.标签由<>把关键字括起来 2.标签通常是成对出现的 , eg ...
- 爬虫模块之requests模块
一 模块的下载安装 pip install requests 二 爬虫的介绍 什么是爬虫:就是模拟浏览器发送请求:保存到本地:提取有用的数据:保存到数据库 爬虫的价值:获取有用的数据,保存到数据库 爬 ...
- Mybatis-Plus 实战完整学习笔记(四)------全局参数配置
一.全局配置设置 (1)全局配置Id自动生成 <!--定义mybatisplus全局配置--> <bean id="globalConfig" class=&qu ...
- ubuntu 出现device not managed,解决方法
1. 编辑/etc/NetworkManager/NetworkManager.conf: sudo vi /etc/NetworkManager/NetworkManager.conf将其中的man ...
- java IODemo
关键代码: RandomAccessFile file = new RandomAccessFile("temp.dat", "rw"); fi ...
- ERR_CACHE_MISS 上一页提示确认重新提交表单
SITUATION: 设备搜索后,根据返回结果 list.php 进入特定设备的详细页面 one.php,但点击后退按钮(上一页)返回 list.php,会出现确认重新提交表单的错误页面 ERR_CA ...