
TPM及TSS协议栈的安装使用
TPM及TSS协议栈的安装
标签: 可信计算。
目录
安装环境介绍
TPM及TSS安装
交互过程
- 编写代码测试TPM是否可用
- 编写代码测试TSS是否可用
- [对编译指令的一点说明](#10)
测试代码
环境
ubuntu 16.04ubuntu 14.04ubuntu 12.04都可以,本人使用的是Ubuntu16.04
TPM 及TSS安装
- 直接上干货吧
- 下面是仿真环境软件包依赖关系图
- 安装环境应该是由下至上按部就班的安装。
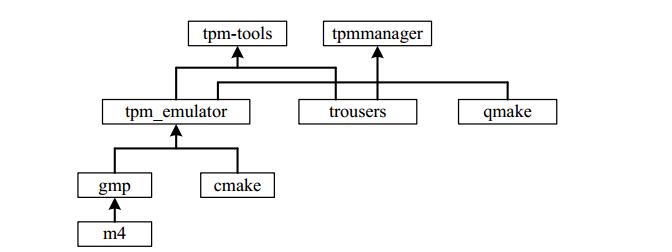
软件包下载百度网盘 提取码1tug
安装步骤
安装libgmp
- step one:使用
sudo apt-get install m4安装m4 - 在百度网盘上下载
gmp6.1.2
- (1)./configure
- (2)make
- (3)make check
- (4)sudo make install
安装TPM_emulator
- 进入之前百度网盘下载的
tpm-emulator-master文件夹下
- (1)mkdir build
- (2)cd build
- (3)cmake ../
- (4)sudo make
- (5)sudo make install//需要权限复制文件 - 初始化TPM
- (1)tpmd deactivated
- (2)killall tpmd
- (3)tpmd clear - 启动TPM
- (1)depmod -a
- (2)modprobe tpmd_dev
- (3)tpmd -f -d
安装TSS协议栈
- 养成好习惯,安装使用别人的东西之前,先看README文档,可以减少很多麻烦
安装依赖:

 Packages needed to build:

  automake > 1.4

  autoconf > 1.4

  pkgconfig

  libtool

  gtk2-devel

  openssl-devel >= 0.9.7

  pthreads library (glibc-devel)
      - 使用````sudo apt-get install 软件包名````挨个安装这些依赖的安装包

      - 使用````sudo apt-get install libssl-dev````安装openssl_dev
进入之前下载的
trousers0.3.14- (1)
./configure - (2)
make - (3)
sudo make install
- (1)
启动TSS 使用
sudo tcsd -e -f启动tss
安装tpm-tools
- 使用指令
sudo apt-get install tpm-tools这里需要等几分钟。
-如果出现fail可能是tcsd没有跑起来,最简单的解决办法就是重启,然后重新启动TPM TSS,重新使用指令sudo apt-get install tpm-tools
- 查看是否安装成功
在/usr/sbin目录下有3个关于tpm的命令运行如下

cd /usr/sbin

./tpm_version      #查看版本号

./tpm_getpubek   #查看ek公钥

./tpm_takeownership   #获取owner
TPM交互
- 安装完
TPM以及TSS还有tpm tools后。 Step one:启动TPM:- 使用指令
sudo depmod -a//分析可载入模块的相依性 - 使用指令
sudo modprobe tpmd_dev//加载模块 - 使用指令
sudo tpmd -f -d//启动模块

- 使用指令
- 启动成功后的信息记录如下
aaronhoo@aaronhoo:~/tpm/tpm-emulator-master$ sudo tpmd -f -d

tpmd.c:523: Info: starting TPM Emulator daemon (1.2.0.7-475)

tpmd.c:102: Info: parsing options

tpmd.c:109: Debug: debug mode enabled

tpmd.c:228: Info: installing signal handlers

tpmd.c:387: Info: staring main loop

tpmd.c:302: Info: initializing socket /var/run/tpm/tpmd_socket:0

tpmd.c:401: Debug: initializing TPM emulator

tpm_emulator_extern.c:101: Info: _tpm_extern_init()

tpm_emulator_extern.c:104: Debug: openening random device /dev/urandom

tpm_cmd_handler.c:4113: Debug: tpm_emulator_init(2, 0x00000000)

tpm_startup.c:29: Info: TPM_Init()

tpm_testing.c:243: Info: TPM_SelfTestFull()

tpm_testing.c:39: Debug: tpm_test_prng()

tpm_testing.c:69: Debug: Monobit: 9948

tpm_testing.c:70: Debug: Poker:   11.3

tpm_testing.c:71: Debug: run_1:   2487, 2525

tpm_testing.c:72: Debug: run_2:   1280, 1299

tpm_testing.c:73: Debug: run_3:   672, 617

tpm_testing.c:74: Debug: run_4:   302, 295

tpm_testing.c:75: Debug: run_5:   139, 145

tpm_testing.c:76: Debug: run_6+:  156, 155

tpm_testing.c:77: Debug: run_34:  0

tpm_testing.c:111: Debug: tpm_test_sha1()

tpm_testing.c:157: Debug: tpm_test_hmac()

tpm_testing.c:184: Debug: tpm_test_rsa_EK()

tpm_testing.c:186: Debug: tpm_rsa_generate_key()

tpm_testing.c:191: Debug: testing endorsement key

tpm_testing.c:197: Debug: tpm_rsa_sign(RSA_SSA_PKCS1_SHA1)

tpm_testing.c:200: Debug: tpm_rsa_verify(RSA_SSA_PKCS1_SHA1)

tpm_testing.c:203: Debug: tpm_rsa_sign(RSA_SSA_PKCS1_DER)

tpm_testing.c:206: Debug: tpm_rsa_verify(RSA_SSA_PKCS1_DER)

tpm_testing.c:210: Debug: tpm_rsa_encrypt(RSA_ES_PKCSV15)

tpm_testing.c:214: Debug: tpm_rsa_decrypt(RSA_ES_PKCSV15)

tpm_testing.c:218: Debug: verify plain text

tpm_testing.c:221: Debug: tpm_rsa_encrypt(RSA_ES_OAEP_SHA1)

tpm_testing.c:225: Debug: tpm_rsa_decrypt(RSA_ES_OAEP_SHA1)

tpm_testing.c:229: Debug: verify plain text

tpm_testing.c:261: Info: Self-Test succeeded

tpm_startup.c:43: Info: TPM_Startup(2)

tpmd.c:412: Debug: waiting for connections...
编写一个测试程序,测试TPM是否正常使用
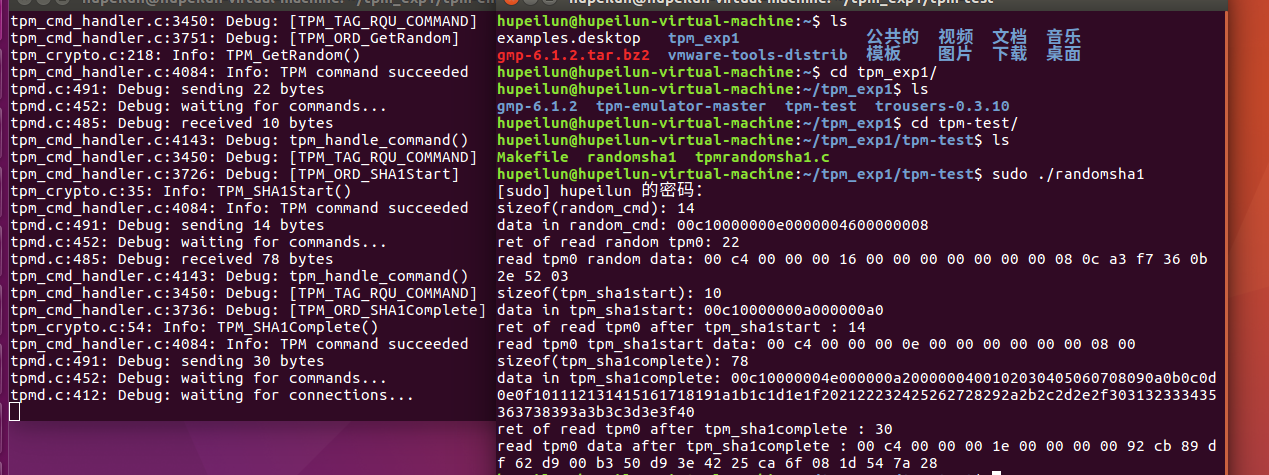
- 启动TPM后新开一个终端,输入指令
sudo tcsd -e -f启动tss - 启动成功后如下图:

- 新开一个端口,设置授权,授权方式由编写的代码中的参数决定
tpm_takeownership setup an owner on the system's TPM (via the TPM_TakeOwnership API). This operation requires the TPM to be enabled and can be restricted by tpm_setownable. The command will prompt for owner and SRK passwords and confirmations of these if executed without either of the -well-known options, otherwise, a secret of all zeros is set for the requested password. After the second confirmation, be patient as the command may take awhile.

-h, --help

    Display command usage info.

-v, --version

    Display command version info.

-l, --log [none|error|info|debug]

    Set logging level.

-u, --unicode

    Use TSS UNICODE encoding for passwords to comply with applications using TSS popup boxes

-y, --owner-well-known

    Set a secret of all zeros (20 bytes of zeros) as the owner's secret.

-z, --srk-well-known

    Set a secret of all zeros (20 bytes of zeros) as the SRK secret.
启动成功后,编写一个测试程序,测试TSS是否正常使用

- 使用
gcc指令进行编译,-l去链接需要使用到的库,生成可执行文件。- 例如:我有一个
test.c文件需要编译。可以使用gcc test.c -o exp -ltspi - 大概的意思就是链接
tspi编译test.c生成 一个可执行文件exp
- 例如:我有一个
- 注意不同的代码,需要链接的库可能不一样所以
-l后面跟的库名根据代码而定。
关于测试代码:
- TPM的测试代码老师会给
- TSS 测试代码看这里
[安装中遇见的问题参考我的这一篇博客](http://www.cnblogs.com/hpl20155329/p/8586362.html)
[TPM交互看这篇博客](http://www.cnblogs.com/hpl20155329/p/9013003.html)
还有就是参考老师的实验指导书。
初学可信 若有错误之处 ,请大佬们指出。
TPM及TSS协议栈的安装使用的更多相关文章
- linux tpm 测试完整记录,亲测有效。
没有tpm芯片,采用模拟器的方式来测试. 实验环境:内核版本 3.10.0-327 软件包准备: 内网,没有仓库,自己网上下载: 1. cmake-3.9.6-Linux-x86_64.tar.gz ...
- 【TPM】tpm搭建基础指南
pm君第一次通过各种摸索,成功搭建了tpm模拟环境,本篇博客记录了如何去搭建tpm模拟环境,希望能给大家一些帮助. 参考资料(推荐看) ubuntu下安装TPM模拟器 --成功步骤:参考至第2节-安装 ...
- vTPM环境部署(ubuntu)
注:1.系统:ubuntu16.04LTS2.ISO镜像:/home/huanghaoxiang/ubuntu-server.iso3.IMG路径:/home/TPM-Machine4.Login: ...
- [蓝牙] 2、蓝牙BLE协议及架构浅析&&基于广播超时待机说广播事件
第一章 BLE基本概念了解 一.蓝牙4.0和BLE区别 蓝牙4.0是一种应用非常广泛.基于2.4G射频的低功耗无线通讯技术.蓝牙低功耗(Bluetooth Low Energy ),人们又常称之为 ...
- tmux resurrect 配置
概述 tmux 用了很长时间了, 快捷键定制了不少, 唯一的遗憾是没法保存 session, 每次关机重开之后, 恢复不到之前的 tmux session. 虽然也能忍受, 但是每天都手动打开之前的 ...
- cc2650-cc2640蓝牙开发准备手记
1.安装 ti关键库,首先BLE 协议栈,安装那种协议栈,首先你要用哪种库(源代码,官方例子基于哪种用哪个就会好,不然会出现不兼容), 2.然后安装flash_programmer2(有1,.2个版 ...
- 【蓝牙】蓝牙,调试 hcitool与gatttool实例
Bluez协议栈在安装完以后,会提供两个命令行调试工具,hcitool与gattool,我们可以根据提供的工具来轻松的调试我们的蓝牙设备,调试BLE设备时,需要获取root权限. 蓝牙设备的开启与关闭 ...
- NS3网络仿真(7): Wifi节点
快乐虾 http://blog.csdn.net/lights_joy/ 欢迎转载,但请保留作者信息 在上一节中.我们仿真了一个总线型网络,这一节尝试将上一节中的n0变成一个无线的AP.再连上几个节点 ...
- 安装Windows11操作系统(不需要绕过TPM检测脚本等) - 初学者系列 - 学习者系列文章
Windows11操作系统是去年微软公司的最新力作.对于该操作系统的安装,网上有很多的教程了.这次主要写的是不需要绕过TPM检测操作安装Windows11操作系统. 1. 制作启动U盘: ...
随机推荐
- profile,bashrc,.bash_profile,.bash_login,.profile,.bashrc,.bash_logout浅析 Part 2
profile,bashrc,.bash_profile,.bash_login,.profile,.bashrc,.bash_logout浅析 Part 2 by:授客 QQ:103355312 ...
- 巧用foxmail同步qq邮箱的通讯录
如果您企业使用的qq企业邮箱,那么你在web端登陆邮箱并填写收件人时,发现QQ邮箱是可以自动完成,并且中文名称自动完成. 如何在使用foxmail邮件客户端的情况下也同步这些邮箱信息呢?需要七步,看截 ...
- Linux运维之shell脚本基础知识
1.bash中的算术运算 let运算符 [root@:vg_adn_tidbCkhsTest ~/tidb-bench/sysbench]#echo $i [root@:vg_adn_tidbCkhs ...
- 通过sqli-labs学习sql注入——基础挑战之less1-3
首先,先看一些基础知识吧!!!!本人只是初学者,记录一下自己的学习过程,有什么错误之处请指出,谢谢!大佬请绕过!!!! url编码:一般的url编码其实就是那个字符的ASCII值得十六进制,再在前面加 ...
- DevExpress09、SimpleButton、CheckButton、DropDownButton、HScrollBar控件和VScrollBar控件
SimpleButton控件 使用SimpleButton控件, 创建一个Button按钮, 可以通过其Image属性添加图片: 该控件与WinForm自带的Button按钮类似: 效果如下: Che ...
- kudu基础入门
1.kudu介绍 1.1 背景介绍 在KUDU之前,大数据主要以两种方式存储: (1)静态数据: 以 HDFS 引擎作为存储引擎,适用于高吞吐量的离线大数据分析场景.这类存储的局限性是数据无法进行随机 ...
- PyQt5--ShowTips
# -*- coding:utf-8 -*- ''' Created on Sep 13, 2018 @author: SaShuangYiBing ''' import sys from PyQt5 ...
- Nginx防hashdos模块使用帮助
经过上周一周朋友们帮忙测试和bug fix,nginx_http_hashdos_module已经达到可以线上使用的水平,下面是使用记录. 下载 #wget --no-check-certificat ...
- 投稿核心期刊、中文重要期刊、SCI二区及以上期刊目录
大家在研究生期间想必均经历过投稿核心期刊的烦恼,不知道哪些是核心期刊,那些是普通期刊,万一选的不对岂不是浪费了时间,因此小顾在网络上收集了了2018北大核心期刊目录及全国中文重要期刊目录和SCI二区及 ...
- python创建目录保存文件
创建目录 在Python中可以使用os.mkdir()函数创建目录(创建一级目录). 其原型如下所示: os.mkdir(path) 其参数path 为要创建目录的路径. 例如要在D盘下创建hello ...