Win10 安装 digits
安装caffe配置python接口
接下来就按照官方教程来安装了。。。
1. If the installation process complains compiler not found, you need to install Microsoft Visual C++ Compiler for Python 2.7, downloaded at (https://www.microsoft.com/en-us/download/details.aspx?id=44266). We recommend installing it by
msiexec /i VCForPython27.msi ALLUSERS=1
如果提示找不到python 路径,则 python python_path.py
import sys

from _winreg import *

# tweak as necessary

version = sys.version[:3]

installpath = sys.prefix

regpath = "SOFTWARE\\Python\\Pythoncore\\%s\\" % (version)

installkey = "InstallPath"

pythonkey = "PythonPath"

pythonpath = "%s;%s\\Lib\\;%s\\DLLs\\" % (

installpath, installpath, installpath

)

def RegisterPy():

    print "begin RegisterPy "

    try:

        print "open key : %s"%regpath

        reg = OpenKey(HKEY_CURRENT_USER, regpath)

    except EnvironmentError as e:

        try:

            reg = CreateKey(HKEY_CURRENT_USER, regpath)

            SetValue(reg, installkey, REG_SZ, installpath)

            SetValue(reg, pythonkey, REG_SZ, pythonpath)

            CloseKey(reg)

        except:

            print "*** EXCEPT: Unable to register!"

            return

        print "--- Python", version, "is now registered!"

        return

    if (QueryValue(reg, installkey) == installpath and

        QueryValue(reg, pythonkey) == pythonpath):

            CloseKey(reg)

            print "=== Python", version, "is already registered!"

            return CloseKey(reg)

    print "*** ERROR:Unable to register!"

    print "*** REASON:You probably have another Python installation!"

def UnRegisterPy():

    #print "begin UnRegisterPy "

    try:

        print "open HKEY_CURRENT_USER key=%s"%(regpath)

        reg = OpenKey(HKEY_CURRENT_USER, regpath)

        #reg = OpenKey(HKEY_LOCAL_MACHINE, regpath)

    except EnvironmentError:

        print "*** Python not registered?!"

        return

    try:

       DeleteKey(reg, installkey)

       DeleteKey(reg, pythonkey)

       DeleteKey(HKEY_LOCAL_MACHINE, regpath)

    except:

       print "*** Unable to un-register!"

    else:

       print "--- Python", version, "is no longer registered!"

if __name__ == "__main__":

    RegisterPy()
2. 安装Graphviz, Graphviz is available at (www.graphviz.org/Download.php). Please note this site is not always available online. The installation directory can not contain space, so don't install it under the regular 'c:\Program Files (x86)' directory. Try something like 'c:\graphviz' instead. When the installation directory contains space, pydot could not launch the dot.exe file, even it has no problem finding it. Add the c:\graphviz\bin directory to your PATH.
3. Clone DIGITS from github.com (https://github.com/nvidia/digits). From the command prompt (run as administrator) and cd to DIGITS directory. Then type
python -m pip install -r requirements.txt
4. You may see error about Pillow, like ValueError: jpeg is required unless explicitly disabled using --disable-jpeg, aborting If this happens, download Pillow Windows Installer (Pillow-3.1.1.win-amd64-py2.7.exe) at https://pypi.python.org/pypi/Pillow/3.1.1 and run the exectuables. After installing Pillow in the above way, run
python -m pip install -r requirements.txt
After the above command, check if all required Python dependencies are met by comparing requirements.txt and output of the following command.
python -m pip list
5. If gevent is not v1.0.2, install it from the whl file, downloaded previously from (http://www.lfd.uci.edu/~gohlke/pythonlibs/).
python -m pip install gevent-1.0.2-cp27-none-win_amd64.whl
6. It should uninstall the gevent you had, and install gevent 1.0.2.
Because readline is not available in Windows, you need to install one additional Python package.
python -m pip install pyreadline
值得提出的是最后一步运行digits的命令发生了变化
python -m digits
然后是缺什么安装什么。。。
例如:
No module named wtforms
pip install wtforms
Invalid version: 'CAFFE_VERSION'
 windows/caffe/caffe.vcxproj

     <PostBuildEvent>

        <Command>"$(ScriptsDir)\FixGFlagsNaming.cmd" "$(OutDir)" $(Configuration)</Command>

      </PostBuildEvent>

 +    <ClCompile>

 +      <PreprocessorDefinitions>NDEBUG;%(PreprocessorDefinitions);CAFFE_VERSION=1.0.0-rc3</PreprocessorDefinitions>

 +    </ClCompile>

    </ItemDefinitionGroup>

    <ItemGroup>

      <ClCompile Include="..\..\tools\caffe.cpp" />

 windows/pycaffe/pycaffe.vcxproj

   <ItemDefinitionGroup>

      <ClCompile>

        <DisableSpecificWarnings>4003</DisableSpecificWarnings>

 +      <PreprocessorDefinitions Condition="'$(Configuration)|$(Platform)'=='Release|x64'">NDEBUG;%(PreprocessorDefinitions);CAFFE_VERSION=1.0.0-rc3</PreprocessorDefinitions>

      </ClCompile>

      <PreBuildEvent>

        <Command>"$(ScriptsDir)\PythonPreBuild.cmd" "$(SolutionDir)" "$(ProtocDir)" "$(OutDir)"</Command>
No module named flask.ext.socketio
pip install flask-socketio
pip install -I Flask==0.10.1
pip install flask-wtf
No module named lmdb
pip install lmdb
最后 python -m digits 启动
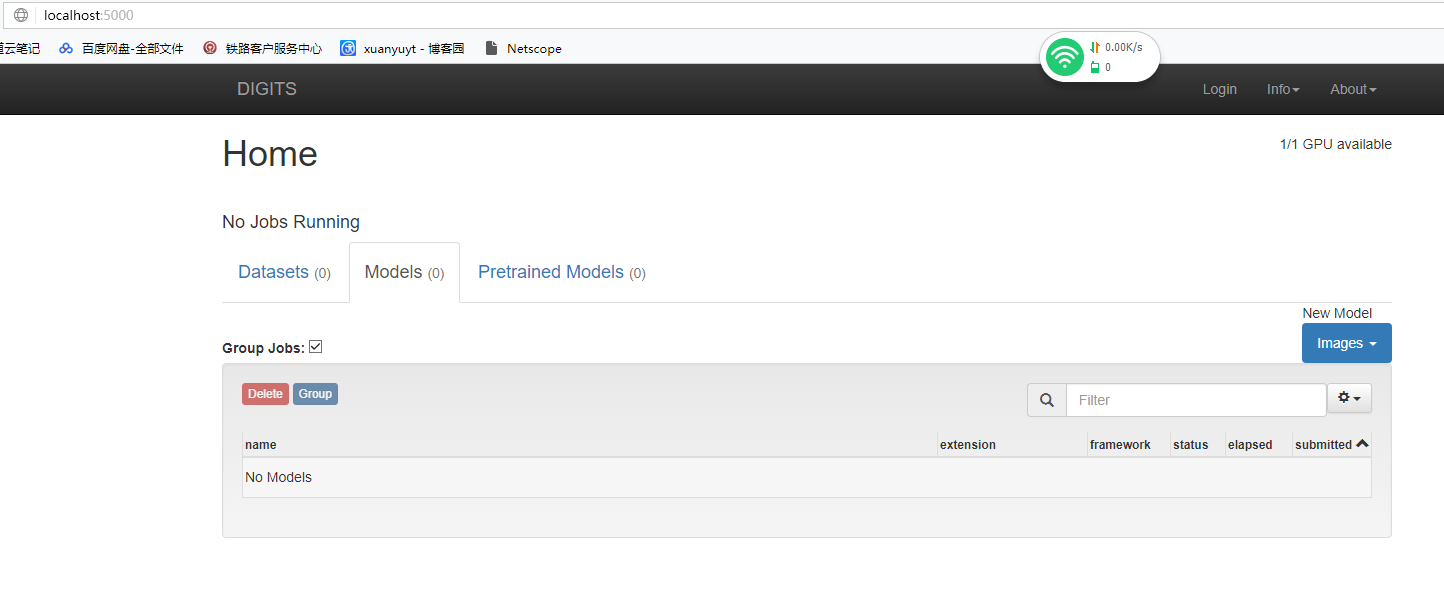
打开浏览器输入: localhost:5000 就可以看到
运行mnist实例
一、准备数据,这里感谢此博文,也可以参照官方教程
原始数据需要的是图片,但网上提供的mnist数据并不是图片格式的数据,因此我们需要将它转换成图片才能运行。
digits提供了一个脚本文件,用于下载mnist, cifar10 和cifar100 三类数据,并转换成png格式图片。文件路径为:
DIGITS-master/download_data/__main__.py
我们先在当前用户的根目录下,新建一个mnist文件夹用来保存mnist图片。
cd C:\DIGITS-master\digits\download_data
然后执行脚本
python __main__.py mnist mnist
__main__.py 带两个参数,第一个为数据集名称(可设置为mnist, cifar10或cifar100),第二个为输出路径(mnist)
执行成功后,会在mnist文件夹下,生成两个文件夹(train文件夹和test文件夹),每个文件夹下面就是我们需要的图片(10类分别放在10个子文件夹内),同时还生成了对应在图片列表文件train.txt和test.txt

接下来,在浏览器上运行digits, 点击左边Dataset模块的"Image"按钮选择“classification", 创建一个dataset
数据集
手写体MNIST数据集的原始数据格式为:png,每幅图像大小为:28×28,包含70K个手写体数字,共10类,其中60K为训练用样本(train+val),10K的测试样本(test)。本例中,从训练样本中随机抽取25%的数据作为验证集(val),使用digits生成的数据信息如下:
| 数据集属性 | 值 |
|---|---|
| Image Type | Grayscale |
| Image Encoding | png |
| Image Dimensions | 28×28 |
| Number of Categories | 10 |
| Number of Training Images | 45002 |
| Number of Validation Images | 14998(25% of 60000) |
| Number of test Images | 10000 |
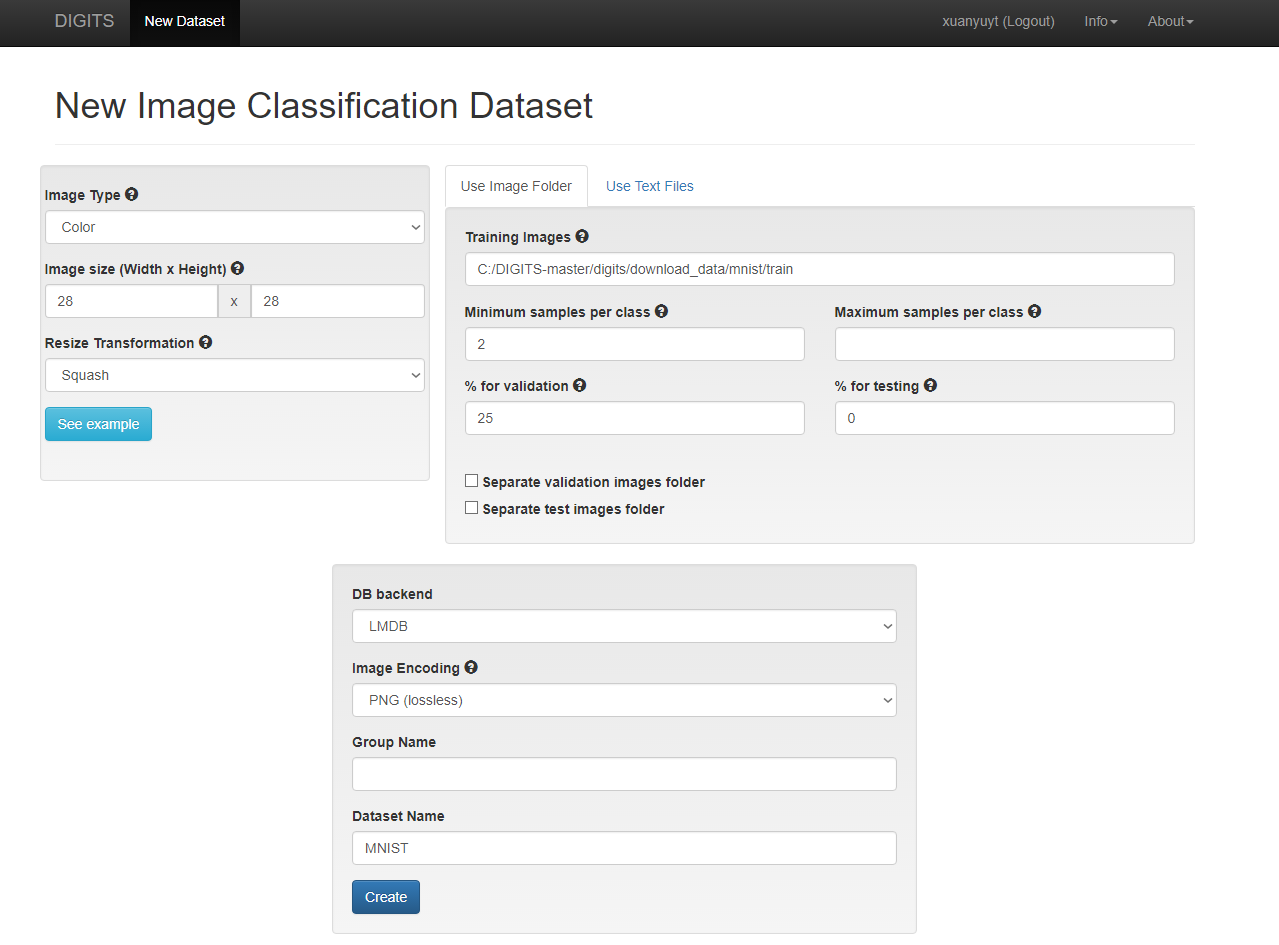
在这个页面的左边,可以设置图片是彩色图片还是灰度图片,如果提供的原始图片大小不一致,还可用Resize Transformation功能转换成一致大小 。从页面中间可以看出,系统默认将训练图片中的25%取出来作为验证集(for validation)。
如果想把用来测试的图片,也生成lmdb, 则把“ separate test image folder" 这个选项选上。
全部设置好后,点击"create" 按钮,开始生成lmdb数据。
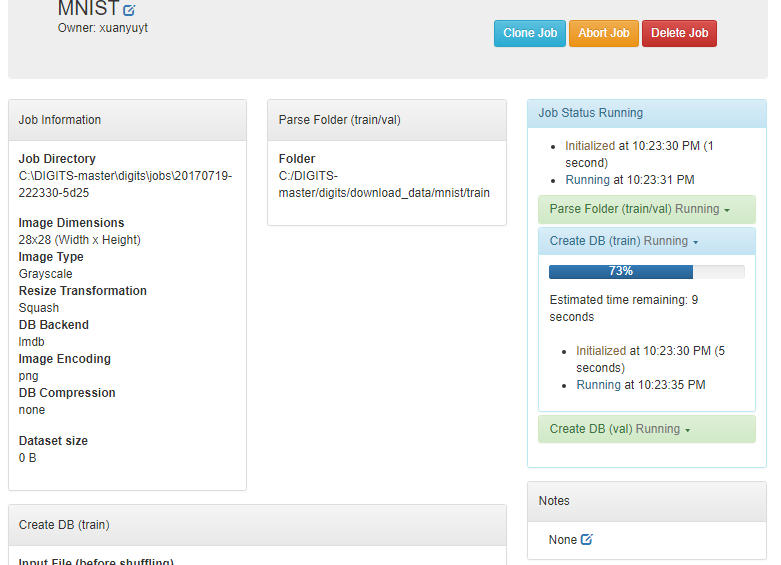
注意左上角的Job Directory(工作目录),生成的lmdb文件就放在这个目录下面,大家最好打开这个目录去看看,看一下生成了些什么文件,了解一下运行原理。

在这个界面,我们还可以可视化查看训练和测试的图片,如下图:

train.txt里面存放的是所有训练图片的列表清单,柱状图清晰地显示了10类样本各自的数量。点击" Explorer the db” 即可查看图片。
最后,点击最左上角“ DIGITS" 链接回到网站根目录。
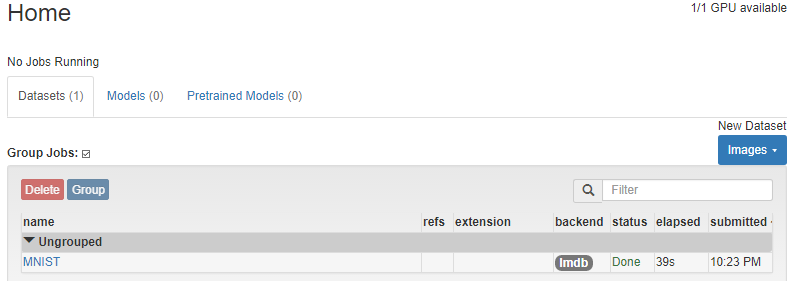
经过前面的操作,我们就把数据准备好了。接下来继续。。。
二、训练一个model,这里感谢此博文,也可以参考官方教程
右击右边Models模块的” Images" 按钮 ,选择“classification"
在打开页面右下角可以看到,系统提供了一个caffe model,分别为LeNet, AlexNet, GoogLeNet, 如果使用这三个模型,则所有参数都已经设置好了,就不用再设置了。
模型参数
模型选择LeNet(Original Paper 1998)
| Solver Options | 意义 | 示例值 | solver.prototxt | 计算 |
|---|---|---|---|---|
| Training epochs | 迭代代数:将训练数据反复送入网络训练的次数 | 30(单位次数) | max_iter | (Training epochs)×(numtrainsamples/batchsizetrain)),如30*(45002/64)=21120 |
| Snapshot interval (in epochs) | 快照间隔:是指训练多少次后进行一次快照记录 | 1(单位次数) | snapshot | (numtrainsamples/batchsizetrain)×(Snapshotinterval),如:(45002/64)*1=704 |
| Validation interval (in epochs) | 验证间隔 | 1(单位次数) | test_interval | (numtrainsamples/batchsizetrain)∗(Validationinterval),如:(45002/64)*1=704 |
| Random seed | 权重随机初始化种子 | [none] | - | - |
| Batch size | 批处理大小 | [network defaults],网络默认值,训练:64,测试100 | - | - |
| Solver type | 优化方法 | Stochastic Gradient Descent (SGD) | solver_type | SGD |
| Base Learning Rate | 学习率 | 0.01 | base_lr | 0.01 |
| Policy | 学习率策略 | Step Size | lr_policy | “step” |
| Step Size | 步长 | 33% | stepsize | max_iter*Step Size,如:21120×33%=6970 |
| Gamma | Gamma参数 | 0.1(单位0.005) | gamma | 0.1 |
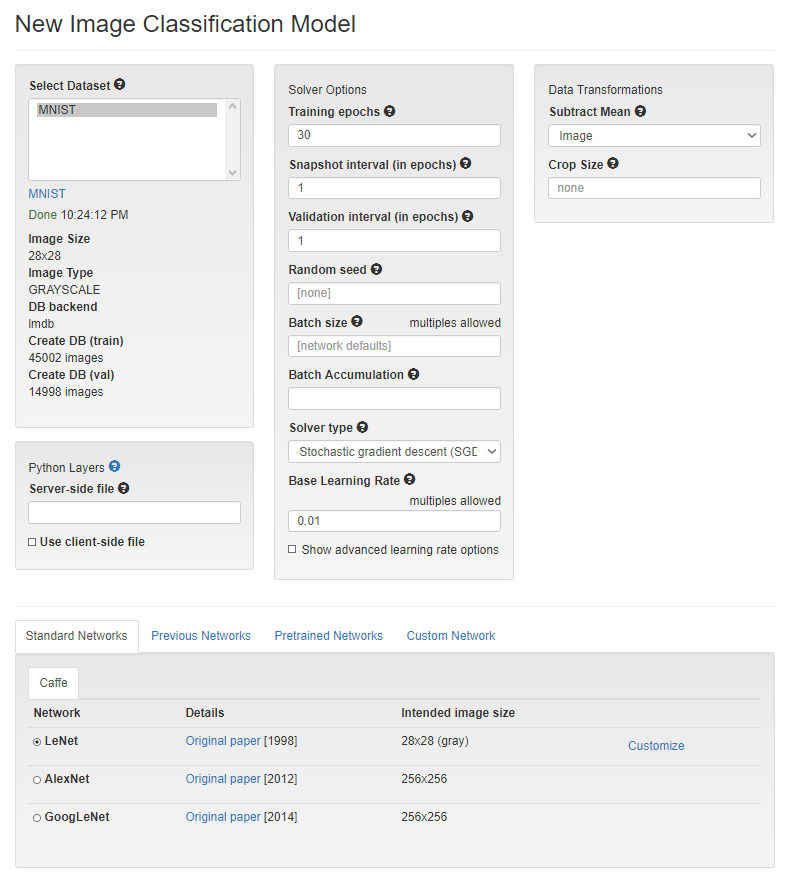
在下面,系统为我们列举出了本机所带的显卡,我们可以选择其中一块进行运行。
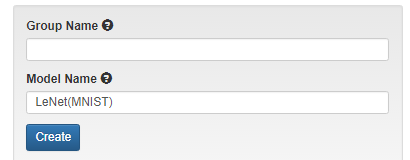
在最下面,输入一个model name, 就可以点击create 按钮了。如果有些选项不对,会有错误提示,很人性化。
在训练过程页面,左上角显示了生成的配置文件名称 (放在job目录文件下,默认路径为:C:/DIGITS-master/digits/jobs/),运行过程中保存的caffemodel快照也保存在这个目录下面。
页面中显示了训练和测试的数据信息、训练所用的时间和gpu使用情况以及一些实时化图表,可以看到训练阶段的loss, 测试阶段的loss和accuracy,相当方便,甚至还可以看到学习率的变化情况,吃惊吧!

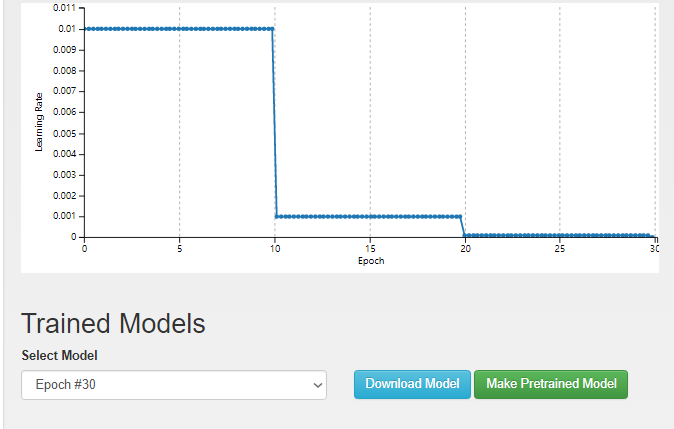
模型训练好后,直接就可以在下面进行测试了。
测试新来的图片
将页面拖到最下面,选择Upload imager按钮,加载一幅测试图片。在 C:/DIGITS-master/digits/download_data/mnist/test 下面有大量的测试图片,随便选一张就可以了。
也可以通过在Image URL方框里,输入一张网上的图片地址来进行测试。
加载好测试图片,在 Show visualizations and statistics 选择模式框上点上勾。
点击”Classify One" 按钮就可以开始测试了。
如果你不是对一张图片进行测试,而是一个测试集,则是在" Upload Image List"这个地方,选择测试图片的列表清单文件(如 val.txt)
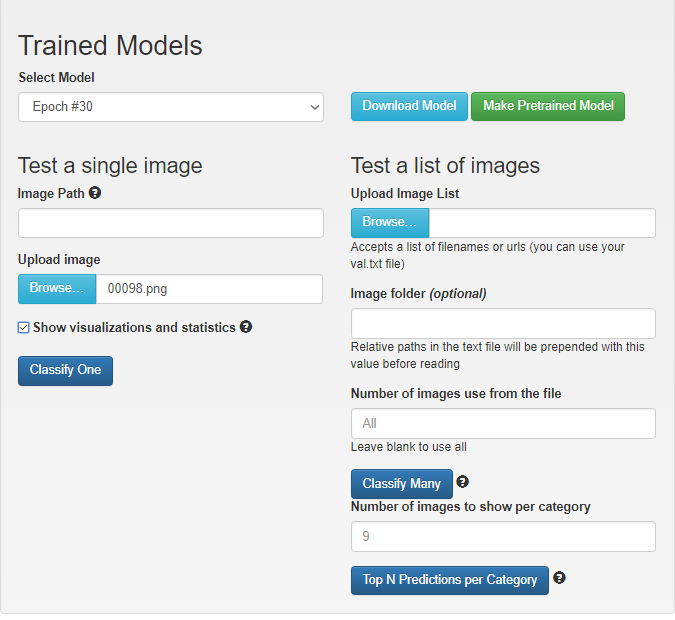
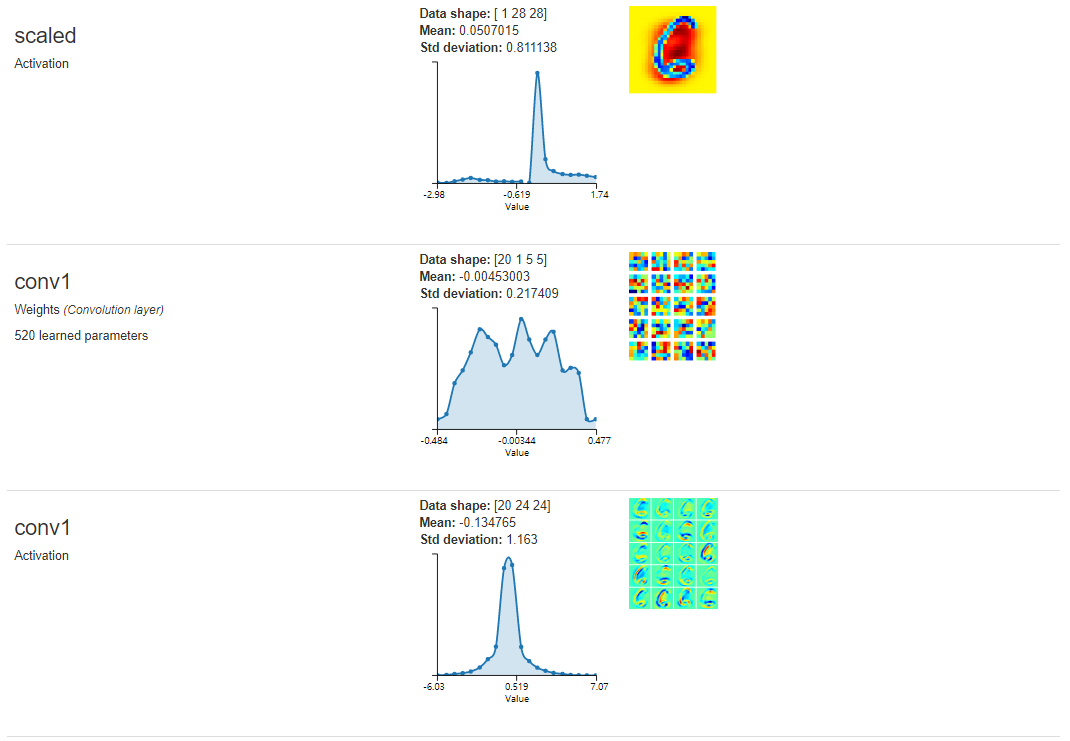
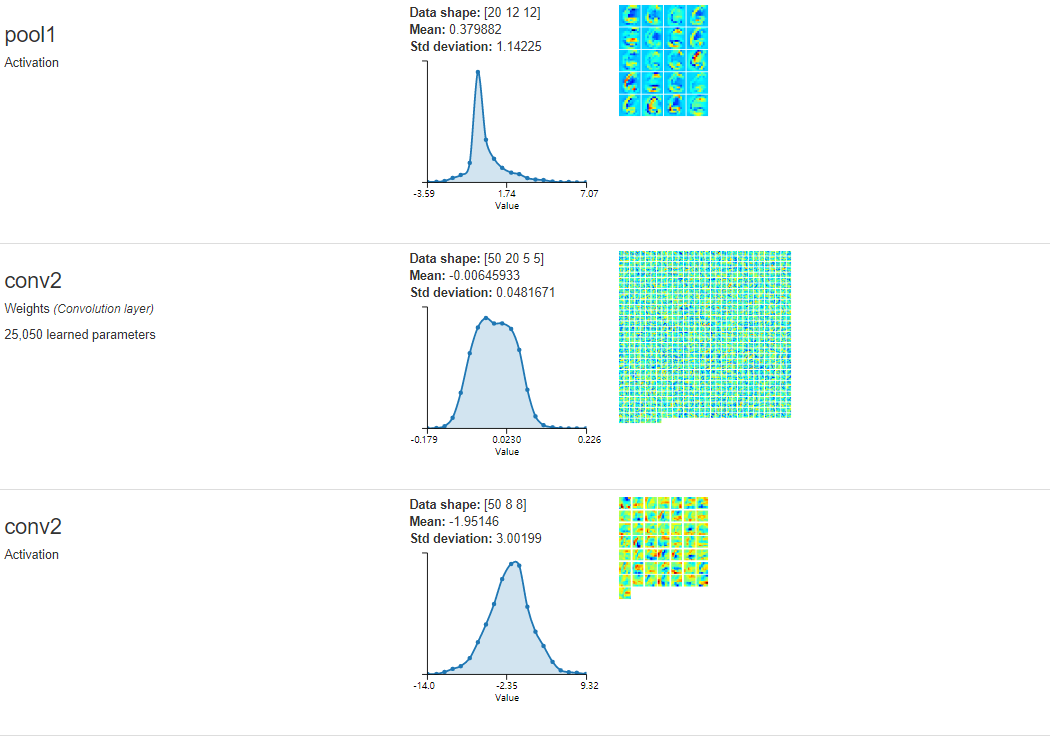
系统会弹出一个新的页面,显示top-5的分类情况 ,同时digits还提供了测试数据与权值的可视化和统计信息。


Win10 安装 digits的更多相关文章
- Win10安装.net framework 4.0失败提示已是操作系统一部分如何解决
有位用户因为工作需求,所以想在win10系统电脑中安装microsoft .net framework 4.0.可是在安装过程中却失败了,还遇到提示"Microsoft.net framew ...
- Win10安装framework3.5
.NET少不了framewrok,其版本也比较多,默认情况下win7及上版本没有安装framework3.5,但有些软件又需要它,比如arcgis软件在安装时会检测是否存在3.5,如果没有,将不会正常 ...
- Win10安装安卓ADB驱动
Win10安装安装ADB驱动 Step1: 首先在黄色感叹号的ADB Interface 点右键菜单,选择“更新驱动程序软件”菜单. 在弹出“更新驱动程序软件”窗口中,选择下面一项“浏览计算机以查找驱 ...
- win10安装sqlserver2016准备
win10安装sql server2016需要注意: 一.下载jdk-8u121-windows-x64.exe这个安装,这个检测不通过会影响安装 二.把万维网服务的这个去掉,这个影响数据库实例的创建 ...
- win10安装Tensorflow
win10安装Tensorflow 前提: 保证你的pip>=8.1版本 否则利用python -m pip install -U pip 进行升级,或下载pip源文件 确定你的显卡是否支持c ...
- win10安装配置jdk的环境变量
换了个硬盘,用上了win10,发现win10安装好jdk之后,配置环境变量这个相对于win7和xp还是有那么一丢丢区别的,趁着夜色,随笔一记. 1.安装jdk之后,或者也可以用之前安装好的文件夹,先记 ...
- win10安装ubuntu16.04及后续配置
原文地址:https://www.jianshu.com/p/842e36a8255c UEFI 模式下win10安装ubuntu16.04双系统教程 - baobei0112的专栏 - CSDN博客 ...
- win10安装ubuntu16.04双系统历程
目录 win10安装ubuntu16.04双系统 历程 安装时间 安装准备 安装过程 其他问题 win10安装ubuntu16.04双系统 历程 安装时间 2018.11.30 安装准备 u盘(格式化 ...
- Win10安装.NetFamework3.5
步骤1:装载Win10安装镜像 本人用的是"cn_windows_10_multiple_editions_x64_dvd_6848463.iso" 如图,我把镜像装载到H盘; 步 ...
随机推荐
- 832. Flipping an Image
class Solution { public: vector<vector<int>> flipAndInvertImage(vector<vector<int& ...
- boost--signal
1.signals2库 signals2库实现了线程安全的观察者模式,在signals2中观察者模式被称为信号/插槽(signals/slots),它是一种函数回调机制.一个信号可以关联一个或多个插槽 ...
- 图解TCP/IP(一)
IP(Internet Protocol) IP/ICMP -数据链路层的主要作用是在互连同一种数据链路的节点之间进行包传递.而一旦跨越多种数据链路,就需要借助网络层. -配备IP的设备,但是不进行路 ...
- nginx自动启动脚本
#!/bin/bash#nginx - this script starts and stops the nginx daemin # # chkconfig: - 85 15 # descripti ...
- ubuntu 出现device not managed,解决方法
1. 编辑/etc/NetworkManager/NetworkManager.conf: sudo vi /etc/NetworkManager/NetworkManager.conf将其中的man ...
- Kafka C++客户端库librdkafka笔记
目录 目录 1 1. 前言 2 2. 缩略语 2 3. 配置和主题 3 3.1. 配置和主题结构 3 3.1.1. Conf 3 3.1.2. ConfImpl 3 3.1.3. Topic 3 3. ...
- 1.7.8使用return 停止线程
package com.cky.thread; /** * Created by edison on 2017/12/3. */ public class MyThread12 extends Thr ...
- Mysql之数据表操作
数据表操作: 查看当前数据库中所有的表: show tables; 查看当前使用数据库: select database(); 使用数据表: use 表名; 创建数据表: create table 数 ...
- 1、从C语言到C++
1.面向对象的C++ c++是在C语言的基础上发展起来的一门语言,C++是即支持结构化程序编程又支持面向对象程序设计的混合型语言.他一方面提供了对C的兼容性,保持了C的简介.高效,接近汇编语言的特点, ...
- Scala_方法、函数、柯里化
方法.函数.柯里化 方法 声明方法: scala> def m1(x:Int,y:Int):Int = { | x + y | }m1: (x: Int, y: Int)Ints ...