
KindEditor的简单使用,以及上传图片预览图片,用户删除图片后的数据处理(重点),以及 BeautifulSoup,shutil两模块了解
KindEditor的简单了解
http://www.cnblogs.com/wupeiqi/articles/6307554.html
简单使用:
<div class="comm">

                <form method="POST" enctype="multipart/form-data">

                    {% csrf_token %}

                    <div style="margin: 0 auto;" class="comment-area">

                        <div class="model {% if req.session.user_info %} hide {% endif %}">

                            您需要登录后才可以回帖 <a href="/login.html">登录</a> | <a href="/register.html">立即注册</a>

                        </div>

                        <textarea name="content" id="content"></textarea>

                    </div>

                    <div class="comment-sub">

                        <span>已输入23/</span>

                        <button type="button" class="btn btn-primary btn-sm" {% if not req.session.user_info %} disabled="disabled" {% endif %}>提交回复</button>

                    </div>

                </form>

            </div>
HTML前端
    <script>

        $(function () {

            initKindEditor();

        });

        function initKindEditor() {

            var kind = KindEditor.create('#content', {

                width: '100%',       // 文本框宽度(可以百分比或像素)

                height: '300px',     // 文本框高度(只能像素)

                resizeType:,    //不允许修改大小

                uploadJson: '/uploadfile.html', //文件上传路径

                extraFileUploadParams: {        //文件上传的额外参数

                    'csrfmiddlewaretoken': '{{ csrf_token }}'  //令牌使用,在POST数据上传时需要的

                },

                //filePostName:'img',  修改上传的文件名字,默认是imgFile

                //fileManagerJson: '/kind/file_manager/', //指定浏览远程图片的服务器端程序。

                allowPreviewEmoticons: true,    //预览表情

                allowImageUpload: true, //允许图片上传

                items: [

                    'fontname', 'fontsize', '|', 'forecolor', 'hilitecolor', 'bold', 'italic', 'underline',

                    'removeformat', '|', 'justifyleft', 'justifycenter', 'justifyright', 'insertorderedlist',

                    'insertunorderedlist', '|', 'emoticons', 'image', 'link']  //编辑样式选择

            });

        }

    </script>
更多参数了解: http://kindeditor.net/docs/option.html
KindEditor的图片上传(临时目录):
                uploadJson: '/uploadfile.html', //文件上传路径

                extraFileUploadParams: {        //文件上传的额外参数

                    'csrfmiddlewaretoken': '{{ csrf_token }}' //令牌使用,在POST数据上传时需要的

                },

                //filePostName:'img',  修改上传的文件名字
这3个和图片上传有关(了解)
后台处理:
settings配置:
MEDIA_URL = '/static/uploads/'

MEDIA_ROOT=os.path.join(BASE_DIR, 'static/uploads')  #注意使用路径连接时后面的必须是相对路径

IMAGE_FIELDS = (

    'jpeg',

    'png',

    'gif',

    'jpg',

    'bmp',

)
>>> os.path.join("c:/mypy/","/da/dwa")

'c:/da/dwa'

>>> os.path.join("c:/mypy/","da/dwa")

'c:/mypy/da/dwa'

注意后面不能写成绝对路径,不然路径连接时会出错(可以想下linux等系统,不分盘符,'/'就是根路径),所以我们注意这里
补充os.path.join,路径拼接
url设置:
url(r'^uploadfile.html$',home.uploadFile,{"document_root": settings.MEDIA_ROOT,'web_root':settings.MEDIA_URL,'image_list':settings.IMAGE_FIELDS}),
文件上传处理业务:
def handle_uploaded_file(fp,filePath,webPath,filename):  //fp文件指针,filepath是我们存放文件的基础目录, webpath是我们网站访问该图片的目录,filename是文件名

    if not os.path.exists(filePath):

        os.makedirs(filePath)

    with open(filePath+filename,'wb+') as destination:

        for chunk in fp.chunks():

            destination.write(chunk)      //写入文件

    return webPath+filename  //返回web访问的文件路径

def uploadFile(req,*args,**kwargs):

    if req.method != "POST":

        return redirect('/')

    status = {

        'error': ,

        'url': '',

        'message': ''

    }

    if req.FILES['imgFile']:

        file_name = str(req.FILES.get("imgFile"))

        from blog import settings

        if file_name.split('.')[-] in kwargs['image_list']:

            #先上传到临时文件夹中,然后在与用户提交的评论进行正则匹配,若是匹配到的数据,则移动到正常文件夹中,剩余的图片(用户在编辑时自己删除了的)我们清空该文件夹,并替换用户的图片路径即可

            #static_path = "comment/"+str(datetime.date.today())+'/'

            static_path = "temp/"+str(req.session['user_info']['id'])+'/' #以用户id为文件名的临时文件夹

            web_path = kwargs['web_root'] + static_path

            file_path = kwargs['document_root']+'/'+ static_path

            ret = handle_uploaded_file(req.FILES['imgFile'],file_path,web_path,file_name)

            status['url'] = ret

        else:

            status['error']=

            status['message']="文件格式不正确"

    else:

        status['error'] =

        status['message'] = "文件上传失败"

    return HttpResponse(json.dumps(status))
KindEditor的图片处理思路:
为用户先创立一个临时文件夹,在用户上传评论时,与img标签进行正则匹配,若是匹配到的数据,我们则移入到正确的路径,然后将临时文件夹删除即可。
其他思路可以参考:
http://kindeditor.net/view.php?bbsid=5&postid=6049
基本上2种解决方案:

. 先把图片提交到临时目录,提交到服务器后,用正则提取图片路径,和上传过的图片比较,如果用到就把图片移动到实际目录。

. 采用图片空间管理,让用户自己删除多余的图片,一个用户的总容量限制就可以了,现在很多大网站都是这个做法。
或者:前端使用ajax进行删除,但是如果用户可以进行撤销操作,那么原来的图片使用ajax似乎不太正确:
http://kindeditor.net/view.php?bbsid=7&postid=6834&pagenum=1
大概思路:
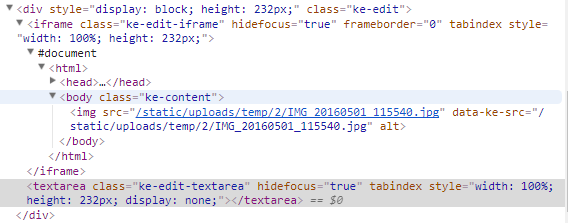
可以知道数据是使用iframe进行传输的:iframe无刷新上传文件:http://www.cnblogs.com/ssyfj/p/8533287.html(了解)
我们可以操作该对象,对img点击事件进行监听
$(".ke-edit-iframe")    //获取iframe对象

obj = $(".ke-edit-iframe") .contents()    //获取iframe中的document对象

$(obj).find("img")  //获取img元素对象,使用click等就可以进行监听,使用户点击使进行删除选项,同意则使用ajax进行删除

KindEditor的图片上传实现:
前端js
        $(function () {

            var Ke = new KindEdit_Class();

            Ke.initKindEditor();

            $(".btn_sub_comm").click(function(){

                Ke.submitData();

            })

        });
$(function(){...});
    function KindEdit_Class(){

            this.kind = null;

            this.initKindEditor = function () {

                this.kind = KindEditor.create('#content', {

                    width: '100%',       // 文本框宽度(可以百分比或像素)

                    height: '300px',     // 文本框高度(只能像素)

                    resizeType:,

                    uploadJson: '/uploadfile.html', //文件上传路径

                    extraFileUploadParams: {        //文件上传的额外参数

                        'csrfmiddlewaretoken': '{{ csrf_token }}'

                    },

                    //filePostName:'img',  修改上传的文件名字

                    //fileManagerJson: '/kind/file_manager/', //指定浏览远程图片的服务器端程序。

                    allowPreviewEmoticons: true,    //预览表情

                    allowImageUpload: true, //允许图片上传

                    items: [

                        'fontname', 'fontsize', '|', 'forecolor', 'hilitecolor', 'bold', 'italic', 'underline',

                        'removeformat', '|', 'justifyleft', 'justifycenter', 'justifyright', 'insertorderedlist',

                        'insertunorderedlist', '|', 'emoticons', 'image', 'link']

                });

            }

            this.submitData = function(){

                this.kind.sync();//将KindEditor的数据同步到textarea标签。

                if($("#content").text().trim() == ""){

                    alert("请填写内容")

                    return;

                }

                var that=this

                $.ajax({

                    url:"/submitComment.html",

                    data:$("#fm").serialize(),

                    dataType:"json",

                    type:"POST",

                    success:function(data){

                        if(!data.error){

                            {#alert(data.message)#}

                            {#that.kind.html("")#}

                            {#$("#content").text("")#}

                            location.href=""

                        }

                    }

                })

            }

        }
function KindEdit_Class(){...}
后台图片处理:
    url(r'^uploadfile.html$',home.uploadFile,{"document_root": settings.MEDIA_ROOT,'web_root':settings.MEDIA_URL,'image_list':settings.IMAGE_FIELDS}),

    url(r'^submitComment.html$',home.comment,{"base_dir": settings.BASE_DIR,'web_root':settings.MEDIA_URL,"document_root": settings.MEDIA_ROOT}),
url
import datetime,json,os

from utils import CustomXss

from repository.Model import CommentModel as CmModels

from web.form.comment import CommentForm
部分模块导入
1.图片上传到临时文件夹:
def handle_uploaded_file(fp,filePath,webPath,filename):

    if not os.path.exists(filePath):

        os.makedirs(filePath)

    with open(filePath+filename,'wb+') as destination:

        for chunk in fp.chunks():

            destination.write(chunk)

    return webPath+filename
def handle_uploaded_file(fp,filePath,webPath,filename) 图片保存
def uploadFile(req,*args,**kwargs):

    if req.method != "POST":

        return redirect('/')

    status = {

        'error': ,

        'url': '',

        'message': ''

    }

    if req.FILES['imgFile']:

        file_name = str(req.FILES.get("imgFile"))

        from blog import settings

        if file_name.split('.')[-] in kwargs['image_list']:

            #先上传到临时文件夹中

            #static_path = "comment/"+str(datetime.date.today())+'/'

            static_path = "temp/"+str(req.session['user_info']['id'])+'/' #以用户id为文件名的临时文件夹

            web_path = kwargs['web_root'] + static_path

            file_path = kwargs['document_root']+'/'+ static_path

            ret = handle_uploaded_file(req.FILES['imgFile'],file_path,web_path,file_name)

            status['url'] = ret

        else:

            status['error']=

            status['message']="文件格式不正确"

    else:

        status['error'] =

        status['message'] = "文件上传失败"

    return HttpResponse(json.dumps(status))
def uploadFile(req,*args,**kwargs) 获取图片信息,进行处理后返回json数据
2.用户提交数据后处理数据:
def comment(req,*args,**kwargs):

    if req.method=="GET":

        return redirect('/')

    form = CommentForm({'comment':req.POST['content'],})

    status = {

        'error':,

        'message':"回复成功",

    }

    if not form.is_valid():

        status['error']=

        status['message']="评论字数过长"

        return HttpResponse(json.dumps(status))

    Xss = CustomXss.XSSFilter(**{'content':req.POST['content']})

    #要移动到的目录

    moveToDir = kwargs['document_root'] + '/' +"comment/" + str(datetime.date.today()) + '/'

    #网站根目录

    baseDir = kwargs['base_dir']

    #网站相对目录

    webPath = kwargs['web_root'] + moveToDir

    #临时文件夹目录

    static_path = "temp/" + str(req.session['user_info']['id']) + '/'

    tempDir = kwargs['document_root'] + '/' + static_path

    #修改img标签src属性,并且移动图片路径  临时文件夹---->固定目录

    Xss.clean_img(**{'baseDir':baseDir,"moveToDir":moveToDir,'webDir':webPath,'tempDir':tempDir}) #获取到了img src列表

    #XSS过滤

    content = Xss.process()  # 获取到了用户的评论数据

    #模型添加评论数据:

    models = CmModels.CommentModel()

    models.add(**{'art_id_id':int(req.POST['art_id']),'user_id_id':int(req.session['user_info']['id']),'comment':content,'parent_id':int(req.POST.get("parent_id",))})

    return HttpResponse(json.dumps(status))
from repository import models

class CommentModel(object):

    comment = None

    model = None

    Insert_Fields = ['art_id_id','user_id_id','ctime','parent_id','comment']

    # Update_Fields = ['theme','title','summary',]   评论不允许修改

    def __new__(cls, *args, **kwargs):

        if not cls.comment:

            cls.comment = super(CommentModel,cls).__new__(cls)

        return cls.comment

    def __init__(self):

        if CommentModel.model is None:

            CommentModel.model = models.Comment.objects

    def add(self,**where):

        data = {}

        for item in where.keys():

            if item in self.Insert_Fields:

                data[item]=where[item]

        ret = CommentModel.model.create(

            **data

        )

        return ret

    def search(self,**where):

        data = CommentModel.model.filter(**where).all()

        return data
CommentModel
补充:http://python.jobbole.com/86506/
    # __new__: 对象的创建,是一个静态方法,第一个参数是cls。(想想也是,不可能是self,对象还没创建,哪来的self)

    # __init__ : 对象的初始化, 是一个实例方法,第一个参数是self。

    # __call__ : 对象可call,注意不是类,是对象。

    # 先有创建,才有初始化。即先__new__,而后__init__。  http://www.jb51.net/article/85719.htm
from bs4 import BeautifulSoup

import shutil,os

#单例模式实现

class XSSFilter(object):

    __instance = None   #__开头是私有成员,为了不让用户在外面直接访问,将变量进行了重新命名将__spam修改为_classname__spam,导致用户在外面是无法使用__spam的,但是用户一定要使用,那么可以使用替换后的名字_className__spam

    def __new__(cls, *args, **kwargs):  #http://python.jobbole.com/86506/

        if not cls.__instance:

            obj = object.__new__(cls)    #父类执行,创建对象

            cls.__instance = obj

        return cls.__instance

    def __init__(self,*args,**kwargs):

        # XSS白名单

        self.valid_tags = {

            "font": ['color', 'size', 'face', 'style'],

            'b': [],

            'div': [],

            "span": [],

            "table": [

                'border', 'cellspacing', 'cellpadding'

            ],

            'th': [

                'colspan', 'rowspan'

            ],

            'td': [

                'colspan', 'rowspan'

            ],

            "a": ['href', 'target', 'name'],

            "img": ['src', 'alt', 'title','height','width'],

            'p': [

                'align'

            ],

            "pre": ['class'],

            "hr": ['class'],

            'strong': []

        }

        self.soup = BeautifulSoup(kwargs['content'], 'lxml')  # https://blog.csdn.net/kikaylee/article/details/56841789

    #进行数据处理

    def process(self):

        #遍历所有节点

        for tag in self.soup.find_all(recursive=True): #遍历所有子孙节点

            if tag.name not in self.valid_tags:

                tag.hidden = True

                if tag.name not in ['html', 'body']:

                    tag.hidden = True

                    tag.clear()  #清除该节点

                continue

            attr_rules = self.valid_tags[tag.name]

            keys = list(tag.attrs.keys())

            for key in keys:

                if key not in attr_rules:

                    del tag[key]

        return self.soup.renderContents()

    def clean_data(self,*args,**kwargs):

        '''

            回调函数,

            用户进行扩展

        '''

        pass

    def clean_img(self,*args,**kwargs):

        '''

            回调函数,

            用户进行扩展

            #baseDir,  要移动到绝对目录(项目根目录)

            #moveToDir 要移动到的固定目录

            #webDir    前端显示时需要的相对目录

            #tempDir   临时文件夹目录

        '''

        # 这里就直接写在这里,不在进行继承调用了

        move_dir = kwargs['moveToDir']  #移动的目录路径

        temp_dir = kwargs['tempDir']    #临时文件夹

        if not os.path.isdir(temp_dir):

            return

        if not os.path.isdir(move_dir):

            os.makedirs(move_dir)

        #处理img的src属性

        for tag in self.soup.find_all('img'):  # 遍历所有图片节点

            src = tag.attrs['src']

            root_dir = kwargs['baseDir']+src  #文件路径

            print(root_dir,move_dir)

            shutil.move(root_dir,move_dir)

            tag.attrs['src'] = kwargs['webDir']+src.split('/')[-]

        #删除临时文件夹

        shutil.rmtree(temp_dir)
单例模式实现xss过滤,以及图片数据处理(重点)
BeautifulSoup了解(最主要的功能是从网页抓取数据)
Beautiful Soup提供一些简单的、python式的函数用来处理导航、搜索、修改分析树等功能。它是一个工具箱,通过解析文档为用户提供需要抓取的数据,因为简单,所以不需要多少代码就可以写出一个完整的应用程序。

Beautiful Soup自动将输入文档转换为Unicode编码,输出文档转换为utf-8编码。你不需要考虑编码方式,除非文档没有指定一个编码方式,这时,Beautiful Soup就不能自动识别编码方式了。然后,你仅仅需要说明一下原始编码方式就可以了。

Beautiful Soup已成为和lxml、html6lib一样出色的python解释器,为用户灵活地提供不同的解析策略或强劲的速度
Beautiful Soup简介
shutil模块了解(文件和文件夹进行移动、复制、删除、重命名,主要依赖os模块和shutil模块)
KindEditor的简单使用,以及上传图片预览图片,用户删除图片后的数据处理(重点),以及 BeautifulSoup,shutil两模块了解的更多相关文章
- 简单实现JS上传图片预览功能
HTML代码 <div class="upload"> <input type="button" class="btn" ...
- HTML5上传图片预览
<!DOCTYPE html> <html> <head> <title>HTML5上传图片预览</title> <meta http ...
- jquery实现上传图片预览(需要浏览器支持html5)
jquery实现上传图片预览(需要浏览器支持html5) <!DOCTYPE html PUBLIC "-//W3C//DTD XHTML 1.0 Transitional//EN&q ...
- HTML5上传图片预览功能
HTML5上传图片预览功能 HTML代码如下: <!-- date: 2018-04-27 14:41:35 author: 王召波 descride: HTML5上传图片预览功能 --> ...
- JS 上传图片 + 预览功能(一)
JS 上传图片 + 预览功能 <body> <input type="file" id="fileimg1" style="disp ...
- js兼容火狐显示上传图片预览效果
js兼容火狐显示上传图片预览效果[谷歌也适用] <!doctype html> <html> <head> <meta content="text/ ...
- 通过HTML5 FileReader实现上传图片预览功能
原文:http://www.htmleaf.com/ziliaoku/qianduanjiaocheng/201706224590.html 在上传图片到服务器之前,我们希望可以预览一下要上传的图片. ...
- 去除ckeditor上传图片预览中的英文字母
去除ckeditor上传图片预览中的英文字母 CKEDITOR.replace('text', { filebrowserImageUploadUrl : 'upload_img.do', langu ...
- HTML5 上传图片预览
html5出现之前如果需要上传图片预览 一般都是先上传到服务器然后远程预览 html5出现之后 有个filereader 解决了这问题 //选中图片之后 $("#fileAddPic&q ...
随机推荐
- Edit Distance问题在两种编程范式下的求解
本文已授权 [Coding博客](https://blog.coding.net) 转载 前言 Edit Distance,中文叫做编辑距离,在文本处理等领域是一个重要的问题,以下是摘自于百度百科的定 ...
- Sqlserver_分组
create table orders ( id int, orderName varchar() ) go create table cars ( id ,) , ordersid int, pna ...
- VS 远程调试 Azure Web App
如果能够远程调试部署在 Azure 上的 Web App,将会极大的提高我们修复 bug 的效率.Visual Studio 一贯以功能强大.好用著称,当然可以通吃基于 Azure 应用的创建.发布和 ...
- OpenGL 笔记 <2> Compiling and Linking a shader program
Preface 这一节所有的主要内容都在一个OpenGL库文件中<LoadShaders.h> ,只需要用LoadShader()函数进行加载即可.但是由于老是出错,所以自己实现了一下,也 ...
- UE4添加植被Foliage Type
在UE4中的地形渲染上不可避免的需要添加植被,而如果采取手动添加StaticMesh植被的方式则会浪费大量的时间精力. UE4提供了一种批量添加地面植被类型的方式Foliage Type.在编辑器内容 ...
- 机器学习之线性回归使用Python和tensorflow实现
导入依赖包 import tensorflow as tf import numpy as np import matplotlib.pylab as plt from pylab import mp ...
- coinmarketcap前20之cardano卡尔达诺(ADA艾达币)
1. 在开始讲述cardano前,我先说说自己在coinmarketcap前20系列的"学习方法". 最初,我把前20做了一个简单表格,不做任何功课的基础上,记录自己对它们的简要认 ...
- VC++ 屏蔽掉警告
使用VC6.0在开发程序的时候经常会遇到很多警告,很麻烦,也很耽误时间,可以使用如下方法屏蔽掉警告 在StdAfx.h 中 #define VC_EXTRALEAN 下面增加:#pragma warn ...
- mac 安装 tomcat 配置
前面的话:记录下 Mac 安装配置 Tomcat 过程 1. 下载安装 Tomcat 下载 Tomcat 地址(官方地址):https://tomcat.apache.org/download-80. ...
- Python进阶量化交易场外篇4——寻找最优化策略参数
新年伊始,很荣幸笔者的<教你用 Python 进阶量化交易>专栏在慕课专栏板块上线了,欢迎大家订阅!为了能够提供给大家更轻松的学习过程,笔者在专栏内容之外会陆续推出一些手记来辅助同学们学习 ...