
sersync+rsync实现服务器文件实时同步
sersync+rsync实现服务器文件实时同步
一、为什么要用rsync+sersync架构?
、sersync是基于inotify开发的,类似于inotify-tools的工具

、sersync可以记录下被监听目录中发生变化的(包括增加、删除、修改)具体某一个文件或者某一个目录的名字,然后使用rsync同步的时候,只同步发生变化的文件或者目录
二、rsync+inotify-tools与rsync+sersync架构的区别?
、rsync+inotify-tools

a、inotify只能记录下被监听的目录发生了变化(增,删,改)并没有把具体是哪个文件或者哪个目录发生了变化记录下来;

b、rsync在同步的时候,并不知道具体是哪个文件或目录发生了变化,每次都是对整个目录进行同步,当数据量很大时,整个目录同步非常耗时(rsync要对整个目录遍历查找对比文件),因此效率很低

、rsync+sersync

a、sersync可以记录被监听目录中发生变化的(增,删,改)具体某个文件或目录的名字;

b、rsync在同步时,只同步发生变化的文件或目录(每次发生变化的数据相对整个同步目录数据来说很小,rsync在遍历查找对比文件时,速度很快),因此效率很高。

总结:

当同步的目录数据量不大时,建议使用rsync+inotify

当同步的目录数据量很大时(几百G甚至1T以上)文件很多时,建议使用rsync+sersync
架构:
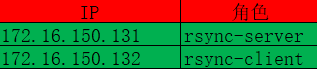
1.部署rsync服务(rsync-server服务器上配置)
yum install rsync -y #安装rsync,如果嫌yum版本过低也可以源码安装
#Rsync server

uid = root

gid = root

use chroot = no                         # 安全相关

max connections =                   # 并发连接数

timeout =                            # 超时时间(秒)

pid file =/var/run/rsyncd.pid           # 指定rsync的pid目录

lock file =/var/run/rsync.lock          # 指定rsync的锁文件【重要】

log file = /var/log/rsyncd.log          # 指定rsync的日志目录

ignore errors                             #忽略一些I/O错误

read only = false                       #设置rsync服务端文件为读写权限

list = false                            #不显示rsync服务端资源列表

hosts allow = 172.16.0.0/               #允许进行数据同步的客户端IP地址,可以设置多个,用英文状态下逗号隔开

hosts deny = 0.0.0.0/                 #禁止数据同步的客户端IP地址,可以设置多个,用英文状态下逗号隔开

auth users = rsync_backup               #执行数据同步的用户名,可以设置多个,用英文状态下逗号隔开

secrets file =/etc/rsync.password       #用户认证配置文件,里面保存用户名称和密码

#################################################

[www]                                   # 模块

comment = www

path = /data/www/

#################################################

[bbs]

comment = bbs

path = /data/bbs/

#################################################

[blog]

comment = blog

path = /data/blog/

#rsync_config____________end

:wq!  #保存,退出
echo "rsync_backup:123456">/etc/rsync.password #配置文件,添加以下内容
chmod /etc/rsync.password
rsync --daemon  #可以使用--config= 指定非标准路径下的配置文件

vim /etc/rc.local

# rsync server progress

/usr/bin/rsync --daemon
mkdir -p /data/{www,bbs,blog}
#rsync-client客户端配置
touch /etc/rsyncd.conf
 echo "">/etc/rsync.password

 chmod  /etc/rsync.password
mkdir -p /data/{www,bbs,blog}

touch /data/www/www.log /data/bbs/bbs.log  /data/blog/blog.log
[root@rsync-client www]# touch {..}.txt

[root@rsync-client www]# rsync  -avzP /data/www/ rsync_backup@172.16.150.131::www/   --password-file=/etc/rsync.password   #/data/www/表示本地需要同步的数据目录  rsync_backup@172.16.150.131::www表示服务端的指定名称的模块下  本条命令执行的操作为:将第一个路径参数下的文件同步到第二个路径参数下  即:推模式 调换路径则为:拉模式

sending incremental file list

./

.txt               %    .00kB/s    :: (xfr#, to-chk=/)

.txt               %    .00kB/s    :: (xfr#, to-chk=/)

.txt

               %    .00kB/s    :: (xfr#, to-chk=/)

sent  bytes  received  bytes  582.00 bytes/sec

total size is   speedup is 0.00

#rsync  -avzP /data/www rsync://rsync_backup@172.16.150.131/data/www   --password-file=/etc/rsync.password 第二种方法,直接指定路径

#rsync  -avzP /data/www rsync://rsync_backup@172.16.150.131/data/www/   --password-file=/etc/rsync.password #test为服务器上的目录

参数: --delete 无差异同步

          --bwlimit=KB/S  限速

           --exclude=PATTERN       exclude files matching PATTERN

           --exclude-from=FILE     read exclude patterns from FILE

           --include=PATTERN       don’t exclude files matching PATTERN

           --include-from=FILE     read include patterns from FILE

#此步骤必须成功才能进行下一步
tar fxzsersync2..4_64bit_binary_stable_final.tar.gz -C /usr/local/  #百度网盘链接: https://pan.baidu.com/s/11yL6HtZsblkZR8vSSIvzrw 提取码: tdam

cd /usr/local/

mv GNU-Linux-x86 sersync
cp sersync/confxml.xml  sersync/confxml.xml-bak

vim  sersync/confxml.xml

修改24--28行

          <localpath watch="/opt/tongbu">

              <remote ip="127.0.0.1" name="tongbu1"/>

              <!--<remote ip="192.168.8.39" name="tongbu"/>-->

              <!--<remote ip="192.168.8.40" name="tongbu"/>-->

          </localpath>

修改后的内容为:

         <localpath watch="/data/www">

             <remote ip="10.1.20.109" name="www"/>

         </localpath>

修改29--35行,认证部分(rsync密码认证)

         <rsync>

             <commonParams params="-artuz"/>

             <auth start="false" users="root" passwordfile="/etc/rsync.pas"/>

             <userDefinedPort start="false" port=""/><!-- port= -->

             <timeout start="false" time=""/><!-- timeout= -->

             <ssh start="false"/>

         </rsync>

修改后的内容如下:

         <rsync>

             <commonParams params="-artuz"/>

             <auth start="true" users="rsync_backup" passwordfile="/etc/rsync.password"/>

             <userDefinedPort start="false" port=""/><!-- port= -->

             <timeout start="true" time=""/><!-- timeout= -->

             <ssh start="false"/>

         </rsync>
/usr/local/sersync/sersync2  -d -r -o /usr/local/sersync/confxml.xml

配置sersync环境变量

echo"PATH=$PATH:/usr/local/sersync/">>/etc/profile

source /etc/profile
set the system param

execute:echo  > /proc/sys/fs/inotify/max_user_watches

execute:echo  > /proc/sys/fs/inotify/max_queued_events

parse the command param

option: -d     run as a daemon

option: -r     rsync all the local files to the remote servers before the sersync work

option: -o     config xml name:  ./confxml.xml

daemon thread num:

parse xml config file

XML Parsing error inside file './confxml.xml'.

Error: File not found

At line , column .
同步测试
set the system param

execute:echo  > /proc/sys/fs/inotify/max_user_watches

execute:echo  > /proc/sys/fs/inotify/max_queued_events

parse the command param

option: -d     run as a daemon

option: -r     rsync all the local files to the remote servers before the sersync work

option: -o     config xml name:  ./confxml-www.xml

daemon thread num:

parse xml config file

host ip : localhost    host port:

daemon start,sersync run behind the console

use rsync password-file :

user is    rsync_backup

passwordfile is     /etc/rsync.password

config xml parse success

please set /etc/rsyncd.conf max connections= Manually

sersync working thread   = (primary thread) + (fail retry thread) + (daemon sub threads)

Max threads numbers is:  = (Thread pool nums) + (Sub threads)

please according your cpu ,use -n param to adjust the cpu rate

------------------------------------------

rsync the directory recursivly to the remote servers once

working please wait...

execute command: cd /data/www && rsync -artuz -R --delete ./  --timeout= rsync_backup@10.1.20.109::www --password-file=/etc/rsync.password >/dev/null >&

run the sersync:

watch path is: /data/www
   、配置多个confxml.xml文件(比如:www、bbs、blog....等等)

    confxml-bbs.xml  confxml-blog.xml  confxml-www.xml(按照单个实例配置即可)

    、根据不同的需求同步对应的实例文件

    rsync -avzP /data/www/ rsync_backup@10.1.20.109::www/   --password-file=/etc/rsync.password

    rsync -avzP /data/bbs/ rsync_backup@10.1.20.109::bbs/   --password-file=/etc/rsync.password

    rsync -avzP /data/test/ rsync_backup@10.1.20.109::blog/   --password-file=/etc/rsync.passwor

分别启动即可
sersync+rsync实现服务器文件实时同步的更多相关文章
- CentOS 7 Sersync+Rsync 实现数据文件实时同步
rsync+inotify-tools与rsync+sersync架构的区别? 1.rsync+inotify-tools inotify只能记录下被监听的目录发生了变化(增,删,改)并没有把具体是哪 ...
- Sersync+Rsync实现数据文件实时同步
rsync+inotify-tools与rsync+sersync架构的区别1,rsync+inotify-tools只能记录下被监听的目录发生的变化(增删改)并没有把具体变化的文件或目录记录下来在同 ...
- linux下两台服务器文件实时同步方案设计和实现
inux下两台服务器文件实时同步方案设计和实现 假设有如下需求: 假设两个服务器: 192.168.0.1 源服务器 有目录 /opt/test/ 192.168.0.2 目标服务器 有目录 /o ...
- Centos 6.5 rsync+inotify 两台服务器文件实时同步
rsync和inotify是什么我这里就不在介绍了,有专门的文章介绍这两个工具. 1.两台服务器IP地址分别为: 源服务器:192.168.1.2 目标服务器:192.168.1.3 @todo:从源 ...
- Rsync+inotify实现文件实时同步#附shell脚本
强烈推荐先仔细看此文 https://segmentfault.com/a/1190000002427568 实验环境 centos 7.3 vm2:192.168.221.128 同步服务器 vm1 ...
- linux使用rsync、inotify-tools实现多台服务器文件实时同步
需求:将本地192.168.1.10上的/data/wwwroot目录同步到 1.来源服务器上安装rsync.inotify-tools yum -y install rsync yum -y ins ...
- python自动化运维-编写rsync+sersync安装脚本实现文件实时同步
rsync+sersync组合可以实时监听目录的变化,实现实时同步数据. 具体安装教程可查看:http://www.osyunwei.com/archives/7447.html. 安装着实有些复杂, ...
- Rsync + inotify 实现文件实时同步
Rsync 用来实现触发式的文件同步. Inotify-tools是一套组件,Linux内核从2.6.13版本开始提供了inotify通知接口,用来监控文件系统的各种变化情况,如文件存取.删除.移动等 ...
- linux下两台服务器文件实时同步方案实现-乾颐堂
假设有如下需求: 假设两个服务器: 192.168.0.1 源服务器 有目录 /opt/test/ 192.168.0.2 目标服务器 有目录 /opt/bak/test/ 实现的目的就是保持这两 ...
随机推荐
- Office 2010 打开文件后所有的格式成了时间的解决方法
最新不知道什么原因,每一个 Excel 文件打开后,时需的数据都成了时间格式. 而且改都改不了,改了后第二次打开又成了这个样子. 最后找到解决方法. 如下动画,将 [$F400] 数据格式删除就可以. ...
- Spring+SpringMVC+mybatis框架整合
1.jdbc.properties 1 driverClassName=com.mysql.jdbc.Driver 2 url=jdbc\:mysql\://127.0.0.1\:3306/slsal ...
- golang 原子操作函数
golang中的原子操作在sync/atomic package中. 下文以比较和交换操作函数为例,介绍其使用. CompareAndSwapInt32 比较和交换操作是原子性的. // Compar ...
- 记一次揪心的MySQL数据恢复过程
https://blog.csdn.net/poxiaonie/article/details/78304699 === 先说下背景,公司其中一个项目所有服务都部署在客户的机房内,机房较小,没有UPS ...
- Release Notes for XE5
开发者之前说明 http://docwiki.embarcadero.com/RADStudio/XE5/en/Release_Notes_for_XE5
- JAVA常量与变量
顺着箭头的转换为自动转换逆这箭头的转换为强制转换. 常量 关键字FINAL 命名为大写 标识符 1要以字母数字下划线和¥组成 2首字母不能为数字 3不能是JAVA的关键字和 保留字 4数据类型分为基本 ...
- sql server 拼接字段
方式一: --select @p_AllPARTOFCHECK = (select CAST(t.PARTOFCHECK as varchar)+'|' from QUEUEDETAIL t wher ...
- 【Darwin学习笔记】之获取系统处理器数量的方法
阅读Darwin源码的时候看到这个方法,感觉挺有用处,且考虑了多种平台下的实现方式,直接贴代码,以后说不定会用到~ 单一种平台下的实现方法可能很容易,但是把这些个系统都收集在一起,在一个函数中实现还是 ...
- JavaScript之图片操作6
上一篇写的关于放大镜的,可能在实际开发中用的不是很多,接下来将的图片无缝滚动在实际工作中就是用的比较多的了. 如上图,通过定时器控制图片无缝滚动,当鼠标悬浮时停止滚动,鼠标离开,滚动继续. 主要原理是 ...
- python列表中的值转换为字符串,及列表里的所有值拼接成一个字符串 的方法
后记: ls3='%'.join(ls2) 会把%加入拼接成的字符里面,同理,加入其它字符也一样,''空就是什么都不加,如上图 最后输出 1%我%22