假设做一个精美的Login界面(攻克了一EditText自带clear的功能,相似iphone的UITextField)
先上图:
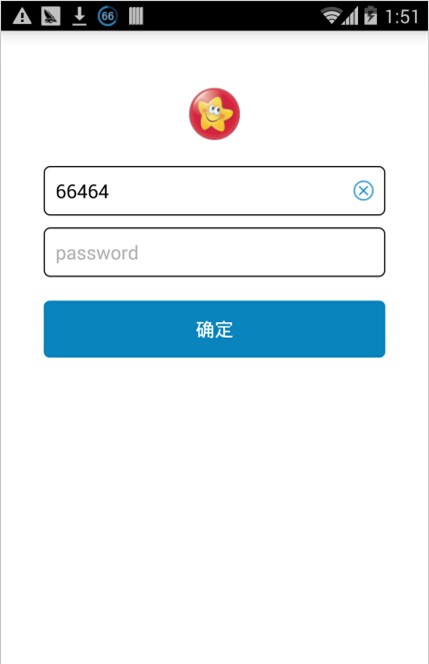
XML为:
<LinearLayout xmlns:android="http://schemas.android.com/apk/res/android"

    xmlns:tools="http://schemas.android.com/tools"

    android:layout_width="match_parent"

    android:layout_height="match_parent"

    android:background="#FFFFFF"

    android:paddingBottom="@dimen/activity_vertical_margin"

    android:paddingLeft="@dimen/activity_horizontal_margin"

    android:paddingRight="@dimen/activity_horizontal_margin"

    android:paddingTop="@dimen/activity_vertical_margin"

    android:orientation="vertical"

    android:layout_gravity="center_horizontal">

      <ImageButton

        android:id="@+id/btn"

        android:layout_width="wrap_content"

        android:layout_height="wrap_content"

        android:layout_marginTop="30dp"

        android:background="@null"

        android:layout_gravity="center_horizontal"

        android:src="@drawable/btn_icon"

        android:textColor="#0A84BD"

        android:textSize="16sp" />

    <EditText

        android:id="@+id/custom_edittext"

        android:layout_width="fill_parent"

        android:layout_height="wrap_content"

        android:layout_marginLeft="@dimen/btn_margin_left_right"

        android:layout_marginRight="@dimen/btn_margin_left_right"

        android:background="@drawable/animation_edit_background"

        android:gravity="left|center_vertical"

        android:hint="username"

        android:layout_marginTop="20dp"

        android:paddingLeft="10dp"

        android:paddingRight="10dp"

         android:maxLength="25"

        android:textColor="#000000"

        android:textColorHint="#AEAEAE"

        android:textSize="16sp" />

    <EditText

        android:id="@+id/password"

        android:layout_width="fill_parent"

        android:layout_height="wrap_content"

        android:layout_marginLeft="@dimen/btn_margin_left_right"

        android:layout_marginRight="@dimen/btn_margin_left_right"

        android:background="@drawable/animation_edit_background"

        android:gravity="left|center_vertical"

        android:hint="password"

        android:inputType="phone|numberDecimal"

        android:layout_marginTop="10dp"

        android:paddingLeft="10dp"

        android:paddingRight="10dp"

        android:maxLength="25"

        android:textColor="#000000"

        android:textColorHint="#AEAEAE"

        android:textSize="16sp" />

    <Button

        android:id="@+id/btn_confirm"

        android:layout_width="fill_parent"

        android:gravity="center"

        android:text="确定"

        android:layout_marginLeft="20dp"

        android:layout_marginRight="20dp"

        android:layout_height="wrap_content"

        android:layout_marginTop="20dp"

        android:background="@drawable/button_item_selector"

        android:textColor="#ffffff"

        android:textSize="16sp" />

</LinearLayout>
重要的是EditText和Button的样式:
关于EditText:
<shape xmlns:android="http://schemas.android.com/apk/res/android">

    <solid android:color="#FFFFFF" />

    <stroke

        android:width="1dp"

        android:color="#000000" />

    <corners android:radius="@dimen/default_button_radius" />

    <padding

        android:bottom="@dimen/default_button_padding"

        android:left="@dimen/default_button_padding"

        android:right="@dimen/default_button_padding"

        android:top="@dimen/default_button_padding" />

</shape>
Button:
<?xml version="1.0" encoding="utf-8"?

>

<shape xmlns:android="http://schemas.android.com/apk/res/android">

    <solid android:color="#0A84BD" />

    <corners android:radius="@dimen/default_button_radius" />

    <padding

        android:bottom="@dimen/default_button_padding"

        android:left="@dimen/default_button_padding"

        android:right="@dimen/default_button_padding"

        android:top="@dimen/default_button_padding" />

</shape>
让EditText自带clear的功能,能够用在EditText的右側增加一个clear的小图标来实现:
我们用setCompoundDrawablesWithIntrinsicBounds来做,这个函数是在控件的Left,Top,Right,Button设置图标。非常实用:
	final int btn_margin_left_right = this.getResources().getDimensionPixelSize(R.dimen.btn_margin_left_right);

		final EditText custom_edittext = (EditText) findViewById(R.id.custom_edittext);

		custom_edittext.addTextChangedListener(new TextWatcher() {

			@Override

			public void beforeTextChanged(CharSequence s, int start, int count, int after) {

			}

			@Override

			public void afterTextChanged(Editable s) {

			}

			@Override

			public void onTextChanged(CharSequence s, int start, int before, int count) {

				if (s.length() > 0) {

					custom_edittext.setCompoundDrawablesWithIntrinsicBounds(0, 0, R.drawable.search_bar_close_btn, 0);

				} else {

					custom_edittext.setCompoundDrawablesWithIntrinsicBounds(0, 0, 0, 0);

				}

			}

		});
为了捕捉用户点击clear图标的事件,要捕捉onTouch事件,在用户抬起手的时候推断假设手指的坐标在clear的图标那里,就清楚EditText的文字:
custom_edittext.setOnTouchListener(new View.OnTouchListener() {

            @Override

            public boolean onTouch(View v, MotionEvent event) {

                final int DRAWABLE_RIGHT = 2;

                if(event.getAction() == MotionEvent.ACTION_UP) {

                    Drawable[] compoundDrawables = custom_edittext.getCompoundDrawables();

                    if(compoundDrawables != null) {

                        Drawable image = compoundDrawables[DRAWABLE_RIGHT];

                        if(image != null) {

                            int leftMargin = custom_edittext.getRight() - custom_edittext.getPaddingRight() - image.getBounds().width() - btn_margin_left_right;

                            if(event.getX() >= leftMargin) {

                                if (custom_edittext != null && custom_edittext.getEditableText() != null) {

                                	custom_edittext.getEditableText().clear();

                                }

                            }

                        }

                    }

                }

                return false;

            }

});代码能够在http://blog.csdn.net/baidu_nod/article/details/37655327下载
假设做一个精美的Login界面(攻克了一EditText自带clear的功能,相似iphone的UITextField)的更多相关文章
- 运用HTML5+CSS3和CSS滤镜做的精美的登录界面
原始出处http://chenjinfei.blog.51cto.com/2965201/774865 <!DOCTYPE HTML> <html> <head> ...
- 用PreferenceActivity做一个标准的设置界面
最后接触到一个任务,做一个工厂设置,在我看来工厂设置不需要多美观,但是一定要方便修改,添加功能,再就是使用方便,我就想到了用PreferenceActivity,android系统的settings就 ...
- 假设做一个循环滚动UIScrollView
先上效果图: 首先初始化: - (void)viewDidLoad { //加入最后一张图 用于循环 int length = 4; NSMutableArray *tempArray = [NSMu ...
- 一个简单WPF登陆界面,包含记住密码,自动登录等功能,简洁美观
简介:这是一个自己以前用WPF设计的登陆界面,属于一个实验性的界面窗体,如果用于产品还很有不足.但也是有一点学习价值.后台代码略有复杂,但基本上都有注释 分类,略有代码经验的一般都能看懂. 登陆界面外 ...
- 用 JS 做一个数独游戏(二)
用 JS 做一个数独游戏(二) 在 上一篇博客 中,我们通过 Node 运行了我们的 JavaScript 代码,在控制台中打印出来生成好的数独终盘.为了让我们的数独游戏能有良好的体验,这篇博客将会为 ...
- 用bootstrap做一个背景可轮转的登录界面
用bootstrap做一个背景可轮转的登录界面 一.总结 一句话总结:用css3的动画的 @keyframes 规则,制作轮转图. 1.用bootstrap做一个背景可轮转的登录界面? a.动画部分用 ...
- 使用react-native做一个简单的应用-04界面主框架
欢迎界面搭建完毕,我们接下来需要做的就是搭建应用程序的主体框架啦.首先我们看一下首页的截图: 从图中看到,我将首页分为了三部分:用黑色矩形表示的头部,绿色表示的内容和红色表示的底部. 下面我们需要解决 ...
- Android UI组件----用相对布局RelativeLayout做一个登陆界面
[声明] 欢迎转载,但请保留文章原始出处→_→ 生命壹号:http://www.cnblogs.com/smyhvae/ 文章来源:http://www.cnblogs.com/smyhvae/p/3 ...
- 致敬学长!J20航模遥控器开源项目计划【开局篇】 | 先做一个开机界面 | MATLAB图像二值化 | Img2Lcd图片取模 | OLED显示图片
我们的开源宗旨:自由 协调 开放 合作 共享 拥抱开源,丰富国内开源生态,开展多人运动,欢迎加入我们哈~ 和一群志同道合的人,做自己所热爱的事! 项目开源地址:https://github.com/C ...
随机推荐
- python django中使用sqlite3数据库 存储二进制数据ByteArray
在python中使用sqlite3数据库存储二进制流数据ByteArray,在django使用sqlite3数据库时,有时候也要注意最好使用二进制流ByteArray插入字符串. 使用ByteArra ...
- 无语的Filezilla
之前也一直用filezilla,今天遇到个奇葩问题:在2008R2上装完filezilla server,本打算生成个证书用于SSL加密,没想到一直报错"Failed to initiali ...
- 实现DIV居中的几种方法
<!DOCTYPE html> <html> <head> <meta charset="UTF-8"> <title> ...
- The Definitive Guide To Django 2 学习笔记(二) 第二个View 动态内容
“Hello World”只是简单的展现了Django 基本的工作机制,但它不是动态的网页.第二个View我们将创建一个动态的网页,该页面上将展现当前的时间和日期. 该View需要做两件事,第一,计算 ...
- Centos版本 32或64位查看命令
[root@root nginx]# uname -a Linux root -.el6.x86_64 # SMP Fri Nov :: UTC x86_64 x86_64 x86_64 GNU/Li ...
- 尽管以C++为基础,但 Java 是一种更纯粹的面向对象程序设计语言
“尽管以C++为基础,但 Java 是一种更纯粹的面向对象程序设计语言”. 无论C++还是Java 都属于杂合语言.但在 Java 中,设计者觉得这种杂合并不象在 C++里那么重要.杂合语言 允许采用 ...
- MongoDB中关于查询条件中包括集合中字段的查询
要查询的数据结构例如以下: watermark/2/text/aHR0cDovL2Jsb2cuY3Nkbi5uZXQvZ2FvMzY5NTE=/font/5a6L5L2T/fontsize/400/f ...
- mysq for visual studio 1.1.1
https://cdn.mysql.com/Downloads/MySQLInstaller/mysql-visualstudio-plugin-1.1.1.msi
- Github基本操作的学习与温习
GitHub是最先进的分布式版本控制工具,下面是我学习中总结的操作流程,仅供参考 ----------------------------------------------------------- ...
- node读写Excel操作
目支持写Excel的node.js模块: node-xlsx: 基于Node.js解析excel文件数据及生成excel文件: excel-parser: 基于Node.js解析excel文件数据,支 ...