LCD驱动程序
学习目标:熟悉TFT LCD的概念,分层驱动工作原理和程序编写。
一、LCD 概念
1. 显示器数据组织格式
1)一幅图像成为一帧,每帧由多行组成,每行由多个像素组成。每个像素的颜色由若干位表示,对于256色LCD,每个像素由8位表示,称为8BPP。
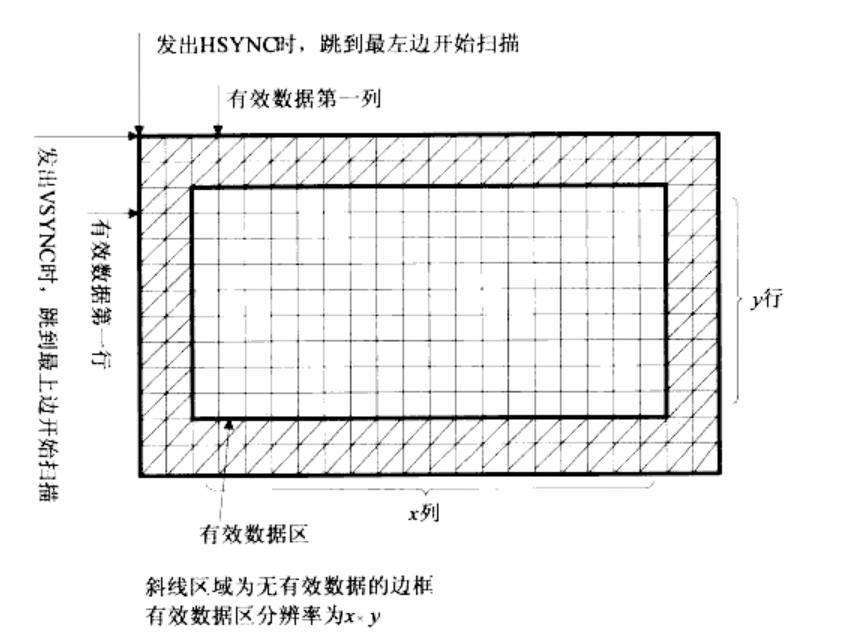
2)显示器呈Z字行的路线进行扫描显示,使用HSYNC、VSYNC控制扫描和跳转的路径;
2、操作过程
1)设置LCD的HSYNC、VSYNC\VCLK等信号的参数,并将帧内存的地址告诉LCD控制器,塔克自动的发起DMA传输,从帧内存中得到图像数据,出现在数据总线VD[23:0]上。我们只需要将显示的图像数据写入帧内存中即可。
2)图像数据的存储:
例如:由三原色组建的256色(8BPP)显示模式,使用8位数据表示一个像素的颜色。但特殊的是,这8位数据用于表示在调色板中的索引值。这里的调色板使用256*16的内存,即使用16BPP的显示格式来表示对应各个索引值的颜色。因此,最终在LCD显示的仍为16BPP的数据。
内存数据和像素对应的关系为:
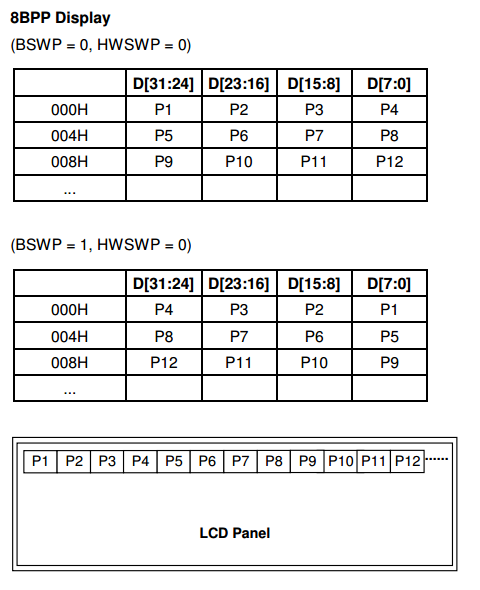
其中,P1、P2...为一个个的像素。
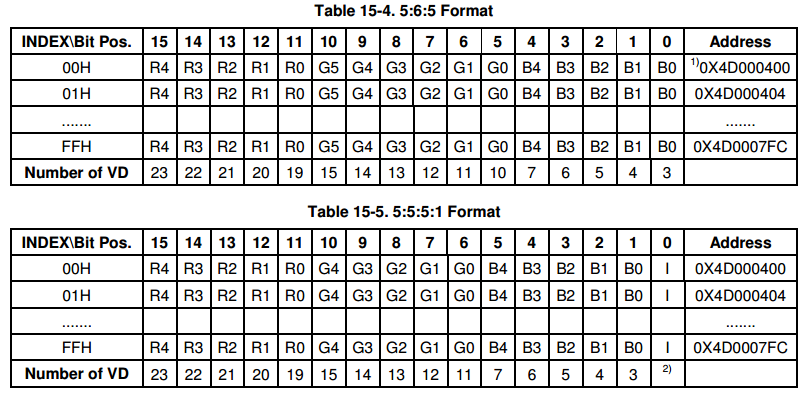
像素在调色板中的数据存放模式16BPP分为两种格式:5:6:5和5:5:5:1.即:
二、LCD驱动
1、帧缓冲设备
frambuffer设备层是对显示设备的一种抽象。其中,帧缓冲是Linux为显示设备提供的一个接口,它把一些显示设备描述成一个缓冲区,允许应用程序通过FrameBuffer定义好的接口访问这些图形设备,从而不用去关心具体的硬件细节。对于帧缓冲设备而言,只要在显示缓冲区与显示点对应的区域写入颜色值,对应的颜色就会自动的在屏幕上显示。
2、LCD作为一种帧缓冲设备,也是一种标准的字符型设备,对应于文件系统下/dev/fb%d设备文件。
3、驱动结构

首先分析一下driver/video/fbmem.c
1)进入__init fbmem_init(入口函数),主要创建了字符设备“fb”和类,利用cat 命令查看(cat /proc/devices),可看到该目录下的fb,主设备号为29。由于还没有注册LCD驱动,所以没有设备节点,
 static int __init fbmem_init(void)

 {

     create_proc_read_entry("fb", , NULL, fbmem_read_proc, NULL);

     //创建字符设备"fb"

     if (register_chrdev(FB_MAJOR,"fb",&fb_fops))

         printk("unable to get major %d for fb devs\n", FB_MAJOR);

     fb_class = class_create(THIS_MODULE, "graphics"); //创建类graphics"

     if (IS_ERR(fb_class)) {

         printk(KERN_WARNING "Unable to create fb class; errno = %ld\n", PTR_ERR(fb_class));

         fb_class = NULL;

     }

     return ;

 }
2)fb_fops结构体及open函数
 static const struct file_operations fb_fops = {

     .owner =    THIS_MODULE,

     .read  =    fb_read,

     .write =    fb_write,

     .ioctl =    fb_ioctl,

 #ifdef CONFIG_COMPAT

     .compat_ioctl = fb_compat_ioctl,

 #endif

     .mmap =       fb_mmap,

     .open =       fb_open,

     .release =    fb_release,

 #ifdef HAVE_ARCH_FB_UNMAPPED_AREA

     .get_unmapped_area = get_fb_unmapped_area,

 #endif

 #ifdef CONFIG_FB_DEFERRED_IO

     .fsync =    fb_deferred_io_fsync,

 #endif

 };
-->fb_open函数:
 static int fb_open(struct inode *inode, struct file *file)

 {

     int fbidx = iminor(inode); //取出设备次设备号

     struct fb_info *info;    //定义一个fb_info结构体

     int res = ;

     if (fbidx >= FB_MAX)

         return -ENODEV;

 #ifdef CONFIG_KMOD

     if (!(info = registered_fb[fbidx])) // 在次设备里面得到fb_info结构信息(lcd的驱动信息)赋值给info

         try_to_load(fbidx);

 #endif /* CONFIG_KMOD */

     if (!(info = registered_fb[fbidx]))

         return -ENODEV;

     if (!try_module_get(info->fbops->owner))

         return -ENODEV;

     file->private_data = info;

     if (info->fbops->fb_open) {    //如果该设备info结构体有open函数,就执行registered_fb[fbidx]->fbops->fb_open

         res = info->fbops->fb_open(info,);

         if (res)

             module_put(info->fbops->owner);

     }

     return res;

 }
由于fb设备(帧缓冲设备)主设备号固定,不同设备以次设备号进行区分,执行该设备open函数时,最终指向的是对应设备的open函数。
接下来看一下fb_read函数:
 static ssize_t

 fb_read(struct file *file, char __user *buf, size_t count, loff_t *ppos)

 {

     unsigned long p = *ppos;

     struct inode *inode = file->f_path.dentry->d_inode;

     int fbidx = iminor(inode);               //取出设备次设备号

     struct fb_info *info = registered_fb[fbidx];  //定义并获取设备的fb_info结构体

     u32 *buffer, *dst;

     u32 __iomem *src;

     int c, i, cnt = , err = ;

     unsigned long total_size;

     if (!info || ! info->screen_base)

         return -ENODEV;

     if (info->state != FBINFO_STATE_RUNNING)

         return -EPERM;

     if (info->fbops->fb_read)

         return info->fbops->fb_read(info, buf, count, ppos); //如果该设备fb_info结构体有read函数,就执行registered_fb[fbidx]->fbops->fb_read

     total_size = info->screen_size;

     if (total_size == )

         total_size = info->fix.smem_len;

     if (p >= total_size)

         return ;

     if (count >= total_size)

         count = total_size;

     if (count + p > total_size)

         count = total_size - p;

     buffer = kmalloc((count > PAGE_SIZE) ? PAGE_SIZE : count,

              GFP_KERNEL);

     if (!buffer)

         return -ENOMEM;

     src = (u32 __iomem *) (info->screen_base + p);

     if (info->fbops->fb_sync)

         info->fbops->fb_sync(info);

     while (count) {

         c  = (count > PAGE_SIZE) ? PAGE_SIZE : count;

         dst = buffer;

         for (i = c >> ; i--; )

             *dst++ = fb_readl(src++);

         if (c & ) {

             u8 *dst8 = (u8 *) dst;

             u8 __iomem *src8 = (u8 __iomem *) src;

             for (i = c & ; i--;)

                 *dst8++ = fb_readb(src8++);

             src = (u32 __iomem *) src8;

         }

         if (copy_to_user(buf, buffer, c)) {

             err = -EFAULT;

             break;

         }

         *ppos += c;

         buf += c;

         cnt += c;

         count -= c;

     }

     kfree(buffer);

     return (err) ? err : cnt;

 }
由以上程序可知,read的调用和open类似。都依赖于对应设备的fb_info结构体info,在程序中是由registered_fb[fbidx]数组获取的。
3)最后,看一下registered_fb[fbidx]数组的定义,位于register_framebuffer函数中。
 int register_framebuffer(struct fb_info *fb_info)

 {

     int i;

     struct fb_event event;

     struct fb_videomode mode;

     if (num_registered_fb == FB_MAX)

         return -ENXIO;

     num_registered_fb++;

     for (i =  ; i < FB_MAX; i++)

         if (!registered_fb[i])

             break;

     fb_info->node = i;

     fb_info->dev = device_create(fb_class, fb_info->device,MKDEV(FB_MAJOR, i), "fb%d", i);//创建设备节点,名称为fbi,主设备号为FB_MAJOR 29,次设备号为i

     if (IS_ERR(fb_info->dev)) {

         /* Not fatal */

         printk(KERN_WARNING "Unable to create device for framebuffer %d; errno = %ld\n", i, PTR_ERR(fb_info->dev));

         fb_info->dev = NULL;

     } else

         fb_init_device(fb_info);

     if (fb_info->pixmap.addr == NULL) {

         fb_info->pixmap.addr = kmalloc(FBPIXMAPSIZE, GFP_KERNEL);

         if (fb_info->pixmap.addr) {

             fb_info->pixmap.size = FBPIXMAPSIZE;

             fb_info->pixmap.buf_align = ;

             fb_info->pixmap.scan_align = ;

             fb_info->pixmap.access_align = ;

             fb_info->pixmap.flags = FB_PIXMAP_DEFAULT;

         }

     }

     fb_info->pixmap.offset = ;

     if (!fb_info->pixmap.blit_x)

         fb_info->pixmap.blit_x = ~(u32);

     if (!fb_info->pixmap.blit_y)

         fb_info->pixmap.blit_y = ~(u32);

     if (!fb_info->modelist.prev || !fb_info->modelist.next)

         INIT_LIST_HEAD(&fb_info->modelist);

     fb_var_to_videomode(&mode, &fb_info->var);

     fb_add_videomode(&mode, &fb_info->modelist);

     registered_fb[i] = fb_info; //赋值到registered_fb[i]数组中


     event.info = fb_info;

     fb_notifier_call_chain(FB_EVENT_FB_REGISTERED, &event);

     return ;

 }
接下来看一下fb硬件驱动程序,以/drivers/video/s3c2410fb.c为例。
1)驱动入口
 static struct platform_driver s3c2410fb_driver = {

     .probe        = s3c2410fb_probe,

     .remove        = s3c2410fb_remove,

     .suspend    = s3c2410fb_suspend,

     .resume        = s3c2410fb_resume,

     .driver        = {

         .name    = "s3c2410-lcd",

         .owner    = THIS_MODULE,

     },

 };

 int __devinit s3c2410fb_init(void)

 {

     return platform_driver_register(&s3c2410fb_driver);

 }

 static void __exit s3c2410fb_cleanup(void)

 {

     platform_driver_unregister(&s3c2410fb_driver);

 }
2)当平台设备的驱动和设备匹配后,会直接调用prob函数。
 static int __init s3c2410fb_probe(struct platform_device *pdev)

 {

     struct s3c2410fb_info *info;

     struct fb_info       *fbinfo;

     struct s3c2410fb_hw *mregs;

     int ret;

     int irq;

     int i;

     u32 lcdcon1;

     mach_info = pdev->dev.platform_data;  //获取lcd设备信息

     if (mach_info == NULL) {

         dev_err(&pdev->dev,"no platform data for lcd, cannot attach\n");

         return -EINVAL;

     }

     fbinfo = framebuffer_alloc(sizeof(struct s3c2410fb_info), &pdev->dev); //分配fb_info结构体

     if (!fbinfo) {

         return -ENOMEM;

     }
     //设置fb_info结构体
     info = fbinfo->par;

     info->fb = fbinfo;

     info->dev = &pdev->dev;

     platform_set_drvdata(pdev, fbinfo);

     dprintk("devinit\n");

     strcpy(fbinfo->fix.id, driver_name);

     memcpy(&info->regs, &mach_info->regs, sizeof(info->regs));

     /* Stop the video and unset ENVID if set */

     info->regs.lcdcon1 &= ~S3C2410_LCDCON1_ENVID;

     lcdcon1 = readl(S3C2410_LCDCON1);

     writel(lcdcon1 & ~S3C2410_LCDCON1_ENVID, S3C2410_LCDCON1);

     info->mach_info            = pdev->dev.platform_data;

     fbinfo->fix.type        = FB_TYPE_PACKED_PIXELS;

     fbinfo->fix.type_aux        = ;

     fbinfo->fix.xpanstep        = ;

     fbinfo->fix.ypanstep        = ;

     fbinfo->fix.ywrapstep        = ;

     fbinfo->fix.accel        = FB_ACCEL_NONE;

     fbinfo->fbops            = &s3c2410fb_ops;

     fbinfo->flags            = FBINFO_FLAG_DEFAULT;

     fbinfo->pseudo_palette      = &info->pseudo_pal;

     fbinfo->var.upper_margin    = S3C2410_LCDCON2_GET_VBPD(mregs->lcdcon2) + ;

     fbinfo->var.lower_margin    = S3C2410_LCDCON2_GET_VFPD(mregs->lcdcon2) + ;

     fbinfo->var.vsync_len        = S3C2410_LCDCON2_GET_VSPW(mregs->lcdcon2) + ;

     fbinfo->var.left_margin        = S3C2410_LCDCON3_GET_HFPD(mregs->lcdcon3) + ;

     fbinfo->var.right_margin    = S3C2410_LCDCON3_GET_HBPD(mregs->lcdcon3) + ;

     fbinfo->var.hsync_len        = S3C2410_LCDCON4_GET_HSPW(mregs->lcdcon4) + ;

      fbinfo->fix.smem_len        =    mach_info->xres.max *

                     mach_info->yres.max *

                     mach_info->bpp.max / ;

     for (i = ; i < ; i++)

         info->palette_buffer[i] = PALETTE_BUFF_CLEAR;

     if (!request_mem_region((unsigned long)S3C24XX_VA_LCD, SZ_1M, "s3c2410-lcd")) {

         ret = -EBUSY;

         goto dealloc_fb;

     }

     dprintk("got LCD region\n");

    //硬件相关的操作,中断、时钟....

     ret = request_irq(irq, s3c2410fb_irq, IRQF_DISABLED, pdev->name, info);

     if (ret) {

         dev_err(&pdev->dev, "cannot get irq %d - err %d\n", irq, ret);

         ret = -EBUSY;

         goto release_mem;

     }

     info->clk = clk_get(NULL, "lcd");

     if (!info->clk || IS_ERR(info->clk)) {

         printk(KERN_ERR "failed to get lcd clock source\n");

         ret = -ENOENT;

         goto release_irq;

     }

     clk_enable(info->clk);

     dprintk("got and enabled clock\n");

     msleep();

     /* Initialize video memory */

     ret = s3c2410fb_map_video_memory(info);

     if (ret) {

         printk( KERN_ERR "Failed to allocate video RAM: %d\n", ret);

         ret = -ENOMEM;

         goto release_clock;

     }

     ret = register_framebuffer(fbinfo);//注册fb_info结构体

     if (ret < ) {

         printk(KERN_ERR "Failed to register framebuffer device: %d\n", ret);

         goto free_video_memory;

     }

     /* create device files */

     device_create_file(&pdev->dev, &dev_attr_debug);

     printk(KERN_INFO "fb%d: %s frame buffer device\n",

         fbinfo->node, fbinfo->fix.id);

     return ;

 free_video_memory:

     s3c2410fb_unmap_video_memory(info);

 release_clock:

     clk_disable(info->clk);

     clk_put(info->clk);

 release_irq:

     free_irq(irq,info);

 release_mem:

      release_mem_region((unsigned long)S3C24XX_VA_LCD, S3C24XX_SZ_LCD);

 dealloc_fb:

     framebuffer_release(fbinfo);

     return ret;

 }
小结:
根据驱动结构和程序源码分析可知,lcd驱动程序需要完成以下几部分:
1)分配一个fb_info结构体:由函数framebuffer_alloc() 完成 ;
2)设置fb_info结构体;
3)注册fb_info:register_framebuffer();
4)硬件相关的操作
LCD驱动程序的更多相关文章
- [国嵌攻略][143][LCD驱动程序分析]
LCD驱动程序分析 LCD驱动程序代码在/drivers/video/s3c2410fb.c文件中,在该驱动的s3c2410fb_init中注册了平台驱动,该驱动的初始化代码在s3c24xxfc_pr ...
- LCD驱动程序编写
学习目标:编写LCD驱动程序,熟悉根据芯片手册分析时序图,配置寄存器,并测试LCD程序. 一.LCD驱动程序编写 步骤: 1)分配fb_info结构体 2)设置fb_info结构体 a. 固定参数 b ...
- LCD驱动程序(一)
LCD显示原理: 在JZ2440上,想要让LCD显示,需要几个部分1.LCD硬件 2.开发板上的LCD控制器 3.SDRAM内存存放数据FramBuffer 4.可能还需要一个调色板(实际上是一块内存 ...
- 10. LCD驱动程序 ——框架分析
引言: 由LCD的硬件原理及操作(可参看韦哥博客:第017课 LCD原理详解及裸机程序分析) 我们知道只要LCD控制器的相关寄存器正确配置好,就可以在LCD面板上显示framebuffer中的内容. ...
- 9、LCD驱动程序框架
linux-3.4.2\drivers\video\S3C2410fb.c(内核自带驱动程序) fbmem.c是LCD驱动程序顶层框架文件,是一个通用的文件,在初始化init函数中会注册一个字符设备, ...
- LCD驱动程序架构和分析
一.LCD驱动程序架构 1.裸机驱动代码分析 ①LCD初始化:控制器初始化,端口初始化,指明帧缓冲 ②LCD图形显示:将图形数据写入帧缓冲 void lcd_init() { lcd_port_ini ...
- 11. Linux——LCD驱动程序
由上一节 得出写个LCD驱动入口函数,需要以下4步: 1) 分配一个fb_info结构体: framebuffer_alloc(); 2) 设置fb_info 3) 设置硬件相关的操作 4) 使能LC ...
- LCD驱动程序之层次分析
1.回顾字符设备驱动程序: 字符设备驱动编写的一般步骤: 1)主设备号 2)构造file_operations结构体体 .open = xxxx .read = xxxxx 3)register_ch ...
- 【AT91SAM3S】SAM3S-EK Demo工程中,LCD驱动程序的加载(函数指针结构体)
为了调试LCD,在英倍特的板子上烧Atmel的sam3s-ek_demo_1.4_source示例代码.LCD显示正常了,却找不到LCD的驱动究竟在哪. 花了好久,追踪到了这个执行过程. 进入main ...
随机推荐
- SQL Server ->> THROW字句对比RAISERROR子句
SQL Server 2012开始引入了THROW字句用于替代从SQL Server开始沿用至今的RAISERROR.既然作用相同,都是在TRY... CATCH代码块后不抓错误然后抛出错误,它们之间 ...
- 使用js时,如何获取系统当前时间并且得到格式为"yyyy年MM月"的日期
1.使用js时,如何获取系统当前时间并且得到格式为"yyyy年MM月"的日期: 1 var newdate = new Date(); 2 var nowyear = newdat ...
- Master的注册机制和状态改变管理解密
本课主题 Master 接收 Worker, Driver, Application 注册 Master 处理 Driver 狀态变换 Master 处理 Executor 狀态变换 Master 接 ...
- Manifold Learning: ISOMAP
转:http://hi.baidu.com/chb_seaok/item/faa54786a3ddd1d7d1f8cd0b 在常见的降维方法中,PCA和LDA是最为常用的两种降维方法.PCA是一种无监 ...
- python数据结构(整理)
http://www.cnblogs.com/yupeng/p/3413763.html 1. 单链表 链表的定义: 链表(linked list)是由一组被称为结点的数据元素组成的数据结构,每个结点 ...
- hdu-2879 hehe---积性函数
题目链接: http://acm.hdu.edu.cn/showproblem.php?pid=2879 题目大意: he[n]为小于n且满足x^2 = x (mod n)的个数 hehe[n] = ...
- java里面list是引用的好例子
java里面的赋值和引用是不同的,以后要详细总结一下! 看一个例子: public static void main(String[] args) { List<String> list ...
- Spring AOP 的切点切在Controller上没有起作用的问题。
做下笔记,以防忘记. 在Spring MVC 中使用面向切面编程,感觉所有的配置.切面.切点的编写都没有写错,但是当切点切在@Controller注解的类的方法上时就不起作用.当切点切在的其他的非@C ...
- Django Url设计 小知识点
mysite/news/urls.py: from django.conf.urls import url from . import views urlpatterns = [ url(r'^art ...
- 编码 Unicode utf-8
编码的发展史: 一开始计算机只在美国使用.8位的字节可以组合出256种不同的状态.他们将0到32种状态规定为”控制码“,后来又用其中32号以后的状态表示空格.标点符号.数字和大小写字母.这样一直编到了 ...