DB数据源之SpringBoot+MyBatis踏坑过程(三)手工+半自动注解配置数据源与加载Mapper.xml扫描
DB数据源之SpringBoot+MyBatis踏坑过程(三)手工+半自动注解配置数据源与加载Mapper.xml扫描
liuyuhang原创,未经允许禁止转载
系列目录连接
DB数据源之SpringBoot+Mybatis踏坑过程实录(一)
1.环境说明
Springboot初学者,需要学习手工配置数据源,不需要多数据源配置的情况下
建议使用本说明进行配置。
springboot,parent 2.0.2.和1.5.3.都已经测试过,
在java8和java7环境下测试过。前者配java8,后者配java7,
使用MyEclipse 2017 C1 64x,MyEclipse 2016之前的版本无法使用java8
pom.xml核心如下:

    <parent>

        <groupId>org.springframework.boot</groupId>

        <artifactId>spring-boot-starter-parent</artifactId>

        <version>2.0.2.RELEASE</version>

        <relativePath /> <!-- lookup parent from repository -->

    </parent>

    <dependencies>

<!-- 添加MySQL依赖 -->

        <dependency>

            <groupId>mysql</groupId>

            <artifactId>mysql-connector-java</artifactId>

        </dependency>

        <!-- 添加JDBC依赖 -->

        <dependency>

            <groupId>org.springframework.boot</groupId>

            <artifactId>spring-boot-starter-jdbc</artifactId>

        </dependency>

        <!-- mybaits基础依赖 -->

        <dependency>

            <groupId>org.mybatis</groupId>

            <artifactId>mybatis</artifactId>

            <version>3.4.0</version>

        </dependency>

        <!-- mybatis插件依赖 -->

        <dependency>

            <groupId>org.mybatis.spring.boot</groupId>

            <artifactId>mybatis-spring-boot-starter</artifactId>

            <version>1.1.1</version>

        </dependency>

        <!-- mapper依赖 -->

        <dependency>

            <groupId>tk.mybatis</groupId>

            <artifactId>mapper</artifactId>

            <version>3.3.7</version>

        </dependency>

        <dependency>

            <groupId>org.springframework.boot</groupId>

            <artifactId>spring-boot-configuration-processor</artifactId>

            <optional>true</optional>

        </dependency>
2.配置思路
2.1.创建SystemConfig类,使用@ConfigurationProperties注解获取application.properties文件中的属性;
2.2.注入SystemConfig到Mybatis的SessionFactory的配置类
2.3.创建数据源DataSource;
2.4.注入数据源属性;
2.5.创建SqlSessionFactory;
2.6.SqlSessionFactory配置DataSource;
2.7.SqlSessionFactory配置扫描MyBatis-config.xml文件;
2.8.SqlSessionFactory配置扫描Mapper.xml所在包;
2.9.获取session查询数据库进行测试;
3.所需类与结构
3.0.application.properties文件与相应内容作为数据源;
3.1.SystemConfig类,用于获取application.properties中的property;
3.2.DataConfig类,用于获取SqlSessionFactory;
3.3.ExampleController类,用于测试;
3.4.AppRun类,springboot的启动入口,将DataConfig初始化;
3.5.mapper.xml内容
4.代码
4.0.application.properties文件,代码如下:
1 master.url=jdbc:mysql://qqq.jjj.xxx.iii:3306/master?characterEncoding=utf8

2 master.username=root

3 master.password=root

4 master.driver=com.mysql.jdbc.Driver

5 #master.driver-class-name=com.mysql.jdbc.Driver  一般是使用这个命名模式
4.1.SystemConfig类,代码如下:
 package com.FM.config;

 import org.springframework.boot.context.properties.ConfigurationProperties;

 import org.springframework.stereotype.Component;

 @Component//作为组件交给spring管理

 @ConfigurationProperties(prefix = "master")//读取application文件前缀为master的属性

 public class SystemConfig {

     String url;

     String driver;

     String username;

     String password;

     //提供setter给spring,提供setter自用

     public String getUrl() {

         return url;

     }

     public void setUrl(String url) {

         this.url = url;

     }

     public String getDriver() {

         return driver;

     }

     public void setDriver(String driver) {

         this.driver = driver;

     }

     public String getUsername() {

         return username;

     }

     public void setUsername(String username) {

         this.username = username;

     }

     public String getPassword() {

         return password;

     }

     public void setPassword(String password) {

         this.password = password;

     }

 }
4.2.DataConfig类,用于获取SqlSessionFactory,代码如下:
 package com.FM.config;

 import java.util.HashMap;

 import javax.sql.DataSource;

 import org.apache.ibatis.session.SqlSessionFactory;

 import org.mybatis.spring.SqlSessionFactoryBean;

 import org.springframework.beans.factory.annotation.Autowired;

 import org.springframework.boot.jdbc.DataSourceBuilder;

 import org.springframework.context.annotation.Configuration;

 import org.springframework.core.io.DefaultResourceLoader;

 import org.springframework.core.io.Resource;

 import org.springframework.core.io.support.PathMatchingResourcePatternResolver;

 /**

  * DataConfig,获取数据源,配置给SqlSessionFactory,并以此获取session

  * @author liuyuhang

  */

 @Configuration//作为配置,交给spring管理

 public class DataConfig {

     @Autowired//注入SystemConfig类,注意变量名

     private SystemConfig systemConfig;

     /**

      * 手动获取sessionFactory并配置用例

      * @param dataSourcePerfix

      * @return

      * @throws Exception

      */

     public SqlSessionFactory getSessionFactory() throws Exception {

         String masterUrl = systemConfig.getUrl();

         String masterDriver = systemConfig.getDriver();

         String masterUsername = systemConfig.getUsername();

         String masterPassword = systemConfig.getPassword();

         // 创建数据源

         DataSourceBuilder create = DataSourceBuilder.create();

         create.url(masterUrl);

         create.driverClassName(masterDriver);

         create.username(masterUsername);

         create.password(masterPassword);

         DataSource source = create.build();

         // 创建sessionFactory

         SqlSessionFactoryBean factoryBean = new SqlSessionFactoryBean();

         factoryBean.setDataSource(source);// 加载数据源

         // 扫描mapper.xml

         Resource[] resources = new PathMatchingResourcePatternResolver().getResources("classpath:com/FM/mapper/*.xml");

         factoryBean.setMapperLocations(resources);

         // 读取config

         factoryBean.setConfigLocation(new DefaultResourceLoader().getResource("classpath:mybatis-config.xml"));

         SqlSessionFactory sessionFactory = factoryBean.getObject();

         return sessionFactory;

     }

 }
4.3.ExampleController类,用于测试;
 package com.FM.controller;

 import java.util.HashMap;

 import java.util.List;

 import java.util.Map;

 import javax.servlet.http.HttpServletRequest;

 import org.apache.ibatis.session.SqlSession;

 import org.apache.ibatis.session.SqlSessionFactory;

 import org.springframework.beans.factory.annotation.Autowired;

 import org.springframework.web.bind.annotation.RequestMapping;

 import org.springframework.web.bind.annotation.RestController;

 import com.FM.config.DataConfig;

 import com.FM.tool.reqUtils;

 @RestController //等同于responseBody + controller双重注解

 public class ExampleController {

     @Autowired

     DataConfig dataConfig;

     /**

      * 手动创建session查询数据库用例,该方法可以创建多个sessionFactory,用多线程

      * @param request

      * @return

      * @throws Exception

      */

     @RequestMapping("/helloMybatis")

     public List helloMybatis(HttpServletRequest request) throws Exception {

         SqlSessionFactory sessionFactory = dataConfig.getSessionFactory();//获取sessionfactory

         SqlSession session = sessionFactory.openSession();//获取session

         List<Object> selectList = session.selectList("com.FM.mapper.MySqlMapper.getUser");

         return selectList;//自动转换为json

     }
  }
4.4.AppRun类,springboot的启动入口,将DataConfig初始化;
 package com.FM;

 import org.springframework.boot.SpringApplication;

 import org.springframework.boot.SpringBootConfiguration;

 import org.springframework.boot.autoconfigure.SpringBootApplication;

 import org.springframework.boot.autoconfigure.jdbc.DataSourceAutoConfiguration;

 import org.springframework.boot.web.servlet.ServletComponentScan;

 @SpringBootApplication(exclude = { DataSourceAutoConfiguration.class }) // 禁用默认的单数据源配置

 @SpringBootConfiguration // springboot基础配置注解

 @ServletComponentScan // springboot servlet filter

 // @EnableConfigurationProperties//该注解于springboot1.5以上废弃

 public class AppRun {

     public static void main(String[] args) throws Exception {

         SpringApplication.run(AppRun.class, args);

     }

 }
4.5.mapper.xml内容:略,前篇有
5.说明
一般来讲是配置数据源,用Mybatis的sessionFactory来读取dao;
然后将dao注入给service,再将service注入给controller。
说明一下,这几个注解本质上是一个意思,即@Repository,@Service,@Controller,
本质上是同样的功能,只是为了分层而使用这种方式,spring的注入是十分灵活的
我平时写业务,习惯写乐观锁,将事务和代码都控制在controller层,
因此在这一层直接获取session并进行操作,省略dao,service两层
不习惯的自行更改
注:本文配置方式会产生几个问题
springboot以这种方式配置的数据源,本质上是交给内置的tomcat来管理的,内置的tomcat来管理会涉及到连接池的问题。
如果数据库对于连接数量没有扩容,而内置tomcat的连接池没有配置,短时间内会产生大量连接而不销毁,会导致连接
拒绝,而报错。
可能报出的两个常见的错误,主要内容如下:
a:Error querying database. Cause: com.mysql.jdbc.exceptions.jdbc4.CommunicationsException: Communications link failure
Cause: com.mysql.jdbc.exceptions.jdbc4.CommunicationsException: Communications link failure
The last packet successfully received from the server was 14,595,596 milliseconds ago. The last packet sent successfully to the server was 14,595,612 milliseconds ago.
该错误的原因通常是因为session没有保证关闭引起的
b: o.a.tomcat.jdbc.pool.ConnectionPool : Unable to create initial connections of pool.
Data source rejected establishment of connection, message from server: "Too many connections"
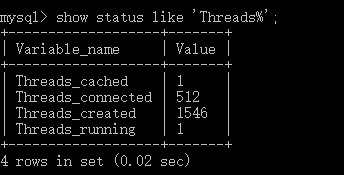
本示例中使用的是MySql数据库,Threads_connected设置的数值是512,因此报上述错误。
该错误的原因不仅有Mysql数据库优化的问题,同时也有连接池管理配置的问题
以上列举问题将在后文中处理,更新后将在文尾插入连接!
6.测试
结果如下图:

以上!
DB数据源之SpringBoot+MyBatis踏坑过程(三)手工+半自动注解配置数据源与加载Mapper.xml扫描的更多相关文章
- DB数据源之SpringBoot+Mybatis踏坑过程实录系列(一)
DB数据源之SpringBoot+MyBatis踏坑过程(一) liuyuhang原创,未经允许进制转载 系列目录 DB数据源之SpringBoot+Mybatis踏坑过程实录(一) DB数据源之Sp ...
- DB数据源之SpringBoot+MyBatis踏坑过程(二)手工配置数据源与加载Mapper.xml扫描
DB数据源之SpringBoot+MyBatis踏坑过程(二)手工配置数据源与加载Mapper.xml扫描 liuyuhang原创,未经允许进制转载 吐槽之后应该有所改了,该方式可以作为一种过渡方式 ...
- DB数据源之SpringBoot+MyBatis踏坑过程(四)没有使用连接池的后果
DB数据源之SpringBoot+MyBatis踏坑过程(四)没有使用连接池的后果 liuyuhang原创,未经允许禁止转载 系列目录连接 DB数据源之SpringBoot+Mybatis踏坑过程实 ...
- DB数据源之SpringBoot+MyBatis踏坑过程(五)手动使用Hikari连接池
DB数据源之SpringBoot+MyBatis踏坑过程(五)手动使用Hikari连接池 liuyuhang原创,未经允许禁止转载 系列目录连接 DB数据源之SpringBoot+Mybatis踏坑 ...
- DB数据源之SpringBoot+MyBatis踏坑过程(七)手动使用Tomcat连接池
DB数据源之SpringBoot+MyBatis踏坑过程(七)手动使用Tomcat连接池 liuyuhang原创,未经允许禁止转载 系列目录连接 DB数据源之SpringBoot+Mybatis踏坑 ...
- DB数据源之SpringBoot+MyBatis踏坑过程(六)mysql中查看连接,配置连接数量
DB数据源之SpringBoot+MyBatis踏坑过程(六)mysql中查看连接,配置连接数量 liuyuhang原创,未经允许禁止转载 系列目录连接 DB数据源之SpringBoot+Mybati ...
- 在mybatis 中批量加载mapper.xml
可以直接加载一个包文件名,将这个包里的所有*mapper.xml文件加载进来. 指定mapper接口的包名,mybatis自动扫描包下边所有mapper接口进行加载: 必须按一定的标准:即xml文件和 ...
- Mybatis热加载Mapper.xml
开发的时候,写Mybatis Mapper.xml文件的时候,每次修改SQL都需要重启服务,感觉十分麻烦,于是尝试写了一个Mybatis的Mapper.xml热加载. 能在修改Mapper.xml之后 ...
- Springboot & Mybatis 构建restful 服务三
Springboot & Mybatis 构建restful 服务三 1 前置条件 成功执行完Springboot & Mybatis 构建restful 服务二 2 restful ...
随机推荐
- JavaScript 递归法排列组合二维数组2
<html> <head> <title>二维数组排列组合</title> </head> <body> <div id= ...
- JavaScript中sort()方法
sort()方法主要是用于对数组进行排序,默认情况下该方法是将数组元素转换成字符串,然后按照ASC码进行排序,这个大家都能理解,但如果数组元素是一个Object呢,转不了字符串,难道不能进行排序?答案 ...
- 比特币钱包Armory使用指南
转自:http://news.yibite.com/application/2014/0525/21603.shtml 比特币钱包Armory(https://bitcoinarmory.com/)是 ...
- [转] RISC-V架构介绍
1. RISC-V和其他开放架构有何不同 如果仅从"免费"或"开放"这两点来评判,RISC-V架构并不是第一个做到免费或开放的处理器架构. 在开始之前,我们先通 ...
- c# 依赖注入之---setterInjection(转)
图3.1 Setter注入示意 定义一个接口: namespace SetterInjection { internal interface IServiceClass { string Servic ...
- css properties
white-space:描述如何处理元素中的空格 word-wrap:(以单词为单位,比如长单词则转行拆分,短单词则直接留空换行!) 用来说明当一个不能被分开的字符串太长因而其containing b ...
- 记账本app(一)
计划开发一款小程序应用,主要来记录自己的财务账目. 通过使用SpringBoot开发后端应用,提供接口,对应前端使用微信小程序来实现. 功能模块(用户信息,账本.账目列表,新增一笔账,修改一笔账,删除 ...
- VSTO 开发中 应用ActionPane、CustomTaskPane
以Excel插件为例: 1. ActionPane 创建 ThisWorkbook 项目 private void ThisWorkbook_Startup(object sender, System ...
- htm5 手机自适应问题 文本框被激活(获取焦点)时,页面会放大至原来尺寸。
加上这句话就ok啦 <meta name="viewport" content="width=device-width, initial-scale=1.0, mi ...
- WSDM 2014推荐系统论文
Xiao Yu, Hao Ma, Paul Hsu, Jiawei Han On Building Entity Recommender Systems Using User Click Log an ...