
Python 之RabbitMQ使用
1. IO 多路复用
# select 模拟socket server

# server 端

import select

import socket

import sys

import queue

server = socket.socket()

server.setblocking(False)

server_addr = ('localhost', 10000)

print('starting up on %s port %s' % server_addr)

server.bind(server_addr)

server.listen(5)

inputs = [server, ]

outputs = []

message_queues = {}

while True:

    print('waiting for next event...')

    readable, writeable, exeptional = select.select(inputs, outputs, inputs)

    for s in readable:  # 每个 s 就是一个socket

        if s in server:

            conn, client_addr = s.accept()

            print('new connection from', client_addr)

            conn.setblocking(False)

            inputs.append(conn)

            message_queues[conn] = queue.Queue()

        else:

            data = s.recv(1024)

            if data:

                print('收到来自[%s]的数据:' % s.getpeername()[0], data)

                message_queues[s].put[data]

                if s not in outputs:

                    outputs.append(s)

            else:

                print('客户端断开了', s)

                if s in outputs:

                    outputs.remove(s)

                inputs.remove(s)

                del message_queues[s]

    for s in writeable:

        try:

            next_msg = message_queues[s].get_nowait()

        except queue.Empty:

            print('client [%s]' % s.getpeername()[0], 'queue is empty...')

            outputs.remove(s)

        else:

            print('sending msg to [%s]' % s.getpeername()[0], next_msg)

            s.send(next_msg.upper())

    for s in exceptional:

        print('handling exception for', s.getpeername())

        inputs.remove(s)

        if s in outputs:

            outputs.remove(s)

        s.close()

        del message_queues[s]

# client 端

import socket

import sys

messages = [b'This is the message ',

           b'It will be sent',

           b'in parts']

server_address = ('localhost', 10000)

socks = [socket.socket(socket.AF_INET, socket.SOCK_STREAM),

         socket.socket(socket.AF_INET, socket.SOCK_STREAM),]

print('connecting to %s port %s' % server_address)

for s in socks:

    s.connect(server_address)

for message in messages:

    for s in socks:

        print('%s: sending "%s"' % (s.getsockname(), message))

        s.send(message)

    for s in socks:

        data = s.recv(1024)

        print('%s: received "%s"' % (s.getsockname(), data))

        if not data:

            print(sys.stderr, 'closing socket', s.getsockname())
2. RabbitMQ
2.1 RabbitMQ 准备工作(以mac为例)
- 安装
RabbitMQ:brew install rabbitmq - 安装
pika:pip3 install pika - 启动
RabbitMQ:/usr/local/Cellar/rabbitmq/3.7.4/sbin/rabbitmq-server
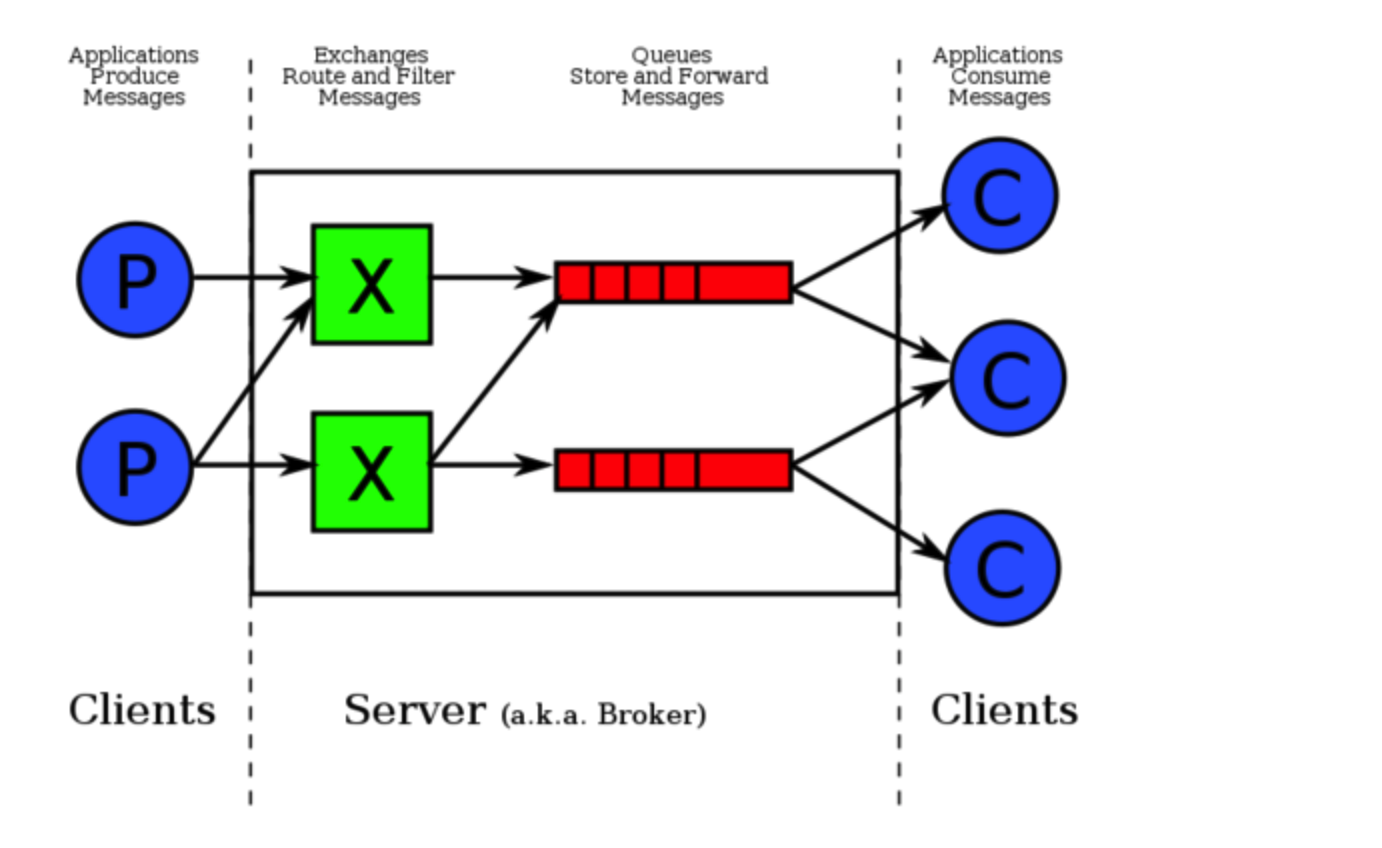
# 示例:

# 发送端

import pika

connection = pika.BlockingConnection(pika.ConnectionParameters('localhost'))

channel = connection.channel()     # 声明一个管道

# 声明queue

channel.queue_declare(queue='hello')

# 需要 exchange 作为中转站

channel.basic_publish(exchange='',

                     routing_key='hello',   # queue 名字

                     body='Hello World!')

print("' [x] Sent 'Hello World!'")

connection.close()

# 接收端

import pika

connection = pika.BlockingConnection(pika.ConnectionParameters('localhost'))

channel = connection.channel()

channel.queue_declare(queue='hello')

def callback(ch, method, properties, body):

    print(" [x] Received %r" % body)

channel.basic_consume(callback,     # 如果收到消息,就调用 CALLBACK 函数来处理消息

                      queue='hello',

                      no_ack=True)      # no acknowledgement 不确认

print(' [*] Waiting fo messages. To exit press CTRL+C')

channel.start_consuming()
2.2 RabbitMQ 消息分发轮询
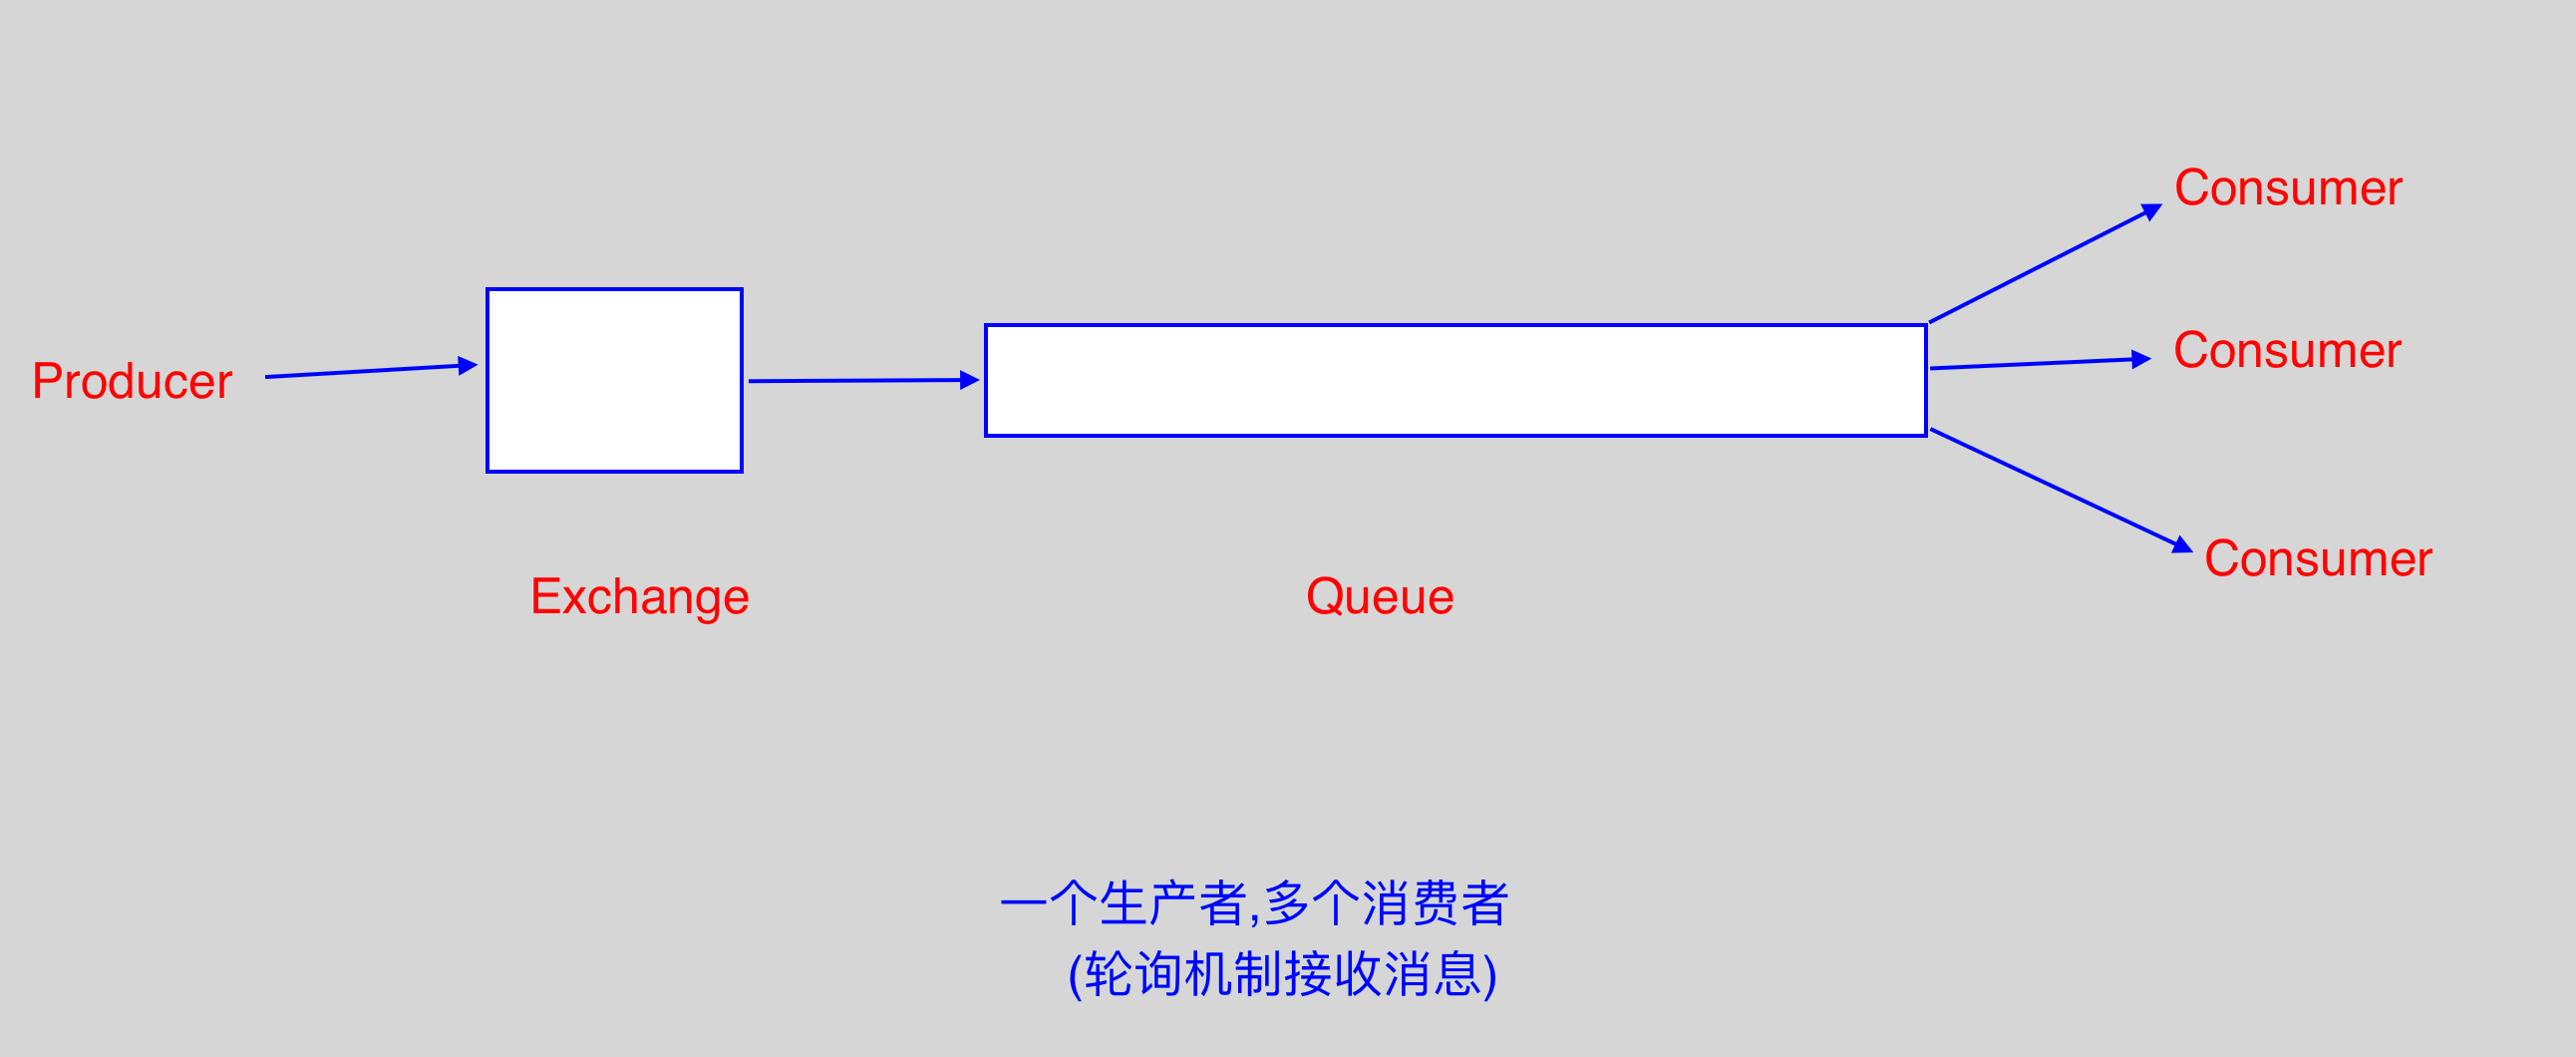
- 先启动消息生产者,然后再分别启动3个消费者,通过生产者多发送几条消息,这几条消息会依次分配到各个消费者身上;
2.3 RabbitMQ 消息持久化(发送端)
# 示例:

`channel.queue_declare(queue='hello', durable=True)`: 队列持久化;

# 示例二: 消息持久化

channel.basic_publish(exchange='',

                      routing_key='hello',

                      body='Hello World!',

                      properties=pika.BasicProperties(delivery_mode=2,)  # 将消息持久化

                      )
2.4 RabbitMQ fanout广播模式
- 如果Rabbit只管按顺序把消息发到各个消费者身上,不考虑消费者负载的话,很可能出现,一个配置不高的机器的消费者那里
堆积了很多消息处理不完,同时配置高的消费者却一直很轻松; - 为解决上述问题,可以在各个消费者端,配置
perfetch=1,意思是告诉RabbitMQ,消费者当前消息还没处理完的时候,就不
要再向该消费者发送新消息了。
# 示例:

# 发送端:

import pika

import sys

connection = pika.BlockingConnection(pika.ConnectionParameters(host='localhost'))

channel = connection.channel()

channel.queue_declare(queue='hello', durable=True)

message='Hello World!'

channel.basic_publish(exchange='',

                      routing_key='hello',

                      body=message,

                      properties=pika.BasicProperties(delivery_mode=2,))

print(' [x] Sent %r' % message)

connection.close()

# 消费者端

import pika

import time

connection = pika.BlockingConnection(pika.ConnectionParameters(host='localhost'))

channel = connection.channel()

channel.queue_declare(queue='hello', durable=True)

def callback(ch, method, properties, body):

    print(' [x] Received %r' % body)

    time.sleep(body.count(b'.'))

    print(' [x] Done')

    ch.basic_ack(delivery_tag = method.delivery_tag)

channel.basic_qos(prefetch_count=1)

channel.basic_consume(callback,

                      queue='hello')

channel.start_consuming()
2.5 RabbitMQ (发布/订阅模式)
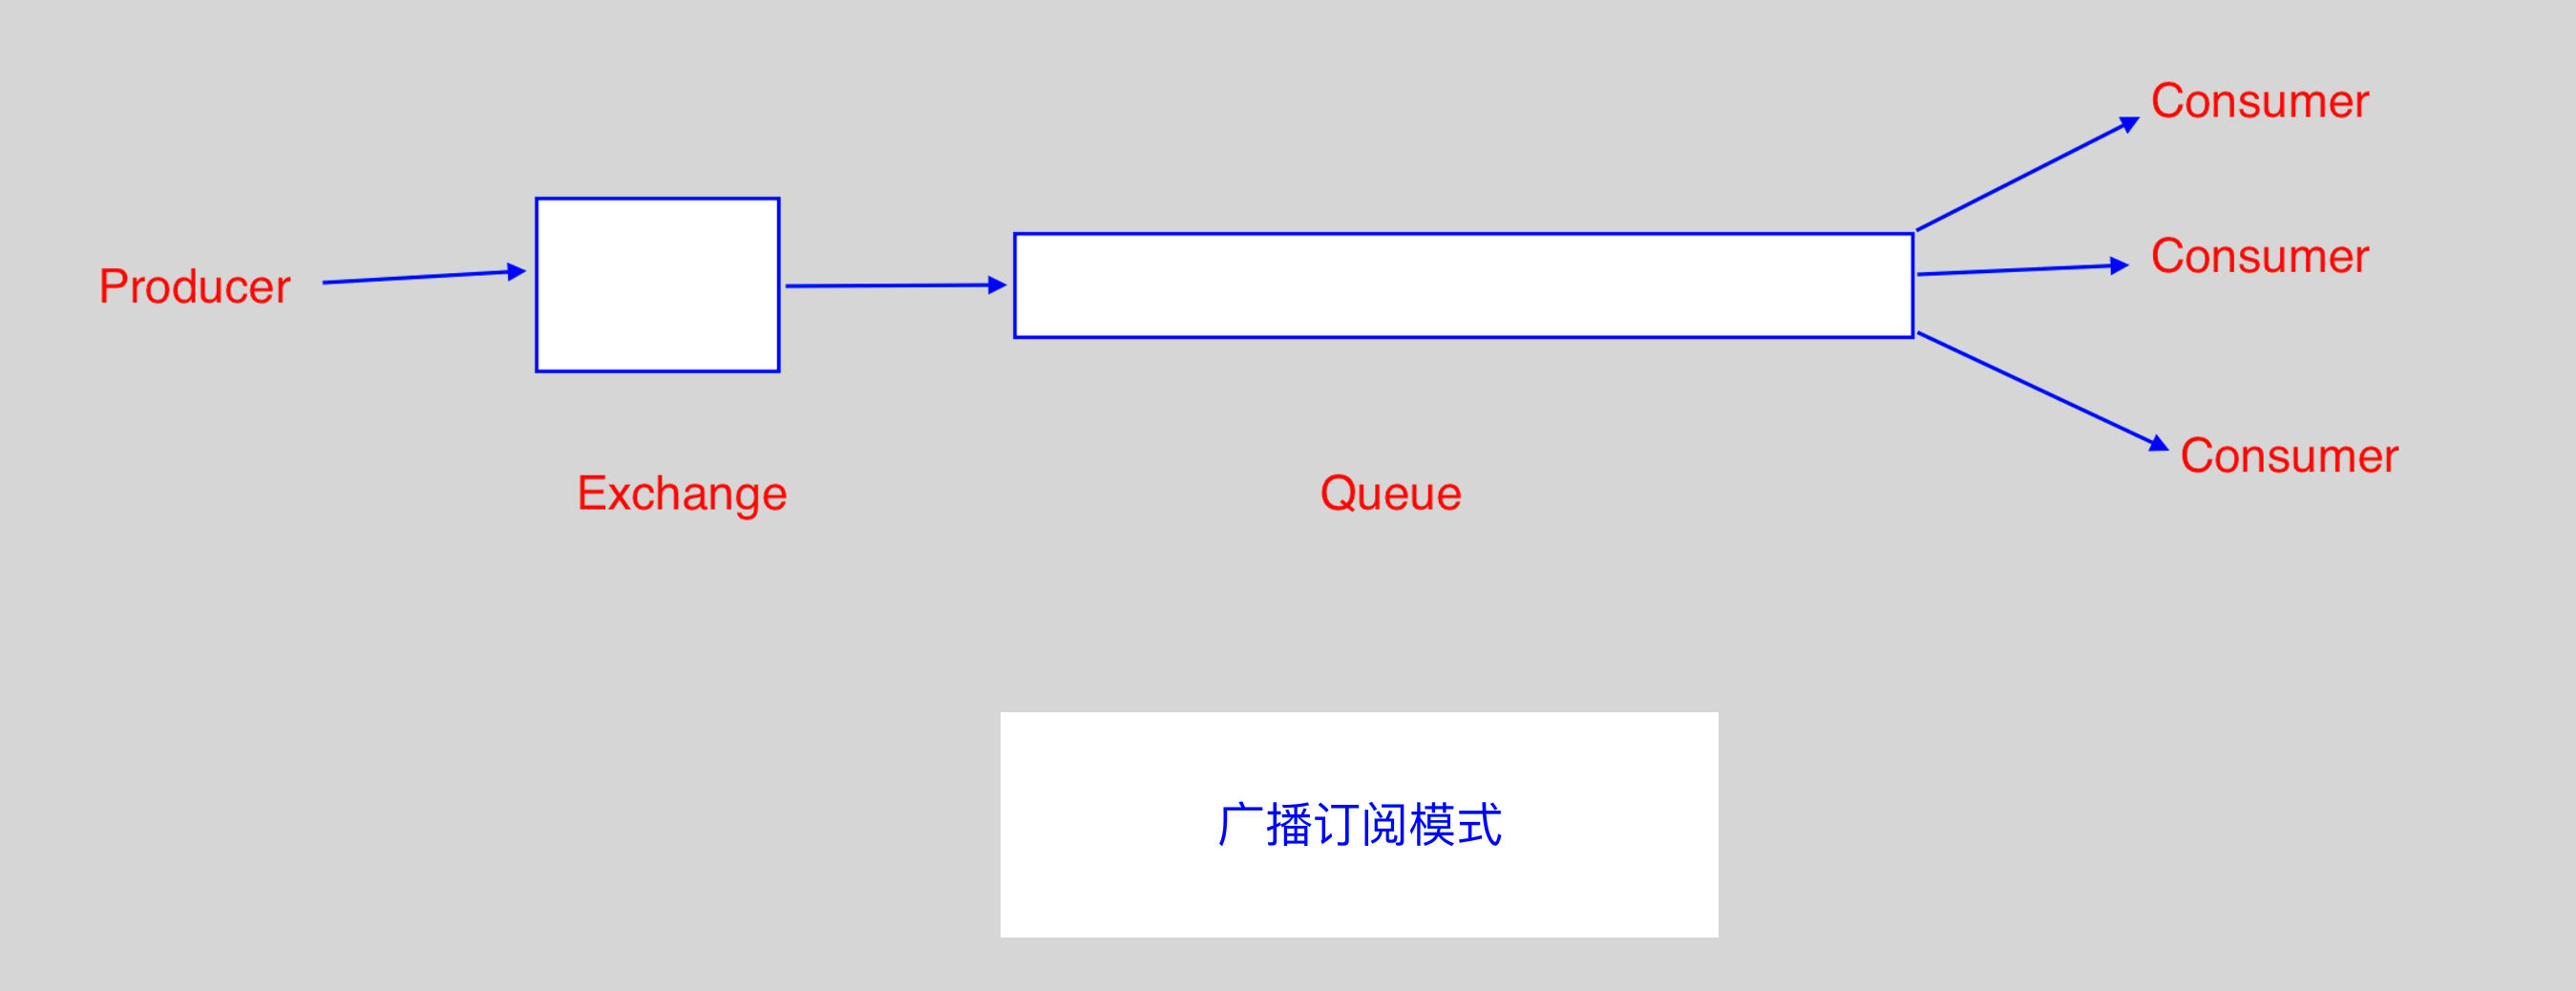
- 发布/订阅模式,需要使用
Exchange; Exchange在定义的时候是有类型的,以决定到底是哪些Queue符合条件,可以接收消息:fanout: 所有bind到此exchange的queue都可以接收消息;direct: 通过routingKey和exchange决定的那个唯一的queue可以接收消息;topic: 所有符合routingKey(此时可以是一个表达式)的routingKey所bind的queue可以接收消息;headers: 通过headers来决定把消息发给哪些queue;
# 表达式符号说明: # 代表一个或多个字符, * 代表任何字符

# 例: #.a 会匹配 a.a, aa.a, aaa.a 等

#     *.a 会匹配 a.a, b.a, c.a 等

# 示例: fanout模式,一方发送,多方同时接收

# 发送端

import pika

connection = pika.BlockingConnection(pika.ConnectionParameters(host='localhost'))

channel = connection.channel()

channel.exchange_declare(exchange='logs',

                         exchange_type='fanout')

message = 'Hello World!'

channel.basic_publish(exchange='logs',

                      routing_key='',

                      body=message)

print(' [x] Sent %r' % message)

connection.close()

# 接收端

import pika

connection = pika.BlockingConnection(pika.ConnectionParameters(host='localhost'))

channel = connection.channel()

channel.exchange_declare(exchange='logs',

                         exchange_type='fanout')

result = channel.queue_declare(exclusive=True) # 不指定queue名字,rabbit会随机分配一个名字, exclusive=True

                                               # 会在使用此queue的消费者断开后,自动将queue删除

queue_name = result.method.queue

channel.queue_bind(exchange='logs',

                   queue=queue_name)

print(' [*]Waiting for logs. To exit press CTRL+C')

def callback(ch, method, properties, body):

    print(' [x] %r' % body)

channel.basic_consume(callback,

                      queue=queue_name,

                      no_ack=True)

channel.start_consuming()

# 示例二: direct 模式(有选择的接收消息)

# 发送端(server.py)

import pika

import sys

connection = pika.BlockingConnection(pika.ConnectionParameters(host='localhost'))

channel = connection.channel()

channel.exchange_declare(exchange='direct_logs',

                        exchange_type='direct')

severity = sys.argv[1] if len(sys.argv) > 1 else 'info'

message = ' '.join(sys.argv[2:]) or 'Hello World!'

channel.basic_publish(exchange='direct_logs',

                      routing_key=severity,

                      body=message)

print(' [x] Sent %r:%r' % (severity, message))

connection.close()

# 接收端(client.py)

import pika

import sys

connection = pika.BlockingConnection(pika.ConnectionParameters(host='localhost'))

channel = connection.channel()

channel.exchange_declare(exchange='direct_logs',

                         exchange_type='direct')

result = channel.queue_declare(exclusive=True)

queue_name = result.method.queue

severities = sys.argv[1:]

if not severities:

    sys.stderr.write('Usage: %s [info] [warning] [error]\n' % sys.argv[0])

    sys.exit(1)

for severity in severities:

    channel.queue_bind(exchange='direct_logs',

                       queue=queue_name,

                       routing_key=severity)

print(' [*]Waiting for logs. To exit press CTRL+C')

def callback(ch, method, properties, body):

    print(' [x] %r:%r' % (method.routing_key, body))

channel.basic_consume(callback,

                      queue=queue_name,

                      no_ack=True)

channel.start_consuming()

# 说明:

#   以上操作在terminal启动: python3 client.py info  (info级别的接收方)

#                         python3 server.py info  (info级别的发送方)

#                         python3 client.py error (error级别的接收方)

#                         python3 server.py error (error级别的发送方)

# 示例三: 更细致的消息过滤(topic 模式)

# 划分为不同应用程序(例如mysql,python等),不同级别(error, info, debug)

# 发送端

import pika

import sys

connection = pika.BlockingConnection(pika.ConnectionParameters(host='localhost'))

channel = connection.channel()

channel.exchange_declare(exchange='topic_logs',

                         exchange_type='topic')

routing_key = sys.argv[1] if len(sys.argv) > 1 else 'anonymous.info'

message = ' '.join(sys.argv[2:]) or 'Hello World!'

channel.basic_publish(exchange='topic_logs',

                      routing_key=routing_key,

                      body=message)

print(' [x] Sent %r:%r' % (routing_key, message))

connection.close()

# 接收端

import pika

import sys

connection = pika.BlockingConnection(pika.ConnectionParameters(host='localhost'))

channel = connection.channel()

channel.exchange_declare(exchange='topic_logs',

                         exchange_type='topic')

result = channel.queue_declare(exclusive=True)

queue_name = result.method.queue

binding_keys = sys.argv[1:]

if not binding_keys:

    sys.stderr.write('Usage: %s [binding_key]...\n' % sys.argv[0])

    sys.exit(1)

for binding_key in binding_keys:

    channel.queue_bind(exchange='topic_logs',

                       queue=queue_name,

                       routing_key=binding_key)

print(' [*] Waiting for logs. To exit press CTRL+C')

def callback(ch, method, properties, body):

    print(' [x] %r:%r' % (method.routing_key, body))

channel.basic_consume(callback,

                      queue=queue_name,

                      no_ack=True)

channel.start_consuming()

# 说明:

#   以上操作在terminal启动: python3 client.py mysql.*  (接收任何以mysql开头的消息)

#                         python3 server.py mysql.error  (发送mysql的报错日志)
2.6 RabbitMQ rpc实现
# 示例:

# RPC server

import pika

import time

connection = pika.BlockingConnection(pika.ConnectionParameters(host='localhost'))

channel = connection.channel()

channel.queue_declare(queue='rpc_queue')

def fib(n):

    if n == 0:

        return 0

    elif n == 1:

        return 1

    else:

        return fib(n-1) + fib(n-2)

def on_request(ch, method, props, body):

    n = int(body)

    print(' [.] fib(%s)' % n)

    response = fib(n)

    ch.basic_publish(exchange='',

                     routing_key=props.reply_to,

                     properties=pika.BasicProperties(correlation_id = \

                                                        props.correlation_id),

                      body=str(response))

    ch.basic_ack(delivery_tag = method.delivery_tag)

channel.basic_qos(prefetch_count=1)

channel.basic_consume(on_request, queue='rpc_queue')

print(' [x] Awaiting RPC requests')

channel.start_consuming()

# RPC client

import pika

import uuid

class FibonacciRpcClient(object):

    def __init__(self):

        self.connection = pika.BlockingConnection(pika.ConnectionParameters(host='localhost'))

        self.channel = self.connection.channel()

        result = self.channel.queue_declare(exclusive=True)

        self.callback_queue = result.method.queue   # 生成随机Queue

        self.channel.basic_consume(self.on_response,    # 只要一收到消息,就调用 on_response

                                   no_ack=True,

                                   queue=self.callback_queue)

    def on_response(self, ch, method, props, body):

        if self.corr_id == props.correlation_id:

            self.response = body

    def call(self, n):

        self.response = None

        self.corr_id = str(uuid.uuid4())

        self.channel.basic_publish(exchange='',

                                   routing_key='rpc_queue',

                                   properties=pika.BasicProperties(

                                        reply_to = self.callback_queue,

                                        correlation_id = self.corr_id,

                                        ),

                                   body=str(n))

        while self.response is None:

            self.connection.process_data_events()   # 非阻塞版的start_consuming

            print('no message')

        return int(self.response)

fibonacci_rpc = FibonacciRpcClient()

print(' [x] Requesting fib(30)')

response = fibonacci_rpc.call(30)

print(' [.] Got %r' % response)
参考资料:
Python 之RabbitMQ使用的更多相关文章
- Python操作RabbitMQ
RabbitMQ介绍 RabbitMQ是一个由erlang开发的AMQP(Advanced Message Queue )的开源实现的产品,RabbitMQ是一个消息代理,从“生产者”接收消息并传递消 ...
- 用 Python、 RabbitMQ 和 Nameko 实现微服务
用 Python. RabbitMQ 和 Nameko 实现微服务 原创 07-17 17:57 首页 Linux中国 "微服务是一股新浪潮" - 现如今,将项目拆分成多个独立的. ...
- python之RabbitMQ
一.安装RabbitMQ 1. 安装erlang 1 2 3 4 tar xf otp_src_18.3.tar.gz cd otp_src_18.3 ./configure --prefix=/ma ...
- Python之路【第九篇】:Python操作 RabbitMQ、Redis、Memcache、SQLAlchemy
Python之路[第九篇]:Python操作 RabbitMQ.Redis.Memcache.SQLAlchemy Memcached Memcached 是一个高性能的分布式内存对象缓存系统,用 ...
- python - 操作RabbitMQ
python - 操作RabbitMQ 介绍 RabbitMQ是一个在AMQP基础上完整的,可复用的企业消息系统.他遵循Mozilla Public License开源协议.MQ全称为Mess ...
- 文成小盆友python-num12 Redis发布与订阅补充,python操作rabbitMQ
本篇主要内容: redis发布与订阅补充 python操作rabbitMQ 一,redis 发布与订阅补充 如下一个简单的监控模型,通过这个模式所有的收听者都能收听到一份数据. 用代码来实现一个red ...
- Python之路第十二天,高级(4)-Python操作rabbitMQ
rabbitMQ RabbitMQ是一个在AMQP基础上完整的,可复用的企业消息系统.他遵循Mozilla Public License开源协议. MQ全称为Message Queue, 消息队列(M ...
- Python与RabbitMQ交互
RabbitMQ 消息队列 成熟的中间件RabbitMQ.ZeroMQ.ActiveMQ等等 RabbitMQ使用erlang语言开发,使用RabbitMQ前要安装erlang语言 RabbitMQ允 ...
- python中RabbitMQ的使用(安装和简单教程)
1,简介 RabbitMQ是一个由erlang开发的AMQP(Advanced Message Queue )的开源实现的产品,RabbitMQ是一个消息代理,从"生产者"接收消息 ...
- Python之RabbitMQ的使用
今天总结一下Python关于Rabbitmq的使用 RabbitMQ官网说明,其实也是一种队列,那和前面说的线程queue和进程queue有什么区别呢? 线程queue只能在同一个进程下进行数据交互 ...
随机推荐
- oracle时间操作结合to_char和to_date使用
1,按每个10分钟进行分组展示数据 例如 有这么一张表 XATXDAY_FLIGHT(航班飞航表), 有这么一个字段 STD_LOCAL(起飞时间), 要求:统计一天24小时之内每隔10分钟,这10分 ...
- [shell]Linux脚本开头#!/bin/bash和#!/bin/sh是什么意思以及区别
一直以为在shell脚本中#都是代表着注释功能,同样在脚本开始的#!/bin/sh也只是告诉用户这是一个shell脚本,而最近顺手查了下,才发现不是这个意思,分享下面的文章. 转自:http://ww ...
- 理解vertical-align或“如何竖向居中”<转>
在各种技术论坛里经常会有这样的问题提出,“我如何能将这个东西竖向居中?”这个问题通常会跟随着这样一句话,“我使用了 vertical-align:middle,但是不管用! ” 这个问题其实有三个层面 ...
- 扩展RBAC用户角色权限设计方案<转>
RBAC(Role-Based Access Control,基于角色的访问控制),就是用户通过角色与权限进行关联.简单地说,一个用户拥有若干角色,每一个角色拥有若干权限.这样,就构造成“用户-角色- ...
- 虚拟化–操作系统级 LXC Linux Containers内核轻量级虚拟化技术
友情提示:非原文链接可能会影响您的阅读体验,欢迎查看原文.(http://blog.geekcome.com) 原文地址:http://blog.geekcome.com/archives/288 软 ...
- Enlish相关术语
APM 自动编程机(Automatic Programming Machine) 高级电源管理(Advanced Power Management) OSD 屏幕显示(On Screen Displa ...
- 10 部署应用程序和applet
跳过 09 Swing用户界面组件 JAR文件 在将应用程序进行打包时, 使用者一定希望仅提供给其一个单独的文件, 而不是一个含有大量类文件的目录, Java归档(JAR)文件就是为此目的而设计的. ...
- python中的列表生成式
列表生成式即List Comprehensions,是Python内置的非常简单却强大的可以用来创建list的生成式. 举个例子,要生成list [1, 2, 3, 4, 5, 6, 7, 8, 9, ...
- 如果可能的话,使用 PC-Lint、LogiScope 等工具进行代码审查
如果可能的话,使用 PC-Lint.LogiScope 等工具进行代码审查. #include <iostream> #include <algorithm> #include ...
- 【POJ】1523 SPF(割点)
http://poj.org/problem?id=1523 太弱... too weak.. 割点我都还要看书和看题解来写..果然是写不出么.. 割点就那样求,然后分量直接这个节点有多少子树就有子树 ...