
Django + mysql 快速搭建简单web投票系统
了解学习pyhton web的简单demo
1. 安装Django, 安装pyhton 自行百度
2. 执行命令创建project django-admin.py startproject mysite
3. 执行命令创建app python manage.py startapp polls
目录结构: polls/templates/polls 目录 和 polls/admin.py 都是自己手动创建的。
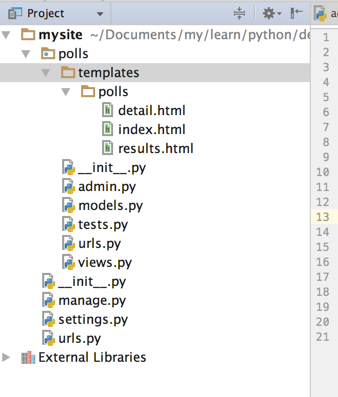
4. 编辑setting.py 添加app polls 同时打开admin
INSTALLED_APPS = (

    'django.contrib.auth',

    'django.contrib.contenttypes',

    'django.contrib.sessions',

    'django.contrib.sites',

    'django.contrib.messages',

    'django.contrib.staticfiles',

    'polls',

    # Uncomment the next line to enable the admin:

    'django.contrib.admin',

    # Uncomment the next line to enable admin documentation:

    # 'django.contrib.admindocs',

)
5. 编辑setting.py 添加数据库连接信息
DATABASES = {

    'default': {

        'ENGINE': 'django.db.backends.mysql', # Add 'postgresql_psycopg2', 'postgresql', 'mysql', 'sqlite3' or 'oracle'.

        'NAME': 'polls',                      # Or path to database file if using sqlite3.

        'USER': 'root',                      # Not used with sqlite3.

        'PASSWORD': '123',                  # Not used with sqlite3.

        'HOST': '',                      # Set to empty string for localhost. Not used with sqlite3.

        'PORT': '',                      # Set to empty string for default. Not used with sqlite3.

    }

}
6. 创建Modle模型 :
# coding=utf-8

from django.db import models

# Create your models here.

class Question(models.Model):

    question_text = models.CharField(max_length=200)

    pub_date = models.DateTimeField('date published')

    def __unicode__(self):

        return self.question_text

class Choice(models.Model):

    question = models.ForeignKey(Question)

    choice_text = models.CharField(max_length=200)

    votes = models.IntegerField(default=0)

    def __unicode__(self):

        return self.choice_text
7. 执行数据库同步 (ORM)自动根据model定义创建表接口 (我这里使用的mysql)
首先创建数据库
create database polls;
然后执行命令:
python manage.py syncdb
8. 检查数据库中表的创建:
use polls
show tables
9. 创建admin.py
# coding=utf-8

from django.contrib import admin

from .models import Question, Choice

# Register your models here.

class ChoiceInline(admin.TabularInline):

    model = Choice

    extra = 3

class QuestionAdmin(admin.ModelAdmin):

    fieldsets = [

        (None,               {'fields': ['question_text']}),

        ('Date information', {'fields': ['pub_date'], 'classes': ['collapse']}),

    ]

    inlines = [ChoiceInline]

    list_display = ('question_text', 'pub_date')

admin.site.register(Choice)

admin.site.register(Question, QuestionAdmin)
10. 启动应用
python manage.py runserver
登录后台:http://127.0.0.1:8000/admin 通过Django自动的后台进行问题添加
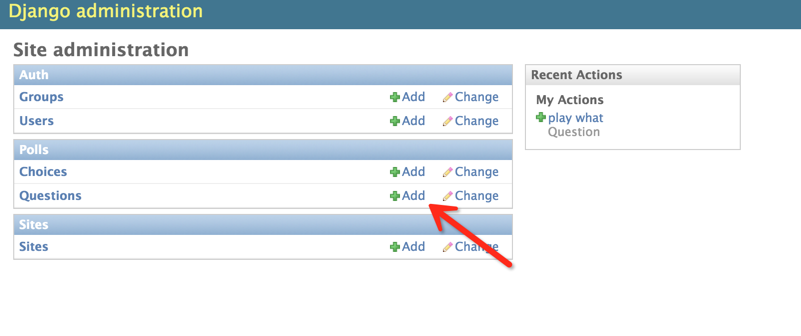
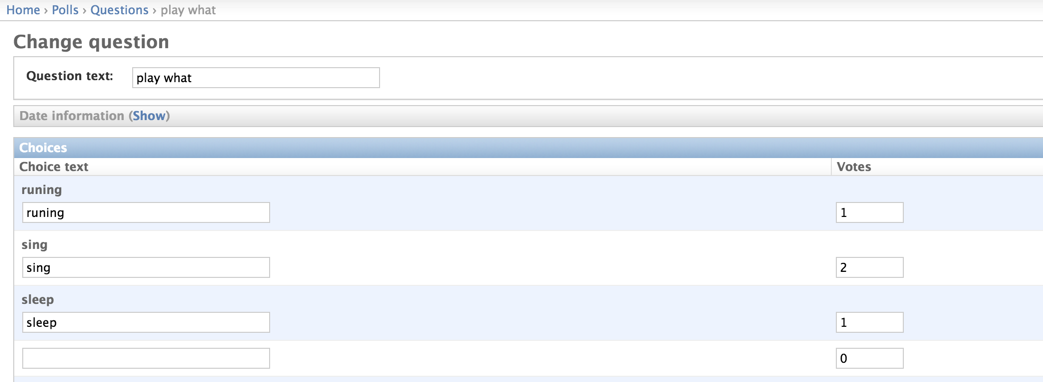
11. 编写视图控制层
视图起着承前启后的作用,前是指前端页面,后是指后台数据库。将数据库表中的内容查询出来显示到页面上。
编写polls/views.py文件:
# coding=utf-8

from django.shortcuts import render, get_object_or_404

from django.http import HttpResponseRedirect, HttpResponse

from django.core.urlresolvers import reverse

from .models import Question, Choice

# Create your views here.

# 首页展示所有问题

def index(request):

    # latest_question_list2 = Question.objects.order_by('-pub_data')[:2]

    latest_question_list = Question.objects.all()

    context = {'latest_question_list': latest_question_list}

    return render(request, 'polls/index.html', context)

# 查看所有问题

def detail(request, question_id):

    question = get_object_or_404(Question, pk=question_id)

    return render(request, 'polls/detail.html', {'question': question})

# 查看投票结果

def results(request, question_id):

    question = get_object_or_404(Question, pk=question_id)

    return render(request, 'polls/results.html', {'question': question})

# 选择投票

def vote(request, question_id):

    p = get_object_or_404(Question, pk=question_id)

    try:

        selected_choice = p.choice_set.get(pk=request.POST['choice'])

    except (KeyError, Choice.DoesNotExist):

        # Redisplay the question voting form.

        return render(request, 'polls/detail.html', {

            'question': p,

            'error_message': "You didn't select a choice.",

        })

    else:

        selected_choice.votes += 1

        selected_choice.save()

        # Always return an HttpResponseRedirect after successfully dealing

        # with POST data. This prevents data from being posted twice if a

        # user hits the Back button.

        return HttpResponseRedirect(reverse('polls:results', args=(p.id,)))
12. 配置视图展示层与逻辑控制层url映射
url是一个请求配置文件,页面中的请求转交给由哪个函数处理,由该文件决定。
首先配置polls/urls.py(该文件需要创建)
from django.conf.urls import url

from . import views

urlpatterns = [

    # ex : /polls/

    url(r'^$', views.index, name='index'),

    # ex : /polls/5/

    url(r'^(?P<question_id>[0-9]+)/$', views.detail, name='detail'),

    # ex : /polls/5/results/

    url(r'^(?P<question_id>[0-9]+)/results/$', views.results, name='results'),

    # ex : /polls/5/vote

    url(r'^(?P<question_id>[0-9]+)/vote/$', views.vote, name='vote'),

]
接着,编辑mysite/urls.py文件。
from django.conf.urls import include, url

from django.contrib import admin

urlpatterns = [

    url(r'^polls/', include('polls.urls', namespace="polls")),

    url(r'^admin/', include(admin.site.urls)),

]
13. 创建视图模板
模板就是前端页面,用来将数据显示到web页面上。
首先创建polls/templates/polls/目录,分别在该目录下创建index.html、detail.html和results.html文件。
index.html
{% if latest_question_list %}

    <ul>

    {% for question in latest_question_list %}

        <li><a href="{% url polls:detail question.id %}">{{ question.question_text }}</a></li>

    {% endfor %}

    </ul>

{% else %}

    <p>No polls are available.</p>

{% endif %}
detail.html
<h1>{{ question.question_text }}</h1>

{% if error_message %}<p><strong>{{ error_message }}</strong></p>{% endif %}

<form action="{% url polls:vote question.id %}" method="post">

{% csrf_token %}

{% for choice in question.choice_set.all %}

    <input type="radio" name="choice" id="choice{{ forloop.counter }}" value="{{ choice.id }}" />

    <label for="choice{{ forloop.counter }}">{{ choice.choice_text }}</label><br />

{% endfor %}

<input type="submit" value="Vote" />

</form>
results.html
<h1>{{ question.question_text }}</h1>

<ul>

{% for choice in question.choice_set.all %}

    <li>{{ choice.choice_text }} -- {{ choice.votes }} vote{{ choice.votes|pluralize }}</li>

{% endfor %}

</ul>

<a href="{% url polls:detail question.id %}">Vote again?</a>
14. 启动web容器,访问:http://127.0.0.1:8000/polls/

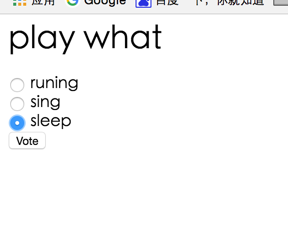

Django + mysql 快速搭建简单web投票系统的更多相关文章
- 使用Django快速搭建简单的数据管理后台
使用Django快速搭建简单的数据管理后台 概述 需求描述: 数据表已建好,能可视化操作增删改查,避免直接操作数据库 简版的管理系统 环境 Windows 10 x64 Python 3.6.3 (A ...
- 快速搭建应用服务日志收集系统(Filebeat + ElasticSearch + kibana)
快速搭建应用服务日志收集系统(Filebeat + ElasticSearch + kibana) 概要说明 需求场景,系统环境是CentOS,多个应用部署在多台服务器上,平时查看应用日志及排查问题十 ...
- koa2+koa-generator+mysql快速搭建nodejs服务器
koa2+koa-generator+mysql快速搭建nodejs服务器 用koa的脚手架koa-generator可以快速生成项目骨架,可以用于发开或者测试接口 https://github.co ...
- 拿nodejs快速搭建简单Oauth认证和restful API server攻略
拿nodejs快速搭建简单Oauth认证和restful API server攻略:http://blog.csdn.net/zhaoweitco/article/details/21708955 最 ...
- 使用docker快速搭建Permeate渗透测试系统实践
一.背景 笔者最近在做一场Web安全培训,其中需要搭建一套安全测试环境:在挑选渗透测试系统的时候发现permeate渗透测试系统比较满足需求,便选择了此系统:为了简化这个步骤,笔者将系统直接封装到了d ...
- 巨杉Tech | 十分钟快速搭建 Wordpress 博客系统
介绍 很多互联网应用程序开发人员第一个接触到的网站项目就是博客系统.而全球使用最广的Wordpress常常被用户用来快速搭建个人博客网站.默认情况下,Wordpress一般在后台使用MySQL关系型数 ...
- 用python3.x与mysql数据库构建简单的爬虫系统(转)
这是在博客园的第一篇文章,由于本人还是一个编程菜鸟,也写不出那些高大上的牛逼文章,这篇文章就是对自己这段时间学习python的一个总结吧. 众所周知python是一门对初学编程的人相当友好的编程语言, ...
- 使用Node.js快速搭建简单的静态文件服务器
做前端有时会采用一些复杂框架,在文件系统中直接打开页面(用file:///方式打开),往往会报跨域的错,类似于“XMLHttpRequest cannot load ...(文件名). Cross o ...
- mysql快速搭建从库
基于mysqldump快速搭建从库 https://blog.csdn.net/leshami/article/details/44994329 使用xtrbackup克隆从库 https://blo ...
随机推荐
- DNS压力测试工具dnsperf简介
dnsperf是我最近写的一个开源的DNS压力测试工具,用户可以用它来对DNS服务器或者Local DNS做压力测试.dnsperf目前的实现是单进程模式,通过epoll非阻塞地处理网络事件. dns ...
- MySQL的下载与安装 和 navicat for mysql 安装使用
新手上路-MySQL安装 目录结构 Windows平台 MySQL安装 示例数据导入 Linux平台 CentOS系统 Ubuntu系统 FAQ 密码生成工具-keepass 修改提示符 图形工具 删 ...
- 搭建S3C6410开发板的测试环境
因为ARM架构的开发板可基于X86架构的PC在CPU指令以及二进制上都有所不同,而且如果linux驱动需要访问硬件,这些硬件很难在PC上模拟,所以就需要我们在带有这些硬件的开发板上进行调试和测试. ...
- swift基础:第一部分:基本数据类型及结构
首先谈点开心的:今天是周二,广州的天气格外明朗,早上上班的心情也不一样,最值得高兴事,很快到五一劳动节了,说到劳动节,放假是吧.你懂的.再来谈谈我上周的工作总结,上周可以说是黑轮压城城欲摧,甲光向日金 ...
- ASP.NET导出文件FileResult的使用
本文给大家讲一下ASP.NET MVC中如何使用FileResult来导出文件,首先网上相关例子有很多大神都有讲,我在这只是稍微说一点不同——为什么我的导出没有反应呢? 这个问题,我找了半天也没有找到 ...
- T-SQL存储过程、游标
Transact-SQL中的存储过程,非常类似于Java语言中的方法,它可以重复调用.当存储过程执行一次后,可以将语句缓存中,这样下次执行的时候直接使用缓存中的语句.这样就可以提高存储过程的性能. Ø ...
- asp.net-枚举绑定控件
1.DropDownList asp.net页面: <asp:DropDownList ID="drpTemplateType" runat="server&quo ...
- 我的Android第四章
本章需掌握 1.连接真机的过程. 2.dx指令的作用 3.adb是什么? 4.adb有什么用(有什么好处)? 5.adb的一些常用命令 1.连接真机的过程. 需要:一部Android机.usb连接线, ...
- Windows7+32位,MongoDB安装
在网上找了各种安装MongoDB的教程,总是会出现一些bug,就自己总结了,亲测正确,MongoDB的安装再也不是一件麻烦的事情了~ 1.下载好跟自己电脑适合的安装包,选择Custom自定义安装,将安 ...
- java获取两个时间的相隔时间,包括年、月、日、时、分、秒
public static final int YEAR_RETURN = 0; public static final int MONTH_RETURN = 1 ...