
Spring+springmvc+Mybatis整合案例 xml配置版(myeclipse)详细版
Spring+springmvc+Mybatis整合案例
Version:xml版(myeclipse)
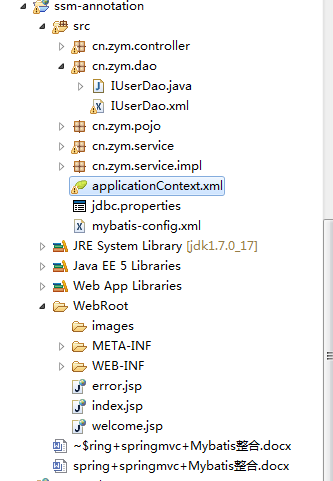
文档结构图:
从底层开始做起:
01.配置web.xml文件
<?xml version="1.0" encoding="UTF-8"?>
<web-app xmlns:xsi="http://www.w3.org/2001/XMLSchema-instance" xmlns="http://java.sun.com/xml/ns/javaee" xmlns:web="http://java.sun.com/xml/ns/javaee/web-app_2_5.xsd" xsi:schemaLocation="http://java.sun.com/xml/ns/javaee http://java.sun.com/xml/ns/javaee/web-app_2_5.xsd" version="2.5">
<display-name></display-name>
<!-- 配置spring装载bean的设置 -->
<context-param>
<param-name>contextConfigLocation</param-name>
<param-value>classpath:applicationcontext.xml</param-value>
</context-param>
<!-- 配置编码 -->
<filter>
<filter-name>CharacterEncoding</filter-name> <filter-class>org.springframework.web.filter.CharacterEncodingFilter</filter-class>
<init-param>
<param-name>encoding</param-name>
<param-value>utf-8</param-value>
</init-param>
<init-param>
<param-name>forceEncoding</param-name>
<param-value>true</param-value>
</init-param>
</filter>
<filter-mapping>
<filter-name>CharacterEncoding</filter-name>
<url-pattern>/*</url-pattern>
</filter-mapping>
<servlet>
<servlet-name>springmvc</servlet-name>
<servlet-class>org.springframework.web.servlet.DispatcherServlet</servlet-class>
<!-- 配置springmvc需要的组件设置 -->
<init-param>
<param-name>contextConfigLocation</param-name>
<param-value>classpath:applicationContext.xml</param-value>
</init-param>
<load-on-startup>1</load-on-startup>
</servlet>
<servlet-mapping>
<servlet-name>springmvc</servlet-name>
<url-pattern>*.do</url-pattern>
</servlet-mapping>
<welcome-file-list>
<welcome-file>index.jsp</welcome-file>
</welcome-file-list>
</web-app>
02.配置applicationcontext.xml文件
<?xml version="1.0" encoding="UTF-8"?>
<beans xmlns="http://www.springframework.org/schema/beans"
xmlns:xsi="http://www.w3.org/2001/XMLSchema-instance" xmlns:aop="http://www.springframework.org/schema/aop"
xmlns:context="http://www.springframework.org/schema/context" xmlns:p="http://www.springframework.org/schema/p"
xmlns:tx="http://www.springframework.org/schema/tx"
xsi:schemaLocation="
http://www.springframework.org/schema/beans
http://www.springframework.org/schema/beans/spring-beans.xsd
http://www.springframework.org/schema/aop
http://www.springframework.org/schema/aop/spring-aop-4.2.xsd
http://www.springframework.org/schema/tx
http://www.springframework.org/schema/tx/spring-tx-4.2.xsd
http://www.springframework.org/schema/context
http://www.springframework.org/schema/context/spring-context-4.2.xsd ">
<!--01. 包扫描器 -->
<context:component-scan base-package="cn.zym.controller"></context:component-scan>
<!-- 02.数据源 -->
<bean id="dataSource" class="com.mchange.v2.c3p0.ComboPooledDataSource">
<property name="driverClass" value="${jdbc.driverClass}"></property>
<property name="jdbcUrl" value="${jdbc.jdbcUrl}"></property>
<property name="user" value="${jdbc.user}"></property>
<property name="password" value="${jdbc.password}"></property>
</bean>
<!-- 1.1 关联jdbc.properties -->
<context:property-placeholder location="classpath:jdbc.properties"/>
<!-- 02.配置SessionFactory -->
<bean id="sessionFactory" class="org.mybatis.spring.SqlSessionFactoryBean">
<property name="configLocation" value="classpath:mybatis-config.xml"></property>
<property name="dataSource" ref="dataSource"></property>
</bean>
<!--03. dao -->
<bean class="org.mybatis.spring.mapper.MapperScannerConfigurer">
<property name="sqlSessionFactoryBeanName" value="sessionFactory"></property>
<property name="basePackage" value="cn.zym.dao"></property>
</bean>
<!--04. service -->
<bean id="userservice" class="cn.zym.service.impl.UserServiceImpl">
<property name="dao" ref="IUserDao"></property>
</bean>
<!--05. controller -->
<bean id="/usercontroller.do" class="cn.zym.controller.UserController">
<property name="service" ref="userservice"></property>
</bean>
<!-- 06.配置事务管理器 -->
<bean id="transactionManager" class="org.springframework.jdbc.datasource.DataSourceTransactionManager">
<property name="dataSource" ref="dataSource"></property>
</bean>
<!-- 07.配置开启事务操作 -->
<tx:advice id="txAdvice" transaction-manager="transactionManager">
<tx:attributes>
<!--指定在连接方法上应用的事务属性 -->
<tx:method name="save*" isolation="DEFAULT" propagation="REQUIRED"/>
</tx:attributes>
</tx:advice>
<!-- aop配置 -->
<aop:config>
<aop:pointcut expression="execution(* *..service.*.*(..))" id="stockPointcut"/>
<aop:advisor advice-ref="txAdvice" pointcut-ref="stockPointcut"/>
</aop:config>
</beans>
一般使用Mybatis时不建议使用注解(会降低程序效率和增加开发难度):这里依然还是选择原生的配置;
02.1jdbc.properties文件的书写
jdbc.driverClass=com.mysql.jdbc.Driver
jdbc.jdbcUrl=jdbc\:mysql\://localhost\:3306/zhangyiming
jdbc.user=zym
jdbc.password=admin
03.mybatis-config.xml的配置:
<?xml version="1.0" encoding="UTF-8" ?>
<!DOCTYPE configuration
PUBLIC "-//mybatis.org//DTD Config 3.0//EN"
"http://mybatis.org/dtd/mybatis-3-config.dtd">
<configuration>
<typeAliases>
这里将pojo包下的类设置了别名(在XXXdao.xml中直接调用该包下的类名即可)
<package name="cn.zym.pojo"/>
</typeAliases>
。。。。添加其他配置文件
</configuration>
Dao层书写:
Ok,这里需要添加对应dao的Mybatis操作文件,该文件通过spring容器生成了代理类,在上面有提到;
<!--03. dao --> 该代理类肯能会有多个,每个代理类的名称的生成规则:
Interface:IUserDao proxy:IUserDao
Interface:UserDao proxy:userDao
<bean class="org.mybatis.spring.mapper.MapperScannerConfigurer">
<property name="sqlSessionFactoryBeanName" value="sessionFactory"></property>
<property name="basePackage" value="cn.zym.dao"></property>
</bean>
Ok,配置dao对应的文件
04.IUserDao.xml 的配置
这里的xml文件一定要放置在与该接口同目录下(如果不设置具体描述文件路径的话;)
<?xml version="1.0" encoding="UTF-8" ?>
<!DOCTYPE mapper
PUBLIC "-//mybatis.org//DTD Mapper 3.0//EN"
"http://mybatis.org/dtd/mybatis-3-mapper.dtd">
<mapper namespace="cn.zym.dao.IUserDao">
<select id="save" parameterType="User">
insert into user (name,password) values (#{name},#{password})
</select>
</mapper>
Ok,接下来是注解配置Controller:
05.Controller的配置
public class UserController implements Controller{
private IUserService service;
public ModelAndView handleRequest(HttpServletRequest request,
HttpServletResponse response) throws Exception {
request.setCharacterEncoding("utf-8");
String name = request.getParameter("uname");
String password = request.getParameter("upassword");
System.out.println(name);
User user = new User();
user.setName(name);
user.setPassword(password);
service.save(user);
return new ModelAndView("/welcome.jsp");
}
public IUserService getService() {
return service;
}
public void setService(IUserService service) {
this.service = service;
}
}
这样在前台直接请求携带数据的时候将会触发该Handler,将数据报错到DB中
Useradd.jsp;
<body>
<form action="adduser.do" method="post">
<input type="text" name="name"/><br/>
<input type="text" name="password"/><br/>
<input type="submit" value="submit"/>
</form>
</body>
Spring+springmvc+Mybatis整合案例 xml配置版(myeclipse)详细版的更多相关文章
- Spring+springmvc+Mybatis整合案例 annotation版(myeclipse)详细版
Spring+springmvc+Mybatis整合案例 Version:annotation版 文档结构图: 从底层开始做起: 01.配置web.xml文件 <?xml version=&qu ...
- ssm(spring+springmvc+mybatis)整合之环境配置
1-1.导包 导入SpringMVC.Spring.MyBatis.mybatis-spring.mysql.druid.json.上传和下载.验证的包 1-2.创建并配置web.xml文件 配置sp ...
- 框架篇:Spring+SpringMVC+Mybatis整合开发
前言: 前面我已搭建过ssh框架(http://www.cnblogs.com/xrog/p/6359706.html),然而mybatis表示不服啊. Mybatis:"我抗议!" ...
- Java基础-SSM之Spring和Mybatis整合案例
Java基础-SSM之Spring和Mybatis整合案例 作者:尹正杰 版权声明:原创作品,谢绝转载!否则将追究法律责任. 在之前我分享过mybatis和Spring的配置案例,想必大家对它们的 ...
- ssm之spring+springmvc+mybatis整合初探
1.基本目录如下 2.首先是向lib中加入相应的jar包 3.然后在web.xml中加入配置,使spring和springmvc配置文件起作用. <?xml version="1. ...
- SSM Spring +SpringMVC+Mybatis 整合配置 及pom.xml
SSM Spring +SpringMVC+Mybatis 配置 及pom.xml SSM框架(spring+springMVC+Mybatis) pom.xml文件 maven下的ssm整合配置步骤
- SpringMVC, Spring和Mybatis整合案例一
一 准备工作 包括:spring(包括springmvc).mybatis.mybatis-spring整合包.数据库驱动.第三方连接池. 二 整合思路 Dao层: 1.SqlMapConfig. ...
- Spring+SpringMVC+Mybatis整合(二)
目录结构:
- Spring+SpringMVC+MyBatis整合基础篇(三)搭建步骤
作者:13GitHub:https://github.com/ZHENFENG13版权声明:本文为原创文章,未经允许不得转载. 框架介绍 Spring SpringMVC MyBatis easyUI ...
随机推荐
- POSTMAN发起请求收到乱码 http 406错误
web前段异常: The resource identified by this request is only capable of generating responses with charac ...
- PSP(11.9~11.16)
14号 类别c 内容c 开始时间s 结束e 中断I 净时间T 看书 设计模式 15:20 17:10 25m 85m 看书 构建执法 19:00 20:10 0m 70m 15号 类别c 内容c 开始 ...
- SVN版本问题:svn: E155021: This client is too old to work with the working copy at
最近Android Studio SVN老是提示: SVN版本问题:svn: E155021: This client is too old to work with the working copy ...
- 尚学堂Spring视频教程(七):AOP XML
此处省略N个字.... 直接看下面 推荐链接: Spring Aop实例之xml配置
- centos,apache运维经验
1.防止php木马在apache下跨站 在/etc/php.ini 中设置open_basedir=.:/tmp/ , (还需要加载网站所在的目录) 2.shell下搜索木马 find ./ -ty ...
- 两系统用asp.net forms 身份验证方式实现跨域登录信息共享
1.两个系统的 web.config 都配置为 forms 验证方式( system.web —> authentication 节点) 2.在两个系统的Web.config里配置相同的 sys ...
- Echart图表入门
1.Echart是什么? Enterprise Charts的缩写,商业级数据图表,一个纯Javascript的图表库.更多的内容可以参考网上的资料 2.使用步骤 a.下载开发包 官网地址:http: ...
- Thinkphp源码分析系列(三)– App应用程序类
// +---------------------------------------------------------------------- // | ThinkPHP [ WE CAN DO ...
- Python全栈开发 线程和进程
一.线程 线程是程序工作的最小单元,由进程生成,生成的线程间会共享内存空间.Python中创建线程比较简单,导入threading模块,创建线程实例.下面这段代码是一个简单的多线程例子 import ...
- android嵌套unity3d
最近因为跟小伙伴在制作一个App参加比赛,由于有unity的开发经验,突发奇想的想要在Android应用中内嵌unity提供模型展示的功能. 为此,我们查阅了不少资料.大多发现的是unity中内嵌An ...