canvas绘制圆心扇形可组成颜色随机的七色小花
啊~现在应该还是春天吧、心情一如既往的烦闷呐、最近做了一个canvas的扇形绘制的东西、把它整理出来变成一个适合春天的花朵绘制~沉闷的工作环境已经让我这种有趣的人也变成了无聊鬼怪呢。下次一定想找一个年轻的明亮的有意思的技术环境~
canvas绘制圆、弧参考理解:http://www.cnblogs.com/guopei/archive/2011/06/30/2093981.html
随机颜色函数参考:https://yq.aliyun.com/ziliao/174922
最终实现图
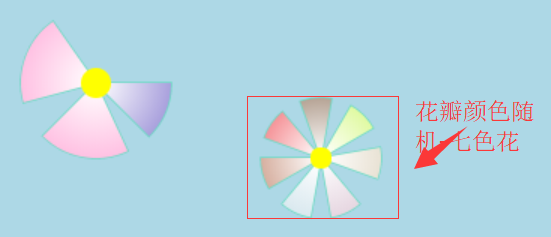
怎么样、还可以吧~七色花有些颜色相近是因为这个绘制过程比较短、所以随机的时候时间相近就颜色比较近、而且因为渐变、颜色仅仅是深浅区别就更不明显了、但其颜色的rgb值是不同哒·
进入主题哒哒哒~~~~~
①。先来绘制圆心
效果

核心代码
<!DOCTYPE html>

<html lang="en">

<head>

    <meta charset="UTF-8">

    <meta name="viewport" content="width=device-width, initial-scale=1.0">

    <meta http-equiv="X-UA-Compatible" content="ie=edge">

    <title>Document</title>

</head>

<body>

    <div style="height: 100px"></div>

    <div style="text-align: center">

        <canvas id="myCanvas" style="border: 1px solid gray;background-color: lightblue" width="600" height="400">

    </canvas>

    </div>

    <script>

        var canvas = document.getElementById('myCanvas');

        var ctx = canvas.getContext('2d');

        function draw() {

            //定义绘制圆心的方法

            CanvasRenderingContext2D.prototype.circle = function(x, y, raidus, color) {

                this.beginPath();

                this.arc(x, y, raidus, 0, Math.PI * 2, false); //x:坐标点x;y:坐标点y;raidus:圆半径;0:起点角度;Math.PI*2:终点角度;false:非逆时针

                this.closePath();

                this.fillStyle = color; // 填充颜色;

                this.fill(); //对图形进行填充

            }

        }

        function show() {

            draw(); //调用定义好的绘制方法

            ctx.circle(100, 150, 10, '#FFFF00'); //绘制圆心

        }

        window.onload(show())

    </script>

</body>

</html>
drawCircle.js
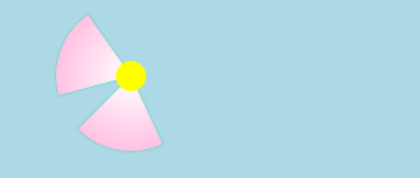
②。绘制扇形
效果:
核心代码
<!DOCTYPE html>

<html lang="en">

<head>

    <meta charset="UTF-8">

    <meta name="viewport" content="width=device-width, initial-scale=1.0">

    <meta http-equiv="X-UA-Compatible" content="ie=edge">

    <title>Document</title>

</head>

<body>

    <div style="height: 100px"></div>

    <div style="text-align: center">

        <canvas id="myCanvas" style="border: 1px solid gray;background-color: lightblue" width="600" height="400">

    </canvas>

    </div>

    <script>

        var canvas = document.getElementById('myCanvas');

        var ctx = canvas.getContext('2d');

        function draw() {

            //定义绘制圆心的方法

            CanvasRenderingContext2D.prototype.circle = function(x, y, raidus, color) {

                this.beginPath();

                this.arc(x, y, raidus, 0, Math.PI * 2, false); //x:坐标点x;y:坐标点y;raidus:圆半径;0:起点角度;Math.PI*2:终点角度;false:非逆时针

                this.closePath();

                this.fillStyle = color; // 填充颜色;

                this.fill(); //对图形进行填充

            }

            //定义绘制扇形的方法

            CanvasRenderingContext2D.prototype.sector = function(x, y, radius, innerR, sDeg, eDeg, color, lineWidth) {

                const DEG = Math.PI / 180;

                var grad = this.createRadialGradient(x, y, 1, x, y, radius + radius); //定义一个渐变色

                grad.addColorStop(0, 'rgba(255,255,255,255)'); //从白色圆心处渐变出来

                grad.addColorStop(1, color); //渐变出传入颜色

                this.beginPath();

                this.moveTo(x, y);

                this.arc(x, y, radius, DEG * sDeg, DEG * eDeg, false); //画圆同方法、控制起始角度就变成扇形

                this.lineTo(x, y); //画外围线

                this.strokeStyle = "rgba(81,217,181,0.75)"; //外围线颜色

                this.lineWidth = lineWidth; //外围线粗

                this.fillStyle = grad; //对扇形颜色设置

                this.stroke();

                this.fill(); //填充

                this.closePath();

            }

        }

        function show() {

            draw(); //调用定义好的绘制方法

            ctx.sector(100, 150, 50, 30, 165, 235, '#FF82C6', 1.5); //绘制扇形

            ctx.sector(100, 150, 50, 30, 65, 135, '#FF82C6', 1.5);

            ctx.circle(100, 150, 10, '#FFFF00'); //绘制圆心

        }

        window.onload(show())

    </script>

</body>

</html>
drawSector.js
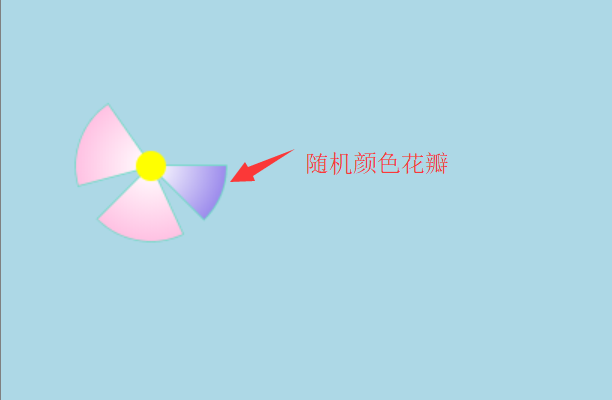
③。加上随机颜色函数
效果:
核心代码
<!DOCTYPE html>

<html lang="en">

<head>

    <meta charset="UTF-8">

    <meta name="viewport" content="width=device-width, initial-scale=1.0">

    <meta http-equiv="X-UA-Compatible" content="ie=edge">

    <title>Document</title>

</head>

<body>

    <div style="height: 100px"></div>

    <div style="text-align: center">

        <canvas id="myCanvas" style="border: 1px solid gray;background-color: lightblue" width="600" height="400">

    </canvas>

    </div>

    <script>

        var canvas = document.getElementById('myCanvas');

        var ctx = canvas.getContext('2d');

        function draw() {

            //定义绘制圆心的方法

            CanvasRenderingContext2D.prototype.circle = function(x, y, raidus, color) {

                this.beginPath();

                this.arc(x, y, raidus, 0, Math.PI * 2, false); //x:坐标点x;y:坐标点y;raidus:圆半径;0:起点角度;Math.PI*2:终点角度;false:非逆时针

                this.closePath();

                this.fillStyle = color; // 填充颜色;

                this.fill(); //对图形进行填充

            }

            //定义绘制扇形的方法

            CanvasRenderingContext2D.prototype.sector = function(x, y, radius, innerR, sDeg, eDeg, color, lineWidth) {

                const DEG = Math.PI / 180;

                var grad = this.createRadialGradient(x, y, 1, x, y, radius + radius); //定义一个渐变色

                grad.addColorStop(0, 'rgba(255,255,255,255)'); //从白色圆心处渐变出来

                grad.addColorStop(1, color); //渐变出传入颜色

                this.beginPath();

                this.moveTo(x, y);

                this.arc(x, y, radius, DEG * sDeg, DEG * eDeg, false); //画圆同方法、控制起始角度就变成扇形

                this.lineTo(x, y); //画外围线

                this.strokeStyle = "rgba(81,217,181,0.75)"; //外围线颜色

                this.lineWidth = lineWidth; //外围线粗

                this.fillStyle = grad; //对扇形颜色设置

                this.stroke();

                this.fill(); //填充

                this.closePath();

            }

        }

        //颜色随机方法

        function getColor() {

            var arr = [];

            i = 0;

            C = '0123456789ABCDEF'; //定义颜色代码的字符串

            //C = '01A23B45C67D89EF';

            while (i++ < 6) {

                x = Math.random() * 16; //取0-16之间的随机数给变量x

                b = parseInt(x); //取0-16之前的整数给变量b

                c = C.substr(b, 1); //由第b(0-16之间的整数)位开始取一个字符

                arr.push(c);

            }

            var cl = "#" + arr.join(''); //去掉之前数组之间的逗号,前面再加一个井号

            return cl;

        }

        function show() {

            draw(); //调用定义好的绘制方法

            var col = getColor(); //调用随机颜色

            ctx.sector(100, 150, 50, 30, 165, 235, '#FF82C6', 1.5); //绘制扇形

            ctx.sector(100, 150, 50, 30, 65, 135, '#FF82C6', 1.5);

            ctx.sector(100, 150, 50, 30, 0, 45, col, 1.5); //绘制随机颜色扇形

            ctx.circle(100, 150, 10, '#FFFF00'); //绘制圆心

        }

        window.onload(show())

    </script>

</body>

</html>
drawRandomColor.js
④。完整代码
在上面的基础上、再加一个循环来绘制花瓣、即得到了“七色花”的效果啦、具体看代码咯
<!DOCTYPE html>

<html lang="en">

<head>

    <meta charset="UTF-8">

    <meta name="viewport" content="width=device-width, initial-scale=1.0">

    <meta http-equiv="X-UA-Compatible" content="ie=edge">

    <title>Document</title>

</head>

<body>

    <div style="height: 100px"></div>

    <div style="text-align: center">

        <canvas id="myCanvas" style="border: 1px solid gray;background-color: lightblue" width="600" height="400">

    </canvas>

    </div>

    <script>

        var canvas = document.getElementById('myCanvas');

        var ctx = canvas.getContext('2d');

        function draw() {

            //定义绘制圆心的方法

            CanvasRenderingContext2D.prototype.circle = function(x, y, raidus, color) {

                this.beginPath();

                this.arc(x, y, raidus, 0, Math.PI * 2, false); //x:坐标点x;y:坐标点y;raidus:圆半径;0:起点角度;Math.PI*2:终点角度;false:非逆时针

                this.closePath();

                this.fillStyle = color; // 填充颜色;

                this.fill(); //对图形进行填充

            }

            //定义绘制扇形的方法

            CanvasRenderingContext2D.prototype.sector = function(x, y, radius, innerR, sDeg, eDeg, color, lineWidth) {

                const DEG = Math.PI / 180;

                var grad = this.createRadialGradient(x, y, 1, x, y, radius + radius); //定义一个渐变色

                grad.addColorStop(0, 'rgba(255,255,255,255)'); //从白色圆心处渐变出来

                grad.addColorStop(1, color); //渐变出传入颜色

                this.beginPath();

                this.moveTo(x, y);

                this.arc(x, y, radius, DEG * sDeg, DEG * eDeg, false); //画圆同方法、控制起始角度就变成扇形

                this.lineTo(x, y); //画外围线

                this.strokeStyle = "rgba(81,217,181,0.75)"; //外围线颜色

                this.lineWidth = lineWidth; //外围线粗

                this.fillStyle = grad; //对扇形颜色设置

                this.stroke();

                this.fill(); //填充

                this.closePath();

            }

        }

        //颜色随机方法

        function getColor() {

            var arr = [];

            i = 0;

            C = '0123456789ABCDEF'; //定义颜色代码的字符串

            //C = '01A23B45C67D89EF';

            while (i++ < 6) {

                x = Math.random() * 16; //取0-16之间的随机数给变量x

                b = parseInt(x); //取0-16之前的整数给变量b

                c = C.substr(b, 1); //由第b(0-16之间的整数)位开始取一个字符

                arr.push(c);

            }

            var cl = "#" + arr.join(''); //去掉之前数组之间的逗号,前面再加一个井号

            return cl;

        }

        function show() {

            draw(); //调用定义好的绘制方法

            var col = getColor(); //调用随机颜色

            ctx.sector(100, 150, 50, 30, 165, 235, '#FF82C6', 1.5); //绘制扇形

            ctx.sector(100, 150, 50, 30, 65, 135, '#FF82C6', 1.5);

            ctx.sector(100, 150, 50, 30, 0, 45, col, 1.5); //绘制随机颜色扇形

            ctx.circle(100, 150, 10, '#FFFF00'); //绘制圆心

            //绘制七色花

            var ii = 0;

            while (ii++ < 7) {

                var c = getColor();

                ctx.sector(250, 200, 40, 30, ii * 50, ii * 50 + 30, c, 1.5);

            }

            ctx.circle(250, 200, 7, '#FFFF00');

        }

        window.onload(show())

    </script>

</body>

</html>
canvasDraw.js
canvas绘制圆心扇形可组成颜色随机的七色小花的更多相关文章
- 使用 HTML5 canvas 绘制精美的图形
HTML5 是一个新兴标准,它正在以越来越快的速度替代久经考验的 HTML4.HTML5 是一个 W3C “工作草案” — 意味着它仍然处于开发阶段 — 它包含丰富的元素和属性,它们都支持现行的 HT ...
- HTML5 canvas 绘制精美的图形
HTML5 是一个新兴标准,它正在以越来越快的速度替代久经考验的 HTML4.HTML5 是一个 W3C “工作草案” — 意味着它仍然处于开发阶段 — 它包含丰富的元素和属性,它们都支持现行的 HT ...
- canvas绘制一定数目的圆(均分)
绘制多圆 2016年5月24日12:12:26 绘制一定数目(num)颜色随机的小圆,围成一个大圆.根据num完全自动生成,且小圆自动均分大圆路径(num≥20). 效果: 前置技能:(1).Canv ...
- canvas绘制太阳系
原文地址:http://jeffzhong.space/2017/10/26/solar/ 学习canvas有一段时间了,顺便写个小项目练手,该项目用到的知识点包括: ES6面向对象 基本的三角函数 ...
- java-js知识库之二——canvas绘制炫彩气泡
现在使用canvas绘制气泡,虽说很多人都已经实现过了,可能方法都大同小异,但自己写和看别人写完全是两码事,自己会写的才是自己的,话不多说,直接上代码. 先来一张效果图: 现在上代码,代码有详细的注释 ...
- Canvas学习:封装Canvas绘制基本图形API
Canvas学习:封装Canvas绘制基本图形API Canvas Canvas学习 从前面的文章中我们了解到,通过Canvas中的CanvasRenderingContext2D对象中的属性和方 ...
- 怎样用JavaScript和HTML5 Canvas绘制图表
原文:https://code.tutsplus.com/zh-...原作:John Negoita翻译:Stypstive 在这篇教程中,我将展示用JavaScript和canvas作为手段,在饼状 ...
- 使用html5 canvas绘制圆形或弧线
注意:本文属于<html5 Canvas绘制图形入门详解>系列文章中的一部分.如果你是html5初学者,仅仅阅读本文,可能无法较深入的理解canvas,甚至无法顺畅地通读本文.请点击上述链 ...
- 使用Canvas绘制图形的基本教程
原文地址:http://www.cnblogs.com/picaso/archive/2012/11/26/2789077.html HTML5火的正热,最近有个想法也是要用到HTML的相关功能,所以 ...
随机推荐
- 上传到 App Store 时出错。
Try this, it fixed it for me. Open Terminal and run: cd ~ mv .itmstransporter/ .old_itmstransporte ...
- docker部署PMA(LNMP架构)
上篇文章中已经部署好php环境,测试也已经OK centos 7 docker 启动了一个web服务 但是启动时 报 WARNING: IPv4 forwarding is disabled. Net ...
- 网络通信 --> select()用法
select()用法 头文件 #include <sys/time.h> #include <sys/types.h> #include <unistd.h> 定义 ...
- java性能调优---------------------JVM调优方案
JVM的调优的主要过程有: 1.确定堆内存大小(-Xmx.-Xms) 2.合理分配新生代和老年代(-XX:NewRatio.-Xmn.-XX:SurvivorRatio) 3.确定永久区大小(-XX: ...
- Linux运维人员共用root帐户权限审计(转至马哥Linux运维)
一.应用场景 在中小型企业,公司不同运维人员基本都是以root 账户进行服务器的登陆管理,缺少了账户权限审计制度.不出问题还好, 出了问题,就很难找出源头.这里介绍下,如何利用编译bash 使不同的客 ...
- centos7 yum 安装mariadb
#vim /etc/yum.repos.d/mariadb.repo [mariadb]name = MariaDBbaseurl = https://yum.mariadb.org/10.1.16/ ...
- MySQL_执行计划详细说明
1 简要说明 id 表格查询的顺序编号. 降序查看,id相同的从上到下查查看. id可以为null ,当table为( union ,m,n )类型的时候,id为null,这个时候,id的 ...
- Java基础学习笔记十四 常用API之基本类型包装类
基本类型包装类 Java中有8种基本的数据类型,可是这些数据是基本数据,想对其进行复杂操作,变的很难.怎么办呢?在实际程序使用中,程序界面上用户输入的数据都是以字符串类型进行存储的.而程序开发中,我们 ...
- Alpha第八天
Alpha第八天 听说 031502543 周龙荣(队长) 031502615 李家鹏 031502632 伍晨薇 031502637 张柽 031502639 郑秦 1.前言 任务分配是VV.ZQ. ...
- C语言的第一次博客作业
题目1:7-3 温度转换 1.代码 int fahr, celsius; fahr=150; celsius=5*(fahr-32)/9; printf("fahr = %d, celsiu ...