Tensorflow学习笔记2019.01.03
tensorflow学习笔记:
3.2 Tensorflow中定义数据流图
张量知识矩阵的一个超集。
超集:如果一个集合S2中的每一个元素都在集合S1中,且集合S1中可能包含S2中没有的元素,则集合S1就是S2的一个超集,反过来,S2是S1的子集。
张量形状:
固定长度: [],() 0阶次;[3],(2,3) 1/2阶次
不定长度:[None] 表示任意长度的向量,(None,3) 表示行数任意,3列的矩阵
获取Op:tf.shape(tensor, name="tensor_shape") , 当然只能通过Session对象得到执行
OP/operation
利用Tensor对象执行运算的节点。计算完毕,返回0/多个张量,可以为数据流图中的其他的Op所使用。
除了输入和属性外,还可以接受一个name参数,描述性的字符串来指代某个特定Op,若对不同Op希望复用name,则用name_scope变成方式将一系列运算组织即可。
运算符重载
一元:tf.neg(),tf.logical_not(),tf.abs()
二元:tf.add(),tf.subtract(),tf.multiply()元素相乘,tf.matmul()矩阵相乘,tf.truediv(),tf.mod(),tf.pow(),< tf.less(),≤ tf.less_equal(),tf.greater(),tf.greater_equal(),tf.logical_and(),tf.logical_or(),tf.logical_xor()
tf.equal(),tf.not_equal()检查张量值是否相同
Graph对象
多个流图协同工作,这样用户在一个python文件中可以计算和适应若干独立模型的输出。
为了方便起见,当Tf库被加载时,会自动创建一个Graph对象,可以用tf.get_default_graph获得默认数据流图的句柄。
创建数据流图。
g1 = tf.Graph()

g2 = tf.Graph()

g3 = tf.get_default_graph()

with g1.as_default():

一系列Op:a = tf.multiply(2, 3)....

with g2.as_default():

一系列Op:b = tf.add(2, 3)....

with g3.as_default():

#一系列Op:c = tf.pow(2, 3)....
Session类
负责数据流图的执行。tf.Session(target, graph, config)
target:大多数默认为空,他为制定所使用的引擎
graph:当使用多个数据流图时,指明Graph对象,默认是当前数据流图。
config:包含cpu/gpu数目,为数据流图设置优化参数以及日志选项等
import tensorflow as tf

#创建Op和Tensor对象

a = tf.add(3, 5)

b = tf.multiply(2, 4)

c = tf.add(a, 9)

sess = tf.Session()

sess.run([a, b])

#输出[8,8]

replace_dict = {a: 2}

sess.run(c, feed_dict=replace_dict)

#输出11

sess.close()

#还可以用上下文管理器

with tf.Session() as sess:

    #...
Session.run(fetches, feed_dict, options, run_medadata)
采用run()方法计算所期望的tensor对象输出。
fetches:接受任意数据流图元素,若为一个Tensor对象,输出Numpy数组。
若为一个Op,输出None。例如sess.run(tf.global_variables_initializer()),执行初始化Variables对象所需的计算,返回None。
feed_dict:传入一个字典,a的值被重新赋予2,主要用在流图局部测试场景,给定输入值。
tf.placeholder()
占位节点用来添加输入。 dtype必须指定,shape可选,还可以为None,接受任意形状的Tensor,name可选。
import tensorflow as tf
import numpy as np
#占位符,输入
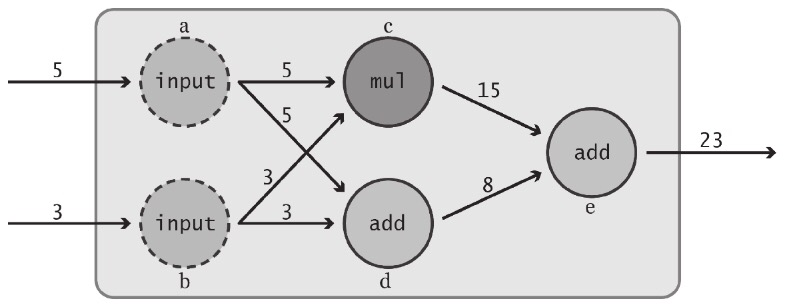
a = tf.placeholder(tf.int32, shape=[2], name="my_input")
b = tf.reduce_prod(a, name="prod_b") # 5x3=15
c = tf.reduce_sum(a, name="sum_c") # 5+3=8
#完成数据流图的定义
d = tf.add(b, c, name="add_d")
sess = tf.Session()
input_dict = {a:np.array([5, 3], dtype=np.int32)}
sess.run(d, feed_dict=input_dict) #输出15+8=23
sess.close()
Variables对象
创建:tf.Variables()
import tensorflow as tf
my_var = tf.Variables(3, name="my_var")
add = tf.add(5, my_var)
#2x2的全0矩阵
zeros = tf.zeros([2, 2])
#长度为6的全1向量
ones = tf.ones([6])
#大小为3x3x3,元素服从0~10的均匀分布
uniform = tf.random_uniform([3, 3, 3], minval=0, maxval=10)
#大小3x3x3,元素服从均值为0,标准差为2的正态分布
normal = tf.random_normal([3, 3, 3], mean=0.0, stddev=2.0)
#截断正态分布,大小2x2,元素值距离均值不会超过两倍的标准差。防止离群点出现
trunc = tf.truncated_normal([2, 2], mean=5.0, stddev=1.0)
#也可以像手工初始化张量那样,将这些Op作为Variavle对象作为初值传入
random_var = tf.Variable(tf.truncated_normal([2, 2]))
初始化:tf.global_variables_initializer() 或 tf.intialize_valiables([var1], name="init_var1")
#全部初始化

init = tf.global_variables_initializer()

sess = tf.Session()

sess.run(init)

init1 = tf.initialize_variables([var1], name="init_var1")

sess1 = tf.Session()

sess1.run(init1)
修改:Variables.assign()赋新值,Variables.assign_add()自增,Varables.assign_sub()自减
my_var = tf.Variables(1)
my_var_times_two = my_var.assign(my_var*2)
init = f.global_variables_initializer()
sess = tf.Session()
sess.run(init)
sess.run(my_var_times_two)
#输出2
sess.run(my_var_times_two)
#输出4
sess.run(my_var_times_two)
#输出8
sess.run(my_var.assign_add(1))
#输出9
sess.run(my_var.assign_sub(1))
#输出8
不同Session会各自独立维护自己的Variables对象的值。
trainable参数
在自动训练的机器学习模型的Optimizer类,会自动修改Variables的值,而不需要做出显示的请求。若不希望这样,则制定trainable=False即可。
not_trainable = tf.Variable(0, trainable=False)
3.3 名称作用域name scope
语法:
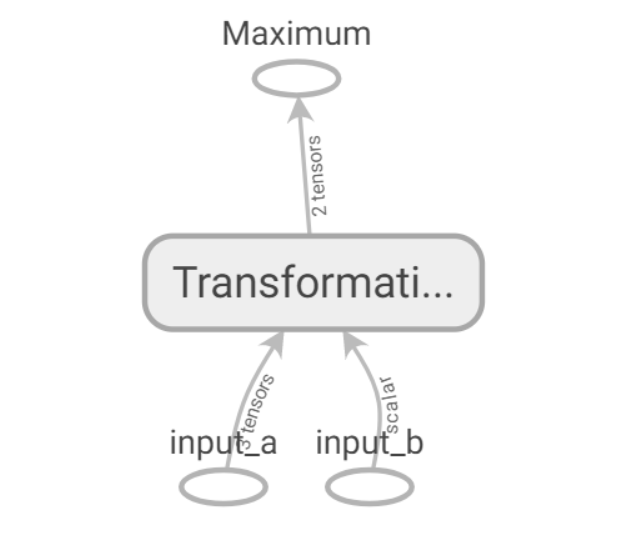
with tf.name_scope("Transformation"):
...
它允许将Op划分到一些较大的,有名称的语句块中,有名称作用域都将自己的Op进行封装。如下图1
import tensorflow as tf

#此处显示创建一个tf.Graph()对象,并未使用默认Graph对象

graph = tf.Graph()

with graph.as_default():

    in_1 = tf.placeholder(tf.float32, shape=[], name="input_a")

    in_2 = tf.placeholder(tf.float32, shape=[], name="input_b")

    const = tf.constant(3, dtype=tf.float32, name="static_value")

    with tf.name_scope("Transformation"):

        with tf.name_scope("A"):

            #接受in_1,输出一些值

            A_mul = tf.multiply(in_1, const)

            A_out = tf.subtract(A_mul, in_1)

        with tf.name_scope("B"):

            #接受in_2,输出一些值

            B_mul = tf.multiply(in_2, const)

            B_out = tf.subtract(B_mul, in_1)

        with tf.name_scope("C"):

            #接受A和B,输出一些值

            C_div = tf.div(A_out, B_out)

            C_out = tf.add(C_div, const)

        with tf.name_scope("D"):

            #接受A和B,输出一些值

            D_div = tf.div(B_out, A_out)

            D_out = tf.subtract(D_div, const)

    #获取C,D的输出

    out = tf.maximum(C_out, D_out)

    writer = tf.summary.FileWriter('./graph/name_scope_2',graph=tf.get_default_graph())

    writer.close()
在tensorboard上可视化数据流图:
借助一下代码可以实现
writer = tf.summary.FileWriter('./graph/name_scope_2',graph=tf.get_default_graph())

writer.close()

点开Transformation 它是一个名称作作用域,包含多个Op和作用域,子作用域还可以包含多个Op和作用域。并且相似操作会着色相同颜色。
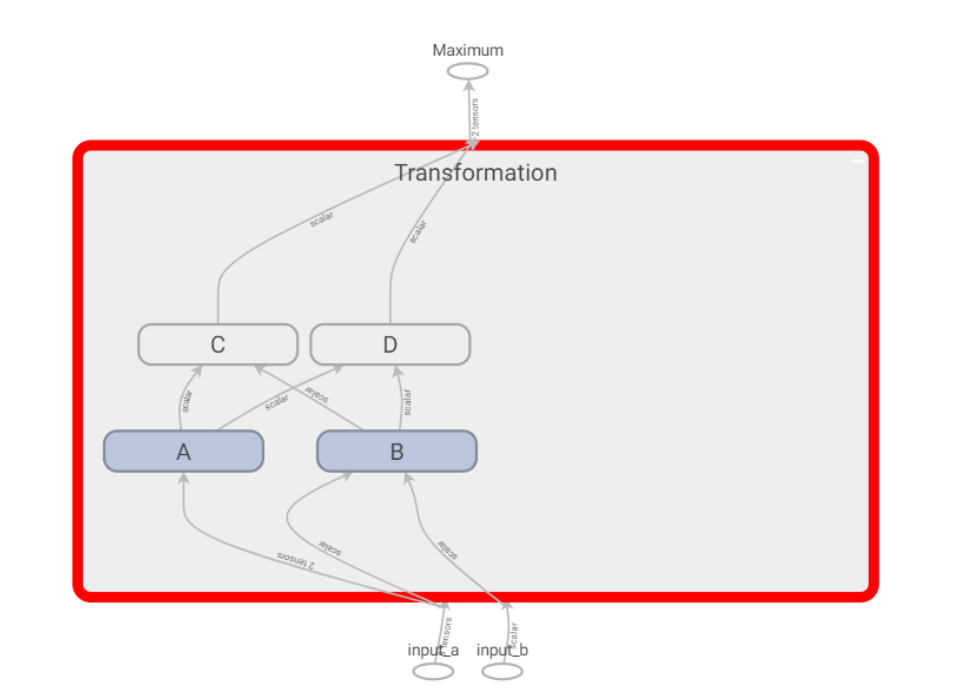

并且常量tf.constant(),会放置在对应名称作用域中。


3.4 练习
任务:运用上述组件,完成对任意长度输入的Tensor进行一系列运算和更新,并且在tensorboard中进行研究。

要求:输入采用占位符,随时间计算输出综合,采用名称作用域对数据流图进行合理划分,每次运行时,都将数据流图的输出,所有输出的累加和,所有输出的均值保存到磁盘中,工Tensorboard使用。
设计如下:


代码:
import tensorflow as tf
print("----start----")
#显示创建一个数据流图
graph = tf.Graph()
with graph.as_default():
#---variables---部分,记录运行次数globa_step和总的输出和total_output
with tf.name_scope("variables"):
#记录数据流图运行次数
global_step = tf.Variable(0, dtype=tf.int32, trainable=False, name="global_step")
#模型输出累加和
total_output = tf.Variable(0.0, dtype=tf.float32, trainable=False, name="total_sum")
#---transformation---部分,构建数据流图:输入层input,中间层intermediate_layer,输出层output
with tf.name_scope("transformation"):
#独立的输入层
with tf.name_scope("input"):
a = tf.placeholder(tf.float32, shape=[None], name="input_placeholder_a")
#独立的中间层
with tf.name_scope("intermediate_layer"):
b = tf.reduce_prod(a, name="prod_b")
c = tf.reduce_sum(a, name="sum_c")
#独立的输出层
with tf.name_scope("output"):
output = tf.add(b, c, name="output")
#---Update---部分,更新variables域update_total,increment_step
with tf.name_scope("update"):
update_total = total_output.assign_add(output)
increment_step = global_step.assign_add(1)
#---summaries---部分,用于tensorboard汇总数据
with tf.name_scope("summaries"):
#随时间计算输出的均值
avg = tf.div(update_total, tf.cast(increment_step, tf.float32), name="average")# tf.cast(x, dtype, name=None)数据类型转换函数
#为输出节点创建汇总数据
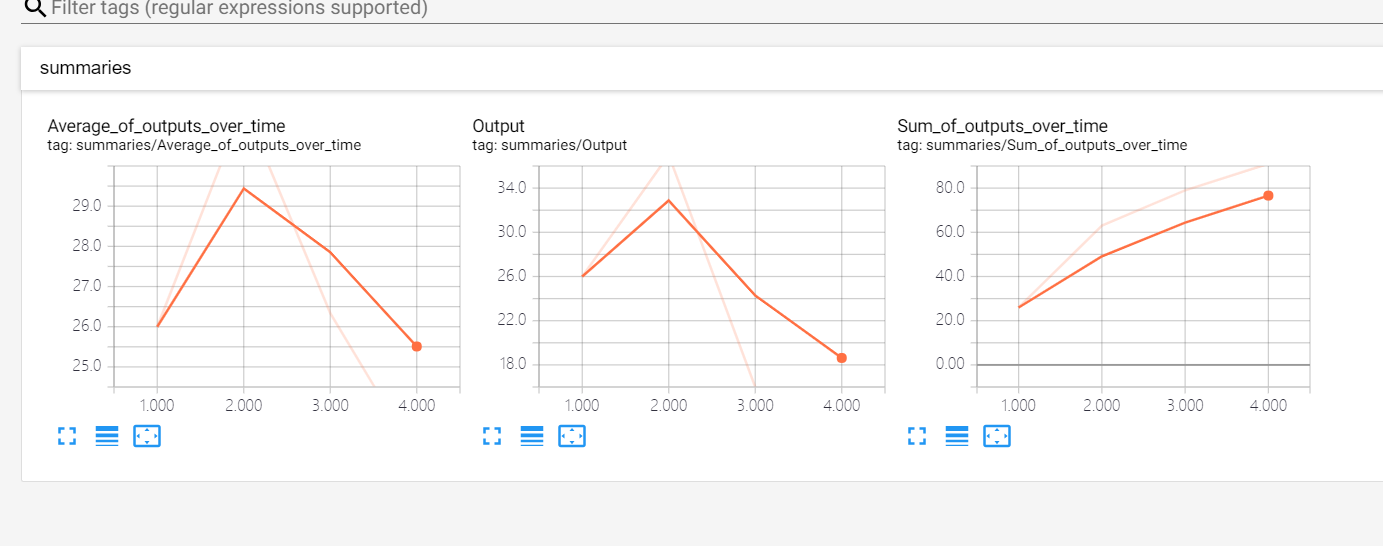
tf.summary.scalar('Output', output)#, name="output_summary")#tf.summary.scalar(name,tensor,collections=None,family=None),可用于tensorboard或者学习速率和loss等。
tf.summary.scalar('Sum_of_outputs_over_time', update_total)#, name="total_summary")
tf.summary.scalar('Average_of_outputs_over_time', avg)#, name="average_summary")
#以上完成了数据流图的创建,还需要创建Variables初始化Op和利用汇总数据总之到一个Op的辅助节点
#---global_ops部分---,全局variables和Op
with tf.name_scope("global_ops"):
#初始化Op
init = tf.global_variables_initializer()
#将所有汇总数据合并到一个Op中
merged_summaries = tf.summary.merge_all()
#用明确创建的Graph对象启动一个会话
sess = tf.Session(graph=graph)
# 开启一个summary.FileWriter对象,保存汇总数据
writer = tf.summary.FileWriter('./graph/impoved_graph',graph)
#初始化Variables对象
sess.run(init)
def run_graph(input_tensor):
"""
辅助函数:用给定的输入张量运行数据流图并保存数据
"""
feed_dict = {a: input_tensor}
_, step, summary = sess.run([output, increment_step, merged_summaries],feed_dict=feed_dict)
writer.add_summary(summary, global_step=step)
run_graph([2,8])
run_graph([3,1,3,3])
run_graph([8])
run_graph([1,2,3])
#将汇总数据写入磁盘
writer.flush()
#关闭FileWriter对象,Session对象
writer.close()
sess.close()
print("----success----")
Tensorboard可视化:


edit by Strangewx 2019.01.03
Tensorflow学习笔记2019.01.03的更多相关文章
- Tensorflow学习笔记2019.01.22
tensorflow学习笔记2 edit by Strangewx 2019.01.04 4.1 机器学习基础 4.1.1 一般结构: 初始化模型参数:通常随机赋值,简单模型赋值0 训练数据:一般打乱 ...
- tensorflow学习笔记——使用TensorFlow操作MNIST数据(2)
tensorflow学习笔记——使用TensorFlow操作MNIST数据(1) 一:神经网络知识点整理 1.1,多层:使用多层权重,例如多层全连接方式 以下定义了三个隐藏层的全连接方式的神经网络样例 ...
- TensorFlow学习笔记——LeNet-5(训练自己的数据集)
在之前的TensorFlow学习笔记——图像识别与卷积神经网络(链接:请点击我)中了解了一下经典的卷积神经网络模型LeNet模型.那其实之前学习了别人的代码实现了LeNet网络对MNIST数据集的训练 ...
- tensorflow学习笔记——使用TensorFlow操作MNIST数据(1)
续集请点击我:tensorflow学习笔记——使用TensorFlow操作MNIST数据(2) 本节开始学习使用tensorflow教程,当然从最简单的MNIST开始.这怎么说呢,就好比编程入门有He ...
- tensorflow学习笔记(3)前置数学知识
tensorflow学习笔记(3)前置数学知识 首先是神经元的模型 接下来是激励函数 神经网络的复杂度计算 层数:隐藏层+输出层 总参数=总的w+b 下图为2层 如下图 w为3*4+4个 b为4* ...
- tensorflow学习笔记(2)-反向传播
tensorflow学习笔记(2)-反向传播 反向传播是为了训练模型参数,在所有参数上使用梯度下降,让NN模型在的损失函数最小 损失函数:学过机器学习logistic回归都知道损失函数-就是预测值和真 ...
- tensorflow学习笔记——自编码器及多层感知器
1,自编码器简介 传统机器学习任务很大程度上依赖于好的特征工程,比如对数值型,日期时间型,种类型等特征的提取.特征工程往往是非常耗时耗力的,在图像,语音和视频中提取到有效的特征就更难了,工程师必须在这 ...
- tensorflow学习笔记——VGGNet
2014年,牛津大学计算机视觉组(Visual Geometry Group)和 Google DeepMind 公司的研究员一起研发了新的深度卷积神经网络:VGGNet ,并取得了ILSVRC201 ...
- Tensorflow学习笔记2:About Session, Graph, Operation and Tensor
简介 上一篇笔记:Tensorflow学习笔记1:Get Started 我们谈到Tensorflow是基于图(Graph)的计算系统.而图的节点则是由操作(Operation)来构成的,而图的各个节 ...
随机推荐
- [蓝桥杯]PREV-25.历届试题_城市建设
问题描述 栋栋居住在一个繁华的C市中,然而,这个城市的道路大都年久失修.市长准备重新修一些路以方便市民,于是找到了栋栋,希望栋栋能帮助他. C市中有n个比较重要的地点,市长希望这些地点重点被考虑.现在 ...
- 20175227张雪莹 2018-2019-2 《Java程序设计》第八周学习总结
20175227张雪莹 2018-2019-2 <Java程序设计>第八周学习总结 教材学习内容总结 第十五章 泛型与集合框架 泛型:主要目的是可以建立具有类型安全的集合框架,如链表.散列 ...
- Android Studio 1.0~3.3加载android源码 笔记
一. AS3.3上出现问题: 1. File Z:\Project\****\***\AndroidManifest.xml doesnt exist 分析引用: ------------------ ...
- [转]Windows 经验集
Windows Server 2012 R2 显示 这台电脑 图标方法: 来自:https://jingyan.baidu.com/article/f25ef2544f6883482c1b82e5.h ...
- Spring4.0开始的泛型依赖
参考资料: http://www.cnblogs.com/solverpeng/p/5687304.html 视频地址:https://edu.51cto.com/course/1956.html 一 ...
- Redux 学习总结
1.Redux 设计理念 Web 应用是一个状态机,视图与状态是一一对应的 所有的状态,保存在一个对象里面 2.基本概念和API Redux 的核心就是 store, action, reducer ...
- GSM与GPRS的区别
1. GSM是全球移动通讯系统(Global System for Mobile Communications)的简称 2. GPRS是通用分组无线业务(General Packet Ra ...
- strct配置文件详解
1,strct配置文件详解 <!DOCTYPE struts PUBLIC "-//Apache Software Foundation//DTD Struts Configurati ...
- Java学习笔记——鸵鸟学习记(二)
---恢复内容开始--- 4. 数组对象 4.1 数组的创建 a, 数组对象 在Java语言中,数组对象可以表示一组数字. int[] arr = new int[30];(new可以表示为创建 ...
- sql脚本过大,无法打开的解决方法
打开cmd命令窗口,输入如下命令: sqlcmd -S ipaddress -U user -P password -d dbname -i file 其中,ipaddress是数据库服务器ip,us ...