webpack踩坑--webpack 2.x升级至4.x
一.安装webpack-cli,webpack@4.26.1
1.npm install webpack-cli -D
2.npm install webpack@4.26.1 -D
二.踩坑
执行npm run dev报错
1./Users/lily/ForWork/forBMSys/bm-fe/node_modules/html-webpack-plugin/lib/compiler.js:81
var outputName = compilation.mainTemplate.applyPluginsWaterfall('asset-path', outputOptions.filename, {
^
TypeError: compilation.mainTemplate.applyPluginsWaterfall is not a function
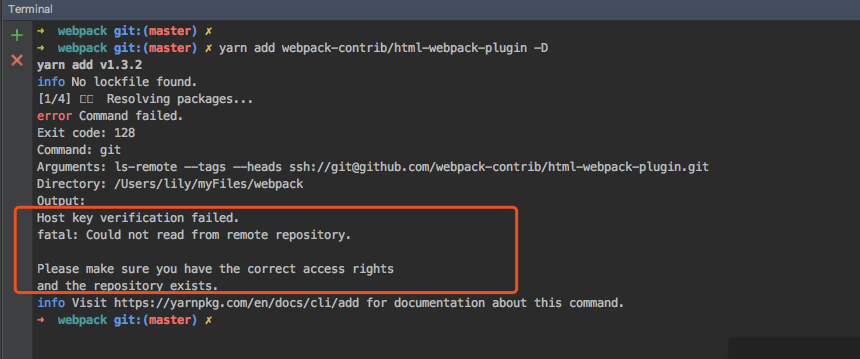
解决方案:1).npm install webpack-contrib/html-webpack-plugin -D 网上大多数是这个答案,但是我这里执行不通,每次都报错。暂时没有找到原因。
2).npm i -–save-dev html-webpack-plugin@next
2./Users/lily/ForWork/forBMSys/bm-fe/node_modules/webpack/lib/webpack.js:185
throw new RemovedPluginError(errorMessage);
^
Error: webpack.optimize.UglifyJsPlugin has been removed, please use config.optimization.minimize instead.
解决方案:
npm install --save-dev uglifyjs-webpack-plugin
webpack.dev.conf.js配置
var UglifyJsPlugin = require('uglifyjs-webpack-plugin')
optimization: {
  minimizer: [
    new UglifyJsPlugin({
      exclude: /\.min\.js$/,
      cache: true,
      parallel: true, // 开启并行压缩,充分利用cpu
      sourceMap: false,
      extractComments: false, // 移除注释
      uglifyOptions: {
        compress: false
      }
    })
  ]
}
3./Users/lily/ForWork/forBMSys/bm-fe/node_modules/webpack/lib/webpack.js:185
throw new RemovedPluginError(errorMessage);
^
Error: webpack.optimize.CommonsChunkPlugin has been removed, please use config.optimization.splitChunks instead.
解决方案:
注释掉CommonsChunkPlugin,webpack4自带代码分割功能,如果想要覆盖默认设置,可以添加:
optimization: {
  splitChunks: {
    cacheGroups: {
      commons: {  // 抽离自己写的公共代码
        chunks: "async",  // async针对异步加载的chunk做切割,initial针对初始chunk,all针对所有chunk。
        name: "common", // 打包后的文件名,任意命名
        minChunks: 2,//最小引用2次
        minSize: 30000 // 只要超出30000字节就生成一个新包
      },
      vendor: {   // 抽离第三方插件
        test: /[\\/]node_modules[\\/]/, // 指定是node_modules下的第三方包
        chunks: 'initial',
        name: 'vendor',  // 打包后的文件名,任意命名
        priority: 10 // 设置优先级,防止和自定义的公共代码提取时被覆盖,不进行打包
      },
    }
  },
  // runtimeChunk: true     // 持久缓存moduleID,ChunkID需要HashedModuleIdsPlugin等插件解决
},
注意:同时去掉 extract-text-webpack-plugin 插件的使用
4.cannot read property 'eslint' of undefined
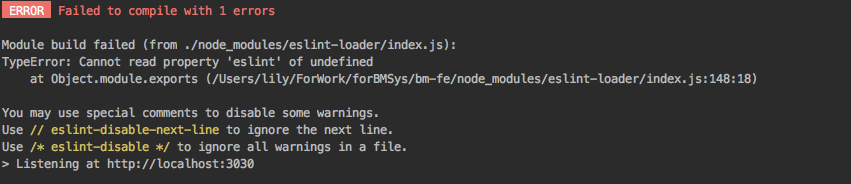
解决方案:
1)网上查了很多,都让使用LoaderOptionsPlugin方案,但是我这边添加之后,并没有任何效果依然报错
plugins: [new webpack.LoaderOptionsPlugin({ options: {} }),],
2)升级eslint-loader,升级 eslint-loader to ^2.0.0. 于是有了第5个错
5.ERROR in ./src/index.js
Module build failed (from ./node_modules/eslint-loader/index.js):
Error: eslint-plugin-html error: It seems that eslint is not loaded. If you think it is a bug, please file a report at https://github.com/BenoitZugmeyer/eslint-plugin-html/issues
解决方案:
eslint4只支持eslint-plugin-html V3 ,把eslint-plugin-html升级即可解决
https://github.com/BenoitZugmeyer/eslint-plugin-html/issues/60
6.ERROR in ./src/components/views/remote-dispatch/remote-car-sku-options/view/RemoteCarSkuOptionsCreate.vue?vue&type=style&index=0&id=a8deb48e&lang=scss&scoped=true& (./node_modules/vue-loader/lib??vue-loader-options!./src/components/views/remote-dispatch/remote-car-sku-options/view/RemoteCarSkuOptionsCreate.vue?vue&type=style&index=0&id=a8deb48e&lang=scss&scoped=true&) 99:0
Module parse failed: Unexpected token (99:0)
You may need an appropriate loader to handle this file type.
|
|
> .remote {
| padding: 20px;
| margin-top: 25px;
解决方案:
添加了file-loader就可以了
需要注意的是 MiniCssExtractPlugin.loader 和 style-loader 由于某种原因不能共存。
7.代码运行的时候,报错,
error in ./src/components/views/workbench/designated-driving/view-customer/task-check/task-check.vue?vue&type=style&index=0&lang=css&
Syntax Error: NonErrorEmittedError: (Emitted value instead of an instance of Error) CssSyntaxError: /Users/lily/ForWork/forBMSys/bm-fe/src/components/views/workbench/designated-driving/view-customer/task-check/task-check.vue:1:1: Unknown word
> 1 | exports = module.exports = require("../../../../../../../node_modules/css-loader/lib/css-base.js")();
| ^
2 | // imports
3 |
@ ./node_modules/vue-style-loader!./node_modules/css-loader!./node_modules/vue-loader/lib/loaders/stylePostLoader.js!./node_modules/css-loader??ref--8-1!./node_modules/vue-loader/lib??vue-loader-options!./src/components/views/workbench/designated-driving/view-customer/task-check/task-check.vue?vue&type=style&index=0&lang=css& 4:14-348 13:3-17:5 14:22-356
网上查的资料,大概两种解决方案,1.css-loader,style-loader顺序错误 2.删除css,less配置 第一种已排除,实行第二种,可行。但是build的时候又会报第6个(上一条)错误
8.Error: Plugin could not be registered at 'html-webpack-plugin-after-emit'. Hook was not found.
BREAKING CHANGE: There need to exist a hook at 'this.hooks'. To create a compatibility layer for this hook, hook into 'this._pluginCompat'.
at Compilation.plugin (/Users/lily/ForWork/forBMSys/bm-fe/node_modules/tapable/lib/Tapable.js:69:9)
at Compilation.deprecated [as plugin] (internal/util.js:53:15)
at /Users/lily/ForWork/forBMSys/bm-fe/build/dev-server.js:38:15
解决方案:
场景:项目运行起来后,一旦做出更改,保存后,便会报出该错
原因:这个错误是html-webpack-plugin和webpack4兼容问题导致,更改html-webpack-plugin版本即可,3.0.4,3.0.6都可以,排除2.28.0,3.2.0,其他版本还没有尝试
---------webpack升级完成之后的分割线-----------
9.这是webpack升级为4.0之后,项目迭代需求时遇到的问题
node_modules/html-webpack-plugin/node_modules/toposort/index.js:29
throw new Error('Cyclic dependency: '+JSON.stringify(node))
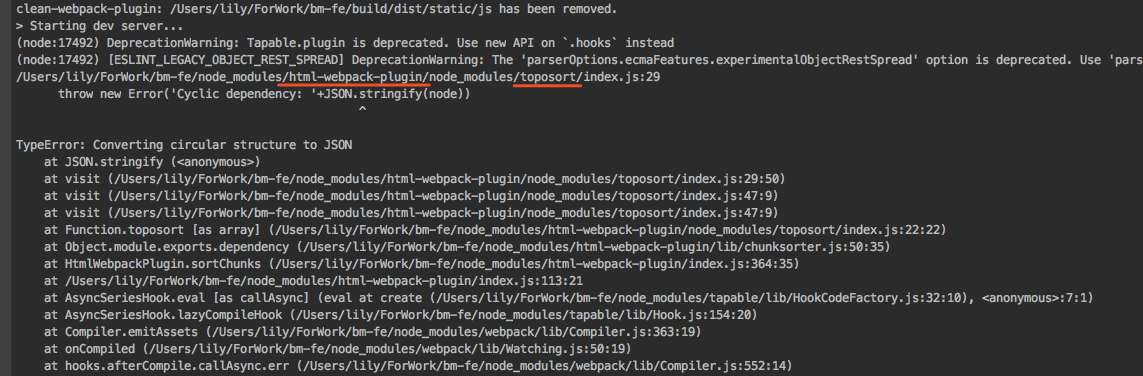
google上查都说是html-webpack-plugin的issue,参考 https://github.com/jantimon/html-webpack-plugin/issues/870 ,
更新html-webpack-plugin版本 以及安装toposort 1.0.4版本 更新完之后貌似还是报错
后来在百度上查到一篇 说是webpack4打包vue2的bug https://blog.csdn.net/alanfancy/article/details/84023940
这才发现,原来是我webpack本地配置的HtmlWebpackPlugin没有设置chunksSortMode: 'none' 至此问题解决
三.优化
1.html-webpack-plugin
npm i --save-dev html-webpack-plugin@next
plugins:[
new HtmlWebpackPlugin({
  filename: process.env.NODE_ENV === 'testing'
    ? 'index.html'
    : config.build.index,
  template: 'index.html',
  inject: true,
  minify: {
    removeComments: true,
    collapseWhitespace: true,
    removeAttributeQuotes: true
    // more options:
    // https://github.com/kangax/html-minifier#options-quick-reference
  },
  // necessary to consistently work with multiple chunks via CommonsChunkPlugin
  chunksSortMode: 'none'
}),
]
2.mini-css-extract-plugin 拆分css
它与extract-text-webpack-plugin最大的区别是:它在code spliting的时候会将原先内联写在每一个 js chunk bundle的 css,单独拆成了一个个 css 文件
rules: [
  {
    test: /\.css$/,
    use: [
      process.env.NODE_ENV !== 'production'
        ? 'vue-style-loader'
        : MiniCssExtractPlugin.loader,
      'css-loader'
    ]
  },
  {
    test: /\.less$/,
    use: [
      process.env.NODE_ENV !== 'production'
        ? 'vue-style-loader'
        : MiniCssExtractPlugin.loader,
      'css-loader',
      'less-loader'
    ]
  },
...
]
3.optimize-css-assets-webpack-plugin 压缩css 优化代码
optimization: {

  minimizer: [new OptimizeCSSAssetsPlugin()];

}
4.热更新速度 babel-plugin-dynamic-import-node
 1)首先在package.json中增加BABEL_ENV
"dev": "BABEL_ENV=development webpack-dev-server XXXX" 2)在.babelrc只能加入babel-plugin-dynamic-import-node这个plugins,并让它只有在development模式中才生效。
  {

    "env": {

      “development": {

        "plugins": ["dynamic-import-node"]

      }

    }

  }
5.清除每次编译后dist目录重复文件 clean-webpack-plugin
const CleanWebpackPlugin = require('clean-webpack-plugin');
plugins:[ new CleanWebpackPlugin(['dist']),//实例化,参数为目录]
6.代码分割splitChunks
optimization: {
  splitChunks: {
    cacheGroups: {
      elementUI: {
        name: "chunk-elementUI", // 单独将 elementUI 拆包
        priority: 20, // 权重要大于 libs 和 app 不然会被打包进 libs 或者 app
        test: /[\\/]node_modules[\\/]element-ui[\\/]/
      },
      libs: {
        name: "chunk-libs",
        test: /[\\/]node_modules[\\/]/,
        priority: 10,
        chunks: "initial" // 只打包初始时依赖的第三方
      },
      commons: {  // 抽离自己写的公共代码
        chunks: "async",  // async针对异步加载的chunk做切割,initial针对初始chunk,all针对所有chunk。
        name: "common", // 打包后的文件名,任意命名
        test: /[\\/]src[\\/]components[\\/]pages/,
        minChunks: 3,//最小引用2次
        minSize: 30000 // 只要超出30000字节就生成一个新包
      },
    }
  },
  runtimeChunk: {
    name: "manifest"
  },
  minimizer: [new OptimizeCSSAssetsPlugin()]
}
7.externals分离第三方库,cdn引入第三方资源
1)index.html中,引入第三方类库 如:<script src="//cdn.bootcss.com/echarts/4.1.0/echarts.min.js"></script>
2) webpack.conf.js中配置externals 如
module.exports = {
  ...
  externals:{echarts: 'echarts'}
  ...
}
8.lodash按需加载
踩坑继续中,如果有人看到,欢迎随时交流----
webpack踩坑--webpack 2.x升级至4.x的更多相关文章
- vue+ vue-router + webpack 踩坑之旅
说是踩坑之旅 其实是最近在思考一些问题 然后想实现方案的时候,就慢慢的查到这些方案 老司机可以忽略下面的内容了 1)起因 考虑到数据分离的问题 因为server是express搭的 自然少 ...
- 开始更新webpack踩坑笔记
今天开始学习webpack,记录下踩过的坑-zxf
- webpack踩坑之路——构建基本的React+ES6项目
转自:http://www.cnblogs.com/ghost-xyx/p/5483464.html webpack是最近比较火的构建工具,搭配上同样比较火的ReacJS与ES6(ES2015)一定是 ...
- webpack踩坑之路——图片的路径与打包
转自:http://www.cnblogs.com/ghost-xyx/p/5812902.html 刚开始用webpack的同学很容易掉进图片打包这个坑里,比如打包出来的图片地址不对或者有的图片并不 ...
- webpack踩坑之路 (2)——图片的路径与打包
刚开始用webpack的同学很容易掉进图片打包这个坑里,比如打包出来的图片地址不对或者有的图片并不能打包进我们的目标文件夹里(bundle).下面我们就来分析下在webpack项目中图片的应用场景. ...
- webpack踩坑之旅
1.安装webpack失败问题 错误原因: 这主要是我以普通用户的身份进行webpack的全局安装,权限不够. [普通用户] 说白了就是通过运行window+r+cmd进入的命令行 解决方式: 用管理 ...
- webpack踩坑 无法解析jquery及webpack-cli
最近在学习Vue,使用到webpack的时候,出现了错误,可能是3和4的版本问题 webpack-dev-server 安装好webpack-dev-server后,需要在package.json 的 ...
- webpack踩坑
1.当你用webpack2实现css文件单独成一个文件的时候: 可能遇到这种错误Error: Breaking change: extract now only takes a single argu ...
- 后端路由项目由 gulp 改为 webpack 的踩坑实录
前言 公司有个后端路由的项目是用 gulp 作为前端自动化构建工具,最近学习了一下 webpack,深感其强大,一狠心将其改成了 webpack 构建,以下是踩坑实录. gulp 先来说说原来的架构. ...
随机推荐
- lucene复合条件查询案例——查询name域 或 description域 包含lucene关键字的两种方式
方式一:使用语法表达式查询 //查询name域 或 description域包含lucene关键字 QueryParser queryParser = new QueryParser("na ...
- linux下面重启nfs报错:nfs-server.service:main process exited
linux下面重启nfs报错:nfs-server.service:main process exited [root@dhcp-66-83-39 images]# service rpcbind s ...
- virtualenv+pyenv管理python工作环境
因为python2与3之间存在差异,所以日常工作中可能需要在2与3之间来回切换.在相同的python版本中,有可能有的项目需要用到django1.8,别的项目需要用到django1.9,所以如果可以在 ...
- ucos中的中断管理
一.中断的概念 中断是一种硬件机制,用于处理异步事件.中断的实时性比轮询要好,通过中断,微控制器可以在异常发生的时候立刻进行处理,而不需要不断轮询事件是否发生. CM3支持中断嵌套,使得高优先级异常可 ...
- 深入Dockerfile(一): 语法指南(转)
最近在学习K8S,发现这两篇文章还不错,转了过来 docker官方文档Dockerfile reference的笔记. 一.机制 1.1 构建 docker构建一个镜像,需要: Dockerfile文 ...
- 获取当前div中的文本(只获取当前div的, 子元素不要, 基于layui)
<!DOCTYPE html> <html> <head> <meta charset="utf-8"> <title> ...
- dubbo知识体系
Dubbo负载均衡 Random随机/ RoundRobin轮询/ LeastActive最少Dubbo缓存Dubbo集群容错 Dubbo回调 服务分组: group Dubbo异步调用 <du ...
- zxlizsm
好久没发表了,毕业之后就没回来过!
- 第二阶段第八次spring会议
昨天我对软件进行了植物网站的添加. 今天我将对软件进行宠物信息的添加. 清屏功能 private void button5_Click(object sender, EventArgs e) { te ...
- 文件比较命令(fc)
fc命令: // 描述: 比较两个文件或文件集,并显示它们之间的差异.相对于 comp 命令来说,这个 fc 命令显示的界面就好看多了.用起来也舒服些. fc: (file comparison) f ...