ASP.NET Core Building chat room using WebSocket
Creating “Login form”
We use here simple form where user can insert his or her preferred nick name for chat. To keep us focused on WebSocket stuff we don’t add any logic or checks in this point. Let’s add view called InsertUserName.cshtml under Home folder.
<form action="@Url.Action("Index")" method="post">
    <input type="text" placeholder="Insert user name" name="userName" />
    <input type="submit" value="Eńter" />
</form>
There will be another view for chat room and we will come back to it later when web sockets related code is done. Index() methods of home controller look like this.
[HttpGet]
public IActionResult Index()
{
    return View("InsertUserName");
}

[HttpPost]
public IActionResult Index(string username)
{
    return View("Index", username);
}
If request method is GET then we show nick name form and if request method is POST we will show chat room view.
WebSockets middleware
Now let’s write ASP.Core middleware for WebSocket. To keep things simple I mixed together custom WebSocket middleware and custom WebSocket connection manager from Radu Matei’s post Creating a WebSockets middleware for ASP .NET Core. I like the work Radu has done but here we will keep things as small as possible. To get better understanding of WebSockets I suggest you to go through Radu’s post.
NB! To use WebSockets in ASP.NET Core project add reference to Microsoft.AspNetCore.WebSockets NuGet package!
In breaf, this is what our WebSocket middleware class does:
- Keep concurrent dictionary with connected WebSockets (this is needed for message broadcast)
- Read messages from WebSocket and broadcast there to all known WebSockets
- Try to keep WebSockets dictionary as clean as possible
Here is the WebSocket middleware class.
public class ChatWebSocketMiddleware
{
    private static ConcurrentDictionary<string, WebSocket> _sockets = new ConcurrentDictionary<string, WebSocket>();

    private readonly RequestDelegate _next;

    public ChatWebSocketMiddleware(RequestDelegate next)
    {
        _next = next;
    }

    public async Task Invoke(HttpContext context)
    {
        if (!context.WebSockets.IsWebSocketRequest)
        {
            await _next.Invoke(context);
            return;
        }

        CancellationToken ct = context.RequestAborted;
        WebSocket currentSocket = await context.WebSockets.AcceptWebSocketAsync();
        var socketId = Guid.NewGuid().ToString();

        _sockets.TryAdd(socketId, currentSocket);

        while (true)
        {
            if (ct.IsCancellationRequested)
            {
                break;
            }

            var response = await ReceiveStringAsync(currentSocket, ct);
            if(string.IsNullOrEmpty(response))
            {
                if(currentSocket.State != WebSocketState.Open)
                {
                    break;
                }

                continue;
            }

            foreach (var socket in _sockets)
            {
                if(socket.Value.State != WebSocketState.Open)
                {
                    continue;
                }

                await SendStringAsync(socket.Value, response, ct);
            }
        }

        WebSocket dummy;
        _sockets.TryRemove(socketId, out dummy);

        await currentSocket.CloseAsync(WebSocketCloseStatus.NormalClosure, "Closing", ct);
        currentSocket.Dispose();
    }

    private static Task SendStringAsync(WebSocket socket, string data, CancellationToken ct = default(CancellationToken))
    {
        var buffer = Encoding.UTF8.GetBytes(data);
        var segment = new ArraySegment<byte>(buffer);
        return socket.SendAsync(segment, WebSocketMessageType.Text, true, ct);
    }

    private static async Task<string> ReceiveStringAsync(WebSocket socket, CancellationToken ct = default(CancellationToken))
    {
        var buffer = new ArraySegment<byte>(new byte[8192]);
        using (var ms = new MemoryStream())
        {
            WebSocketReceiveResult result;
            do
            {
                ct.ThrowIfCancellationRequested();

                result = await socket.ReceiveAsync(buffer, ct);
                ms.Write(buffer.Array, buffer.Offset, result.Count);
            }
            while (!result.EndOfMessage);

            ms.Seek(0, SeekOrigin.Begin);
            if (result.MessageType != WebSocketMessageType.Text)
            {
                return null;
            }

            // Encoding UTF8: https://tools.ietf.org/html/rfc6455#section-5.6
            using (var reader = new StreamReader(ms, Encoding.UTF8))
            {
                return await reader.ReadToEndAsync();
            }
        }
    }
}
Before using middleware we have to introduce it to request pipeline in Startup class of web application. We do it in configure method before initializing MVC.
app.UseWebSockets();
app.UseMiddleware<ChatWebSocketMiddleware>();

app.UseMvc(routes =>
{
    routes.MapRoute(
        name: "default",
        template: "{controller=Home}/{action=Index}/{id?}");
});
NB! It’s very important to add WebSockets before MVC. WebSockets middleware checks in the beginning if request is for WebSocket. If it is WebSocket request then middleware starts handling it. If MVC is added to pipeline before then MVC will handle all the requests and our WebSocket middleware is never used.
Chat room view
Now let’s add chat room view. We will use Index view of home controller for chat room. Chat room view initializes WebSocket connection and starts listening to it. If user writes something to chat box and presses Enter then message is sent to server over WebSocket and WebSocket middleware will broadcast it to all WebSocket clients it knows.
@model string
@{
    ViewData["Title"] = "Home Page";
}
<style>
    body {margin:0px; padding:0px;}
    .msg {
        position: absolute;
        top: ;
        bottom: 30px;
        border: 1px solid green;
        margin-bottom: auto;
        display:block;
        overflow: scroll;
        width:100%;
        white-space:nowrap;
    }
</style>
<div class="msg">
    <div style="position:absolute; bottom:;" id="msgs"></div>
</div>

<div style="position:absolute;height:20px;bottom:10px;left:; display:block;width:100%">
    <input type="text" style="max-width:unset;width:100%;max-width:100%" id="MessageField" placeholder="type message and press enter" />
</div>

@section Scripts {
    <script>
    $(function () {
        var userName = '@Model';

        var protocol = location.protocol === "https:" ? "wss:" : "ws:";
        var wsUri = protocol + "//" + window.location.host;
        var socket = new WebSocket(wsUri);
        socket.onopen = e => {
            console.log("socket opened", e);
        };

        socket.onclose = function (e) {
            console.log("socket closed", e);
        };

        socket.onmessage = function (e) {
            console.log(e);
            $('#msgs').append(e.data + '<br />');
        };

        socket.onerror = function (e) {
            console.error(e.data);
        };

        $('#MessageField').keypress(function (e) {
            if (e.which != 13) {
                return;
            }

            e.preventDefault();

            var message = userName + ": " + $('#MessageField').val();
            socket.send(message);
            $('#MessageField').val('');
        });
    });
    </script>
}
Now let’s build application and run it.
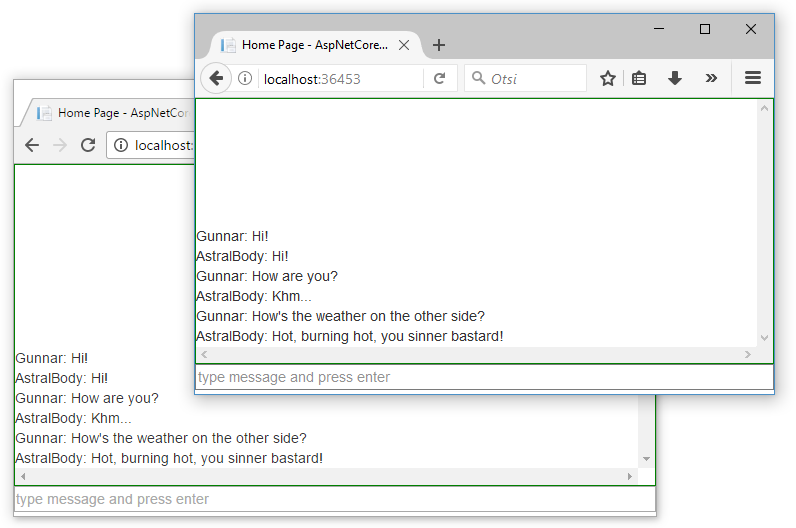
WebSocket chat room in action
The screenshot below shows how our chat room looks like. It’s extremely primitive and simple but it works. There’s room enough for improvements but this is the fun I leave to all my dear readers.
Wrapping up
Using WebSockets in ASP.NET Core is simple. Without any additional libraries we can use the one by Microsoft. We had to write custom middleware class for WebSocket communication and in our case the class came pretty small. We used concurrent dictionary as a WebSockets cache and this enabled us to broadcast messages over sockets. Our solution is very primitive and simple, there is a lot of room for improvements but as a proof of concept it works well.
ASP.NET Core Building chat room using WebSocket的更多相关文章
- Real-time chart using ASP.NET Core and WebSocket
Solution in glance The following diagram illustrates our solution where IoT device reports readings ...
- WebSocket In ASP.NET Core(一)
.NET-Core Series Server in ASP.NET-Core DI in ASP.NET-Core Routing in ASP.NET-Core Error Handling in ...
- 关于ASP.NET Core WebSocket实现集群的思考
前言 提到WebSocket相信大家都听说过,它的初衷是为了解决客户端浏览器与服务端进行双向通信,是在单个TCP连接上进行全双工通讯的协议.在没有WebSocket之前只能通过浏览器到服务端的请求应答 ...
- WebSocket in ASP.NET Core
一.WebSocket WebSocket是HTML5出的东西(协议),也就是说HTTP协议没有变化,或者说没关系,但HTTP是不支持持久连接的(长连接,循环连接的不算) 首先HTTP有1.1和1.0 ...
- 网络游戏开发-服务器(01)Asp.Net Core中的websocket,并封装一个简单的中间件
先拉开MSDN的文档,大致读一遍 (https://docs.microsoft.com/zh-cn/aspnet/core/fundamentals/websockets) WebSocket 是一 ...
- 快速搭建CentOS+ASP.NET Core环境支持WebSocket
环境:CentOS 7.x,.net core 2 以下.net core 2安装操作为官方方法.如果你使用Docker,那么更简单了,只需要docker pull microsoft/dotnet就 ...
- 在Asp.net Core中使用中间件来管理websocket
介绍 ASP.NET Core SignalR是一个有用的库,可以简化Web应用程序中实时通信的管理.但是,我宁愿使用WebSockets,因为我想要更灵活,并且与任何WebSocket客户端兼容. ...
- ASP.NET Core 集成 WebSocket
1. 环境 AspNetCore Web 2.0 (MVC) Windows 10 IIS 10 Express/IIS VS 2017 2.如何配置 在已有的或者新创建的 AspNet Core M ...
- ASP.NET Core 中的 WebSocket 支持(转自MSDN)
本文介绍 ASP.NET Core 中 WebSocket 的入门方法. WebSocket (RFC 6455) 是一个协议,支持通过 TCP 连接建立持久的双向信道. 它用于从快速实时通信中获益的 ...
随机推荐
- Feature Extractor[inception v2 v3]
0 - 背景 在经过了inception v1的基础上,google的人员还是觉得有维度约间的空间,在<Rethinking the Inception Architecture for Com ...
- [Spark][Python][RDD][DataFrame]从 RDD 构造 DataFrame 例子
[Spark][Python][RDD][DataFrame]从 RDD 构造 DataFrame 例子 from pyspark.sql.types import * schema = Struct ...
- Linux 用户身份与进程权限
在学习 Linux 系统权限相关的主题时,我们首先关注的基本都是文件的 ugo 权限.ugo 权限信息是文件的属性,它指明了用户与文件之间的关系.但是真正操作文件的却是进程,也就是说用户所拥有的文件访 ...
- 【C#复习总结】细说 Lambda表达式
1 前言 本系列会将[委托] [匿名方法][Lambda表达式] [泛型委托] [表达式树] [事件]等基础知识总结一下.(本人小白一枚,有错误的地方希望大佬指正) 系类1:细说委托 系类2:细说匿名 ...
- Westore 1.0 正式发布 - 小程序框架一个就够
世界上最小却强大的小程序框架 - 100多行代码搞定全局状态管理和跨页通讯 Github: https://github.com/dntzhang/westore 众所周知,小程序通过页面或组件各自的 ...
- python之间的基础
编程第一步 print('hello,world!') 变量名的命名的规则: 1:变量由字母,数字,下划线组成 2:变量不能以数字开头 3:禁止使用python中的关键字,如 'alse', 'Non ...
- Python-TXT文本操作
一.列出IO操作的标识符及描述 标识符 描述 r 以只读方式打开文件.文件的指针将会放在文件的开头.这是默认模式. rb 以二进制格式打开一个文件用于只读.文件指针将会放在文件的开头.这是默认模式. ...
- Appium-超过60s的应用场景如何处理
前言: 最近在搞appium自动化项目,遇到超过60s的应用场景时,总是报错报错.如何解决呢?见下文. 报错信息: 2018-05-21 14:03:42:253 - [HTTP] <-- PO ...
- Linux常见问题汇总
Linux问题: ifconfig查看IP地下载报错:bash: ifconfig: commandnotfound 解决方法: 先执行 export PATH="$PATH:/sbin&q ...
- Node 系列之path模块
//引用该模块 var path = require("path"); 1.路径解析,得到规范化的路径格式 //对window系统,目录分隔为'\', 对于UNIX系统,分隔符为' ...