
vCenter 5.1 U1 Installation: Part 9 (vCenter SSO Configuration)
http://www.derekseaman.com/2012/09/vmware-vcenter-51-installation-part-9.html
In this installment of the vCenter 5.1 installation series I’ll show you a few vCenter SSO Configuration changes that you will likely want to make. These steps are optional, but probably nearly everyone will want to implement some form of these changes. The two tweaks are setting the default login domain for SSO and the other is using an AD group to control admin rights to the SSO service and not rely on the default built-in account. Oh and let’s not forget licensing too!
Before we get started, listed below are the other related articles in this series:
Part 1 (SSO Service)
Part 2 (Create vCenter SSL Certificates)Part 3 (Install vCenter SSO SSL Certificate)
Part 4 (Install Inventory Service)
Part 5 (Install Inventory Service SSL Certificate)
Part 6 (Create vCenter and VUM Databases)
Part 7 (Install vCenter Server)
Part 8 (Install Web Client)
Part 10 (Create VUM DSN)
Part 11 (Install VUM)
Part 12 (VUM SSL Configuration)
Part 13 (VUM Configuration)
Part 14 (Web Client and Log Browser SSL)
Part 15 (ESXi Host SSL Certificate)
vCenter SSO Configuration
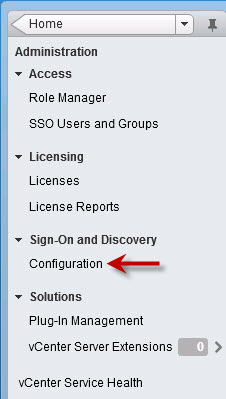
1. Login to the vSphere Web Client with the SSO administrator credentials (admin@System-Domain). In the left pane click on Administration then click on Configuration under Sign-On and Discovery.
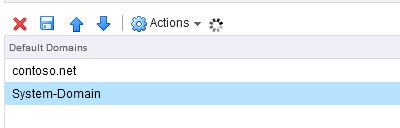
2. If you wish to reduce future sign in keystrokes you can add your Active Directory domain to the list of default SSO domains. To do that highlight your AD server URL then click on the blue dot with an arrow, as shown below.

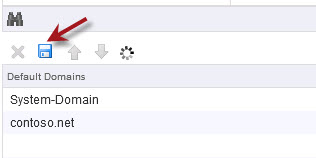
3. Acknowledge any warning about possible locked out accounts, and you should now see your AD domain listed under default domains.
Important! Click on the blue disk icon to save your change, otherwise you will be wondering why it is not working as expected.
4. At this point you may want to add an AD-based group to the SSO administrator group, so you don’t have to remember, or share, the built-in admin account credentials. To do that click on SSO Users and Groups in the left pane. Click on the ___Administrators___ principal name then click on the person icon with the plus sign next to it.
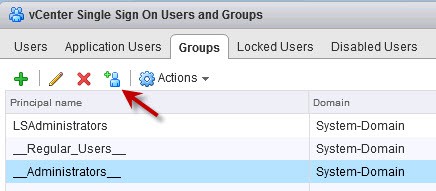
5. Now I created a group in AD called APP_VCTR_SSO_Administrator and added my admin account to it. Use whatever group name suits your needs. Change the identity source to your domain name then enter the name of the AD group and click on Search. After a few seconds it should populate the fields, then click on Add. Finally click OK.

6. Log out of the vSphere web client, logoff Windows if needed to refresh your group membership, then then validate you can access the SSO configuration once you login to the Web Client.
7. You probably want to assign a license key to your vCenter server, otherwise after the grace period is up, it will be non-functional. In the web client, go back to the Home page in the left pane, then click onAdministration.
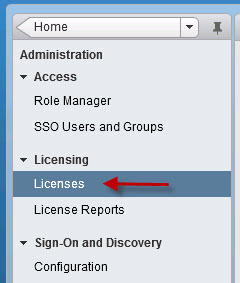
8. Once that pane opens, click on Licenses. You can now input your licenses for vCenter and ESXi hosts. Don’t forget to assign the licenses to their respective products.
Next up is creating the VUM DSN, which is covered in Part 10.
Related Posts:
- vCenter 5.1 U1 Installation: Part 8 (Install web client)
- vCenter 5.1 U1 Installation: Part 1 (SSO Service)
- vCenter 5.1 U1 Installation: Part 7 (Install vCenter Server 5.1)
- vCenter 5.1 U1 Installation: Part 4 (Inventory Service Install)
- vCenter 5.1 U1 Installation: Part 11 (Install VUM)
vCenter 5.1 U1 Installation: Part 9 (vCenter SSO Configuration)的更多相关文章
- Openstack: Single node Installation and External Network Accessing Configuration Guide
Summary of installation Step 0: Prerequisites Step 1: Create Openstack hostsystem Step 2: Config Ope ...
- 很好的vmware目录
http://www.globalknowledge.com/training/course.asp?pageid=9&courseid=18023&country=United+St ...
- vsphere vcenter server下安装ubuntu的vmwaretools
0.参考文献 百度经验:这里面是以redhat桌面版为实例进行介绍的,我的环境是ubuntu-server,虽然不一样,也可以参考 http://jingyan.baidu.com/article/2 ...
- vCenter Single Sign On 5.1 best practices
http://www.virtualizationteam.com/virtualization-vmware/vsphere-virtualization-vmware/vcenter-single ...
- HOW TO: Synchronize changes when completing a P2V or V2V with VMware vCenter Converter Standalone 5.1
http://www.experts-exchange.com/Software/VMWare/A_11489-HOW-TO-Synchronize-changes-when-completing-a ...
- 烂泥:vcenter通过模板部署vm
本文由ilanniweb提供友情赞助,首发于烂泥行天下 想要获得更多的文章,可以关注我的微信ilanniweb. 前一篇文章我们介绍了有关vcenter5.5的安装与配置,这篇文章我们再来介绍下,如何 ...
- 试用vSphere 6(三):安装vCenter 6(独立数据库)之:vCenter安装与配置
------------------------------------------ 一.VMware vSphere 6(RC版)安装配置系列文章: 1.试用vSphere 6(一):安装ESXi ...
- 【VMware虚拟化解决方案】设计和配置VMware vCenter 5.5
在这之前,我们已经对VMware ESXi 5.5进行了整个环境的设计和规划,虽然安装VMware ESXi 5.5在CPU的选型.网络的设计.共享存储的方式.虚拟化资源的需求和安装ESXI的模式等一 ...
- 怎样使用Secure CRT查看vcenter和esxi主机的日志文件(转)
对ESXI主机的日志管理对于故障诊断和合规性至关重要.Esxi主机的日志通过syslog工具进行管理的,在默认的情况下,日志文件存储在主机的scratch分区中(/scratch/log/).scra ...
随机推荐
- Android按返回键退出程序但不销毁,程序后台运行,同QQ退出处理方式
@Override public boolean onKeyDown(int keyCode, KeyEvent event) { if (keyCode == KeyEvent.KEYCODE_BA ...
- Java 公历转农历,然后农历减一年(或者几天或者任意天),再把这个日期转成公历
由于系统的提醒有可能是农历的今天或指定时间要用quartz 实现定时任务 公历转农历,然后农历减一年(或者几天或者任意天),再把这个日期转成公历. 网上很多农历转公历的程序都有问题,QQ.百度的也有 ...
- linux syslog详解 转
分三部分 一.syslog协议介绍 二.syslog函数 三.linux syslog配置 一.syslog协议介绍 1.介绍 在Unix类操作系统上,syslog广泛应用于系统日志.syslog ...
- byte[],bitmap,drawable之间的相互转换
Byte[]转Bitmap BitmapFactory.decodeByteArray(data, 0, data.length); Bitmap转Byte[] ByteArrayOutputStre ...
- MySql和相关驱动的安装方式
下载mySql for java驱动的地址:http://www.mysql.com/products/connector/ (可下可不下,因为安装mySql的时候就会包含了各种驱动) MySQL下载 ...
- attrs.xml中declare-styleable 详解(用于自定义控件的属性)
1. 框架定义: <declare-styleable name = "名称"> <attr name = "……" format = &qu ...
- Kubernetes 存储系统 Storage 介绍
本文环境为Kubernetes V1.11,操作系统版本为 CentOs 7.3,Kubernetes集群安装可以参考 kubeadm安装kubernetes V1.11.1 集群 容器中的存储都是临 ...
- [转载][HASS.IO] 【HASSOS安装】成功安装HASSOS 1.9(避开了大部分坑版)
7月20日HA官方放出HASSOS说明时,我开始入坑HASSOS,经历了安装没流量.打开主页:8123没显示.HASS.IO边栏不显示.安装不了HASS.IO插件等问题之后,在8月6日总算避开了大坑进 ...
- 【转】Delphi"配置系统未能初始化"
好久没用DelphiXE8了,最近打开一看,在启动时报错了“配置系统未能初始化”,在网上一搜,有各种种样的说法,大体上是与.net的Framewok相关,照着一个一个地试了下,还是解决不了这个错误.有 ...
- ubuntu18.04+ cuda9.0+opencv3.1+caffe-ssd安装
详细Ubuntu18.04,CUDA9.0,OpenCV3.1,Tensorflow完全配置指南 问题1:使用Cmake编译opencv源码 CMake Error: The following va ...