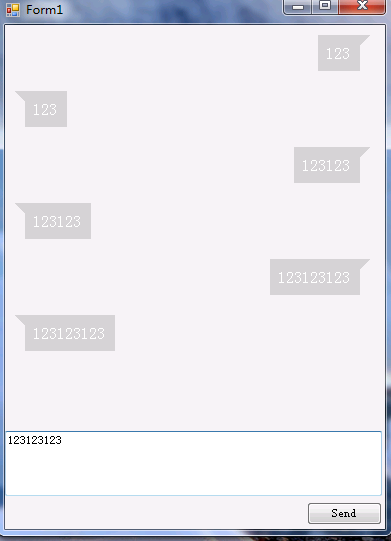
Winform仿制QQ微信聊天窗口气泡
因为公司业务原因,不能上传原始项目,这是简化版本。
临时设计的窗体和气泡样式,有需要可以重新设计。效果如下:
主要原理:一个TextBlock + 一个三角形
项目结构:
-- Form1 窗体类
-- Item 控件类(气泡)
Form1前端代码:
#region Windows 窗体设计器生成的代码

        /// <summary>

        /// 设计器支持所需的方法 - 不要

        /// 使用代码编辑器修改此方法的内容。

        /// </summary>

        private void InitializeComponent()

        {

            this.panel1 = new System.Windows.Forms.Panel();

            this.textBox1 = new System.Windows.Forms.TextBox();

            this.button1 = new System.Windows.Forms.Button();

            this.SuspendLayout();

            //

            // panel1

            //

            this.panel1.AutoScroll = true;

            this.panel1.Location = new System.Drawing.Point(, );

            this.panel1.Name = "panel1";

            this.panel1.Size = new System.Drawing.Size(, );

            this.panel1.TabIndex = ;

            //

            // textBox1

            //

            this.textBox1.Location = new System.Drawing.Point(, );

            this.textBox1.Multiline = true;

            this.textBox1.Name = "textBox1";

            this.textBox1.Size = new System.Drawing.Size(, );

            this.textBox1.TabIndex = ;

            //

            // button1

            //

            this.button1.Location = new System.Drawing.Point(, );

            this.button1.Name = "button1";

            this.button1.Size = new System.Drawing.Size(, );

            this.button1.TabIndex = ;

            this.button1.Text = "Send";

            this.button1.UseVisualStyleBackColor = true;

            this.button1.Click += new System.EventHandler(this.button1_Click);

            //

            // Form1

            //

            this.AutoScaleDimensions = new System.Drawing.SizeF(6F, 12F);

            this.AutoScaleMode = System.Windows.Forms.AutoScaleMode.Font;

            this.ClientSize = new System.Drawing.Size(, );

            this.Controls.Add(this.button1);

            this.Controls.Add(this.textBox1);

            this.Controls.Add(this.panel1);

            this.Name = "Form1";

            this.Text = "Form1";

            this.ResumeLayout(false);

            this.PerformLayout();

        }

        #endregion

        private System.Windows.Forms.Panel panel1;

        private System.Windows.Forms.TextBox textBox1;

        private System.Windows.Forms.Button button1;
Form类后台代码:
/// <summary>

        /// 当前消息气泡起始位置

        /// </summary>

        private int top = ;

        /// <summary>

        /// 当前消息气泡高度

        /// </summary>

        private int height = ;

private void button1_Click(object sender, EventArgs e)

        {

            AddSendMessage(textBox1.Text);

            AddReceiveMessage(textBox1.Text);

        }

/// <summary>

        /// 显示接收消息

        /// </summary>

        /// <param name="model"></param>

        private void AddReceiveMessage(string content)

        {

            Item item = new Item();

            item.messageType = WindowsFormsApplication2.Item.MessageType.receive;

            item.SetWeChatContent(content);

//计算高度

            item.Top = top + height;

            top = item.Top;

            height = item.HEIGHT;

            //滚动条移动最上方,重新计算气泡在panel的位置

            panel1.AutoScrollPosition = new Point(, );

            panel1.Controls.Add(item);

        }

// <summary>

        /// 更新界面,显示发送消息

        /// </summary>

        private void AddSendMessage(string content)

        {

            Item item = new Item();

            item.messageType = WindowsFormsApplication2.Item.MessageType.send;

            item.SetWeChatContent(content);

            item.Top = top + height;

            item.Left =  - item.WIDTH;

top = item.Top;

            height = item.HEIGHT;

            panel1.AutoScrollPosition = new Point(, );

            panel1.Controls.Add(item);

        }
Item类前端代码:
#region 组件设计器生成的代码

        /// <summary>

        /// 设计器支持所需的方法 - 不要

        /// 使用代码编辑器修改此方法的内容。

        /// </summary>

        private void InitializeComponent()

        {

this.panel1 = new System.Windows.Forms.Panel();

            this.lblContent = new System.Windows.Forms.Label();

            this.panel1.SuspendLayout();

            this.SuspendLayout();

            //

            // panel1

            //

this.panel1.AutoSize = true;

            this.panel1.BackColor = System.Drawing.Color.LightGray;

            this.panel1.Controls.Add(this.lblContent);

            this.panel1.Location = new System.Drawing.Point(, );

            this.panel1.MaximumSize = new System.Drawing.Size(, );

            this.panel1.Name = "panel1";

            this.panel1.Padding = new System.Windows.Forms.Padding(, , , );

            this.panel1.Size = new System.Drawing.Size(, );

 this.panel1.TabIndex = ;

            //

            // lblContent

            //

            this.lblContent.AutoSize = true;

            this.lblContent.Font = new System.Drawing.Font("宋体", 16F, System.Drawing.FontStyle.Regular, System.Drawing.GraphicsUnit.Pixel);

            this.lblContent.ForeColor = System.Drawing.Color.White;

            this.lblContent.ImeMode = System.Windows.Forms.ImeMode.NoControl;

this.lblContent.Location = new System.Drawing.Point(, );

            this.lblContent.Margin = new System.Windows.Forms.Padding();

            this.lblContent.MaximumSize = new System.Drawing.Size(, );

            this.lblContent.Name = "lblContent";

            this.lblContent.Size = new System.Drawing.Size(, );

            this.lblContent.TabIndex = ;

            this.lblContent.Text = " ";

            this.lblContent.Visible = false;

//

            // Item

            //

            this.AutoScaleDimensions = new System.Drawing.SizeF(6F, 12F);

            this.AutoScaleMode = System.Windows.Forms.AutoScaleMode.Font;

            this.AutoSize = true;

            this.Controls.Add(this.panel1);

            this.Name = "Item";

this.Padding = new System.Windows.Forms.Padding(, , , );

            this.Size = new System.Drawing.Size(, );

            this.panel1.ResumeLayout(false);

            this.panel1.PerformLayout();

            this.ResumeLayout(false);

            this.PerformLayout();

}

        #endregion

        private System.Windows.Forms.Panel panel1;

        private System.Windows.Forms.Label lblContent;
Item 类后台代码:
/// <summary>

        /// 本窗体总高度

        /// </summary>

        public int HEIGHT = ;

        /// <summary>

        /// 本窗体总宽度

        /// </summary>

        public int WIDTH = ;

        /// <summary>

        /// 消息类型

        /// </summary>

        public MessageType messageType;

public Item()

        {

            ///设置控件样式

            SetStyle(

                    ControlStyles.AllPaintingInWmPaint | //不闪烁

                    ControlStyles.OptimizedDoubleBuffer //支持双缓存

                    , true);

            InitializeComponent();

            this.Paint += Item_Paint;

        }

 #region 界面重绘

        /// <summary>

        /// 绘制气泡左上角小箭头

        /// </summary>

        /// <param name="sender"></param>

        /// <param name="e"></param>

        private void Item_Paint(object sender, PaintEventArgs e)

        {

            //自己发送的消息箭头在右上角

            if (messageType == MessageType.send)

            {

Color color = System.Drawing.Color.LightGray;

                panel1.BackColor = color;

                Brush brushes = new SolidBrush(color);

                Point[] point = new Point[];

                point[] = new Point(WIDTH - , );

                point[] = new Point(WIDTH - , );

                point[] = new Point(WIDTH - , );

                e.Graphics.FillPolygon(brushes, point);

            }

            else

            {

Color color = System.Drawing.Color.LightGray;

                Brush brushes = new SolidBrush(color);

                Point[] point = new Point[];

                point[] = new Point(, );

                point[] = new Point(, );

                point[] = new Point(, );

                e.Graphics.FillPolygon(brushes, point);

            }

        }

        #endregion

#region 功能操作

        /// <summary>

        /// 设置气泡内容

        /// </summary>

        /// <param name="type">消息类型</param>

        /// <param name="content">消息内容</param>

        public void SetWeChatContent(string content)

        {

lblContent.Text = content;

            lblContent.Visible = true;

            HEIGHT += lblContent.Height;

            WIDTH += lblContent.Width;

        }

        #endregion

        /// <summary>

        /// 内部类

        /// </summary>

class MessageItem

        {

            public string RESPATH { get; set; }

            public string RESTYPE { get; set; }

        }

        /// <summary>

        /// 消息类型

        /// </summary>

        public enum MessageType

        {

            send,

            receive

        }
项目中的一些坑:
1. panel控件出现滚动条后,添加控件时需要重新计算相对位置,不然每个气泡间的间距会变大。比较简单的解决方法:每次添加控件前将滚动条移到最上方,添加完控件后再将滚动条移到最下方。
2. 设置双缓冲和不闪烁
3. 计算气泡位置和绘制小箭头,这个不难但是需要时间,不知道为什么按设计稿设置位置一直出错,对winform理解不够,wpf可能会更自由一点
Github:
https://github.com/haibincoder/WinformBubble
Winform仿制QQ微信聊天窗口气泡的更多相关文章
- C#绘制三角形并填充,使用winform实现qq聊天气泡
首先是需求,需要制作一个聊天气泡, 但是winform中有没有类似Android的.9图,只有自己设计图形拼接气泡. 第一种是绘制空心三角形,第二种是绘制三角形区域,可以指定RGB颜色. privat ...
- winform实现QQ聊天气泡200行代码
c# winform实现QQ聊天气泡界面,原理非常简单,通过webKitBrowser(第三方浏览器控件,因为自带的兼容性差)加载html代码实现,聊天界面是一个纯HTML的代码,与QQ的聊天界面可以 ...
- Winform调用QQ发信息并且开机启动 (开源)
前言 公司CS系统需要加入启动qq从winform调用qq聊天窗口的功能,前提是需要将聊天者的QQ号码作为参数传递到函数中,一直没有搞过,正好很感兴趣,就折腾,Winform调用qq,我想肯定是需要一 ...
- 访问量分类统计(QQ,微信,微博,网页,网站APP,其他)
刚准备敲键盘,突然想起今天已经星期五了,有点小兴奋,一周又这么愉快的结束,又可以休息了,等等..我好像是来写Java博客的,怎么变成了写日记,好吧,言归正传. 不知道大家有没有遇到过这样的需求:统计一 ...
- 拾人牙慧篇之———QQ微信的第三方登录实现
一.写在前面 关于qq微信登录的原理之流我就不一一赘述了,对应的官网都有,在这里主要是展示我是怎么实现出来的,看了好几个博客,有的是直接复制官网的,有的不知道为什么实现不了.我只能保证我的这个是我实现 ...
- Oauth2.0 QQ&微信&微博实现第三方登陆
一.写在前面 目前对于大多数的App或Web网站都支持有第三方登陆这个功能,用户可使用 QQ/ 微信/ 微博 帐号快速登录你的网站,降低注册门槛,为你的网站带来海量新用户.最近在新项目上刚好用到了,在 ...
- HTML5实现微信聊天气泡效果
最近做一个HybridApp,前端有一个群聊的功能,于是就想模仿微信的聊天界面,先看效果图: HTML代码: <!DOCTYPE html> <html lang="en& ...
- Ubuntu16.04或18.04上安装QQ微信迅雷
0. 写在前面 没办法,公司的电脑是Windows的,windows下面开发实在太恶心人,并且开发中需要编译golang和C++的程序,于是开始了Linux的折腾之路. 如果你只是想用Linux环境开 ...
- 制作QQ微信支付宝三合一收款码
转载:http://blog.mambaxin.com/article/56 发现很多博客都带了打赏功能,虽说打赏的人可能很少,但始终是一份心意,能让博主知道自己写的文章有用,能够帮助到人.所以,我也 ...
随机推荐
- [转] JDBC中的Statement和PreparedStatement的区别
以Oracle为例吧 Statement为一条Sql语句生成执行计划,如果要执行两条sql语句select colume from table where colume=1;select colume ...
- alibaba fastjson TypeReference 通过字符串反射返回对象
TypeReferenceEditNew Page温绍 edited this page Nov 3, 2017 · 8 revisions1. 基础使用在fastjson中提供了一个用于处理泛型反序 ...
- 转: nginx使用image_filter生成缩略图 -- fasdfs海量图片缩略图整合
转: nginx使用image_filter生成缩略图 -- fasdfs海量图片缩略图整合 http://blog.csdn.net/CleverCode/article/details/522 ...
- mysql 大数据提取
今天要重五百多万的一个数据库表 提取 大约五十万条数据,刚开始的解决思路是: 先把数据查询出来,然后再导出来,然后再设计一个数据库表格,把这些数据导入,最后导出数据和导入数据花费了很多时间,最后向同事 ...
- ELK收集mysql_slow.log
关于慢查询的收集及处理也耗费了我们太多的时间和精力,如何在这一块也能提升效率呢?且看本文讲解如何利用ELK做慢日志收集. ELK 介绍 ELK 最早是 Elasticsearch(以下简称ES).Lo ...
- supervisor 安装脚本
mkdir /data/tools && cd /data/tools wget --no-check-certificate https://bootstrap.pypa.io/ez ...
- Libgdx之Music Sound 音效
教程总文件夹: http://blog.csdn.net/zqiang_55/article/details/50878524 一个好的游戏.假设没有游戏音效那么这个游戏就过于简单乏味.Libgdx中 ...
- 用sendcloud来发邮件
平时发验证码邮件都是用免费域名邮箱,但是有时一频繁发多了就发不了了,听说用sendcloud可以避免,还能避免阿里云邮件发QQ邮箱进垃圾箱中,去注册了下,免费账户号每个月才50封,自己玩玩可以吧.. ...
- 【Unity】10.4 类人动画角色的控制
分类:Unity.C#.VS2015 创建日期:2016-05-02 一.简介 导入角色网格和动画及设置 Avatar 之后,就可以准备开始在游戏中使用它们了.以下部分涵盖 Mecanim 提供的.用 ...
- how many shards and replicas should be set for Elastic Search
https://cpratt.co/how-many-shards-should-elasticsearch-indexes-have/ https://blog.trifork.com/2014/0 ...