
怎样优雅地增删查改(一):从0开始搭建Volo.Abp项目
@
软件系统中数据库或者持久层的基本操作功能可以用Curd描述,Curd即 增加(Create)、更新(Update)、读取查询(Retrieve)和删除(Delete), 这4个单词的首字母。
在常见的业务系统中,对数据的大部分操作都是Curd,在实践的过程中对数据的筛选、排序、分页、关联查询等功能抽象和封装。
本系列博文将从0开始,逐步搭建一个基于Volo.Abp + Vue 的前后端分离的,具有Curd通用查询功能的项目。
怎样优雅地增删查改(二):扩展身份管理模块
项目介绍
本项目是基于一个简单的用户健康数据管理系统,我们将对业务常用的查询功能进行扩展,抽象这些业务并封装成接口,称之为通用查询接口(GeneralCurdInterfaces),本项目关注的是基础设施层,但大部分实现还是围绕业务,对于普适性有待研究,所以我还是决定以Sample为名。
模块化
Abp模块是可以供主模块重用的独立功能单元,每个模块可以包含应用服务、领域层、数据访问层、Web API等,模块可以被其他模块引用,也可以被主模块引用。
本项目模块化的目的除了可重用,更多是为微服务架构做准备。微服务架构不在本博文的讨论范围,为了简化,还是使用单体应用架构。
由框架实现的
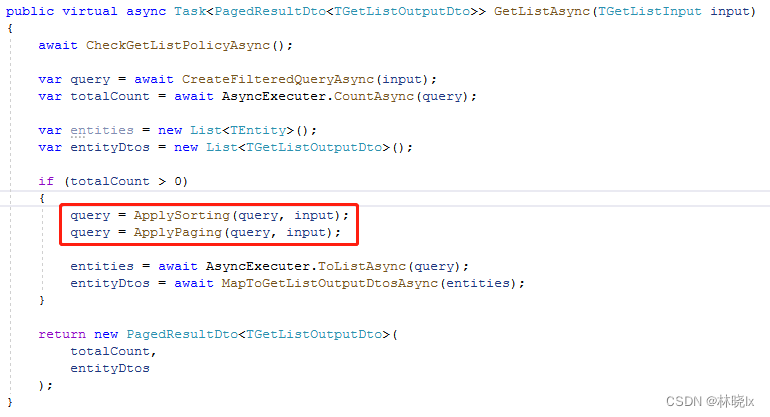
Volo.Abp 为我们实现了CrudAppService,(在旧版本的AbpBoilerplate中称Crud为Curd,在我看来两者没有什么区别,本项目还是以Curd命名)
CrudAppService为我们提供了基本的增删改查,以及分页、排序的实现
需要实现的
按任意字段关键字查询
按任意字段排序
按组织架构查询
按用户查询
按用户关系查询
按创建日期查询(起始日期,结束日期)
本项目虽然是用Volo.Abp实现,但对于旧版本的AbpBoilerplate仍然可以方便的移植,可以看我之前的博文:[Volo.Abp升级笔记]使用旧版Api规则替换RESTful Api以兼容老程序,如何以最大限度保持接口的兼容性。
创建项目
创建空白文件夹,在文件夹内打开命令行
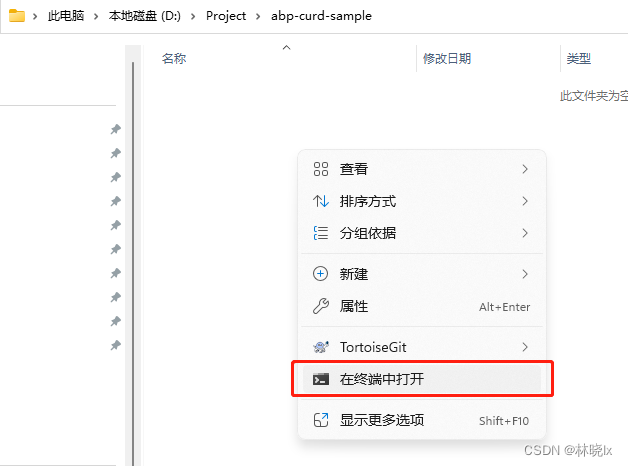
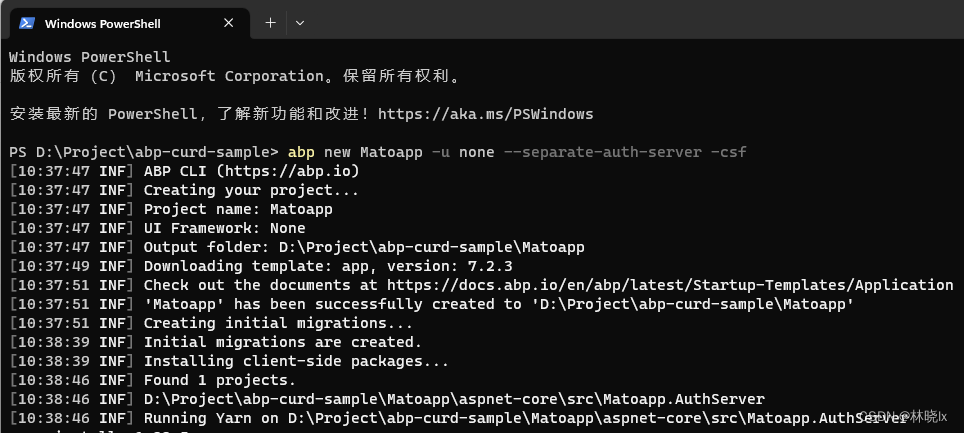
使用AbpCli创建一个无UI的项目 拆分Auth Server,执行以下命令
abp new Matoapp -u none --separate-auth-server -csf
等待项目创建成功
创建业务模块
作为命名空间前缀,Matoapp是一个虚构的企业名称。
在解决方案目录中创建新目录src/modules,在该目录下创建员工健康管理模块Health,公共业务模块Common,以及扩展了Volo.Abp.Indentity的Identity模块
在modules目录下打开命令行,分别执行以下命令
abp new Matoapp.Health -t module --no-ui

abp new Matoapp.Common -t module --no-ui

abp new Matoapp.Identity -t module --no-ui
等待模块创建完成
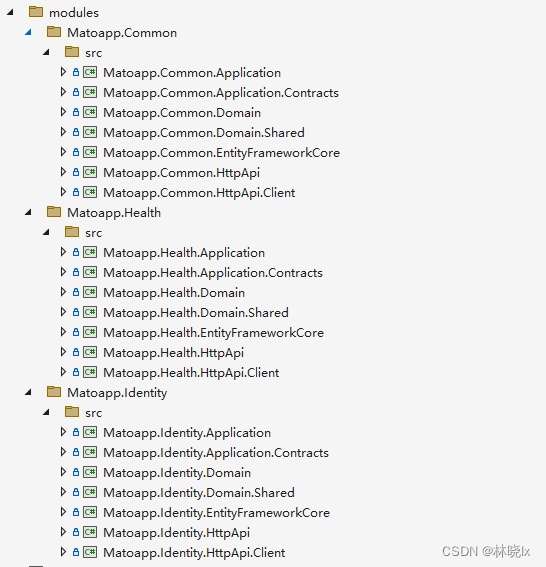
打开解决方案,将业务模块中的各个项目添加到解决方案中,我们只需要添加各模块的Application,Application.Contracts,Domain,Domain.Shared,EntityFrameworkCore,HttpApi以及HttpApi.Client。
添加完成后的解决方案结构看上去像这样:
配置引用和依赖
将Volo.Abp.Identity.Application添加到Application项目的引用中
dotnet add package Volo.Abp.Identity.Application
将Volo.Abp.Identity.Application.Contracts添加到Application.Contracts项目的引用中
dotnet add package Volo.Abp.Identity.Application.Contracts
将Volo.Abp.Identity.Domain,Volo.Abp.PermissionManagement.Domain添加到Domain项目的引用中
dotnet add package Volo.Abp.Identity.Domain

dotnet add package Volo.Abp.PermissionManagement.Domain
将Volo.Abp.Identity.EntityFrameworkCore添加到EntityFrameworkCore项目的引用中
dotnet add package Volo.Abp.Identity.EntityFrameworkCore
Application层
Application层添加对各模块的引用,
ApplicationModule中添加对各模块的依赖
[DependsOn(

    ...

    typeof(CommonApplicationModule),

    typeof(HealthApplicationModule),

    typeof(IdentityApplicationModule)

    )]

public class MatoappApplicationModule : AbpModule

{

}
AuthServer添加Identity数据访问层引用,并配置依赖关系
[DependsOn(

    ...

    typeof(IdentityDomainModule),

    typeof(IdentityEntityFrameworkCoreModule)

)]

public class MatoappAuthServerModule : AbpModule

{

}
HttpApi层添加对各模块的引用,
HttpApiModule中添加对各模块的依赖
[DependsOn(

    ...

    typeof(CommonHttpApiModule),

    typeof(HealthHttpApiModule),

    typeof(IdentityHttpApiModule)

    )]

public class MatoappHttpApiModule : AbpModule

{

}
配置DbContext
用CodeFirst方式创建一些业务表,比如员工表,客户表,报警表等,这些表都是在Health模块中创建的,
Tag相关的表放入Common模块中,Relation表放入Identity模块中。
这些业务表按照业务模块的划分,放入各自的DbContext中。
public interface IIdentityDbContext : IEfCoreDbContext

{

    DbSet<Relation.Relation> Relation { get; set; }

}
public interface IHealthDbContext : IEfCoreDbContext

{

    DbSet<Client.Client> Client { get; set; }

    DbSet<Employee.Employee> Employee { get; set; }

    DbSet<Alarm.Alarm> Alarm { get; set; }

    DbSet<SimpleValueRecord> SimpleValueRecord { get; set; }

}
public interface ICommonDbContext : IEfCoreDbContext

{

    DbSet<DataEnum.DataEnum> DataEnum { get; set; }

    DbSet<DataEnumCategory.DataEnumCategory> DataEnumCategory { get; set; }

    DbSet<Tag.Tag> Tag { get; set; }

}
各业务模块的DbContextModelCreatingExtensions中添加对各表的字段,约束,索引等的配置。以便在DbContext的OnModelCreating中调用
builder.ConfigureCommon();

builder.ConfigureHealth();

builder.ConfigureMatoIdentity();
EntityFrameworkCore层中改写MatoappDbContext如下:
[ReplaceDbContext(typeof(Matoapp.Identity.EntityFrameworkCore.IIdentityDbContext))]

[ReplaceDbContext(typeof(IHealthDbContext))]

[ReplaceDbContext(typeof(ICommonDbContext))]

[ReplaceDbContext(typeof(ITenantManagementDbContext))]

[ConnectionStringName("Default")]

public class MatoappDbContext :

    AbpDbContext<MatoappDbContext>,

    Matoapp.Identity.EntityFrameworkCore.IIdentityDbContext,

    IHealthDbContext,

    ICommonDbContext,

    ITenantManagementDbContext

{

    #region Entities from the modules

    public DbSet<Relation> Relation { get; set; }

    // Tenant Management

    public DbSet<Tenant> Tenants { get; set; }

    public DbSet<TenantConnectionString> TenantConnectionStrings { get; set; }

    public DbSet<Client> Client { get; set; }

    public DbSet<Employee> Employee { get; set; }

    public DbSet<Alarm> Alarm { get; set; }

    public DbSet<SimpleValueRecord> SimpleValueRecord { get; set; }

    public DbSet<DataEnum> DataEnum { get; set; }

    public DbSet<DataEnumCategory> DataEnumCategory { get; set; }

    public DbSet<Tag> Tag { get; set; }

    #endregion

    public MatoappDbContext(DbContextOptions<MatoappDbContext> options)

        : base(options)

    {

    }

    protected override void OnModelCreating(ModelBuilder builder)

    {

        base.OnModelCreating(builder);

        /* Include modules to your migration db context */

        builder.ConfigurePermissionManagement();

        builder.ConfigureSettingManagement();

        builder.ConfigureBackgroundJobs();

        builder.ConfigureAuditLogging();

        builder.ConfigureIdentity();

        builder.ConfigureOpenIddict();

        builder.ConfigureFeatureManagement();

        builder.ConfigureTenantManagement();

        builder.ConfigureCommon();

        builder.ConfigureHealth();

        builder.ConfigureMatoIdentity();

        /* Configure your own tables/entities inside here */

        //builder.Entity<YourEntity>(b =>

        //{

        //    b.ToTable(MatoappConsts.DbTablePrefix + "YourEntities", MatoappConsts.DbSchema);

        //    b.ConfigureByConvention(); //auto configure for the base class props

        //    //...

        //});

    }

}
在AuthServer创建AuthServerDbContextFactory,AuthServerDbContext。
AuthServerDbContext.cs代码如下
public class AuthServerDbContext : AbpDbContext<AuthServerDbContext>

{

    public AuthServerDbContext(DbContextOptions<AuthServerDbContext> options)

        : base(options)

    {

    }

    protected override void OnModelCreating(ModelBuilder modelBuilder)

    {

        base.OnModelCreating(modelBuilder);

        modelBuilder.ConfigureIdentity();

        modelBuilder.ConfigureIdentityServer();

        modelBuilder.ConfigureAuditLogging();

        modelBuilder.ConfigurePermissionManagement();

        modelBuilder.ConfigureSettingManagement();

        modelBuilder.ConfigureTenantManagement();

        modelBuilder.ConfigureFeatureManagement();

        modelBuilder.ConfigureMatoIdentity();

    }

}
创建实体和Dto
在各业务模块中创建实体类,以及对应的Dto类
此处以Health模块为例,创建以下实体类
- Employee 员工
- Client 客户
- Alarm 报警
- SimpleValueRecord 简单值记录
配置AutoMapper
根据实际业务需求,配置AutoMapper,将实体类映射到DTO类。此处以Health模块为例。
public HealthApplicationAutoMapperProfile()

{

    CreateMap<Client.Client, ClientDto>().Ignore(c => c.EntityVersion);

    CreateMap<Employee.Employee, EmployeeDto>().Ignore(c => c.EntityVersion);

    CreateMap<ClientDto, Client.Client>();

    CreateMap<EmployeeDto, Employee.Employee>();

    CreateMap<Alarm.Alarm, AlarmDto>();

    CreateMap<Alarm.Alarm, AlarmBriefDto>();

    CreateMap<AlarmDto, Alarm.Alarm>().Ignore(c => c.TenantId)

            .Ignore(c => c.ConcurrencyStamp);

    CreateMap<CreateAlarmInput, Alarm.Alarm>().IgnoreFullAuditedObjectProperties()

            .IgnoreSoftDeleteProperties()

            .Ignore(c => c.TenantId)

            .Ignore(c => c.User)

            .Ignore(c => c.ConcurrencyStamp)

            .Ignore(c => c.Id);

    CreateMap<UpdateAlarmInput, Alarm.Alarm>().IgnoreFullAuditedObjectProperties()

            .IgnoreSoftDeleteProperties()

            .Ignore(c => c.TenantId)

            .Ignore(c => c.User)

            .Ignore(c => c.ConcurrencyStamp);

    CreateMap<SimpleValueRecord, SimpleValueRecordBriefDto>();

    CreateMap<SimpleValueRecord, SimpleValueRecordDto>();

    CreateMap<SimpleValueRecordDto, SimpleValueRecord>().Ignore(c => c.TenantId)

        .Ignore(c => c.Alarm)

            .Ignore(c => c.ConcurrencyStamp);

    CreateMap<CreateClientInput, Client.Client>()

        .ForAllMembers(opt => opt.Condition((src, dest, srcMember, destMember) => srcMember != null));

    CreateMap<CreateClientWithUserInput, Client.Client>()

        .IgnoreFullAuditedObjectProperties()

        .IgnoreSoftDeleteProperties()

        .Ignore(c => c.LockoutEnabled)

        .Ignore(c => c.LockoutEnd)

        .Ignore(c => c.TenantId)

        .Ignore(c => c.ConcurrencyStamp)

        .Ignore(c => c.EmailConfirmed)

        .Ignore(c => c.PhoneNumberConfirmed)

        .Ignore(c => c.Id)

        .ForAllMembers(opt => opt.Condition((src, dest, srcMember, destMember) => srcMember != null));

    CreateMap<CreateEmployeeInput, Employee.Employee>()

        .ForAllMembers(opt => opt.Condition((src, dest, srcMember, destMember) => srcMember != null));

    CreateMap<CreateEmployeeWithUserInput, Employee.Employee>()

        .IgnoreFullAuditedObjectProperties()

        .IgnoreSoftDeleteProperties()

        .Ignore(c => c.LockoutEnabled)

        .Ignore(c => c.LockoutEnd)

        .Ignore(c => c.TenantId)

        .Ignore(c => c.ConcurrencyStamp)

        .Ignore(c => c.EmailConfirmed)

        .Ignore(c => c.PhoneNumberConfirmed)

        .Ignore(c => c.Id)

        .ForAllMembers(opt => opt.Condition((src, dest, srcMember, destMember) => srcMember != null));

}
至此,我们有了基础的数据库,实体类,Dto类。下一步我们将创建通用Curd应用服务,以及通用查询接口。
怎样优雅地增删查改(一):从0开始搭建Volo.Abp项目的更多相关文章
- 6.在MVC中使用泛型仓储模式和依赖注入实现增删查改
原文链接:http://www.c-sharpcorner.com/UploadFile/3d39b4/crud-operations-using-the-generic-repository-pat ...
- 3.EF 6.0 Code-First实现增删查改
原文链接:http://www.c-sharpcorner.com/UploadFile/3d39b4/crud-operations-using-entity-framework-5-0-code- ...
- 4.在MVC中使用仓储模式进行增删查改
原文链接:http://www.c-sharpcorner.com/UploadFile/3d39b4/crud-using-the-repository-pattern-in-mvc/ 系列目录: ...
- 5.在MVC中使用泛型仓储模式和工作单元来进行增删查改
原文链接:http://www.c-sharpcorner.com/UploadFile/3d39b4/crud-operations-using-the-generic-repository-pat ...
- jdbc的实例应用:增删查改实现
//在jdbc中进行增删查改 //查看所有 public static void findAll() { String url = "jdbc:mysql://localhost:3306/ ...
- 用javascript实现html元素的增删查改[xyytit]
<!DOCTYPE html PUBLIC "-//W3C//DTD XHTML 1.0 Transitional//EN" "http://www.w3.org/ ...
- hibernate基础增删查改简单实例
hibernate 基础理论知识网上很多,可以百度和google.这里不做多的介绍,以一个User表来开展例子 建一个web-project 我这里用了junit单元测试环境来进行增删查改的测试,别的 ...
- Entity FrameWork 增删查改的本质
之前的文章里面已经说了,EF的增删查改.那时候的修改,删除,只能是先查询出来要修改的数据,再修改,删除...现在来一个改进版的,增删查改. 1.Add static void Add() { //1. ...
- nodejs连接mysql并进行简单的增删查改
最近在入门nodejs,正好学习到了如何使用nodejs进行数据库的连接,觉得比较重要,便写一下随笔,简单地记录一下 使用在安装好node之后,我们可以使用npm命令,在项目的根目录,安装nodejs ...
- 使用EntityFramework6完成增删查改和事务
使用EntityFramework6完成增删查改和事务 上一节我们已经学习了如何使用EF连接数据库,并简单演示了一下如何使用EF6对数据库进行操作,这一节我来详细讲解一下. 使用EF对数据库进行操作, ...
随机推荐
- React+Antd在使用form表单提交DatePicker日期框的时候会出现少八小时的情况
在使用antd做form表单提交的时候,突然发现了一个很有意思的bug.就是在使用datepicker组件日期框的时候会出现提交后少一天的问题 我在网上搜索了许多解决办法,也是困扰了我一天的时间,下面 ...
- xtrabackup8.0.27备份失败
问题描述:mysql8.0.27备份出现中断,重新备份发现xtrabackup备份失败,xtrabackup与mysql版本不匹配,后来想起来时mysql进行了升级,8.0.27->8.0.29 ...
- 如何玩转国产神器:接口一体化协作平台Apifox!
前言:Apifox是什么? 简介: 简单来说,Apifox = swagger + mock + postman+Jmeter,是API 文档.API 调试.API Mock.API 自动化测试一体化 ...
- 回车,换行,转义字符“\r”,“\n”是什么关系?
1."回车"这个名词的来历. 关于"回车键"的来历,还得从机械英文打字机说起.在机械英文打字机上,有一个部件叫"字车",每打一个字符(原为单 ...
- 31-dll
webpack.dll.js /** * 使用dll技术,对某些库(第三方库:jquery.react.vue...)进行单独打包 * 当你运行 webpack 时,默认查找 webpack.conf ...
- Marior去除边距和迭代内容矫正用于自然文档矫正
一.简要介绍 本文简要介绍了论文" Marior: Margin Removal and Iterative Content Rectification for Document Dewar ...
- Windows防病毒Defender 排除病毒误报
开发的软件安装后,windows上提示病毒,默默被系统删除了. 一开始以为是自己软件的签名问题,后面发现,将被隔离的文件还原,文件的签名是存在的. 这是微软denfender的误报,为啥会报病毒呢? ...
- DFS(深度优先搜索) 总是需要重置 visited 的状态吗?
问题来自 P1902 刺杀大使,在最初的实现中 DFS 中一段代码如下: visited[x2][y2] = true; flag = dfs(v, x2, y2); visited[x2][y2] ...
- 使用ONE.Abp快速开发微服务,再也不用加班了
项目背景 公司采用项目制工作方式,因此在不同项目上可能存在多个团队开发独立的代码库,但通用的基础设施却是相同的,这可能导致每个项目都需要编写相同的代码,并重复造轮子.更严重的是,每个项目都有自己的用户 ...
- 知识拷问:工作站和服务器哪个更适合做CST电磁仿真?
通常大型企业都会具备工作站和服务器用以作为办公的支持,在大家做仿真分析时,我们一般建议大家更多地使用工作站,工作站要比服务器更适合做CST软件的仿真运算. 什么是服务器? 服务器是指在网络环境下运行相 ...