Linux命令cURL详解,并实现文件定时上传到ftp服务器的程序
前言
前段时间群里讨论,想实现某个文件定时上传到服务器要怎么来实现。我记得之前做过
一个项目:为高通的iot模组编写FOTA功能:实现模组可以远程下载升级镜像包,实现版本升级功能。并当时使用的一个超级强大的工具cURL。心血来潮,决定专门写一篇文章,送给需要的朋友。
文章分两部分
- 首先介绍cURL的用法;
- 实现一个定时上传日志文件的一个简单的程序。

概念
cURL 是常用的命令行工具,用来请求 Web 服务器。它的名字就是客户端(client)的 URL 工具的意思。
cURL 的原作者是 Daniel Stenberg (目前是 cURL 的核心开发者),同时也是 IETF HTTPbis 工作组的资深成员。Daniel 在 1998 年创建了 curl 项目,他编写了最初的 curl 版本,并创建了 libcurl 库。到目前为止,代码仓库包括的 24000 次 commit 有超过一半是 Daniel 本人提交的,他依然是项目的核心开发者。Daniel 表示已将 curl 视为自己的孩子。
作为一款强力工具,支持的协议包括 (DICT, FILE, FTP, FTPS, GOPHER, HTTP, HTTPS, IMAP, IMAPS, LDAP, LDAPS, POP3, POP3S, RTMP, RTSP, SCP, SFTP, SMTP, SMTPS, TELNET and TFTP),还支持POST、cookies、认证、从指定偏移处下载部分文件等功能,具有用户代理字符串、限速、文件大小、进度条、cookie支持、用户认证、断点续传等特征。
一、命令的安装
sudo apt-get install curl
二、cURL命令语法:
curl [options] [URL...]
三、URL格式
URL的格式定义要参考 RFC 1808 。
地址:http://www.w3.org/Addressing/rfc1808.txt

《Relative Uniform Resource Locators 》
URL由三部分组成:资源类型、存放资源的主机域名、资源文件名。
也可认为由4部分组成:协议、主机、端口、路径
URL的一般语法格式为:
protocol :// hostname[:port] / path / [;parameters][?query]#fragment
(带方括号[]的为可选项)。
protocol(协议)
指定使用的传输协议,下表列出 protocol 属性的有效方案名称。 最常用的是HTTP协议,它也是WWW中应用最广的协议。
- file 资源是本地计算机上的文件。格式file:///,注意后边应是三个斜杠。
- ftp 通过 FTP访问资源。格式 FTP://
- gopher 通过 Gopher 协议访问该资源。
- http 通过 HTTP 访问该资源。 格式 HTTP://
- https 通过安全的 HTTPS 访问该资源。 格式 HTTPS://
- mailto 资源为电子邮件地址,通过 SMTP 访问。 格式 mailto:
- MMS 通过 支持MMS(流媒体)协议的播放该资源。(代表软件:Windows Media Player)格式 MMS://
- ed2k 通过 支持ed2k(专用下载链接)协议的P2P软件访问该资源。(代表软件:电驴) 格式 ed2k://
- Flashget 通过 支持Flashget:(专用下载链接)协议的P2P软件访问该资源。(代表软件:快车) 格式 Flashget://
- thunder 通过 支持thunder(专用下载链接)协议的P2P软件访问该资源。(代表软件:迅雷) 格式 thunder://
- news 通过 NNTP 访问该资源。
hostname(主机名)
是指存放资源的服务器的域名系统(DNS) 主机名或 IP 地址。有时,在主机名前也可以包含连接到服务器所需的用户名和密码(格式:username:password@hostname)。
port(端口号)
整数,可选,省略时使用方案的默认端口,各种传输协议都有默认的端口号,如http的默认端口为80。如果输入时省略,则使用默认端口号。有时候出于安全或其他考虑,可以在服务器上对端口进行重定义,即采用非标准端口号,此时,URL中就不能省略端口号这一项。
path(路径)
由零或多个“/”符号隔开的字符串,一般用来表示主机上的一个目录或文件地址。
parameters(参数)
这是用于指定特殊参数的可选项。
query(查询)
可选,用于给动态网页(如使用CGI、ISAPI、PHP/JSP/ASP/ASP.NET等技术制作的网页)传递参数,可有多个参数,用“&”符号隔开,每个参数的名和值用“=”符号隔开。
fragment(信息片断)
字符串,用于指定网络资源中的片断。例如一个网页中有多个名词解释,可使用fragment直接定位到某一名词解释。
四、curl命令参数详解:
由于linux curl功能十分强大,所以命令参数十分多,下表只筛选出来部分常用的参数,更多参数请运行“man curl”命令查看。
| 参数 | 功能 |
|---|---|
| -a/--append | 上传文件时,附加到目标文件 |
| -A/--user-agent | 设置用户代理发送给服务器 |
| -anyauth | 可以使用“任何”身份验证方法 |
| -b/--cookie <name=string/file> | cookie字符串或文件读取位置 |
| --basic | 使用HTTP基本验证 |
| -B/--use-ascii | 使用ASCII /文本传输 |
| -c/--cookie-jar | 操作结束后把cookie写入到这个文件中 |
| -C/--continue-at | 断点续转 |
| -d/--data | HTTP POST方式传送数据 |
| --data-ascii | 以ascii的方式post数据 |
| --data-binary | 以二进制的方式post数据 |
| --negotiate | 使用HTTP身份验证 |
| --digest | 使用数字身份验证 |
| --disable-eprt | 禁止使用EPRT或LPRT |
| --disable-epsv | 禁止使用EPSV |
| -D/--dump-header | 把header信息写入到该文件中 |
| --egd-file | 为随机数据(SSL)设置EGD socket路径 |
| --tcp-nodelay | 使用TCP_NODELAY选项 |
| -e/--referer | 来源网址 |
| -E/--cert <cert[:passwd]> | 客户端证书文件和密码 (SSL) |
| --cert-type | 证书文件类型 (DER/PEM/ENG) (SSL) |
| --key | 私钥文件名 (SSL) |
| --key-type | 私钥文件类型 (DER/PEM/ENG) (SSL) |
| --pass | 私钥密码 (SSL) |
| --engine | 加密引擎使用 (SSL). "--engine list" for list |
| --cacert | CA证书 (SSL) |
| --capath | CA目录 (made using c_rehash) to verify peer against (SSL) |
| --ciphers | SSL密码 |
| --compressed | 要求返回是压缩的形势 (using deflate or gzip) |
| --connect-timeout | 设置最大请求时间 |
| --create-dirs | 建立本地目录的目录层次结构 |
| --crlf | 上传是把LF转变成CRLF |
| -f/--fail | 连接失败时不显示http错误 |
| --ftp-create-dirs | 如果远程目录不存在,创建远程目录 |
| --ftp-method [multicwd/nocwd/singlecwd] | 控制CWD的使用 |
| --ftp-pasv | 使用 PASV/EPSV 代替端口 |
| --ftp-skip-pasv-ip | 使用PASV的时候,忽略该IP地址 |
| --ftp-ssl | 尝试用 SSL/TLS 来进行ftp数据传输 |
| --ftp-ssl-reqd | 要求用 SSL/TLS 来进行ftp数据传输 |
| -F/--form <name=content> | 模拟http表单提交数据 |
| --form-string <name=string> | 模拟http表单提交数据 |
| -g/--globoff | 禁用网址序列和范围使用{}和[] |
| -G/--get | 以get的方式来发送数据 |
| -H/--header | 自定义头信息传递给服务器 |
| --ignore-content-length | 忽略的HTTP头信息的长度 |
| -i/--include | 输出时包括protocol头信息 |
| -I/--head | 只显示请求头信息 |
| -j/--junk-session-cookies | 读取文件进忽略session cookie |
| --interface | 使用指定网络接口/地址 |
| --krb4 | 使用指定安全级别的krb4 |
| -k/--insecure | 允许不使用证书到SSL站点 |
| -K/--config | 指定的配置文件读取 |
| -l/--list-only | 列出ftp目录下的文件名称 |
| --limit-rate | 设置传输速度 |
| --local-port | 强制使用本地端口号 |
| -m/--max-time | 设置最大传输时间 |
| --max-redirs | 设置最大读取的目录数 |
| --max-filesize | 设置最大下载的文件总量 |
| -M/--manual | 显示全手动 |
| -n/--netrc | 从netrc文件中读取用户名和密码 |
| --netrc-optional | 使用 .netrc 或者 URL来覆盖-n |
| --ntlm | 使用 HTTP NTLM 身份验证 |
| -N/--no-buffer | 禁用缓冲输出 |
| -o/--output | 把输出写到该文件中 |
| -O/--remote-name | 把输出写到该文件中,保留远程文件的文件名 |
| -p/--proxytunnel | 使用HTTP代理 |
| --proxy-anyauth | 选择任一代理身份验证方法 |
| --proxy-basic | 在代理上使用基本身份验证 |
| --proxy-digest | 在代理上使用数字身份验证 |
| --proxy-ntlm | 在代理上使用ntlm身份验证 |
| -P/--ftp-port |
使用端口地址,而不是使用PASV |
| -q | 作为第一个参数,关闭 .curlrc |
| -Q/--quote | 文件传输前,发送命令到服务器 |
| -r/--range | 检索来自HTTP/1.1或FTP服务器字节范围 |
| --range-file | 读取(SSL)的随机文件 |
| -R/--remote-time | 在本地生成文件时,保留远程文件时间 |
| --retry | 传输出现问题时,重试的次数 |
| --retry-delay | 传输出现问题时,设置重试间隔时间 |
| --retry-max-time | 传输出现问题时,设置最大重试时间 |
| -s/--silent | 静默模式。不输出任何东西 |
| -S/--show-error | 显示错误 |
| --socks4 <host[:port]> | 用socks4代理给定主机和端口 |
| --socks5 <host[:port]> | 用socks5代理给定主机和端口 |
| --stderr | |
| -t/--telnet-option <OPT=val> | Telnet选项设置 |
| --trace | 对指定文件进行debug |
| --trace-ascii | Like --跟踪但没有hex输出 |
| --trace-time | 跟踪/详细输出时,添加时间戳 |
| -T/--upload-file | 上传文件 |
| --url | Spet URL to work with |
| -u/--user <user[:password]> | 设置服务器的用户和密码 |
| -U/--proxy-user <user[:password]> | 设置代理用户名和密码 |
| -w/--write-out [format] | 什么输出完成后 |
| -x/--proxy <host[:port]> | 在给定的端口上使用HTTP代理 |
| -X/--request | 指定什么命令 |
| -y/--speed-time | 放弃限速所要的时间,默认为30 |
| -Y/--speed-limit | 停止传输速度的限制,速度时间 |
五、Linux curl命令退出码:
下面是linux curl命令的错误代码和她们的相应的错误消息,命令执行错误的时候可以通过错误码来查看出错原因,方便开发调试。
| 退 出 码 | 错误描述 |
|---|---|
| 1 | Unsupported protocol. This build of curl has no support for this protocol. |
| 2 | Failed to initialize. |
| 3 | URL malformed. The syntax was not correct. |
| 5 | Couldn't resolve proxy. The given proxy host could not be resolved. |
| 6 | Couldn't resolve host. The given remote host was not resolved. |
| 7 | Failed to connect to host. |
| 8 | FTP weird server reply. The server sent data curl couldn't parse. |
| 9 | FTP access denied. The server denied login or denied access to the particular resource or directory you wanted to reach. Most often you tried to change to a directory that doesn't exist on the server. |
| 11 | FTP weird PASS reply. Curl couldn't parse the reply sent to the PASS request. |
| 13 | FTP weird PASV reply, Curl couldn't parse the reply sent to the PASV request. |
| 14 | FTP weird 227 format. Curl couldn't parse the 227-line the server sent. |
| 15 | FTP can't get host. Couldn't resolve the host IP we got in the 227-line. |
| 17 | FTP couldn't set binary. Couldn't change transfer method to binary. |
| 18 | Partial file. Only a part of the file was transferred. |
| 19 | FTP couldn't download/access the given file, the RETR (or similar) command failed. |
| 21 | FTP quote error. A quote command returned error from the server. |
| 22 | HTTP page not retrieved. The requested url was not found or returned another error with the HTTP error code being 400 or above. This return code only appears if -f/--fail is used. |
| 23 | Write error. Curl couldn't write data to a local filesystem or similar. |
| 25 | FTP couldn't STOR file. The server denied the STOR operation, used for FTP uploading. |
| 26 | Read error. Various reading problems. |
| 27 | Out of memory. A memory allocation request failed. |
| 28 | Operation timeout. The specified time-out period was reached according to the conditions. |
| 30 | FTP PORT failed. The PORT command failed. Not all FTP servers support the PORT command, try doing a transfer using PASV instead! |
| 31 | FTP couldn't use REST. The REST command failed. This command is used for resumed FTP transfers. |
| 33 | HTTP range error. The range "command" didn't work. |
| 34 | HTTP post error. Internal post-request generation error. |
| 35 | SSL connect error. The SSL handshaking failed. |
| 36 | FTP bad download resume. Couldn't continue an earlier aborted download. |
| 37 | FILE couldn't read file. Failed to open the file. Permissions? |
| 38 | LDAP cannot bind. LDAP bind operation failed. |
| 39 | LDAP search failed. |
| 41 | Function not found. A required LDAP function was not found. |
| 42 | Aborted by callback. An application told curl to abort the operation. |
| 43 | Internal error. A function was called with a bad parameter. |
| 45 | Interface error. A specified outgoing interface could not be used. |
| 47 | Too many redirects. When following redirects, curl hit the maximum amount. |
| 48 | Unknown TELNET option specified. |
| 49 | Malformed telnet option. |
| 51 | The peer's SSL certificate or SSH MD5 fingerprint was not ok. |
| 52 | The server didn't reply anything, which here is considered an error. |
| 53 | SSL crypto engine not found. |
| 54 | Cannot set SSL crypto engine as default. |
| 55 | Failed sending network data. |
| 56 | Failure in receiving network data. |
| 58 | Problem with the local certificate. |
| 59 | Couldn't use specified SSL cipher. |
| 60 | Peer certificate cannot be authenticated with known CA certificates. |
| 61 | Unrecognized transfer encoding. |
| 62 | Invalid LDAP URL. |
| 63 | Maximum file size exceeded. |
| 64 | Requested FTP SSL level failed. |
| 65 | Sending the data requires a rewind that failed. |
| 66 | Failed to initialize SSL Engine. |
| 67 | The user name, password, or similar was not accepted and curl failed to log in. |
| 68 | File not found on TFTP server. |
| 69 | Permission problem on TFTP server. |
| 70 | Out of disk space on TFTP server. |
| 71 | Illegal TFTP operation. |
| 72 | Unknown TFTP transfer ID. |
| 73 | File already exists (TFTP). |
| 74 | No such user (TFTP). |
| 75 | Character conversion failed. |
| 76 | Character conversion functions required. |
| 77 | Problem with reading the SSL CA cert (path? access rights?). |
| 78 | The resource referenced in the URL does not exist. |
| 79 | An unspecified error occurred during the SSH session. |
| 80 | Failed to shut down the SSL connection. |
| 82 | Could not load CRL file, missing or wrong format (added in 7.19.0). |
| 83 | Issuer check failed (added in 7.19.0). |
| XX | More error codes will appear here in future releases. The existing ones are meant to never change. |
六、用法演示:
为节省篇幅,部分操作不再贴上执行结果。
1、查看网页源码
直接在curl命令后加上网址,就可以看到网页源码。我们以网址www.sina.com为例(选择该网址,主要因为它的网页代码较短):
root@ubuntu:/home/peng# curl www.sohu.com

<html>

<head><title>307 Temporary Redirect</title></head>

<body bgcolor="white">

<center><h1>307 Temporary Redirect</h1></center>

<hr><center>nginx</center>

</body>

</html>
执行结果显示 307 Temporary Redirect,说明该网址需要重定向。
如果要把这个网页保存下来,可以使用-o参数,这就相当于使用wget命令了。
curl -o [文件名] www.sohu.com
2、自动跳转
有的网址是自动跳转的。使用-L参数,curl就会跳转到新的网址。
curl -L www.sohu.com
键入上面的命令,结果就自动跳转为www.sohu.com.cn。
3、显示头信息
-i参数可以显示http response的头信息,连同网页代码一起。
root@ubuntu:/home/peng/driver/test#  curl -i www.sohu.com

HTTP/1.1 307 Temporary Redirect

Content-Type: text/html

Content-Length: 180

Connection: keep-alive

Server: nginx

Date: Tue, 25 Aug 2020 10:10:54 GMT

Location: https://www.sohu.com/

FSS-Cache: from 9790436.18244590.10468709

FSS-Proxy: Powered by 2384755.3433341.3062915

<html>

<head><title>307 Temporary Redirect</title></head>

<body bgcolor="white">

<center><h1>307 Temporary Redirect</h1></center>

<hr><center>nginx</center>

</body>

</html>
-I参数则是只显示http response的头信息。
4、显示通信过程
-v参数可以显示一次http通信的整个过程,包括端口连接和http request头信息。
root@ubuntu:/home/peng/driver/test#  curl -v www.sohu.com

* About to connect() to www.sohu.com port 80 (#0)

*   Trying 240e:83:201:3700::5... connected

> GET / HTTP/1.1

> User-Agent: curl/7.22.0 (i686-pc-linux-gnu) libcurl/7.22.0 OpenSSL/1.0.1 zlib/1.2.3.4 libidn/1.23 librtmp/2.3

> Host: www.sohu.com

> Accept: */*

>

< HTTP/1.1 307 Temporary Redirect

< Content-Type: text/html

< Content-Length: 180

< Connection: keep-alive

< Server: nginx

< Date: Tue, 25 Aug 2020 10:11:49 GMT

< Location: https://www.sohu.com/

< FSS-Cache: from 9855973.18375663.10534247

< FSS-Proxy: Powered by 2450292.3564414.3128453

<

<html>

<head><title>307 Temporary Redirect</title></head>

<body bgcolor="white">

<center><h1>307 Temporary Redirect</h1></center>

<hr><center>nginx</center>

</body>

</html>

* Connection #0 to host www.sohu.com left intact

* Closing connection #0
如果你觉得上面的信息还不够,那么下面的命令可以查看更详细的通信过程。
curl --trace output.txt www.sohu.com
或者
curl --trace-ascii output.txt www.sohu.com
运行后,请打开output.txt文件查看。
5、发送表单信息
发送表单信息有GET和POST两种方法。GET方法相对简单,只要把数据附在网址后面就行。
curl example.com/form.cgi?data=xxx
POST方法必须把数据和网址分开,curl就要用到--data参数。
curl -X POST --data "data=xxx" example.com/form.cgi
如果你的数据没有经过表单编码,还可以让curl为你编码,参数是--data-urlencode。
curl -X POST--data-urlencode "date=April 1" example.com/form.cgi
6、HTTP动词
curl默认的HTTP动词是GET,使用-X参数可以支持其他动词。
curl -X POST www.example.com

curl -X DELETE www.example.com
7、文件上传
假定文件上传的表单是下面这样:
<form method="POST" enctype='multipart/form-data' action="upload.cgi">

 <input type=file name=upload>

 <input type=submit name=press value="OK">

</form>
你可以用curl这样上传文件:
curl --form upload=@localfilename --form press=OK [URL]
8、Referer字段
有时你需要在http request头信息中,提供一个referer字段,表示你是从哪里跳转过来的。
curl --referer http://www.example.com http://www.example.com
9、User Agent字段
这个字段是用来表示客户端的设备信息。服务器有时会根据这个字段,针对不同设备,返回不同格式的网页,比如手机版和桌面版。
iPhone4的User Agent是
Mozilla/5.0 (iPhone; U; CPU iPhone OS 4_0 like Mac OS X; en-us) AppleWebKit/532.9 (KHTML, like Gecko) Version/4.0.5 Mobile/8A293 Safari/6531.22.7
curl可以这样模拟:
curl --user-agent "[User Agent]" [URL]
10、cookie
使用--cookie参数,可以让curl发送cookie。
curl --cookie "name=xxx" www.example.com
至于具体的cookie的值,可以从http response头信息的Set-Cookie字段中得到。
-c cookie-file可以保存服务器返回的cookie到文件,-b cookie-file可以使用这个文件作为cookie信息,进行后续的请求。
curl -c cookies http://example.com

curl -b cookies http://example.com
11、增加头信息
有时需要在http request之中,自行增加一个头信息。--header参数就可以起到这个作用。
$ curl --header "Content-Type:application/json" http://example.com
12、认证
使用curl选项 -u 可以完成HTTP或者FTP的认证,可以指定密码,也可以不指定密码在后续操作中输入密码:
curl -u user:pwd http://man.linuxde.net

curl -u user http://man.linuxde.net
13、FTP
1)、列出ftp服务器上的目录列表
curl ftp://www.xxx.com/ --user name:passwd

curl ftp://www.xxx.com/ –u name:passwd #简洁写法

curl ftp://name:passwd@www.xxx.com #简洁写法2
例如:在IP地址192.168.43.117上搭建FTP服务器,并设置用户名为user,密码为123456
现在我们要显示服务器上根目录下的所有文件信息,命令如下:
curl -u user:123456 ftp://192.168.43.117
执行结果如下:

简洁写法:
curl ftp://user:123456@192.168.43.117
执行结果如下:

2)、只列出目录,不显示进度条
curl ftp://www.xxx.com –u name:passwd -s
3)、下载一个文件:
格式
curl ftp://www.xxx.com/size.zip –u name:passwd -o size.zip
示例如下:
从服务器的根目录下下载文件test.c,保存到本地,本地文件名也为test.c。
【注意】如果没有-o选项,程序会吧数据流定向到stdout,即直接把文件内容显示到终端上。
curl ftp://user:123456@192.168.43.117/test.c -o test.c
执行结果如下:

简洁模式
curl -u user:123456 ftp://192.168.43.117/list.h -o list.h
执行结果如下:

4)、上载一个文件:
curl –u name:passwd -T size.mp3 ftp://www.xxx.com/mp3/
举例如下:
curl -u user:123456 ftp://192.168.43.117/ -T list.h

可以看到文件并没有上传成功,返回错误码是25,参考第五章
25 FTP couldn't STOR file. The server denied the STOR operation, used for FTP uploading.
可知,是因为服务器没有赋予存储的权限,所以设置服务器的write权限即可。

5)、从服务器上删除文件(使用curl传递ftp协议的DELE命令):
curl –u name:passwd ftp://www.xxx.com/ -X 'DELE mp3/size.mp3'
6)、另外curl不支持递归下载,不过可以用数组方式下载文件,比如我们要下载1-10.gif连续命名的文件:**
curl –u name:passwd ftp://www.xxx.com/img/[1-10].gif –O #O字母大写
7)、要连续下载多个文件:
curl –u name:passwd ftp://www.xxx.com/img/[one,two,three].jpg –O #O字母大写
六、实现日志文件定时上传
功能
- 程序运行时要记录当前日志文件的最后修改时间;
- 每个10秒钟就检查下log文件是否被修改,如果没有被修改就休眠10秒钟;
- 如果log文件被修改了,就将当前的日志文件拷贝成备份文件,备份文件名字加上当前时间;
- 通过curl发送给ftp服务器;
- 删除备份文件,重复步骤2。
程序流程图如下:
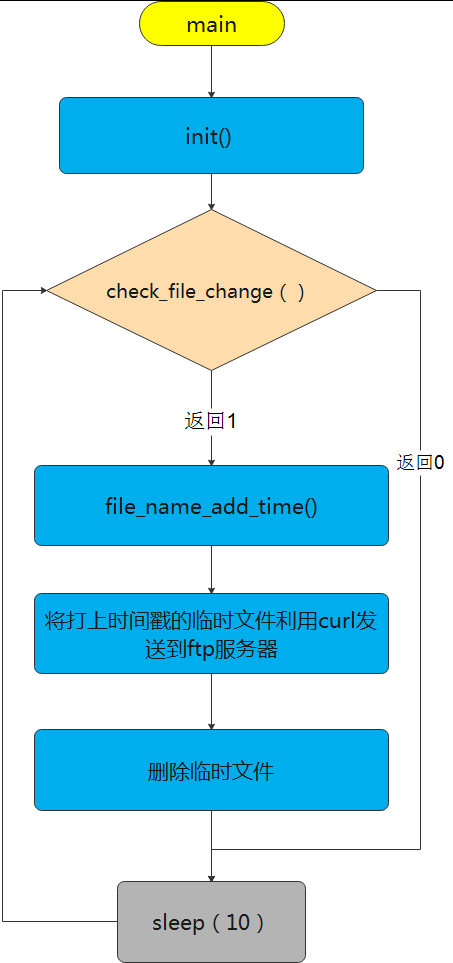
函数功能介绍
init()
首先记录当前log文件时间,并记录到全局变量last_mtime中。
check_file_change()
读取文件最后修改时间,并和last_mtime进行比较,如果相同就返回0,不同就返回1.
file_name_add_time()
将当前的日志文件拷贝成备份文件,备份文件名字加上当前时间。
stat()
得到对应文件的属性信息,存放到struct stat结构体变量中。
system()
执行参数中字符串对应的命令
代码如下:
/*   Copyright (C)   公众号: yikoulinux  */

#include <sys/stat.h>

#include <stdio.h>

#include <stdlib.h>

#include <unistd.h>

#include <time.h>

typedef struct stat ST;

unsigned long last_mtime;

/*用户名密码暂时写死,实际应该保存在配置文件*/

char name[32]="user";

char pass[32] ="123456";

char ip[32]     ="192.168.43.117";

char filename[32]="t.log";

char dstfile[256]  ={0};

int init(void)

{

	//准备结构体

	ST status;

	//调用stat函数

	int res = stat(filename,&status);

	if(-1 == res)

	{

		perror("error:open file fail\n");

		return 0;

	}

	last_mtime = status.st_mtime;

	printf("init time:%s \n",ctime(&last_mtime));

	return 1;

}

int  check_file_change(void)

{

	//准备结构体

	ST status;

	//调用stat函数

	int res = stat(filename,&status);

	if(-1 == res)

	{

		perror("error:open file fail\n");

		return 0;

	}

//	printf("old:%s new:%s",ctime(&last_mtime),ctime(&status.st_mtime));

	if(last_mtime == status.st_mtime)

	{

		printf("file not change\n");

		return 0;

	}else{

		printf("file updated\n");

		last_mtime = status.st_mtime;

		return 1;

	}

}

void file_name_add_time(void)

{

	ST status;

	time_t t;

	struct tm *tblock;

	char cmd[1024]={0};

	t = time(NULL);

	tblock = localtime(&t);

	sprintf(dstfile,"t-%d-%d-%d-%d-%d-%d.log",

		tblock->tm_year+1900,

		tblock->tm_mon,

		tblock->tm_mday,

		tblock->tm_hour,

		tblock->tm_min,

		tblock->tm_sec);

	sprintf(cmd,"cp %s %s",filename,dstfile);

//	printf("cdm=%s\n",cmd);

	system(cmd);

}

int main(void)

{

	char cmd[1024]={0};

	init();

	while(1)

	{

		if(check_file_change() == 1)

		{

			file_name_add_time();

			sprintf(cmd,"curl -u %s:%s ftp://%s/ -T %s",name,pass,ip,dstfile);

	//		printf("cdm=%s\n",cmd);

			system(cmd);

			unlink(dstfile);

		}

		sleep(10);

	}

}
运行截图:
第一步:

因为log文件没有被修改过,所以程序不会上传。
第二步:
手动输入字符串 yikoulinux 到日志文件 t.log中。
 第三步:
第三步:
因为文件发生了改变,所以打印“file updated”,同时可以看到curl上传文件的log信息。
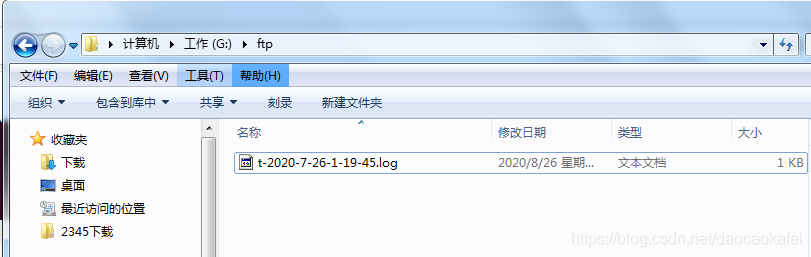
 以下是FTP服务器的根目录,可以看到,上传的日志文件:
t-2020-7-26-1-19-45.log。
【补充】
- 配置信息,直接在代码中写死,通常应该从配置文件中读取,为方便读者阅读,本代码没有增加该功能;
- FTP服务器搭建,本文没有说明,相关文件比较多,大家可以自行搜索,一口君用的是File zilla;

- 通常这种需要长时间运行的程序,需要设置成守护进程,本文没有添加相应功能,读者可以自行搜索。如果强烈要求可以单开一篇详细介绍。
- 代码中time的管理函数,请读者自行搜索相关文章。
- curl也提供了相关的函数库curl.lib,如果要实现更灵活的功能可以使用对应的api。
- 之所以先把文件拷贝成备份文件,主要是考虑其他模块随时可能修改日志文件,起到一定保护作用。
想和博主交流,请关注公众号「一口Linux」
Linux命令cURL详解,并实现文件定时上传到ftp服务器的程序的更多相关文章
- 将文件夹上传到FTP服务器,遍历上传,,,文件夹不能直接上传到FTP服务器上。。。
<? $ftp_ip = "FTP"; $ftp_user = "user"; $ftp_pwd = "password"; $con ...
- shell脚本实现自动压缩一天前的日志文件 ,并传到ftp服务器上
shell脚本实现自动压缩一天前的日志文件 ,并传到ftp服务器上 naonao_127关注2人评论19401人阅读2012-06-08 11:26:16 生产环境下脚本自动备份脚本是 ...
- 5、利用控件TVCLZip和TIdFTP压缩文件并上传到FTP的线程单元pas 改进版
用到临界区 保护写日志的函数: 递归函数 删除目录下的所有文件: 循环创建或判断FTP的目录: 可改进的地方:循环压缩深层次目录的所以文件: 实现断点续传,或断点下载: {************** ...
- 打包成apk,生成apk文件,上传到网站服务器提供链接下载
Android开发把项目打包成apk: 做完一个Android项目之后,如何才能把项目发布到Internet上供别人使用呢?我们需要将自己的程序打包成Android安装包文件--APK(Android ...
- C# 本地文件夹上传至网络服务器中(待续)
一.文件的上传参考 思想,C#FTP上传 /// <summary> /// 上传 /// </summary> /// <param name="filena ...
- Linux命令的详解
cat /etc/passwd文件中的每个用户都有一个对应的记录行,记录着这个用户的一下基本属性.该文件对所有用户可读. /etc/shadow 文件正如他 ...
- linux c 链接详解1-多目标文件链接
1. 多目标文件的链接 摘自:linux c编程一站式学习 http://learn.akae.cn/media/index.html 可以学会在linux下将多个c语言文件一起编译. 现在我们把例 ...
- 每天一个linux命令(26):用SecureCRT来上传和下载文件
用SSH管理linux服务器时经常需要远程与本地之间交互文件.而直接用SecureCRT自带的上传下载功能无疑是最方便的,SecureCRT下的文件传输协议有ASCII.Xmodem.Zmodem. ...
- 每天一个linux命令(26):用SecureCRT来上传和下载文件(转载自竹子)
用SSH管理linux服务器时经常需要远程与本地之间交互文件.而直接用SecureCRT自带的上传下载功能无疑是最方便的,SecureCRT下的文件传输协议有ASCII.Xmodem.Zmodem. ...
- 【转】每天一个linux命令(26):用SecureCRT来上传和下载文件
原文网址:http://www.cnblogs.com/peida/archive/2012/11/28/2793181.html 用SSH管理linux服务器时经常需要远程与本地之间交互文件.而直接 ...
随机推荐
- 掌握 Nuxt 3 中的状态管理:实践指南
title: 掌握 Nuxt 3 中的状态管理:实践指南 date: 2024/6/22 updated: 2024/6/22 author: cmdragon excerpt: 摘要:该文指南详述了 ...
- Spring之webMvc异常处理
异常处理可以前端处理,也可以后端处理. 从稳妥的角度出发,两边都应该进行处理. 本文专门阐述如何在服务端进行http请求异常处理. 一.常见的异常类型 当我们做http请求的时候,会有各种各样的可能错 ...
- 在Linux驱动中使用regmap
背景 在学习SPI的时候,看到了某个rtc驱动中用到了regmap,在学习了对应的原理以后,也记录一下如何使用. 介绍 在Linu 3.1开始,Linux引入了regmap来统一管理内核的I2C, S ...
- 【论文阅读】Causal Imitative Model for Autonomous Driving
Sensor/组织: EPFL Sharif University of Technology Status: Finished Summary: 看看框架图就行.高效缓解因果混淆问题,将因果作为学习 ...
- P9376 题解
首先考虑怎么暴力. 考虑把每个数进行 \(B\) 进制分解,然后我们惊奇的发现这两个操作就是把最低位去掉和往最低位后面插入一个数. 然后我们顺藤摸瓜,把每个数的分解扔到 Trie 树上,我们发现我们要 ...
- Linux 更新网络时间
下载包 yum install -y ntpdate 同步网络时间 ntpdate 0.asia.pool.ntp.org 若上面的时间服务器不可用,也可以改用如下服务器进行同步: time.nist ...
- LabVIEW的自定义按钮
下载几张图片: 比较好的 网站1:https://www.iconfont.cn/ 网站2:https://yesicon.app/ 选用windows风格按钮控件进行自定义, 自定义的图片分别放入这 ...
- 数据仓库建模工具之一——Hive学习第二天
Hive的概述 1.Hive基本概念 1.1 Hive简介 Hive本质是将SQL转换为MapReduce的任务进行运算,底层由HDFS来提供数据存储,说白了hive可以理解为一个将SQL转换为Map ...
- 判断C盘下有没有Templets文件夹,没有则新建,然后判断Templets文件夹下有没有TEST.xlt文件
VB.NET 判断C盘下有没有Templets文件夹,没有则新建,然后判断Templets文件夹下有没有TEST.xlt文件,如果没有则新建 你可以使用VB.NET中的Directory和File ...
- python网络通信:IP/端口基础知识
1.学习网络编程的目的 将多个设备通过网络连接在一起,进行数据共享 2.IP地址 作用:在逻辑上标记一台电脑 特点:没有重复的 3.通过收发数据理解IP地址的作用 dest ip 表示目的ip/src ...